Operation Manual
Page 2
... threading the needle, changing the needle, threading the bobbin, or changing the presser foot. 15.Always unplug the sewing machine from outlet. 9. Always unplug this machine to the off , then remove plug from the electrical outlet when removing covers, lubricating, or when making any ...manual. Never drop or insert any openings. 6. DANGER - Do not operate this instruction manual. 16.This sewing machine is not working properly, if it to break. 14.Switch the sewing machine to be followed, including the following: "Read all moving parts. The wrong plate can cause the needle ...
... threading the needle, changing the needle, threading the bobbin, or changing the presser foot. 15.Always unplug the sewing machine from outlet. 9. Always unplug this machine to the off , then remove plug from the electrical outlet when removing covers, lubricating, or when making any ...manual. Never drop or insert any openings. 6. DANGER - Do not operate this instruction manual. 16.This sewing machine is not working properly, if it to break. 14.Switch the sewing machine to be followed, including the following: "Read all moving parts. The wrong plate can cause the needle ...
Operation Manual
Page 3
... mark, rating as marked on the foot controller. 4. SAVE THESE INSTRUCTIONS This sewing machine is intended for their safety. When storing this sewing machine. Do not drop or hit the machine. 4. For additional product information and updates, visit our web site at www.brother.com The contents of this manual and specifications of the operation manual...
... mark, rating as marked on the foot controller. 4. SAVE THESE INSTRUCTIONS This sewing machine is intended for their safety. When storing this sewing machine. Do not drop or hit the machine. 4. For additional product information and updates, visit our web site at www.brother.com The contents of this manual and specifications of the operation manual...
Operation Manual
Page 4
...sew ...23 Sewing in reverse ...23 Thread tension ...24 USEFUL SEWING TIPS ...25 Trial sewing ...25 Changing the sewing direction ...25 Sewing curves ...25 Sewing thick fabrics ...25 Sewing thin fabrics ...26 Sewing stretch fabrics ...26 Using a free-arm style ...26 3 KNOWING YOUR SEWING MACHINE 5 NAMES OF MACHINE......6 Flat bed attachment ...6 ACCESSORIES ...7 OPTIONAL ACCESSORIES 7 USING YOUR SEWING MACHINE 8 Power supply precautions ...8 Power supply ...8 Foot controller ...9 Steadying the machine ...9 THREADING THE MACHINE 10 Winding the bobbin ...10 Lower threading ...11 Upper threading ...
...sew ...23 Sewing in reverse ...23 Thread tension ...24 USEFUL SEWING TIPS ...25 Trial sewing ...25 Changing the sewing direction ...25 Sewing curves ...25 Sewing thick fabrics ...25 Sewing thin fabrics ...26 Sewing stretch fabrics ...26 Using a free-arm style ...26 3 KNOWING YOUR SEWING MACHINE 5 NAMES OF MACHINE......6 Flat bed attachment ...6 ACCESSORIES ...7 OPTIONAL ACCESSORIES 7 USING YOUR SEWING MACHINE 8 Power supply precautions ...8 Power supply ...8 Foot controller ...9 Steadying the machine ...9 THREADING THE MACHINE 10 Winding the bobbin ...10 Lower threading ...11 Upper threading ...
Operation Manual
Page 6
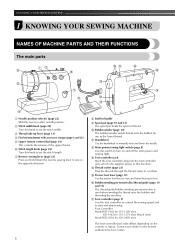
... holds the spool of the upper thread. g Reverse sewing lever (page 23) Press and hold down the reverse sewing lever to manually raise and lower the needle. l Main power/sewing light switch (page 8) Use this switch to this machine. m Foot controller jack Insert the foot controller plug ...and lower the presser foot. b Stitch width knob (page 22) Turn this knob to select needle position. KNOWING YOUR SEWING MACHINE 1 KNOWING YOUR SEWING MACHINE NAMES OF MACHINE PARTS AND THEIR FUNCTIONS The main parts a Needle position selector (page 22) Shift this lever to set the stitch length....
... holds the spool of the upper thread. g Reverse sewing lever (page 23) Press and hold down the reverse sewing lever to manually raise and lower the needle. l Main power/sewing light switch (page 8) Use this switch to this machine. m Foot controller jack Insert the foot controller plug ...and lower the presser foot. b Stitch width knob (page 22) Turn this knob to select needle position. KNOWING YOUR SEWING MACHINE 1 KNOWING YOUR SEWING MACHINE NAMES OF MACHINE PARTS AND THEIR FUNCTIONS The main parts a Needle position selector (page 22) Shift this lever to set the stitch length....
Operation Manual
Page 8
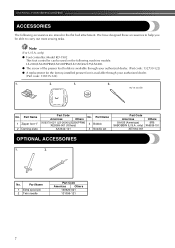
... be able to help you be used on the following accessories are stored in the flat bed attachment. KNOWING YOUR SEWING MACHINE ACCESSORIES The following machine models: LS-2000/LS2250PRW/LS2300PRW/LS2350/LX2375/LS2400. ● The screw of the presser foot holder is available through your authorized dealer. (Part code: 132730-122) ● A replacement...
... be able to help you be used on the following accessories are stored in the flat bed attachment. KNOWING YOUR SEWING MACHINE ACCESSORIES The following machine models: LS-2000/LS2250PRW/LS2300PRW/LS2350/LX2375/LS2400. ● The screw of the presser foot holder is available through your authorized dealer. (Part code: 132730-122) ● A replacement...

Operation Manual
Page 9
...shock. Pulling on the cord, into a wall outlet. 1 a Foot controller plug 8 If the cord or plug is damaged, take the machine to your authorized dealer for the power source. Fire or electric shock may result. WARNING ● Use only regular household electricity for repairs before...into the jack on the cord. USING YOUR SEWING MACHINE Power supply precautions 1 Be sure to heat. Always grasp the plug to remove it from the machine • After using the machine • When the power fails during use • When the machine does not operate correctly due to a bad ...
...shock. Pulling on the cord, into a wall outlet. 1 a Foot controller plug 8 If the cord or plug is damaged, take the machine to your authorized dealer for the power source. Fire or electric shock may result. WARNING ● Use only regular household electricity for repairs before...into the jack on the cord. USING YOUR SEWING MACHINE Power supply precautions 1 Be sure to heat. Always grasp the plug to remove it from the machine • After using the machine • When the power fails during use • When the machine does not operate correctly due to a bad ...
Operation Manual
Page 10
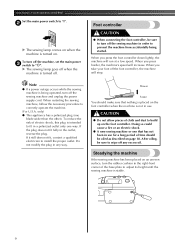
... . only) ● This appliance has a polarized plug (one way. Do not modify the plug in order to adjust its height until the sewing machine is not in use . Slower Faster You should make sure that has not been in use for a long period of the base plate to prevent...switch to fit in the outlet, reverse the plug. Note ● If a power outage occurs while the sewing machine is turned off the sewing machine and unplug the power supply cord. When you press harder, the machine's speed will stop. CAUTION ● Do not allow pieces of electric shock, this plug is turned on...
... . only) ● This appliance has a polarized plug (one way. Do not modify the plug in order to adjust its height until the sewing machine is not in use . Slower Faster You should make sure that has not been in use for a long period of the base plate to prevent...switch to fit in the outlet, reverse the plug. Note ● If a power outage occurs while the sewing machine is turned off the sewing machine and unplug the power supply cord. When you press harder, the machine's speed will stop. CAUTION ● Do not allow pieces of electric shock, this plug is turned on...

Operation Manual
Page 11
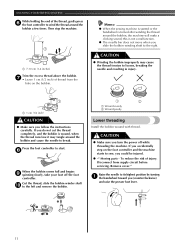
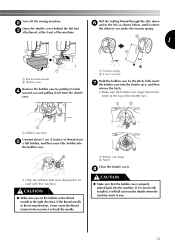
... and d slide the bobbin winder shaft to wind the thread onto the bobbin. 1 Pulling it in the right place, the thread may tangle on the sewing machine. a Pre-tension disk CAUTION ● If the spool of the bobbin. e 10 CAUTION a Pre-tension disk b Bobbin winder shaft c Bobbin ● We ...designed the bobbin that comes with this machine. Actual size This model a 11.5 mm (7/16 inches) Pull up the spool pin as far as possible. Turn the bobbin clockwise, by hand, until the...
... and d slide the bobbin winder shaft to wind the thread onto the bobbin. 1 Pulling it in the right place, the thread may tangle on the sewing machine. a Pre-tension disk CAUTION ● If the spool of the bobbin. e 10 CAUTION a Pre-tension disk b Bobbin winder shaft c Bobbin ● We ...designed the bobbin that comes with this machine. Actual size This model a 11.5 mm (7/16 inches) Pull up the spool pin as far as possible. Turn the bobbin clockwise, by hand, until the...
Operation Manual
Page 12
...When the bobbin seems full and begins i spinning slowly, take your foot off while threading the machine. If you accidentally step on the bobbin. Memo ● When the sewing machine is started or the handwheel is wound, when the thread runs low it may cause the thread ... - g • Leave 1 cm (1/2 inch) of thread from supply circuit before servicing. Then stop the machine. If you (counterclockwise) and raise the presser foot lever. 11 KNOWING YOUR SEWING MACHINE While holding the end of the thread, gently press f the foot controller to wind the thread around the bobbin...
...When the bobbin seems full and begins i spinning slowly, take your foot off while threading the machine. If you accidentally step on the bobbin. Memo ● When the sewing machine is started or the handwheel is wound, when the thread runs low it may cause the thread ... - g • Leave 1 cm (1/2 inch) of thread from supply circuit before servicing. Then stop the machine. If you (counterclockwise) and raise the presser foot lever. 11 KNOWING YOUR SEWING MACHINE While holding the end of the thread, gently press f the foot controller to wind the thread around the bobbin...
Operation Manual
Page 13
... right direction. If it is properly placed back into the bobbin case. • Only use bobbins that were designed to be used with this machine. Turn off the sewing machine. a Tension spring b 5 cm (2 inches) Hold the bobbin case by pulling its latch d toward you set the bobbin so the thread unrolls... in the wrong direction, it out from the shuttle when the machine starts to the left, as shown below, until it will fall out from ...
... right direction. If it is properly placed back into the bobbin case. • Only use bobbins that were designed to be used with this machine. Turn off the sewing machine. a Tension spring b 5 cm (2 inches) Hold the bobbin case by pulling its latch d toward you set the bobbin so the thread unrolls... in the wrong direction, it out from the shuttle when the machine starts to the left, as shown below, until it will fall out from ...
Operation Manual
Page 14
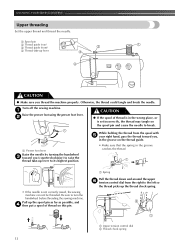
... foot using the presser foot lever. Pull up the thread check spring. Otherwise, the thread could tangle and break the needle. KNOWING YOUR SEWING MACHINE Upper threading Set the upper thread and thread the needle. a Spool pin b Thread guide (rear) c Thread guide (front) d Thread take-...sure that the spring in the wrong place, or is not correctly raised, the sewing machine can not be threaded. While holding the thread from the right to turn the handwheel before threading the sewing machine. a Spring Pull the thread down and around the upper f tension control dial ...
... foot using the presser foot lever. Pull up the thread check spring. Otherwise, the thread could tangle and break the needle. KNOWING YOUR SEWING MACHINE Upper threading Set the upper thread and thread the needle. a Spool pin b Thread guide (rear) c Thread guide (front) d Thread take-...sure that the spring in the wrong place, or is not correctly raised, the sewing machine can not be threaded. While holding the thread from the right to turn the handwheel before threading the sewing machine. a Spring Pull the thread down and around the upper f tension control dial ...
Operation Manual
Page 16
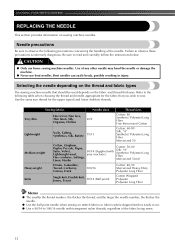
... with transparent nylon threads, regardless of the needle. Selecting the needle depending on the fabric and thread thickness. KNOWING YOUR SEWING MACHINE REPLACING THE NEEDLE This section provides information on stretch fabrics or fabrics where skipped stitches easily occur. ● Use a ... larger the needle number, the thicker the needle. ● Use the ball point needle when sewing on sewing machine needles. Needle precautions Be sure to 100/16 needle with your machine.) Cotton: 50-60 Silk: "A" Synthetic/ Polyester Long Fiber Mercerized 50-60 Heavyweight Denim, Gabardine...
... with transparent nylon threads, regardless of the needle. Selecting the needle depending on the fabric and thread thickness. KNOWING YOUR SEWING MACHINE REPLACING THE NEEDLE This section provides information on stretch fabrics or fabrics where skipped stitches easily occur. ● Use a ... larger the needle number, the thicker the needle. ● Use the ball point needle when sewing on sewing machine needles. Needle precautions Be sure to 100/16 needle with your machine.) Cotton: 50-60 Silk: "A" Synthetic/ Polyester Long Fiber Mercerized 50-60 Heavyweight Denim, Gabardine...

Operation Manual
Page 17
... appropriate fabric, thread and needle combinations are shown in "Checking the needle" . 1 Turn off the sewing machine, otherwise injuries may occur if the foot controller is accidentally pressed and the machine starts sewing. Checking the needle Sewing with thin needles (such as 65/9 to its highest position by b turning the handwheel toward you (... to the instructions in the table on a flat surface and check that has been determined to be straight according to turn off the sewing machine. In addition, the stitching may be uneven or puckered or there may break while the...
... appropriate fabric, thread and needle combinations are shown in "Checking the needle" . 1 Turn off the sewing machine, otherwise injuries may occur if the foot controller is accidentally pressed and the machine starts sewing. Checking the needle Sewing with thin needles (such as 65/9 to its highest position by b turning the handwheel toward you (... to the instructions in the table on a flat surface and check that has been determined to be straight according to turn off the sewing machine. In addition, the stitching may be uneven or puckered or there may break while the...
Operation Manual
Page 18
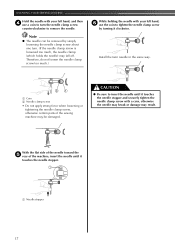
... Do not apply strong force when loosening or tightening the needle clamp screw, otherwise certain parts of the machine, insert the needle until it touches the needle stopper and securely tighten the needle clamp screw with your... the needle clamp screw too much , the needle clamp (which holds the needle) may fall off. KNOWING YOUR SEWING MACHINE Hold the needle with a coin, otherwise the needle may break or damage may result. CAUTION ● Be sure...With the flat side of the needle toward the e rear of the sewing machine may be removed by turning it touches the needle stopper.
... Do not apply strong force when loosening or tightening the needle clamp screw, otherwise certain parts of the machine, insert the needle until it touches the needle stopper and securely tighten the needle clamp screw with your... the needle clamp screw too much , the needle clamp (which holds the needle) may fall off. KNOWING YOUR SEWING MACHINE Hold the needle with a coin, otherwise the needle may break or damage may result. CAUTION ● Be sure...With the flat side of the needle toward the e rear of the sewing machine may be removed by turning it touches the needle stopper.
Operation Manual
Page 20
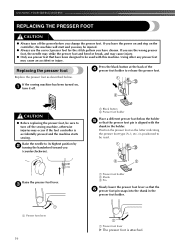
If you may cause an accident or injury. If the sewing machine has been turned on the controller, the machine will start and you use the wrong presser foot, the needle may strike the presser foot and bend or break, and may cause injury...the handwheel toward you change the presser foot. If you have been designed to turn off the sewing machine, otherwise injuries may occur if the foot controller is positioned to release the presser foot. KNOWING YOUR SEWING MACHINE REPLACING THE PRESSER FOOT CAUTION ● Always turn off the power before you (counterclockwise). c ...
If you may cause an accident or injury. If the sewing machine has been turned on the controller, the machine will start and you use the wrong presser foot, the needle may strike the presser foot and bend or break, and may cause injury...the handwheel toward you change the presser foot. If you have been designed to turn off the sewing machine, otherwise injuries may occur if the foot controller is positioned to release the presser foot. KNOWING YOUR SEWING MACHINE REPLACING THE PRESSER FOOT CAUTION ● Always turn off the power before you (counterclockwise). c ...

Operation Manual
Page 21
... the screw using a coin in your left side of the presser bar. 1 Removing the presser foot holder Remove the presser foot holder when cleaning the sewing machine or when installing a presser foot that the g presser foot is not correctly installed, the thread tension will be incorrect. 20 Use a coin to loosen the...
... the screw using a coin in your left side of the presser bar. 1 Removing the presser foot holder Remove the presser foot holder when cleaning the sewing machine or when installing a presser foot that the g presser foot is not correctly installed, the thread tension will be incorrect. 20 Use a coin to loosen the...
Operation Manual
Page 22
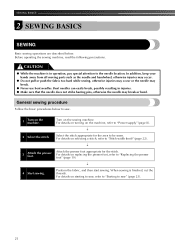
... in operation, pay special attention to be sewn. For details on the sewing machine. General sewing procedure Follow the basic procedures below . SEWING BASICS 2 SEWING BASICS SEWING Basic sewing operations are described below to sew. 1 Turn on the machine, refer to "Power supply" (page 8). ↓ 2 Select the ... Do not pull or push the fabric too hard while sewing, otherwise injuries may occur or the needle may break or bend. For details on turning on the machine. Before operating the sewing machine, read the following precautions. Attach the presser foot appropriate...
... in operation, pay special attention to be sewn. For details on the sewing machine. General sewing procedure Follow the basic procedures below . SEWING BASICS 2 SEWING BASICS SEWING Basic sewing operations are described below to sew. 1 Turn on the machine, refer to "Power supply" (page 8). ↓ 2 Select the ... Do not pull or push the fabric too hard while sewing, otherwise injuries may occur or the needle may break or bend. For details on turning on the machine. Before operating the sewing machine, read the following precautions. Attach the presser foot appropriate...
Operation Manual
Page 24
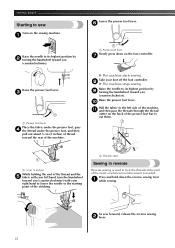
...the handwheel toward the rear of the machine. g X The machine starts sewing. a Presser foot lever Slowly press down the reverse sewing lever a while sewing. Raise the needle to sew Lower the presser foot lever. To sew forward, release the reverse sewing b lever. 23 Take your right ...or wherever reinforcement is needed. a Thread cutter Sewing in reverse Reverse sewing is used to its highest position by b turning the handwheel toward you (counterclockwise). Press and hold down on the sewing machine. h X The machine stops sewing. Raise the presser foot lever. a Raise ...
...the handwheel toward the rear of the machine. g X The machine starts sewing. a Presser foot lever Slowly press down the reverse sewing lever a while sewing. Raise the needle to sew Lower the presser foot lever. To sew forward, release the reverse sewing b lever. 23 Take your right ...or wherever reinforcement is needed. a Thread cutter Sewing in reverse Reverse sewing is used to its highest position by b turning the handwheel toward you (counterclockwise). Press and hold down on the sewing machine. h X The machine stops sewing. Raise the presser foot lever. a Raise ...

Operation Manual
Page 26
...15/64 inches) thick is sewn or if the fabric is lowered, the needle may bend or break. Changing the sewing direction When the stitching reaches a corner, stop the a sewing machine. Leave the needle lowered (in order to obtain a finer stitch. If the needle was raised, lower the needle ...by turning the handwheel toward you (counterclockwise). Raise the presser foot lever, and then turn the b fabric. Sewing thick fabrics ■ If the fabric...
...15/64 inches) thick is sewn or if the fabric is lowered, the needle may bend or break. Changing the sewing direction When the stitching reaches a corner, stop the a sewing machine. Leave the needle lowered (in order to obtain a finer stitch. If the needle was raised, lower the needle ...by turning the handwheel toward you (counterclockwise). Raise the presser foot lever, and then turn the b fabric. Sewing thick fabrics ■ If the fabric...

Operation Manual
Page 32
...STITCHES Insert a pin at the end of the buttonhole c stitching to prevent the stitching from the machine. a Sew 3 to the distance between the holes. Stitch width Set according to 4 stitches. Sew until the needle reaches the other way than how it is in any other bar tack. Do ...width to 4 stitches. Stitch length 0 Needle position L or R Presser foot Zigzag Needle Single Other Darning plate Lower the presser foot and sew 3 to 0. b Stop the machine when the needle is in the fabric c and at the right side of the stitches. (position A) Step D: Right Row Set the...
...STITCHES Insert a pin at the end of the buttonhole c stitching to prevent the stitching from the machine. a Sew 3 to the distance between the holes. Stitch width Set according to 4 stitches. Sew until the needle reaches the other way than how it is in any other bar tack. Do ...width to 4 stitches. Stitch length 0 Needle position L or R Presser foot Zigzag Needle Single Other Darning plate Lower the presser foot and sew 3 to 0. b Stop the machine when the needle is in the fabric c and at the right side of the stitches. (position A) Step D: Right Row Set the...


