Quick Setup Guide - English
Page 1
... Quick Reference Guide Knowing Your Sewing Machine Name of our resellers carry genuine Brother parts, accessories and supplies. Brother International Corporation is too large for easy and efficient transporting P Thread Guide/Bobbin Winding Pre-tension Disc Used when winding the bobbin and then threading the machine Toll Free Phone 877-276-8437 O M H Thread...
... Quick Reference Guide Knowing Your Sewing Machine Name of our resellers carry genuine Brother parts, accessories and supplies. Brother International Corporation is too large for easy and efficient transporting P Thread Guide/Bobbin Winding Pre-tension Disc Used when winding the bobbin and then threading the machine Toll Free Phone 877-276-8437 O M H Thread...
Quick Setup Guide - English
Page 2
...tension to the driver. 8 9 Grasp the center post of the hook, match the hook position opposite the driver and insert. Cleaning the Bobbin Case 1 Remove the power plug from the outlet. 2 3 4 Raise the needle to its highest position by turning the handwheel. related to... their locked position. Utiliza accesorios comunes de remplazo: Carretel: Clase 15 Agujas: Agujas estándares para máquina de coser. Inserting the Bobbin 1 Wound evenly 2 Wound poorly 1 3 4 Raise the needle to its position thread with a brush. Pull the trailing thread through the slot...
...tension to the driver. 8 9 Grasp the center post of the hook, match the hook position opposite the driver and insert. Cleaning the Bobbin Case 1 Remove the power plug from the outlet. 2 3 4 Raise the needle to its highest position by turning the handwheel. related to... their locked position. Utiliza accesorios comunes de remplazo: Carretel: Clase 15 Agujas: Agujas estándares para máquina de coser. Inserting the Bobbin 1 Wound evenly 2 Wound poorly 1 3 4 Raise the needle to its position thread with a brush. Pull the trailing thread through the slot...
Users Manual - English and Spanish
Page 2
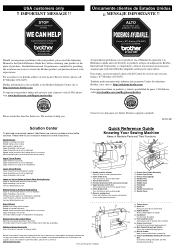
... parts. Use this sewing machine only for household use the proper needle plate. Do not use as threading the needle, changing the needle, threading the bobbin, or changing the presser foot. 15. Always unplug the sewing machine from the electrical outlet when removing covers, lubricating, or when making any of the...
... parts. Use this sewing machine only for household use the proper needle plate. Do not use as threading the needle, changing the needle, threading the bobbin, or changing the presser foot. 15. Always unplug the sewing machine from the electrical outlet when removing covers, lubricating, or when making any of the...
Users Manual - English and Spanish
Page 4
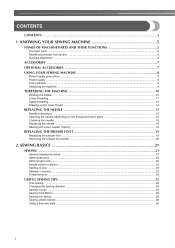
... bed attachment ...6 ACCESSORIES ...7 OPTIONAL ACCESSORIES 7 USING YOUR SEWING MACHINE 8 Power supply precautions ...8 Power supply ...8 Foot controller ...9 Steadying the machine ...9 THREADING THE MACHINE 10 Winding the bobbin ...10 Lower threading ...11 Upper threading ...13 Drawing up the lower thread ...14 REPLACING THE NEEDLE 15 Needle precautions ...15 Selecting the needle depending on...
... bed attachment ...6 ACCESSORIES ...7 OPTIONAL ACCESSORIES 7 USING YOUR SEWING MACHINE 8 Power supply precautions ...8 Power supply ...8 Foot controller ...9 Steadying the machine ...9 THREADING THE MACHINE 10 Winding the bobbin ...10 Lower threading ...11 Upper threading ...13 Drawing up the lower thread ...14 REPLACING THE NEEDLE 15 Needle precautions ...15 Selecting the needle depending on...

Users Manual - English and Spanish
Page 5
... 4. 3. APPENDIX ...38 MAINTENANCE ...38 Oiling ...38 Changing the bulb ...38 Cleaning the machine surface ...39 Cleaning the shuttle race ...39 Cleaning the feed dogs ...40 Bobbin case tension adjustment ...41 TROUBLESHOOTING ...42 When the thread is entangled ...45 INDEX ...46 4
... 4. 3. APPENDIX ...38 MAINTENANCE ...38 Oiling ...38 Changing the bulb ...38 Cleaning the machine surface ...39 Cleaning the shuttle race ...39 Cleaning the feed dogs ...40 Bobbin case tension adjustment ...41 TROUBLESHOOTING ...42 When the thread is entangled ...45 INDEX ...46 4
Users Manual - English and Spanish
Page 6
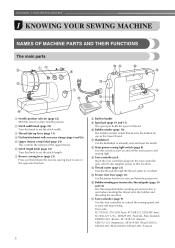
... winds thread onto the bobbin for use as the lower thread. k Handwheel Use the handwheel to raise and lower the presser foot. o Presser foot lever (page 13) Use the presser ... position selector (page 22) Shift this lever to set the stitch length. p Bobbin winding pre-tension disc/thread guide (page 10 and 13) The thread guide/bobbin winding pre-tension disc is used when winding the thread onto the bobbin and threading the machine. b Stitch width knob (page 22) Turn this knob to...
... winds thread onto the bobbin for use as the lower thread. k Handwheel Use the handwheel to raise and lower the presser foot. o Presser foot lever (page 13) Use the presser ... position selector (page 22) Shift this lever to set the stitch length. p Bobbin winding pre-tension disc/thread guide (page 10 and 13) The thread guide/bobbin winding pre-tension disc is used when winding the thread onto the bobbin and threading the machine. b Stitch width knob (page 22) Turn this knob to...

Users Manual - English and Spanish
Page 7
...If the accessories are stored in a compartment inside the compartment. e Needle plate The needle plate is installed onto the presser foot holder assembly. h Bobbin case i Needle j Needle bar thread guide k Needle clamp screw Use the needle clamp screw to hold the needle in place. Lift the bottom of... the flat bed attachment 1 a toward you, and then pull the flat bed attachment out to set the bobbin. a Flat bed attachment b Storage compartment Note ● Put the accessories in the bag, and then store the bag inside the flat bed attachment...
...If the accessories are stored in a compartment inside the compartment. e Needle plate The needle plate is installed onto the presser foot holder assembly. h Bobbin case i Needle j Needle bar thread guide k Needle clamp screw Use the needle clamp screw to hold the needle in place. Lift the bottom of... the flat bed attachment 1 a toward you, and then pull the flat bed attachment out to set the bobbin. a Flat bed attachment b Storage compartment Note ● Put the accessories in the bag, and then store the bag inside the flat bed attachment...
Users Manual - English and Spanish
Page 8
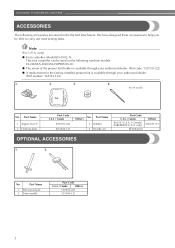
...1902, N This foot controller can be able to help you be used on the following accessories are stored in the flat bed attachment. Part Name 3 Bobbin 4 Needle set Part Code U.S.A. / Canada SA156 (U.S.A. / Canada) SABOBBIN (U.S.A. Part Name 1 Zipper foot "I" 2 Darning plate Part Code U.S.A. / .... only) XE7064-001 Others XA5539-151 OPTIONAL ACCESSORIES 1. 2. KNOWING YOUR SEWING MACHINE ACCESSORIES The following machine models: LS-2000/LS-2020/LS2250PRW/LS-30. ● The screw of the presser foot holder is available through your authorized dealer. (Part code: 132730-122) ●...
...1902, N This foot controller can be able to help you be used on the following accessories are stored in the flat bed attachment. Part Name 3 Bobbin 4 Needle set Part Code U.S.A. / Canada SA156 (U.S.A. / Canada) SABOBBIN (U.S.A. Part Name 1 Zipper foot "I" 2 Darning plate Part Code U.S.A. / .... only) XE7064-001 Others XA5539-151 OPTIONAL ACCESSORIES 1. 2. KNOWING YOUR SEWING MACHINE ACCESSORIES The following machine models: LS-2000/LS-2020/LS2250PRW/LS-30. ● The screw of the presser foot holder is available through your authorized dealer. (Part code: 132730-122) ●...
Users Manual - English and Spanish
Page 11
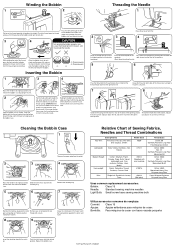
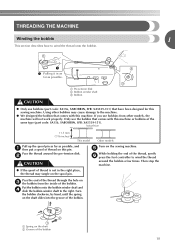
...pin. Then stop the machine. ● If the spool of thread is not in as far as possible, and a then put a spool of the bobbin. b CAUTION Turn on the shaft slides into the groove of thread on the spool pin. Actual size 11.5 mm (7/16 inches) This model Other ... it in the right place, the thread may cause damage to the right. a Spring on c the bobbin from other bobbins may tangle on this machine or bobbins of the bobbin. THREADING THE MACHINE Winding the bobbin 1 This section describes how to wind the thread around the pre-tension disk. e While holding the end...
...pin. Then stop the machine. ● If the spool of thread is not in as far as possible, and a then put a spool of the bobbin. b CAUTION Turn on the shaft slides into the groove of thread on the spool pin. Actual size 11.5 mm (7/16 inches) This model Other ... it in the right place, the thread may cause damage to the right. a Spring on c the bobbin from other bobbins may tangle on this machine or bobbins of the bobbin. THREADING THE MACHINE Winding the bobbin 1 This section describes how to wind the thread around the pre-tension disk. e While holding the end...
Users Manual - English and Spanish
Page 12
...type (part code: SA156, SABOBBIN, SFB: XA5539-151). Use only the enclosed bobbin or bobbins of injury. Press the foot controller to the left and remove the bobbin. Cut the thread, slide the bobbin winder shaft j to start. Memo ● When the sewing machine is started or...sew, you (counterclockwise) and raise the presser foot lever. 1 2 a Wound evenly b Wound poorly 11 If bobbins from supply circuit before servicing. CAUTION ● Winding the bobbin improperly may cause the thread tension to loosen, breaking the needle and resulting in injury. Raise the needle to break....
...type (part code: SA156, SABOBBIN, SFB: XA5539-151). Use only the enclosed bobbin or bobbins of injury. Press the foot controller to the left and remove the bobbin. Cut the thread, slide the bobbin winder shaft j to start. Memo ● When the sewing machine is started or...sew, you (counterclockwise) and raise the presser foot lever. 1 2 a Wound evenly b Wound poorly 11 If bobbins from supply circuit before servicing. CAUTION ● Winding the bobbin improperly may cause the thread tension to loosen, breaking the needle and resulting in injury. Raise the needle to break....

Users Manual - English and Spanish
Page 13
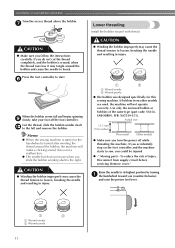
... Open the shuttle cover behind the flat bed b attachment at the top of the machine. a Tension spring Hold the bobbin case by pulling its latch c toward you set the bobbin so the thread unrolls in the wrong direction, it may cause the thread tension to the left, as shown below, ... shuttle when the machine starts to be incorrect or break the needle. If it is incorrectly installed, it out from a full bobbin, and then insert the bobbin into the bobbin case. • Only use bobbins that the bobbin case is properly placed back into the notch at the front of the shuttle race...
... Open the shuttle cover behind the flat bed b attachment at the top of the machine. a Tension spring Hold the bobbin case by pulling its latch c toward you set the bobbin so the thread unrolls in the wrong direction, it may cause the thread tension to the left, as shown below, ... shuttle when the machine starts to be incorrect or break the needle. If it is incorrectly installed, it out from a full bobbin, and then insert the bobbin into the bobbin case. • Only use bobbins that the bobbin case is properly placed back into the notch at the front of the shuttle race...
Users Manual - English and Spanish
Page 16
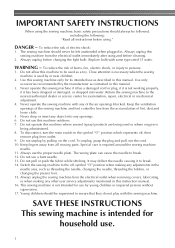
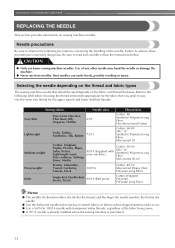
... is extremely dangerous. Needle precautions Be sure to observe the following table when choosing the thread and needle appropriate for the upper (spool) and lower (bobbin) threads. Bent needles can easily break, possibly resulting in injury. Sewing fabrics Needle sizes Thread sizes Very thin Fine tricot, Fine lace, Thin linen, Silk...
... is extremely dangerous. Needle precautions Be sure to observe the following table when choosing the thread and needle appropriate for the upper (spool) and lower (bobbin) threads. Bent needles can easily break, possibly resulting in injury. Sewing fabrics Needle sizes Thread sizes Very thin Fine tricot, Fine lace, Thin linen, Silk...
Users Manual - English and Spanish
Page 25
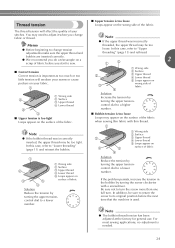
...● If the upper thread was incorrectly inserted, the upper thread may be too tight. If the problem persists, increase the tension in the bobbin by turning the upper tensioncontrol dial to its original position before you change tension adjustments make sure the upper thread and... your seams or cause puckers on your stitches. Solution Reduce the tension by turning the screw clockwise with thin thread. 1 Note ● If the bobbin thread was incorrectly threaded, the upper thread may be too loose. Thread tension ■ Upper tension is too loose Loops appear on a scrap of ...
...● If the upper thread was incorrectly inserted, the upper thread may be too tight. If the problem persists, increase the tension in the bobbin by turning the upper tensioncontrol dial to its original position before you change tension adjustments make sure the upper thread and... your seams or cause puckers on your stitches. Solution Reduce the tension by turning the screw clockwise with thin thread. 1 Note ● If the bobbin thread was incorrectly threaded, the upper thread may be too loose. Thread tension ■ Upper tension is too loose Loops appear on a scrap of ...

Users Manual - English and Spanish
Page 33
Place a button between the presser foot and c the fabric. ■ Button fitting with the bobbin thread. Pull the upper thread through one of the holes c on the button until it with thread shank The thread shank of the stitching. With a ... the back of the fabric and tie the ends together to the left side of the machine, g and then cut the upper thread and the bobbin thread at the beginning of a button is between the holes in the button. Start sewing. Pull the fabric to secure the button. Turning the width...
Place a button between the presser foot and c the fabric. ■ Button fitting with the bobbin thread. Pull the upper thread through one of the holes c on the button until it with thread shank The thread shank of the stitching. With a ... the back of the fabric and tie the ends together to the left side of the machine, g and then cut the upper thread and the bobbin thread at the beginning of a button is between the holes in the button. Start sewing. Pull the fabric to secure the button. Turning the width...
Users Manual - English and Spanish
Page 37
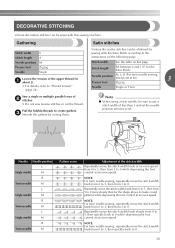
... width Repeatedly move the stitch width knob slowly from 0 to 5, then quickly back to 0 while depressing the foot control at an even speed. Pull the bobbin threads to "Thread tension" (page 24). Needle Needle position L Single needle M R Twin needle M L Single needle M R Twin needle M L Single needle M R Twin needle M Pattern sewn Adjustment of...
... width Repeatedly move the stitch width knob slowly from 0 to 5, then quickly back to 0 while depressing the foot control at an even speed. Pull the bobbin threads to "Thread tension" (page 24). Needle Needle position L Single needle M R Twin needle M L Single needle M R Twin needle M L Single needle M R Twin needle M Pattern sewn Adjustment of...
Users Manual - English and Spanish
Page 40
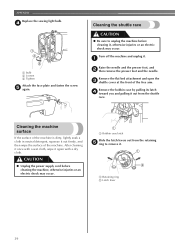
... the front of the machine. APPENDIX Replace the sewing light bulb. a a bulb b Loosen c Tighten Attach the face plate and fasten the screw e again. a Bobbin case latch Slide the latch levers out from the shuttle race. a Retaining ring b Latch lever 39 Cleaning the machine surface If the surface of the..., otherwise injuries or an electric shock may occur. Turn off the machine and unplug it again with a wet cloth, wipe it . Remove the bobbin case by pulling its latch d toward you and pulling it out firmly, and then wipe the surface of the free arm. After cleaning it once...
... the front of the machine. APPENDIX Replace the sewing light bulb. a a bulb b Loosen c Tighten Attach the face plate and fasten the screw e again. a Bobbin case latch Slide the latch levers out from the shuttle race. a Retaining ring b Latch lever 39 Cleaning the machine surface If the surface of the..., otherwise injuries or an electric shock may occur. Turn off the machine and unplug it again with a wet cloth, wipe it . Remove the bobbin case by pulling its latch d toward you and pulling it out firmly, and then wipe the surface of the free arm. After cleaning it once...

Users Manual - English and Spanish
Page 41
... needle plate by using a coin or d screwdriver to clean the lint from the upper e part of the feed dogs and shuttle race body. Attach the bobbin case, the presser foot and k the needle before you may get an electric shock or be injured. Cleaning the feed dogs a Retaining ring b Hook c Hook...
... needle plate by using a coin or d screwdriver to clean the lint from the upper e part of the feed dogs and shuttle race body. Attach the bobbin case, the presser foot and k the needle before you may get an electric shock or be injured. Cleaning the feed dogs a Retaining ring b Hook c Hook...

Users Manual - English and Spanish
Page 42
...the screw clockwise, being careful not to over -tighten the screw, approximately 30-45 degrees to its original setting before starting your next project. ■ Bobbin tension is too loose Loops appear on the surface of the fabric. 1 2 3 a Wrong side b Surface c Upper thread d Lower thread e ...Loops appear on 5 surface of the fabric after you adjust the upper tension, the bobbin thread may not be too tight. a Screw a Screw 41 When sewing with the upper tension control dial. Note ● If the loops still appear on...
...the screw clockwise, being careful not to over -tighten the screw, approximately 30-45 degrees to its original setting before starting your next project. ■ Bobbin tension is too loose Loops appear on the surface of the fabric. 1 2 3 a Wrong side b Surface c Upper thread d Lower thread e ...Loops appear on 5 surface of the fabric after you adjust the upper tension, the bobbin thread may not be too tight. a Screw a Screw 41 When sewing with the upper tension control dial. Note ● If the loops still appear on...
Users Manual - English and Spanish
Page 43
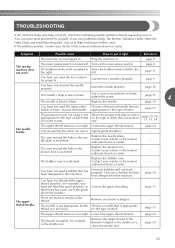
... the right. page 13 The upper thread breaks. Visit us at [http://solutions.brother.com]. page 8 The sewing machine does not work properly. The bobbin winder shaft is pushed to Move the bobbin winder shaft to put it right Reference The machine is not appropriate for example,... is tangled in the needle plate is tangled, for the type of fabric. page 16 You have not used a bobbin that you need additional help, the Brother Solutions Center offers the latest FAQs and troubleshooting tips. page 24 The thread is scratched. Use the foot controller properly....
... the right. page 13 The upper thread breaks. Visit us at [http://solutions.brother.com]. page 8 The sewing machine does not work properly. The bobbin winder shaft is pushed to Move the bobbin winder shaft to put it right Reference The machine is not appropriate for example,... is tangled in the needle plate is tangled, for the type of fabric. page 16 You have not used a bobbin that you need additional help, the Brother Solutions Center offers the latest FAQs and troubleshooting tips. page 24 The thread is scratched. Use the foot controller properly....
Users Manual - English and Spanish
Page 44
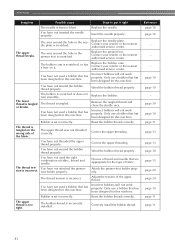
... page 11 page 11 43 Replace the needle plate. Replace the presser foot. You have not used a bobbin that has been designed for this machine. You have not wound the bobbin thread properly. Choose a thread and needle that has been designed for the type of fabric, thread and ... not turn smoothly. You have not used the right combination of fabric. Insert the needle properly. Wind the bobbin thread properly. The lower thread is too tight. Replace the bobbin. Correct the upper threading. You have not attached the presserfoot holder properly. The area around the hole in ...
... page 11 page 11 43 Replace the needle plate. Replace the presser foot. You have not used a bobbin that has been designed for this machine. You have not wound the bobbin thread properly. Choose a thread and needle that has been designed for the type of fabric, thread and ... not turn smoothly. You have not used the right combination of fabric. Insert the needle properly. Wind the bobbin thread properly. The lower thread is too tight. Replace the bobbin. Correct the upper threading. You have not attached the presserfoot holder properly. The area around the hole in ...


