Quick Setup Guide - English
Page 1
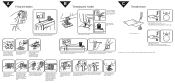
...the latch. Hold the bobbin case as shown, insert the bobbin with the top opening around the bobbin winder thread guide. 2 3 4 4 Raise the presser foot lifter. 5 * Raise the thread takeup lever to its highest position and remove the bobbin case by turning the dial a higher number. Pull the thread tail... the take -up lever and back down the right channel on the front of the machine. While holding the end of the thread, depress the foot controller. The latch should hold the bobbin case in place. Place the thread spool on the spool pin. Guide the thread up the left . 6 7...
...the latch. Hold the bobbin case as shown, insert the bobbin with the top opening around the bobbin winder thread guide. 2 3 4 4 Raise the presser foot lifter. 5 * Raise the thread takeup lever to its highest position and remove the bobbin case by turning the dial a higher number. Pull the thread tail... the take -up lever and back down the right channel on the front of the machine. While holding the end of the thread, depress the foot controller. The latch should hold the bobbin case in place. Place the thread spool on the spool pin. Guide the thread up the left . 6 7...
Users Manual - English
Page 2
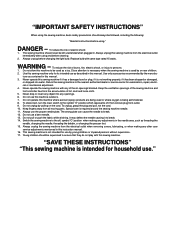
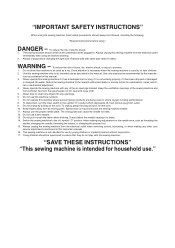
... air openings blocked. This sewing machine is being used as threading the needle, changing the needle, threading the bobbin, or changing the presser foot. 15. Never operate the sewing machine with same type rated 15 watts. Keep fingers away from the electrical outlet when removing covers, ...Do not pull or push the fabric while stitching. WARNING - Do not operate this manual. To reduce the risk of the sewing machine and foot controller free from the electrical outlet immediately after using ." DANGER - Return the sewing machine to the off , then remove plug from outlet....
... air openings blocked. This sewing machine is being used as threading the needle, changing the needle, threading the bobbin, or changing the presser foot. 15. Never operate the sewing machine with same type rated 15 watts. Keep fingers away from the electrical outlet when removing covers, ...Do not pull or push the fabric while stitching. WARNING - Do not operate this manual. To reduce the risk of the sewing machine and foot controller free from the electrical outlet immediately after using ." DANGER - Return the sewing machine to the off , then remove plug from outlet....
Users Manual - English
Page 7
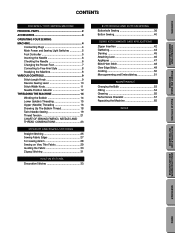
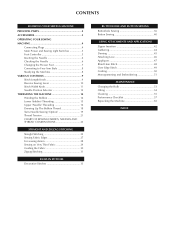
... STITCHES STITCHING KNOWING YOUR SEWING MACHINE PRINCIPAL PARTS 2 ACCESSORIES 3 OPERATING YOUR SEWING MACHINE 4 Connecting Plugs 4 Main Power and Sewing Light Switches 5 Foot Controller 5 Inserting the Needle 6 Checking the Needle 6 Changing the Presser Foot 7 Converting to Free-Arm Style 8 Steadying the Machine 8 VARIOUS CONTROLS 9 Stitch Length Knob 9 Reverse Sewing Lever 10 Stitch Width Knob...
... STITCHES STITCHING KNOWING YOUR SEWING MACHINE PRINCIPAL PARTS 2 ACCESSORIES 3 OPERATING YOUR SEWING MACHINE 4 Connecting Plugs 4 Main Power and Sewing Light Switches 5 Foot Controller 5 Inserting the Needle 6 Checking the Needle 6 Changing the Presser Foot 7 Converting to Free-Arm Style 8 Steadying the Machine 8 VARIOUS CONTROLS 9 Stitch Length Knob 9 Reverse Sewing Lever 10 Stitch Width Knob...
Users Manual - English
Page 29
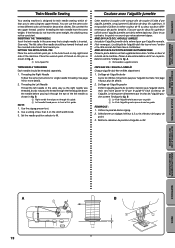
Place the second spool of thread on the stitch width knob. 3. Use the zigzag presser foot. 2. Couture avec l'aiguille jumelée Cette machine à coudre a été conçue afin de coudre à l'aide d'une aiguille jumelée, ce qui ...
Place the second spool of thread on the stitch width knob. 3. Use the zigzag presser foot. 2. Couture avec l'aiguille jumelée Cette machine à coudre a été conçue afin de coudre à l'aide d'une aiguille jumelée, ce qui ...
Users Manual - English
Page 68
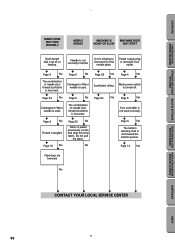
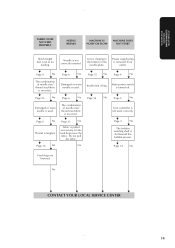
Power supply plug is tangled. w Page 6 No w Thread is removed from outlet. w Page 5 No w Foot controller is not correctly inserted. No w w w w CONTACT YOUR LOCAL SERVICE CENTER BUTTONHOLE AND USING ATTACHMENTS BUTTON SEWING AND APPLICATIONS MAINTENANCE INDEX 58 Do not pull ... STITCHING FABRIC DOES NOT FEED PROPERLY NEEDLE BREAKS MACHINE IS NOISY OR SLOW MACHINE DOES NOT START Stitch length dial is slid toward the bobbin presser. w Page 23 No w Fabric is pulled excessively.
Power supply plug is tangled. w Page 6 No w Thread is removed from outlet. w Page 5 No w Foot controller is not correctly inserted. No w w w w CONTACT YOUR LOCAL SERVICE CENTER BUTTONHOLE AND USING ATTACHMENTS BUTTON SEWING AND APPLICATIONS MAINTENANCE INDEX 58 Do not pull ... STITCHING FABRIC DOES NOT FEED PROPERLY NEEDLE BREAKS MACHINE IS NOISY OR SLOW MACHINE DOES NOT START Stitch length dial is slid toward the bobbin presser. w Page 23 No w Fabric is pulled excessively.
Users Manual - English
Page 76
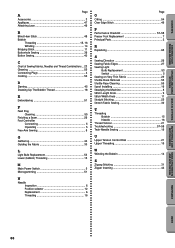
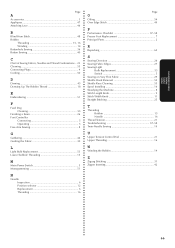
... 15 M Main Power Switch 5 Monogramming 51 N Needle Inspection 6 Position selector 12 Replacement 6 Threading 16 Page O Oiling 54 Over Edge Stitch 49 P Performance Checklist 57-58 Presser Foot Replacement 7 Principal Parts 2 R Repacking 65 S Sewing Direction 26 Sewing Fabric Edges 27 Sewing Light Bulb Replacement 53 Switch 5 Sewing on Very Thin Fabric 29 Shuttle...
... 15 M Main Power Switch 5 Monogramming 51 N Needle Inspection 6 Position selector 12 Replacement 6 Threading 16 Page O Oiling 54 Over Edge Stitch 49 P Performance Checklist 57-58 Presser Foot Replacement 7 Principal Parts 2 R Repacking 65 S Sewing Direction 26 Sewing Fabric Edges 27 Sewing Light Bulb Replacement 53 Switch 5 Sewing on Very Thin Fabric 29 Shuttle...
User Manual - French
Page 2
... - Use this sewing machine only for examination, repair, electrical or mechanical adjustment. 4. Keep the ventilation openings of the sewing machine and foot controller free from the electrical outlet when removing covers, lubricating, or when making any of burns, fire, electric shock, or injury to ... is not working properly, if it to be used as threading the needle, changing the needle, threading the bobbin, or changing the presser foot. 15. Do not unplug by the manufac- Always unplug before cleaning. 2. Close attention is necessary when the sewing machine is used or...
... - Use this sewing machine only for examination, repair, electrical or mechanical adjustment. 4. Keep the ventilation openings of the sewing machine and foot controller free from the electrical outlet when removing covers, lubricating, or when making any of burns, fire, electric shock, or injury to ... is not working properly, if it to be used as threading the needle, changing the needle, threading the bobbin, or changing the presser foot. 15. Do not unplug by the manufac- Always unplug before cleaning. 2. Close attention is necessary when the sewing machine is used or...
User Manual - French
Page 7
CONTENTS KNOWING YOUR SEWING MACHINE PRINCIPAL PARTS 2 ACCESSORIES 3 OPERATING YOUR SEWING MACHINE 4 Connecting Plugs 4 Main Power and Sewing Light Switches 5 Foot Controller 5 Inserting the Needle 6 Checking the Needle 6 Changing the Presser Foot 7 Converting to Free-Arm Style 8 Steadying the Machine 8 VARIOUS CONTROLS 9 Stitch Length Knob 9 Reverse Sewing Lever 10 Stitch Width Knob 11 Needle...
CONTENTS KNOWING YOUR SEWING MACHINE PRINCIPAL PARTS 2 ACCESSORIES 3 OPERATING YOUR SEWING MACHINE 4 Connecting Plugs 4 Main Power and Sewing Light Switches 5 Foot Controller 5 Inserting the Needle 6 Checking the Needle 6 Changing the Presser Foot 7 Converting to Free-Arm Style 8 Steadying the Machine 8 VARIOUS CONTROLS 9 Stitch Length Knob 9 Reverse Sewing Lever 10 Stitch Width Knob 11 Needle...
User Manual - French
Page 68
... size/fabric is used correctly. M Page 6 No M Thread is incorrect. No M Page 55 No M M Page 4 No M Insufficient oiling. M Page 54 M No Page 5 No M Foot controller is pulled excessively. No M M M M CONTACT YOUR LOCAL SERVICE CENTER 58 M Page 9 No M The combination of the needle plate. M Page 6 No M The combination of needle... DOES NOT FEED PROPERLY NEEDLE BREAKS MACHINE IS NOISY OR SLOW MACHINE DOES NOT START Stitch length dial is slid toward the bobbin presser. M Page 23 No M Fabric is not used . Do not pull the fabric.
... size/fabric is used correctly. M Page 6 No M Thread is incorrect. No M Page 55 No M M Page 4 No M Insufficient oiling. M Page 54 M No Page 5 No M Foot controller is pulled excessively. No M M M M CONTACT YOUR LOCAL SERVICE CENTER 58 M Page 9 No M The combination of the needle plate. M Page 6 No M The combination of needle... DOES NOT FEED PROPERLY NEEDLE BREAKS MACHINE IS NOISY OR SLOW MACHINE DOES NOT START Stitch length dial is slid toward the bobbin presser. M Page 23 No M Fabric is not used . Do not pull the fabric.
User Manual - French
Page 76
... 15 M Main Power Switch 5 Monogramming 51 N Needle Inspection 6 Position selector 12 Replacement 6 Threading 16 Page O Oiling 54 Over Edge Stitch 49 P Performance Checklist 57-58 Presser Foot Replacement 7 Principal Parts 2 R Repacking 65 S Sewing Direction 26 Sewing Fabric Edges 27 Sewing Light Bulb Replacement 53 Switch 5 Sewing on Very Thin Fabric 29 Shuttle...
... 15 M Main Power Switch 5 Monogramming 51 N Needle Inspection 6 Position selector 12 Replacement 6 Threading 16 Page O Oiling 54 Over Edge Stitch 49 P Performance Checklist 57-58 Presser Foot Replacement 7 Principal Parts 2 R Repacking 65 S Sewing Direction 26 Sewing Fabric Edges 27 Sewing Light Bulb Replacement 53 Switch 5 Sewing on Very Thin Fabric 29 Shuttle...


