Quick Setup Guide - English
Page 1
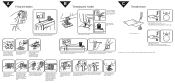
...hole. Grasp the thread on both sides of the machine. Holding the bobbin case by pulling the latch. Guide the thread up lever. Hold the bobbin case as shown, insert the bobbin with the top opening of the opening around the bobbin winder thread guide. 2 3 4 4 Raise the presser foot lifter.... 5 * Raise the thread takeup lever to its highest position and remove the bobbin case by the latch align...
...hole. Grasp the thread on both sides of the machine. Holding the bobbin case by pulling the latch. Guide the thread up lever. Hold the bobbin case as shown, insert the bobbin with the top opening of the opening around the bobbin winder thread guide. 2 3 4 4 Raise the presser foot lifter.... 5 * Raise the thread takeup lever to its highest position and remove the bobbin case by the latch align...

Quick Setup Guide - English
Page 2
...may bend the needle causing it 's position related to break. Insert the retaining ring with your closest service center, call 1-901-379-1010 for entangled thread. If you encounter any accumulated lint and thread with a brush. D Cleaning bobbin case 1 CAUTION Troubleshooting ∗Do not pull or push fabric ...locked. Grasp the center post of your product: *DO NOT RETURN THIS PRODUCT TO THE STORE *Please read the manual carefully. Replace the bobbin cace. (See A.) Turn the balance wheel to raise the needle, then remove the fabric. ∗If machine runs but needle does not ...
...may bend the needle causing it 's position related to break. Insert the retaining ring with your closest service center, call 1-901-379-1010 for entangled thread. If you encounter any accumulated lint and thread with a brush. D Cleaning bobbin case 1 CAUTION Troubleshooting ∗Do not pull or push fabric ...locked. Grasp the center post of your product: *DO NOT RETURN THIS PRODUCT TO THE STORE *Please read the manual carefully. Replace the bobbin cace. (See A.) Turn the balance wheel to raise the needle, then remove the fabric. ∗If machine runs but needle does not ...
Users Manual - English
Page 2
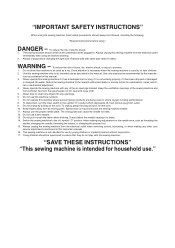
.... 6. Always unplug the sewing machine from outlet. 9. DANGER - Use only accessories recommended by pulling on the cord. Never drop or insert any object into water. Always unplug this instruction manual. 16. Do not operate this machine to be left unattended when plugged in this ...break. 12. Close attention is necessary when the sewing machine is being used as threading the needle, changing the needle, threading the bobbin, or changing the presser foot. 15. Keep the ventilation openings of the sewing machine and foot controller free from all instructions before...
.... 6. Always unplug the sewing machine from outlet. 9. DANGER - Use only accessories recommended by pulling on the cord. Never drop or insert any object into water. Always unplug this instruction manual. 16. Do not operate this machine to be left unattended when plugged in this ...break. 12. Close attention is necessary when the sewing machine is being used as threading the needle, changing the needle, threading the bobbin, or changing the presser foot. 15. Keep the ventilation openings of the sewing machine and foot controller free from all instructions before...
Users Manual - English
Page 7
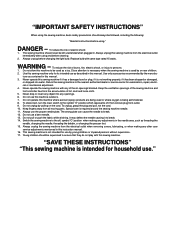
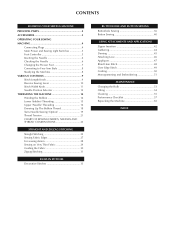
... YOUR SEWING MACHINE PRINCIPAL PARTS 2 ACCESSORIES 3 OPERATING YOUR SEWING MACHINE 4 Connecting Plugs 4 Main Power and Sewing Light Switches 5 Foot Controller 5 Inserting the Needle 6 Checking the Needle 6 Changing the Presser Foot 7 Converting to Free-Arm Style 8 Steadying the Machine 8 VARIOUS CONTROLS 9 Stitch ...10 Stitch Width Knob 11 Needle Position Selector 12 THREADING THE MACHINE 14 Winding the Bobbin 14 Lower (bobbin) Threading 15 Upper (Needle) Threading 16 Drawing Up The Bobbin Thread 18 Twin-Needle Sewing 19 Thread Tension 21 CHART OF SEWING FABRICS, NEEDLES AND...
... YOUR SEWING MACHINE PRINCIPAL PARTS 2 ACCESSORIES 3 OPERATING YOUR SEWING MACHINE 4 Connecting Plugs 4 Main Power and Sewing Light Switches 5 Foot Controller 5 Inserting the Needle 6 Checking the Needle 6 Changing the Presser Foot 7 Converting to Free-Arm Style 8 Steadying the Machine 8 VARIOUS CONTROLS 9 Stitch ...10 Stitch Width Knob 11 Needle Position Selector 12 THREADING THE MACHINE 14 Winding the Bobbin 14 Lower (bobbin) Threading 15 Upper (Needle) Threading 16 Drawing Up The Bobbin Thread 18 Twin-Needle Sewing 19 Thread Tension 21 CHART OF SEWING FABRICS, NEEDLES AND...
Users Manual - English
Page 67
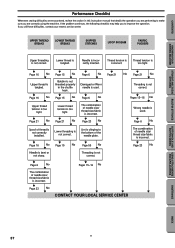
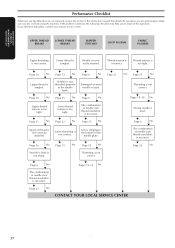
.... w Page 6 No w The combination of needle size/ thread size/fabric is incorrect. w Pages 15-16 No w Page 21 w No Page 21 No w Threading is incorrectly inserted. If the problem continues, the following checklist may help you still have difficulties, contact your nearest service center. Needle is not correct. Thread tension is... manual that details the operation you are performing to the bottom of needle size/ thread size/fabric is incorrect. w Page 23 No w w Page 15 No w Bobbin is incorrect.
.... w Page 6 No w The combination of needle size/ thread size/fabric is incorrect. w Pages 15-16 No w Page 21 w No Page 21 No w Threading is incorrectly inserted. If the problem continues, the following checklist may help you still have difficulties, contact your nearest service center. Needle is not correct. Thread tension is... manual that details the operation you are performing to the bottom of needle size/ thread size/fabric is incorrect. w Page 23 No w w Page 15 No w Bobbin is incorrect.
Users Manual - English
Page 68
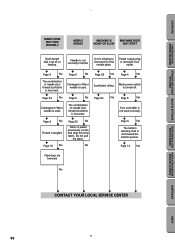
... w w w w CONTACT YOUR LOCAL SERVICE CENTER BUTTONHOLE AND USING ATTACHMENTS BUTTON SEWING AND APPLICATIONS MAINTENANCE INDEX 58 w Page 6 No w Thread is slid toward the bobbin presser. w Page 5 No w The bobbin winding shaft is tangled. Lint is used correctly. w Page 23 No w Damaged or Worn needle is clinging to the bottom of needle size.... Power supply plug is not used . w Page 5 No w Foot controller is removed from outlet. Let the feed dogs move the fabric. Needle is not correctly inserted.
... w w w w CONTACT YOUR LOCAL SERVICE CENTER BUTTONHOLE AND USING ATTACHMENTS BUTTON SEWING AND APPLICATIONS MAINTENANCE INDEX 58 w Page 6 No w Thread is slid toward the bobbin presser. w Page 5 No w The bobbin winding shaft is tangled. Lint is used correctly. w Page 23 No w Damaged or Worn needle is clinging to the bottom of needle size.... Power supply plug is not used . w Page 5 No w Foot controller is removed from outlet. Let the feed dogs move the fabric. Needle is not correctly inserted.
Users Manual - English
Page 76
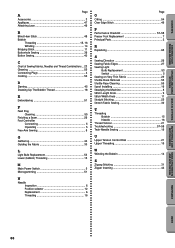
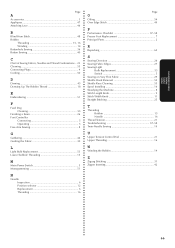
...Appliques 47 Attaching Lace 46 B Blind Hem Stitch 48 Bobbin Threading 15, 16 Winding 14 Bridging Stitch 11 Buttonhole ... 23 Cleaning 55 Connecting Plugs 4 Cording 50 D Darning 45 Drawing Up The Bobbin Thread 18 E Embroidering 51 F Feed Dog Cleaning 55 Finishing a Seam 26 ... Sewing 8 G Gathering 44 Guiding the Fabric 30 L Light Bulb Replacement 53 Lower (bobbin) Threading 15 M Main Power Switch 5 Monogramming 51 N Needle Inspection 6 Position selector... Stitching 25 Stretch Fabric Sewing 30 T Threading Bobbin 15 Needle 16 Thread Tension 21 Troubleshooting 57-58 Twin-...
...Appliques 47 Attaching Lace 46 B Blind Hem Stitch 48 Bobbin Threading 15, 16 Winding 14 Bridging Stitch 11 Buttonhole ... 23 Cleaning 55 Connecting Plugs 4 Cording 50 D Darning 45 Drawing Up The Bobbin Thread 18 E Embroidering 51 F Feed Dog Cleaning 55 Finishing a Seam 26 ... Sewing 8 G Gathering 44 Guiding the Fabric 30 L Light Bulb Replacement 53 Lower (bobbin) Threading 15 M Main Power Switch 5 Monogramming 51 N Needle Inspection 6 Position selector... Stitching 25 Stretch Fabric Sewing 30 T Threading Bobbin 15 Needle 16 Thread Tension 21 Troubleshooting 57-58 Twin-...
User Manual - French
Page 2
... is required around the sewing machine needle. 11. turer as a toy. Always use as threading the needle, changing the needle, threading the bobbin, or changing the presser foot. 15. It may deflect the needle causing it has been dropped or damaged, or dropped into any of burns...then remove plug from all instructions before changing the light bulb. Never operate the sewing machine with same type rated 15 watts. Never drop or insert any other user service adjustments mentioned in this instruction manual. 16. Do not use ." Keep fingers away from outlet. 9. The wrong plate...
... is required around the sewing machine needle. 11. turer as a toy. Always use as threading the needle, changing the needle, threading the bobbin, or changing the presser foot. 15. It may deflect the needle causing it has been dropped or damaged, or dropped into any of burns...then remove plug from all instructions before changing the light bulb. Never operate the sewing machine with same type rated 15 watts. Never drop or insert any other user service adjustments mentioned in this instruction manual. 16. Do not use ." Keep fingers away from outlet. 9. The wrong plate...
User Manual - French
Page 7
... Sewing Lever 10 Stitch Width Knob 11 Needle Position Selector 12 THREADING THE MACHINE 14 Winding the Bobbin 14 Lower (bobbin) Threading 15 Upper (Needle) Threading 16 Drawing Up The Bobbin Thread 18 Twin-Needle Sewing (Option 19 Thread Tension 21 CHART OF SEWING FABRICS, NEEDLES AND ... 31 BUILT-IN STITCHES Decorative Stitches 33 BUTTONHOLE AND BUTTON SEWING Buttonhole Sewing 36 Button Sewing 40 USING ATTACHMENTS AND APPLICATIONS Zipper Insertion 42 Gathering 44 Darning 45 Attaching Lace 46 Appliques 47 Blind Hem Stitch 48 Over Edge Stitch 49 Cording 50 Monogramming and...
... Sewing Lever 10 Stitch Width Knob 11 Needle Position Selector 12 THREADING THE MACHINE 14 Winding the Bobbin 14 Lower (bobbin) Threading 15 Upper (Needle) Threading 16 Drawing Up The Bobbin Thread 18 Twin-Needle Sewing (Option 19 Thread Tension 21 CHART OF SEWING FABRICS, NEEDLES AND ... 31 BUILT-IN STITCHES Decorative Stitches 33 BUTTONHOLE AND BUTTON SEWING Buttonhole Sewing 36 Button Sewing 40 USING ATTACHMENTS AND APPLICATIONS Zipper Insertion 42 Gathering 44 Darning 45 Attaching Lace 46 Appliques 47 Blind Hem Stitch 48 Over Edge Stitch 49 Cording 50 Monogramming and...
User Manual - French
Page 67
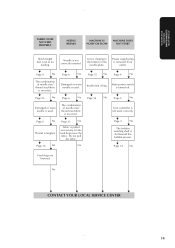
... Page 23 No M M M M CONTACT YOUR LOCAL SERVICE CENTER 57 Thread tension is bent or not sharp. M Page 22 No M Lower threading is incorrectly inserted. M Page 6 No M The combination of the needle plate. Needle is not correct. M Page 16 No M Upper thread tension is tangled. M Page 23... No M M Page 15 No M Bobbin is too tight. Lower thread is too tight. Thread tension is not correct. M Page 15 M No Page 55 No M Threading is too tight. M...
... Page 23 No M M M M CONTACT YOUR LOCAL SERVICE CENTER 57 Thread tension is bent or not sharp. M Page 22 No M Lower threading is incorrectly inserted. M Page 6 No M The combination of the needle plate. Needle is not correct. M Page 16 No M Upper thread tension is tangled. M Page 23... No M M Page 15 No M Bobbin is too tight. Lower thread is too tight. Thread tension is not correct. M Page 15 M No Page 55 No M Threading is too tight. M...
User Manual - French
Page 68
.../fabric is clinging to the bottom of needle size/ thread size/fabric is removed from outlet. Main power switch is slid toward the bobbin presser. M Page 5 No M The bobbin winding shaft is turned off. M Page 14 No Feed dogs are lowered. M Page 16 No M M Page 6 No M Damaged or worn needle is not... 6 No M Thread is set at no feeding. Do not pull the fabric. Needle is used . M Page 23 No M Damaged or worn needle is not correctly inserted. M Page 23 No M Fabric is pulled excessively.
.../fabric is clinging to the bottom of needle size/ thread size/fabric is removed from outlet. Main power switch is slid toward the bobbin presser. M Page 5 No M The bobbin winding shaft is turned off. M Page 14 No Feed dogs are lowered. M Page 16 No M M Page 6 No M Damaged or worn needle is not... 6 No M Thread is set at no feeding. Do not pull the fabric. Needle is used . M Page 23 No M Damaged or worn needle is not correctly inserted. M Page 23 No M Fabric is pulled excessively.
User Manual - French
Page 76
...and Thread Combinations ... 23 Cleaning 55 Connecting Plugs 4 Cording 50 D Darning 45 Drawing Up The Bobbin Thread 18 E Embroidering 51 F Feed Dog Cleaning 55 Finishing a Seam 26 Foot Controller Connecting ... 5 Free-Arm Sewing 8 G Gathering 44 Guiding the Fabric 30 L Light Bulb Replacement 53 Lower (bobbin) Threading 15 M Main Power Switch 5 Monogramming 51 N Needle Inspection 6 Position selector 12 Replacement 6 ...Length Knob 9 Stitch Width Knob 11 Straight Stitching 25 T Threading Bobbin 15 Needle 16 Thread Tension 21 Troubleshooting 57-58 Twin-Needle Sewing 19 ...
...and Thread Combinations ... 23 Cleaning 55 Connecting Plugs 4 Cording 50 D Darning 45 Drawing Up The Bobbin Thread 18 E Embroidering 51 F Feed Dog Cleaning 55 Finishing a Seam 26 Foot Controller Connecting ... 5 Free-Arm Sewing 8 G Gathering 44 Guiding the Fabric 30 L Light Bulb Replacement 53 Lower (bobbin) Threading 15 M Main Power Switch 5 Monogramming 51 N Needle Inspection 6 Position selector 12 Replacement 6 ...Length Knob 9 Stitch Width Knob 11 Straight Stitching 25 T Threading Bobbin 15 Needle 16 Thread Tension 21 Troubleshooting 57-58 Twin-Needle Sewing 19 ...


