Operation Manual
Page 3
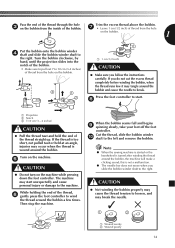
...manufacturer as a stove or iron; For additional product information, visit our web site at www.brother.com 2 The machine may start unexpectedly and cause personal injury or damage to the machine. • Switch the machine to the symbol "O" position to turn on an unstable surface, such as described in should ...operation manual to the needle. Never allow children to play with the bag due to break. • Do not push or pull the fabric when sewing, and follow the troubleshooting table in the back of . Do not use outdoors. 8 For a longer service life: • When storing this ...
...manufacturer as a stove or iron; For additional product information, visit our web site at www.brother.com 2 The machine may start unexpectedly and cause personal injury or damage to the machine. • Switch the machine to the symbol "O" position to turn on an unstable surface, such as described in should ...operation manual to the needle. Never allow children to play with the bag due to break. • Do not push or pull the fabric when sewing, and follow the troubleshooting table in the back of . Do not use outdoors. 8 For a longer service life: • When storing this ...

Operation Manual
Page 5
... insertion 35 Gathering 36 Appliqués 36 USING OPTIONAL ACCESSORIES 37 Sewing buttons 37 Darning 38 Using the blind stitch foot 39 6. KNOWING YOUR SEWING MACHINE 5 ACCESSORIES 5 Optional accessories 5 THE MAIN PARTS 6 Flat bed attachment 6 USING YOUR SEWING MACHINE 7 Connecting plugs 7 Main power and sewing light switch 8 Foot controller 8 Checking the needle 8 Replacing the needle 8 Changing...
... insertion 35 Gathering 36 Appliqués 36 USING OPTIONAL ACCESSORIES 37 Sewing buttons 37 Darning 38 Using the blind stitch foot 39 6. KNOWING YOUR SEWING MACHINE 5 ACCESSORIES 5 Optional accessories 5 THE MAIN PARTS 6 Flat bed attachment 6 USING YOUR SEWING MACHINE 7 Connecting plugs 7 Main power and sewing light switch 8 Foot controller 8 Checking the needle 8 Replacing the needle 8 Changing...
Operation Manual
Page 6
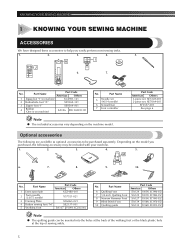
... Screwdriver 7 Foot controller Note ● The included accessories vary depending on the model you easily perform most sewing tasks. 1. 2. 3. 4. 5. Depending on the machine model. No. Part Name 5 Needle set : XE7064-001 XF3557-001 See page 6 Optional accessories The following... black plastic hole at the top of sewing ankle. 5 A A I I " XE9369-001 4 Bobbin (One is on machine) XC4901-121 2 Buttonhole foot "A" X59369-321 3 Zipper foot "I JJ 6. 7. KNOWING YOUR SEWING MACHINE 1 KNOWING YOUR SEWING MACHINE ACCESSORIES We have designed these accessories to ...
... Screwdriver 7 Foot controller Note ● The included accessories vary depending on the model you easily perform most sewing tasks. 1. 2. 3. 4. 5. Depending on the machine model. No. Part Name 5 Needle set : XE7064-001 XF3557-001 See page 6 Optional accessories The following... black plastic hole at the top of sewing ankle. 5 A A I I " XE9369-001 4 Bobbin (One is on machine) XC4901-121 2 Buttonhole foot "A" X59369-321 3 Zipper foot "I JJ 6. 7. KNOWING YOUR SEWING MACHINE 1 KNOWING YOUR SEWING MACHINE ACCESSORIES We have designed these accessories to ...
Operation Manual
Page 7
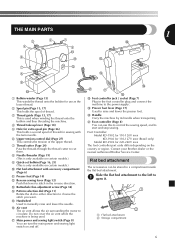
...accessory compartment (Page 6) A Presser foot (Page 10) B Reverse sewing lever (Page 12) Push this to control the sewing speed, and to 1 open it. 1 2 1 Flat bed attachment 2 Storage compartment 6 J Handle Carry the machine by its handle when transporting. Slide the flat bed attachment to the...-127V area (Brazil only) Model KD-2902 for 220-240V area The foot controller part code differs depending on and off. Contact your Brother dealer or the nearest authorized Brother Service Center. THE MAIN PARTS 3 2 1 1 J 4 5 D 6 C E 7 B 8 F 9 0 A 1 Bobbin winder (Page 13) This ...
...accessory compartment (Page 6) A Presser foot (Page 10) B Reverse sewing lever (Page 12) Push this to control the sewing speed, and to 1 open it. 1 2 1 Flat bed attachment 2 Storage compartment 6 J Handle Carry the machine by its handle when transporting. Slide the flat bed attachment to the...-127V area (Brazil only) Model KD-2902 for 220-240V area The foot controller part code differs depending on and off. Contact your Brother dealer or the nearest authorized Brother Service Center. THE MAIN PARTS 3 2 1 1 J 4 5 D 6 C E 7 B 8 F 9 0 A 1 Bobbin winder (Page 13) This ...
Operation Manual
Page 8
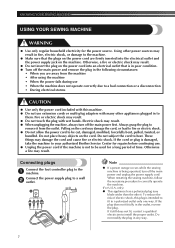
... fit fully in any way. 7 Connecting plugs Connect the foot controller plug to a wall 2 outlet. Note ● If a power outage occurs while the sewing machine is in poor condition. ● Turn off the main power and remove the plug in the following circumstances: • When you are firmly inserted into... outlet. Do not modify the plug in the outlet, reverse the plug. Using other ). If the cord or plug is damaged, take the machine to your authorized Brother Service Center for the power source. only) ● This appliance has a polarized plug (one way. If it from the...
... fit fully in any way. 7 Connecting plugs Connect the foot controller plug to a wall 2 outlet. Note ● If a power outage occurs while the sewing machine is in poor condition. ● Turn off the main power and remove the plug in the following circumstances: • When you are firmly inserted into... outlet. Do not modify the plug in the outlet, reverse the plug. Using other ). If the cord or plug is damaged, take the machine to your authorized Brother Service Center for the power source. only) ● This appliance has a polarized plug (one way. If it from the...

Operation Manual
Page 9
... needle from the top and the sides. When you (counterclockwise) so that nothing is accidentally pressed and the machine starts sewing. ● Only use . The machine may occur if the foot controller is placed on a flat surface. Otherwise, injuries may start unexpectedly and cause... Model KD-1902 This foot controller can be straight and sharp 1 This switch turns the main power and sewing light on the machine with a bent needle. Lower the presser foot lever. 3 1 1 Presser foot lever 8 for home use sewing machine needles for smooth sewing. 1 2 1 Turn on the foot controller.
... needle from the top and the sides. When you (counterclockwise) so that nothing is accidentally pressed and the machine starts sewing. ● Only use . The machine may occur if the foot controller is placed on a flat surface. Otherwise, injuries may start unexpectedly and cause... Model KD-1902 This foot controller can be straight and sharp 1 This switch turns the main power and sewing light on the machine with a bent needle. Lower the presser foot lever. 3 1 1 Presser foot lever 8 for home use sewing machine needles for smooth sewing. 1 2 1 Turn on the foot controller.
Operation Manual
Page 10
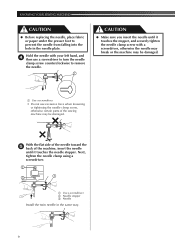
...Needle Install the twin needle in the needle plate. Hold the needle with a screwdriver, otherwise the needle may break or the machine may be damaged. KNOWING YOUR SEWING MACHINE CAUTION ● Before replacing the needle, place fabric or paper under the presser foot to remove the needle. 1 CAUTION ... with your left hand, and 4 then use excessive force when loosening or tightening the needle clamp screw, otherwise certain parts of the sewing machine may be damaged. 1 Use a screwdriver • Do not use a screwdriver to turn the needle clamp screw counterclockwise to prevent the...
...Needle Install the twin needle in the needle plate. Hold the needle with a screwdriver, otherwise the needle may break or the machine may be damaged. KNOWING YOUR SEWING MACHINE CAUTION ● Before replacing the needle, place fabric or paper under the presser foot to remove the needle. 1 CAUTION ... with your left hand, and 4 then use excessive force when loosening or tightening the needle clamp screw, otherwise certain parts of the sewing machine may be damaged. 1 Use a screwdriver • Do not use a screwdriver to turn the needle clamp screw counterclockwise to prevent the...
Operation Manual
Page 11
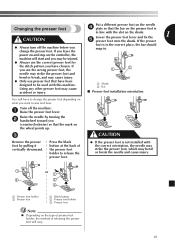
Turn off the machine before you change the presser foot depending on what you want to sew and how. If you use the wrong presser foot, the 1 2 needle may strike the ...the presser foot is in the correct place, the bar should snap in line with this machine. If the presser ● Always turn off the machine. 1 Raise the presser foot lever. Using any other presser foot may be used with ...the slot on the controller, the machine will start and you leave the foot is CAUTION in . Lower the presser foot lever and fix...
Turn off the machine before you change the presser foot depending on what you want to sew and how. If you use the wrong presser foot, the 1 2 needle may strike the ...the presser foot is in the correct place, the bar should snap in line with this machine. If the presser ● Always turn off the machine. 1 Raise the presser foot lever. Using any other presser foot may be used with ...the slot on the controller, the machine will start and you leave the foot is CAUTION in . Lower the presser foot lever and fix...

Operation Manual
Page 12
...) 9 STRAIGHT STITCH (Center Needle Position) 0.5 (1/32) 5 (3/16) 1.6 (1/16) - 29, 36 29, 38 1.8 (1/8) - 29, 38 2 (1/16) - 29, 38 3 (1/8) - 29, 35, 36, 38, 39 11 KNOWING YOUR SEWING MACHINE THE CONTROLS Pattern selection dial CAUTION ● When you use the pattern selection dial to choose a pattern, raise the needle by turning the handwheel toward...
...) 9 STRAIGHT STITCH (Center Needle Position) 0.5 (1/32) 5 (3/16) 1.6 (1/16) - 29, 36 29, 38 1.8 (1/8) - 29, 38 2 (1/16) - 29, 38 3 (1/8) - 29, 35, 36, 38, 39 11 KNOWING YOUR SEWING MACHINE THE CONTROLS Pattern selection dial CAUTION ● When you use the pattern selection dial to choose a pattern, raise the needle by turning the handwheel toward...
Operation Manual
Page 13
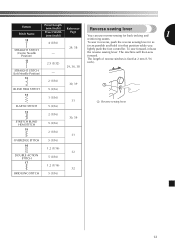
... machine will then sew forward. 11 2.5 (3/32) The length of reverse stitches is fixed at 2 mm (1/16 inch). 29, 36, 38 STRAIGHT STITCH (Left Needle Position) - 12 2 (1/16) 30, 39 1 BLIND HEM STITCH 5 (3/16) 13 1 (1/16) 31 ELASTIC STITCH 5 (3/16) 1 Reverse sewing ... (3/16) 1.2 (1/16) 5 (3/16) 1.2 (1/16) 5 (3/16) 30, 39 31 32 32 12 Pattern Preset Length (mm (inch)) Reference Reverse sewing lever Stitch Name Preset Width (mm (inch)) Page You can use reverse sewing for back tacking and 1 10 STRAIGHT STITCH (Center Needle Position) 4 (3/16) - 29, 38 reinforcing seams. To...
... machine will then sew forward. 11 2.5 (3/32) The length of reverse stitches is fixed at 2 mm (1/16 inch). 29, 36, 38 STRAIGHT STITCH (Left Needle Position) - 12 2 (1/16) 30, 39 1 BLIND HEM STITCH 5 (3/16) 13 1 (1/16) 31 ELASTIC STITCH 5 (3/16) 1 Reverse sewing ... (3/16) 1.2 (1/16) 5 (3/16) 1.2 (1/16) 5 (3/16) 30, 39 31 32 32 12 Pattern Preset Length (mm (inch)) Reference Reverse sewing lever Stitch Name Preset Width (mm (inch)) Page You can use reverse sewing for back tacking and 1 10 STRAIGHT STITCH (Center Needle Position) 4 (3/16) - 29, 38 reinforcing seams. To...

Operation Manual
Page 14
If you , in the wrong place, or is set incorrectly, the thread may cause damage to the machine. SA156 is in the groove on the spool pin. Actual size 11.5 mm (7/16 inch) This model Other models 1 1 Pull the thread in completely. 2 3 1 Pre-... use bobbins from the spool 2 with your right hand, pass the thread toward you use the bobbin that comes with this machine or bobbins of the same type (part code: SA156, SFB: XA5539-151). KNOWING YOUR SEWING MACHINE THREADING THE MACHINE Winding the bobbin CAUTION ● We designed the bobbin that comes with this...
If you , in the wrong place, or is set incorrectly, the thread may cause damage to the machine. SA156 is in the groove on the spool pin. Actual size 11.5 mm (7/16 inch) This model Other models 1 1 Pull the thread in completely. 2 3 1 Pre-... use bobbins from the spool 2 with your right hand, pass the thread toward you use the bobbin that comes with this machine or bobbins of the same type (part code: SA156, SFB: XA5539-151). KNOWING YOUR SEWING MACHINE THREADING THE MACHINE Winding the bobbin CAUTION ● We designed the bobbin that comes with this...
Operation Manual
Page 15
If the thread is wound around the bobbin a few times. The machine may occur when the thread is too short, not pulled taut or held at an angle, injuries may start . ... shaft and slide the bobbin winder shaft to the machine. If you slide the bobbin winder shaft to wind the thread around the bobbin. Then stop the machine. Note ● When the sewing machine is started or the handwheel is not a malfunction.... the thread tension to loosen, and may tangle around the bobbin, the machine will make a clicking sound; Cut the thread, slide the bobbin winder 0 shaft to break. Turn on the...
If the thread is wound around the bobbin a few times. The machine may occur when the thread is too short, not pulled taut or held at an angle, injuries may start . ... shaft and slide the bobbin winder shaft to the machine. If you slide the bobbin winder shaft to wind the thread around the bobbin. Then stop the machine. Note ● When the sewing machine is started or the handwheel is not a malfunction.... the thread tension to loosen, and may tangle around the bobbin, the machine will make a clicking sound; Cut the thread, slide the bobbin winder 0 shaft to break. Turn on the...
Operation Manual
Page 16
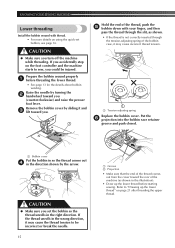
KNOWING YOUR SEWING MACHINE Lower threading Install the bobbin wound with your finger, and then pass the thread through the slit, as shown. • If the thread is not correctly inserted through the tension-adjusting spring of the machine (as shown in the illustration). • Draw up the lower ...arrow. Prepare the bobbin wound properly 1 before starting sewing. CAUTION ● Make sure you set bobbin, see page 16. Raise the needle by sliding it and 3 lift toward you accidentally step on the foot controller and the machine starts to "Drawing up the lower thread before threading...
KNOWING YOUR SEWING MACHINE Lower threading Install the bobbin wound with your finger, and then pass the thread through the slit, as shown. • If the thread is not correctly inserted through the tension-adjusting spring of the machine (as shown in the illustration). • Draw up the lower ...arrow. Prepare the bobbin wound properly 1 before starting sewing. CAUTION ● Make sure you set bobbin, see page 16. Raise the needle by sliding it and 3 lift toward you accidentally step on the foot controller and the machine starts to "Drawing up the lower thread before threading...
Operation Manual
Page 18
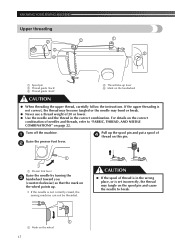
... wheel points up lever 5 Mark on the handwheel CAUTION ● When threading the upper thread, carefully follow the instructions. KNOWING YOUR SEWING MACHINE Upper threading 2 2 3 4 1 5 1 Spool pin 2 Thread guide (back) 3 Thread guide (front) 4 Thread take-up . • If... the needle is not correctly raised, the sewing machine can not be threaded. Turn off the machine. 1 Raise the presser foot lever. 2 Pull up the spool pin and put a spool of thread is in the correct combination. If...
... wheel points up lever 5 Mark on the handwheel CAUTION ● When threading the upper thread, carefully follow the instructions. KNOWING YOUR SEWING MACHINE Upper threading 2 2 3 4 1 5 1 Spool pin 2 Thread guide (back) 3 Thread guide (front) 4 Thread take-up . • If... the needle is not correctly raised, the sewing machine can not be threaded. Turn off the machine. 1 Raise the presser foot lever. 2 Pull up the spool pin and put a spool of thread is in the correct combination. If...

Operation Manual
Page 19
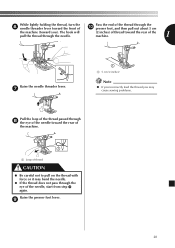
... threader to thread the needle (see next section). 1 1 Thread take-up lever Memo ● If the thread take-up lever is equipped with your sewing machine is lowered, the upper thread can easily be wrapped around the thread take-up lever. thread in your left as shown in the 6 following illustration... presser foot lever and the thread take-up lever before you feed the upper thread. ● If you incorrectly feed the thread you may cause sewing problems. 18 While holding the 1 • Make sure that the mark on the thread guide. • The thread can not be passed behind ...
... threader to thread the needle (see next section). 1 1 Thread take-up lever Memo ● If the thread take-up lever is equipped with your sewing machine is lowered, the upper thread can easily be wrapped around the thread take-up lever. thread in your left as shown in the 6 following illustration... presser foot lever and the thread take-up lever before you feed the upper thread. ● If you incorrectly feed the thread you may cause sewing problems. 18 While holding the 1 • Make sure that the mark on the thread guide. • The thread can not be passed behind ...

Operation Manual
Page 20
KNOWING YOUR SEWING MACHINE Using the needle threader (for models equipped with a 75/11 through the eye of the needle and grabs the thread....This feature is only available on certain models. CAUTION ● The needle threader can be used with a 65/9 home sewing machine needle. Lower the presser foot lever. 2 Make sure that the mark on the wheel 3 points up as shown in front of the... toward the back of the needle to make sure that the hook passes through 100/16 home sewing machine needle. Follow steps 1 to "Upper threading" on page 17 before using the needle threader.
KNOWING YOUR SEWING MACHINE Using the needle threader (for models equipped with a 75/11 through the eye of the needle and grabs the thread....This feature is only available on certain models. CAUTION ● The needle threader can be used with a 65/9 home sewing machine needle. Lower the presser foot lever. 2 Make sure that the mark on the wheel 3 points up as shown in front of the... toward the back of the needle to make sure that the hook passes through 100/16 home sewing machine needle. Follow steps 1 to "Upper threading" on page 17 before using the needle threader.
Operation Manual
Page 21
... the thread through the 0 presser foot, and then pull out about 5 cm the machine (toward the rear of the machine. 1 1 Loop of thread CAUTION ● Be careful not to pull on the thread with force or it may cause sewing problems. Pull the loop of the thread passed through the eye of the... needle toward you). Raise the presser foot lever. 9 20 The hook will pull the thread through the needle. (2 inches) of thread toward the rear of the machine. 1 Raise the needle threader lever...
... the thread through the 0 presser foot, and then pull out about 5 cm the machine (toward the rear of the machine. 1 1 Loop of thread CAUTION ● Be careful not to pull on the thread with force or it may cause sewing problems. Pull the loop of the thread passed through the eye of the... needle toward you). Raise the presser foot lever. 9 20 The hook will pull the thread through the needle. (2 inches) of thread toward the rear of the machine. 1 Raise the needle threader lever...

Operation Manual
Page 22
... up the lower thread by hand to lower and then raise the needle. ■ For models equipped with a quick-set bobbin You can begin sewing immediately without cutting it. Before you draw up the lower thread, put them toward you (counterclockwise) by hand so that some thread will be removed... the bobbin back in 3 the previous steps 1 to draw up the 2 lower thread. 1 2 1 • The bobbin cover should still be left over. KNOWING YOUR SEWING MACHINE Drawing up the lower thread While lightly holding the end of the upper 1 thread, slowly turn the handwheel toward the back of the...
... up the lower thread by hand to lower and then raise the needle. ■ For models equipped with a quick-set bobbin You can begin sewing immediately without cutting it. Before you draw up the lower thread, put them toward you (counterclockwise) by hand so that some thread will be removed... the bobbin back in 3 the previous steps 1 to draw up the 2 lower thread. 1 2 1 • The bobbin cover should still be left over. KNOWING YOUR SEWING MACHINE Drawing up the lower thread While lightly holding the end of the upper 1 thread, slowly turn the handwheel toward the back of the...
Operation Manual
Page 23
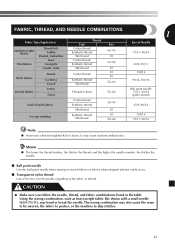
...such as heavyweight fabric like denim with a small needle (65/9-75/11), may cause machine malfunction. FABRIC, THREAD, AND NEEDLE COMBINATIONS 1 Fabric Type/Application Medium weight fabrics Thin ...The wrong combination may also cause the seam to be uneven, the fabric to pucker, or the machine to 100/16 needle, regardless of Needle 75/11-90/14 65/9-75/11 100/16 90/...higher the needle number, the thicker the needle. ■ Ball point needle Use the ball point needle when sewing on stretch fabrics or fabrics where skipped stitches easily occur. ■ Transparent nylon thread Use a 90/14 ...
...such as heavyweight fabric like denim with a small needle (65/9-75/11), may cause machine malfunction. FABRIC, THREAD, AND NEEDLE COMBINATIONS 1 Fabric Type/Application Medium weight fabrics Thin ...The wrong combination may also cause the seam to be uneven, the fabric to pucker, or the machine to 100/16 needle, regardless of Needle 75/11-90/14 65/9-75/11 100/16 90/...higher the needle number, the thicker the needle. ■ Ball point needle Use the ball point needle when sewing on stretch fabrics or fabrics where skipped stitches easily occur. ■ Transparent nylon thread Use a 90/14 ...
Operation Manual
Page 24
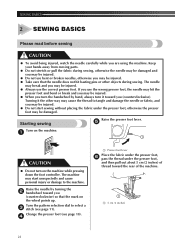
...your hands away from moving parts. ● Do not stretch or pull the fabric during sewing. Raise the needle by hand, always turn on the machine. 1 1 CAUTION ● Do not turn it the other objects during sewing, otherwise the needle may be damaged and you may be injured. ● Do not... the 2 handwheel toward you (counterclockwise) so that the mark on the wheel points up. The needle may break and you are using the machine. SEWING BASICS 2 SEWING BASICS Please read before sewing CAUTION ● To avoid being injured, watch the needle carefully while you may be damaged.
...your hands away from moving parts. ● Do not stretch or pull the fabric during sewing. Raise the needle by hand, always turn on the machine. 1 1 CAUTION ● Do not turn it the other objects during sewing, otherwise the needle may be damaged and you may be injured. ● Do not... the 2 handwheel toward you (counterclockwise) so that the mark on the wheel points up. The needle may break and you are using the machine. SEWING BASICS 2 SEWING BASICS Please read before sewing CAUTION ● To avoid being injured, watch the needle carefully while you may be damaged.


