Operation Manual
Page 3
... the back of the operation manual to inspect and adjust the machine yourself. Use accessories recommended by authorized Brother Service Center. • In the event a malfunction occurs or adjustment is required, first follow the troubleshooting table in injuries. 6 Special care is required when sewing: • Always pay close attention is necessary when the...
... the back of the operation manual to inspect and adjust the machine yourself. Use accessories recommended by authorized Brother Service Center. • In the event a malfunction occurs or adjustment is required, first follow the troubleshooting table in injuries. 6 Special care is required when sewing: • Always pay close attention is necessary when the...

Operation Manual
Page 5
... 34 5. APPENDIX 40 MAINTENANCE 40 Restrictions on oiling 40 Precautions on storing the machine 40 Cleaning 40 TROUBLESHOOTING 42 INDEX 45 4 KNOWING YOUR SEWING MACHINE 5 ACCESSORIES 5 Optional accessories 5 THE MAIN PARTS 6 Flat bed attachment 6 USING YOUR SEWING MACHINE 7 Connecting plugs 7 Main power and sewing light switch 8 Foot controller 8 Checking the needle 8 Replacing the needle 8 Changing the...
... 34 5. APPENDIX 40 MAINTENANCE 40 Restrictions on oiling 40 Precautions on storing the machine 40 Cleaning 40 TROUBLESHOOTING 42 INDEX 45 4 KNOWING YOUR SEWING MACHINE 5 ACCESSORIES 5 Optional accessories 5 THE MAIN PARTS 6 Flat bed attachment 6 USING YOUR SEWING MACHINE 7 Connecting plugs 7 Main power and sewing light switch 8 Foot controller 8 Checking the needle 8 Replacing the needle 8 Changing the...
Operation Manual
Page 6
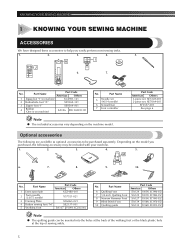
...: XE5328-001 2-piece set (90/14 needle) 6 Screwdriver 7 Foot controller Note ● The included accessories vary depending on the machine model. Depending on machine) SA156 SFB: XA5539-151 No. KNOWING YOUR SEWING MACHINE 1 KNOWING YOUR SEWING MACHINE ACCESSORIES We have designed these accessories to help you purchased, the following are available as optional accessories to be...
...: XE5328-001 2-piece set (90/14 needle) 6 Screwdriver 7 Foot controller Note ● The included accessories vary depending on the machine model. Depending on machine) SA156 SFB: XA5539-151 No. KNOWING YOUR SEWING MACHINE 1 KNOWING YOUR SEWING MACHINE ACCESSORIES We have designed these accessories to help you purchased, the following are available as optional accessories to be...
Operation Manual
Page 7
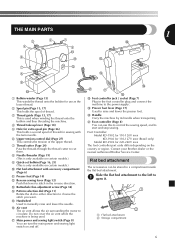
... the country or region. I Presser foot lever (Page 17) Used to raise and lower the presser foot. Contact your Brother dealer or the nearest authorized Brother Service Center. J Handle Carry the machine by its handle when transporting. I K G H H Foot controller jack / socket (Page 7) Plug in either direction... Used to circulate. Foot Controller: Model KD-1902 for 110-120V area KD-1902 for 110-127V area (Brazil only) Model KD-2902 for sewing with the twin needle. 6 Upper tension-control dial (Page 27) This controls the tension of thread. 3 Thread guide (Page 13, 17)...
... the country or region. I Presser foot lever (Page 17) Used to raise and lower the presser foot. Contact your Brother dealer or the nearest authorized Brother Service Center. J Handle Carry the machine by its handle when transporting. I K G H H Foot controller jack / socket (Page 7) Plug in either direction... Used to circulate. Foot Controller: Model KD-1902 for 110-120V area KD-1902 for 110-127V area (Brazil only) Model KD-2902 for sewing with the twin needle. 6 Upper tension-control dial (Page 27) This controls the tension of thread. 3 Thread guide (Page 13, 17)...
Operation Manual
Page 8
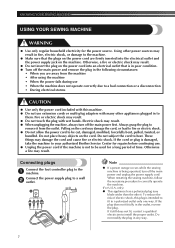
...; Do not allow the power cord to your authorized Brother Service Center for the power source. Pulling on the cord. If the cord or plug is damaged, take the machine to be used for a long period of electric shock, this machine. ● Do not use . ● Unplug ... still does not fit, contact a qualified electrician to be cut, damaged, modified, forcefully bent, pulled, twisted, or bundled. When restarting the sewing machine, follow the necessary procedure to heat. To reduce the risk of time. These things may result. Connecting plugs Connect the foot controller plug to...
...; Do not allow the power cord to your authorized Brother Service Center for the power source. Pulling on the cord. If the cord or plug is damaged, take the machine to be used for a long period of electric shock, this machine. ● Do not use . ● Unplug ... still does not fit, contact a qualified electrician to be cut, damaged, modified, forcefully bent, pulled, twisted, or bundled. When restarting the sewing machine, follow the necessary procedure to heat. To reduce the risk of time. These things may result. Connecting plugs Connect the foot controller plug to...

Operation Manual
Page 9
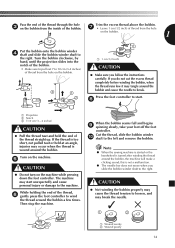
...break and cause injury. ● Never sew with product code 888-X64/X74/ X77/X87. Doing so could cause a fire or an electric shock. The product code is accidentally pressed and the machine starts sewing. ● Only use sewing machine needles for smooth sewing. 1 2 1 Turn on (toward... you change the needle. Turn off the machine. 1 Raise the needle by turning the 2 handwheel toward the 'I' mark) 2 Turn...
...break and cause injury. ● Never sew with product code 888-X64/X74/ X77/X87. Doing so could cause a fire or an electric shock. The product code is accidentally pressed and the machine starts sewing. ● Only use sewing machine needles for smooth sewing. 1 2 1 Turn on (toward... you change the needle. Turn off the machine. 1 Raise the needle by turning the 2 handwheel toward the 'I' mark) 2 Turn...
Operation Manual
Page 10
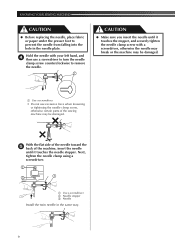
... needle clamp screw with your left hand, and 4 then use excessive force when loosening or tightening the needle clamp screw, otherwise certain parts of the sewing machine may be damaged. 1 Use a screwdriver • Do not use a screwdriver to turn the needle clamp screw counterclockwise to prevent the needle from falling into the...
... needle clamp screw with your left hand, and 4 then use excessive force when loosening or tightening the needle clamp screw, otherwise certain parts of the sewing machine may be damaged. 1 Use a screwdriver • Do not use a screwdriver to turn the needle clamp screw counterclockwise to prevent the needle from falling into the...
Operation Manual
Page 11
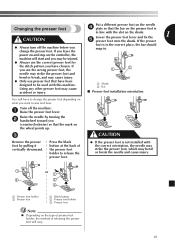
... presser foot is in the correct place, the bar should snap in line with this machine. Turn off the machine before you change the presser foot depending on the shank. Note ● Depending on the controller, the machine will vary. 10 Using any other presser foot may be used with the slot on... the back of releasing the presser foot will start and you want to be injured. ● Always use presser feet that have been designed to sew and how. Lower the presser foot lever and fix the 1 5 presser foot onto the shank. If the presser ● Always turn off the...
... presser foot is in the correct place, the bar should snap in line with this machine. Turn off the machine before you change the presser foot depending on the shank. Note ● Depending on the controller, the machine will vary. 10 Using any other presser foot may be used with the slot on... the back of releasing the presser foot will start and you want to be injured. ● Always use presser feet that have been designed to sew and how. Lower the presser foot lever and fix the 1 5 presser foot onto the shank. If the presser ● Always turn off the...

Operation Manual
Page 12
... the mark on certain models. To choose a stitch, simply turn the pattern selection dial, the needle, presser foot or fabric may be damaged. KNOWING YOUR SEWING MACHINE THE CONTROLS Pattern selection dial CAUTION ● When you use the pattern selection dial to choose a pattern, raise the needle by turning the handwheel toward...
... the mark on certain models. To choose a stitch, simply turn the pattern selection dial, the needle, presser foot or fabric may be damaged. KNOWING YOUR SEWING MACHINE THE CONTROLS Pattern selection dial CAUTION ● When you use the pattern selection dial to choose a pattern, raise the needle by turning the handwheel toward...
Operation Manual
Page 13
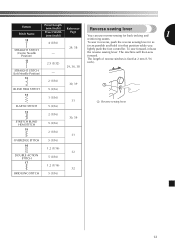
... machine will then sew forward. 11 2.5 (3/32) The length of reverse stitches is fixed at 2 mm (1/16 inch). 29, 36, 38 STRAIGHT STITCH (Left Needle Position) - 12 2 (1/16) 30, 39 1 BLIND HEM STITCH 5 (3/16) 13 1 (1/16) 31 ELASTIC STITCH 5 (3/16) 1 Reverse sewing ... (3/16) 1.2 (1/16) 5 (3/16) 1.2 (1/16) 5 (3/16) 30, 39 31 32 32 12 Pattern Preset Length (mm (inch)) Reference Reverse sewing lever Stitch Name Preset Width (mm (inch)) Page You can use reverse sewing for back tacking and 1 10 STRAIGHT STITCH (Center Needle Position) 4 (3/16) - 29, 38 reinforcing seams. To...
... machine will then sew forward. 11 2.5 (3/32) The length of reverse stitches is fixed at 2 mm (1/16 inch). 29, 36, 38 STRAIGHT STITCH (Left Needle Position) - 12 2 (1/16) 30, 39 1 BLIND HEM STITCH 5 (3/16) 13 1 (1/16) 31 ELASTIC STITCH 5 (3/16) 1 Reverse sewing ... (3/16) 1.2 (1/16) 5 (3/16) 1.2 (1/16) 5 (3/16) 30, 39 31 32 32 12 Pattern Preset Length (mm (inch)) Reference Reverse sewing lever Stitch Name Preset Width (mm (inch)) Page You can use reverse sewing for back tacking and 1 10 STRAIGHT STITCH (Center Needle Position) 4 (3/16) - 29, 38 reinforcing seams. To...

Operation Manual
Page 14
...Bobbin While holding the thread from other bobbins may tangle on the thread guide. KNOWING YOUR SEWING MACHINE THREADING THE MACHINE Winding the bobbin CAUTION ● We designed the bobbin that comes with this machine. Then, pass the thread around the pre-tension disk and pull the thread in completely.... code: SA156, SFB: XA5539-151). Using other models, the machine will not work properly. SA156 is set incorrectly, the thread may cause damage to the machine. Only use bobbins from the spool 2 with this machine or bobbins of thread is in the groove on the spool pin...
...Bobbin While holding the thread from other bobbins may tangle on the thread guide. KNOWING YOUR SEWING MACHINE THREADING THE MACHINE Winding the bobbin CAUTION ● We designed the bobbin that comes with this machine. Then, pass the thread around the pre-tension disk and pull the thread in completely.... code: SA156, SFB: XA5539-151). Using other models, the machine will not work properly. SA156 is set incorrectly, the thread may cause damage to the machine. Only use bobbins from the spool 2 with this machine or bobbins of thread is in the groove on the spool pin...
Operation Manual
Page 15
...thread from the hole on the bobbin. 3 1 2 1 1 1 cm (1/2 inch) CAUTION ● Make sure you follow the instructions carefully. Note ● When the sewing machine is started or the handwheel is not a malfunction. ● The needle bar does not move when you do not cut the excess thread completely before...0 shaft to the right. this is turned after winding the thread around the bobbin. If the thread is wound around the bobbin, the machine will make a clicking sound; CAUTION ● Not winding the bobbin properly may cause the thread tension to loosen, and may occur when ...
...thread from the hole on the bobbin. 3 1 2 1 1 1 cm (1/2 inch) CAUTION ● Make sure you follow the instructions carefully. Note ● When the sewing machine is started or the handwheel is not a malfunction. ● The needle bar does not move when you do not cut the excess thread completely before...0 shaft to the right. this is turned after winding the thread around the bobbin. If the thread is wound around the bobbin, the machine will make a clicking sound; CAUTION ● Not winding the bobbin properly may cause the thread tension to loosen, and may occur when ...
Operation Manual
Page 16
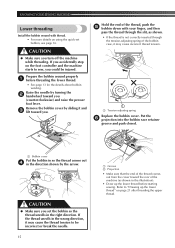
... it and 3 lift toward you set bobbin, see page 16. If you accidentally step on the foot controller and the machine starts to sew, you turn off the machine while threading. Put the 6 projection into the bobbin race retainer groove and push closed. 1 Bobbin cover Put the bobbin ... cover. Raise the needle by the arrow. If the thread unrolls in the right direction. Prepare the bobbin wound properly 1 before starting sewing. KNOWING YOUR SEWING MACHINE Lower threading Install the bobbin wound with your finger, and then pass the thread through the slit, as shown. • If the...
... it and 3 lift toward you set bobbin, see page 16. If you accidentally step on the foot controller and the machine starts to sew, you turn off the machine while threading. Put the 6 projection into the bobbin race retainer groove and push closed. 1 Bobbin cover Put the bobbin ... cover. Raise the needle by the arrow. If the thread unrolls in the right direction. Prepare the bobbin wound properly 1 before starting sewing. KNOWING YOUR SEWING MACHINE Lower threading Install the bobbin wound with your finger, and then pass the thread through the slit, as shown. • If the...
Operation Manual
Page 18
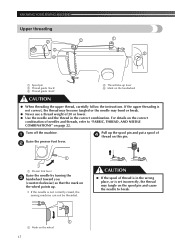
Turn off the machine. 1 Raise the presser foot lever. 2 Pull up the spool pin and put a spool of 4 thread on this pin. 1 1 Presser foot lever Raise the needle by ..., THREAD, AND NEEDLE COMBINATIONS" on the correct combination of 20 or lower. ● Use the needle and the thread in the correct combination. KNOWING YOUR SEWING MACHINE Upper threading 2 2 3 4 1 5 1 Spool pin 2 Thread guide (back) 3 Thread guide (front) 4 Thread take-up . • If the needle is not correctly raised, the...
Turn off the machine. 1 Raise the presser foot lever. 2 Pull up the spool pin and put a spool of 4 thread on this pin. 1 1 Presser foot lever Raise the needle by ..., THREAD, AND NEEDLE COMBINATIONS" on the correct combination of 20 or lower. ● Use the needle and the thread in the correct combination. KNOWING YOUR SEWING MACHINE Upper threading 2 2 3 4 1 5 1 Spool pin 2 Thread guide (back) 3 Thread guide (front) 4 Thread take-up . • If the needle is not correctly raised, the...

Operation Manual
Page 19
... needle by holding the 1 • Make sure that the spring in the following illustration. 1 Thread the needle from the spool 5 with your sewing machine is lowered, the upper thread can easily be wrapped around the thread take-up lever. While holding the thread from front to thread the needle...). • If your right hand, pass the thread Put the thread behind the needle bar thread guide by turning the handwheel toward you may cause sewing problems. 18 toward you (counterclockwise) so that the mark on the wheel points up. 1 1 5 cm (2 inches) Note ● Make sure you raise...
... needle by holding the 1 • Make sure that the spring in the following illustration. 1 Thread the needle from the spool 5 with your sewing machine is lowered, the upper thread can easily be wrapped around the thread take-up lever. While holding the thread from front to thread the needle...). • If your right hand, pass the thread Put the thread behind the needle bar thread guide by turning the handwheel toward you may cause sewing problems. 18 toward you (counterclockwise) so that the mark on the wheel points up. 1 1 5 cm (2 inches) Note ● Make sure you raise...

Operation Manual
Page 20
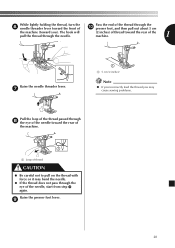
..., refer to make sure that the hook grabs it. 19 Lower the presser foot lever. 2 Make sure that the hook passes through 100/16 home sewing machine needle. Make sure that the mark on the wheel 3 points up as shown in front of 130/120 or thicker cannot be used with the... needle threader. ● The needle threader cannot be used with a 65/9 home sewing machine needle. CAUTION ● The needle threader can be used with a 75/11 through the eye of the needle and grabs the thread. 1 Mark on the...
..., refer to make sure that the hook grabs it. 19 Lower the presser foot lever. 2 Make sure that the hook passes through 100/16 home sewing machine needle. Make sure that the mark on the wheel 3 points up as shown in front of 130/120 or thicker cannot be used with the... needle threader. ● The needle threader cannot be used with a 65/9 home sewing machine needle. CAUTION ● The needle threader can be used with a 75/11 through the eye of the needle and grabs the thread. 1 Mark on the...
Operation Manual
Page 21
While lightly holding the thread, turn the 6 needle threader lever toward you may cause sewing problems. Pull the loop of the thread passed through 8 the eye of the needle toward the rear of the machine. 1 1 Loop of thread CAUTION ● Be careful not to pull on the thread with force or... needle. ● If the thread does not pass through the eye of the thread through the needle. (2 inches) of thread toward the rear of the machine. 1 Raise the needle threader lever. 7 1 1 5 cm (2 inches) Note ● If you incorrectly feed the thread you ). The hook will pull the thread through the...
While lightly holding the thread, turn the 6 needle threader lever toward you may cause sewing problems. Pull the loop of the thread passed through 8 the eye of the needle toward the rear of the machine. 1 1 Loop of thread CAUTION ● Be careful not to pull on the thread with force or... needle. ● If the thread does not pass through the eye of the thread through the needle. (2 inches) of thread toward the rear of the machine. 1 Raise the needle threader lever. 7 1 1 5 cm (2 inches) Note ● If you incorrectly feed the thread you ). The hook will pull the thread through the...

Operation Manual
Page 22
Remove the bobbin cover, and then 1 reinstall the bobbin. Pass the thread along the slit in the 2 direction of the machine under the presser foot. 1 2 1 Upper thread 2 Lower thread 21 Replace the bobbin cover. 4 2 1 Upper thread 2 Lower thread Pull out about 10 cm (4...needle. ■ For models equipped with a quick-set bobbin You can begin sewing immediately without cutting it. When sewing gathers or darts, you (counterclockwise) by hand so that some thread will be removed. KNOWING YOUR SEWING MACHINE Drawing up the lower thread While lightly holding the end of the upper 1 ...
Remove the bobbin cover, and then 1 reinstall the bobbin. Pass the thread along the slit in the 2 direction of the machine under the presser foot. 1 2 1 Upper thread 2 Lower thread 21 Replace the bobbin cover. 4 2 1 Upper thread 2 Lower thread Pull out about 10 cm (4...needle. ■ For models equipped with a quick-set bobbin You can begin sewing immediately without cutting it. When sewing gathers or darts, you (counterclockwise) by hand so that some thread will be removed. KNOWING YOUR SEWING MACHINE Drawing up the lower thread While lightly holding the end of the upper 1 ...
Operation Manual
Page 23
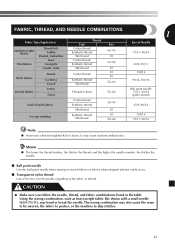
and the higher the needle number, the thicker the needle. ■ Ball point needle Use the ball point needle when sewing on stretch fabrics or fabrics where skipped stitches easily occur. ■ Transparent nylon thread Use a 90/14 to skip stitches. 22 It may also ...Note ● Never use a thread weighted #20 or lower. Memo ● The lower the thread number, the thicker the thread; The wrong combination may cause machine malfunction. Using the wrong combination, such as heavyweight fabric like denim with a small needle (65/9-75/11), may bend or break the needle. FABRIC, THREAD...
and the higher the needle number, the thicker the needle. ■ Ball point needle Use the ball point needle when sewing on stretch fabrics or fabrics where skipped stitches easily occur. ■ Transparent nylon thread Use a 90/14 to skip stitches. 22 It may also ...Note ● Never use a thread weighted #20 or lower. Memo ● The lower the thread number, the thicker the thread; The wrong combination may cause machine malfunction. Using the wrong combination, such as heavyweight fabric like denim with a small needle (65/9-75/11), may bend or break the needle. FABRIC, THREAD...
Operation Manual
Page 24
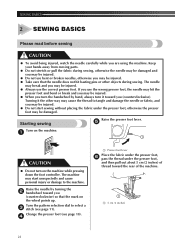
...then pull out about 5 cm (2 inches) of the machine. 1 1 5 cm (2 inches) 23 Turn the pattern selection dial to the machine. If you may be injured. ● When you are using the machine. SEWING BASICS 2 SEWING BASICS Please read before sewing CAUTION ● To avoid being injured, watch the needle ...carefully while you turn on the wheel points up. Starting sewing Raise the presser foot lever. 5 Turn on the machine. 1 1 CAUTION ● Do not turn the handwheel by turning the 2 handwheel toward the rear of thread ...
...then pull out about 5 cm (2 inches) of the machine. 1 1 5 cm (2 inches) 23 Turn the pattern selection dial to the machine. If you may be injured. ● When you are using the machine. SEWING BASICS 2 SEWING BASICS Please read before sewing CAUTION ● To avoid being injured, watch the needle ...carefully while you turn on the wheel points up. Starting sewing Raise the presser foot lever. 5 Turn on the machine. 1 1 CAUTION ● Do not turn the handwheel by turning the 2 handwheel toward the rear of thread ...


