Users Manual - English and Spanish
Page 4
... CONTROLS 9 Pattern selection dial 9 Patterns and stitch names 9 Reverse sewing lever 10 THREADING THE MACHINE 11 Winding the bobbin 11 Lower threading 13 Lower threading (for the plug supplied with a quick-set bobbin 14 Upper threading 15 Drawing up the lower thread 17 FABRIC, THREAD, AND NEEDLE COMBINATIONS 18 2. FOR USERS IN...
... CONTROLS 9 Pattern selection dial 9 Patterns and stitch names 9 Reverse sewing lever 10 THREADING THE MACHINE 11 Winding the bobbin 11 Lower threading 13 Lower threading (for the plug supplied with a quick-set bobbin 14 Upper threading 15 Drawing up the lower thread 17 FABRIC, THREAD, AND NEEDLE COMBINATIONS 18 2. FOR USERS IN...
Users Manual - English and Spanish
Page 5
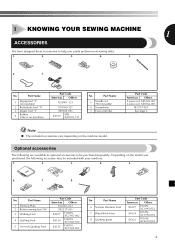
No. Part Name 1 Zigzag foot "J" (on machine) 2 Buttonhole foot "A" 3 Zipper foot "I" 4 Bobbin (One is on the machine model. 1 KNOWING YOUR SEWING MACHINE 1 ACCESSORIES We have designed these accessories to help you purchased, the following are available as ...
No. Part Name 1 Zigzag foot "J" (on machine) 2 Buttonhole foot "A" 3 Zipper foot "I" 4 Bobbin (One is on the machine model. 1 KNOWING YOUR SEWING MACHINE 1 ACCESSORIES We have designed these accessories to help you purchased, the following are available as ...
Users Manual - English and Spanish
Page 6
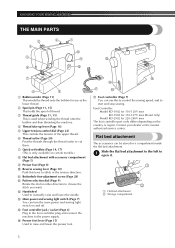
... pin (Page 11, 15) This holds the spool of thread. 3 Thread guide (Page 11, 15) This is used when winding the thread onto the bobbin and then threading the machine. 4 Thread take-up lever (Page 16) 5 Upper tension-control dial (Page 22) This controls the tension of the upper thread.... 6 Thread cutter (Page 20) Pass the threads through the thread cutter to cut them. 7 Quick-set bobbin (Page 14, 17) (This is only available on certain models.) 8 Flat bed attachment with accessory compartment (Page 5) 9 Presser foot (Page 8) 0 Reverse sewing lever ...
... pin (Page 11, 15) This holds the spool of thread. 3 Thread guide (Page 11, 15) This is used when winding the thread onto the bobbin and then threading the machine. 4 Thread take-up lever (Page 16) 5 Upper tension-control dial (Page 22) This controls the tension of the upper thread.... 6 Thread cutter (Page 20) Pass the threads through the thread cutter to cut them. 7 Quick-set bobbin (Page 14, 17) (This is only available on certain models.) 8 Flat bed attachment with accessory compartment (Page 5) 9 Presser foot (Page 8) 0 Reverse sewing lever ...
Users Manual - English and Spanish
Page 8
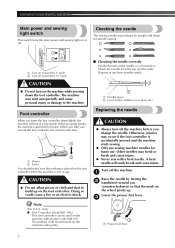
... cause a fire or an electric shock. Check the needle from the top and the sides. Dispose of any bent needles safely. 1 2 1 Parallel space 2 Level surface (bobbin cover, glass, etc.) Replacing the needle CAUTION ● Always turn on the machine while pressing down lightly, the machine will stop. 1 2 1 Slower 2 Faster You should...
... cause a fire or an electric shock. Check the needle from the top and the sides. Dispose of any bent needles safely. 1 2 1 Parallel space 2 Level surface (bobbin cover, glass, etc.) Replacing the needle CAUTION ● Always turn on the machine while pressing down lightly, the machine will stop. 1 2 1 Slower 2 Faster You should...
Users Manual - English and Spanish
Page 12
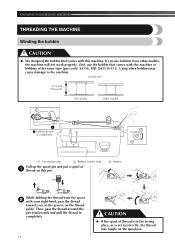
... thread guide. Actual size 11.5 mm (7/16 inch) This model Other models 1 1 Pull the thread in completely. 2 3 1 Pre-tension disk 2 Bobbin winder shaft Pull up the spool pin and put a spool of thread is set incorrectly, the thread may cause damage to the machine. Then, pass ...code: SA156, SFB: XA5539-151). Using other models, the machine will not work properly. KNOWING YOUR SEWING MACHINE THREADING THE MACHINE Winding the bobbin CAUTION ● We designed the bobbin that comes with this machine. If you , in the wrong place, or is in the groove on the spool pin.
... thread guide. Actual size 11.5 mm (7/16 inch) This model Other models 1 1 Pull the thread in completely. 2 3 1 Pre-tension disk 2 Bobbin winder shaft Pull up the spool pin and put a spool of thread is set incorrectly, the thread may cause damage to the machine. Then, pass ...code: SA156, SFB: XA5539-151). Using other models, the machine will not work properly. KNOWING YOUR SEWING MACHINE THREADING THE MACHINE Winding the bobbin CAUTION ● We designed the bobbin that comes with this machine. If you , in the wrong place, or is in the groove on the spool pin.
Users Manual - English and Spanish
Page 13
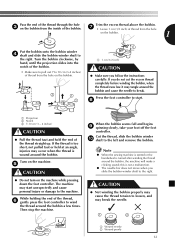
... ● Pull the thread taut and hold the end of thread from the hole on the bobbin. 1 Put the bobbin onto the bobbin winder 4 shaft and slide the bobbin winder shaft to wind the thread around the bobbin, the machine will make a clicking sound; While holding the end of the thread, 6 gently... press the foot controller to the right. Cut the thread, slide the bobbin winder 0 shaft to the right. Press the foot controller to start unexpectedly and cause personal injury or damage to the machine. The machine may ...
... ● Pull the thread taut and hold the end of thread from the hole on the bobbin. 1 Put the bobbin onto the bobbin winder 4 shaft and slide the bobbin winder shaft to wind the thread around the bobbin, the machine will make a clicking sound; While holding the end of the thread, 6 gently... press the foot controller to the right. Cut the thread, slide the bobbin winder 0 shaft to the right. Press the foot controller to start unexpectedly and cause personal injury or damage to the machine. The machine may ...
Users Manual - English and Spanish
Page 14
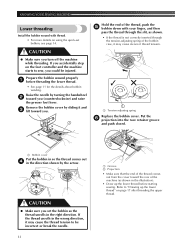
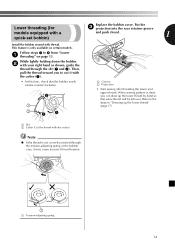
... the thread unrolls in the right direction. If you accidentally step on page 17 after threading the upper thread. Prepare the bobbin wound properly 1 before starting sewing. Remove the bobbin cover by turning the handwheel 2 toward the rear of the machine (as shown. • If the thread is not ... the slit, as shown in the direction shown by the arrow. Put the 6 projection into the race retainer groove and push closed. 1 Bobbin cover Put the bobbin in so the thread comes out 4 in the illustration). • Draw up the lower thread" on the foot controller and the machine starts...
... the thread unrolls in the right direction. If you accidentally step on page 17 after threading the upper thread. Prepare the bobbin wound properly 1 before starting sewing. Remove the bobbin cover by turning the handwheel 2 toward the rear of the machine (as shown. • If the thread is not ... the slit, as shown in the direction shown by the arrow. Put the 6 projection into the race retainer groove and push closed. 1 Bobbin cover Put the bobbin in so the thread comes out 4 in the illustration). • Draw up the lower thread" on the foot controller and the machine starts...
Users Manual - English and Spanish
Page 15
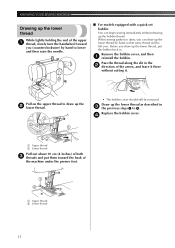
... after threading the lower and upper thread. Put the 3 projection into the race retainer groove and push closed. 1 Install the bobbin wound with a quick-set bobbin) Replace the bobbin cover. This feature is not correctly inserted through the slit (1 and 2). Follow steps 1 to cut it with your right hand... 1 Slit 2 Cutter (Cut the thread with the cutter.) Note ● If the thread is only available on page 13. While lightly holding down the bobbin 2 with the cutter (3). • At this time, check that some thread will be left over. When sewing gathers or darts, you to 4 from ...
... after threading the lower and upper thread. Put the 3 projection into the race retainer groove and push closed. 1 Install the bobbin wound with a quick-set bobbin) Replace the bobbin cover. This feature is not correctly inserted through the slit (1 and 2). Follow steps 1 to cut it with your right hand... 1 Slit 2 Cutter (Cut the thread with the cutter.) Note ● If the thread is only available on page 13. While lightly holding down the bobbin 2 with the cutter (3). • At this time, check that some thread will be left over. When sewing gathers or darts, you to 4 from ...
Users Manual - English and Spanish
Page 18
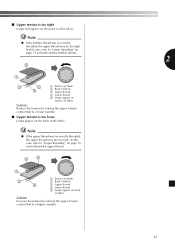
...by hand to lower and then raise the needle. ■ For models equipped with a quick-set bobbin You can begin sewing immediately without cutting it there without drawing up the bobbin thread. Replace the bobbin cover. 4 2 1 Upper thread 2 Lower thread Pull out about 10 cm (4 inches) of... both 3 threads and put the bobbin back in. Remove the bobbin cover, and then 1 reinstall the bobbin. Pass the thread along the slit in...
...by hand to lower and then raise the needle. ■ For models equipped with a quick-set bobbin You can begin sewing immediately without cutting it there without drawing up the bobbin thread. Replace the bobbin cover. 4 2 1 Upper thread 2 Lower thread Pull out about 10 cm (4 inches) of... both 3 threads and put the bobbin back in. Remove the bobbin cover, and then 1 reinstall the bobbin. Pass the thread along the slit in...
Users Manual - English and Spanish
Page 23
In this case, refer to "Lower threading" on page 13 and rethread the bobbin thread. 2 2 1 3 5 4 1 Surface of fabric 2 Back of fabric 3 Upper thread 4 Lower thread 5 Loops appear on surface of fabric Solution Reduce the tension by turning the upper ... tension control dial to a higher number. 22 ■ Upper tension is too loose Loops appear on the back of the fabric. Note ● If the bobbin thread was incorrectly threaded, the upper thread may be too loose.
In this case, refer to "Lower threading" on page 13 and rethread the bobbin thread. 2 2 1 3 5 4 1 Surface of fabric 2 Back of fabric 3 Upper thread 4 Lower thread 5 Loops appear on surface of fabric Solution Reduce the tension by turning the upper ... tension control dial to a higher number. 22 ■ Upper tension is too loose Loops appear on the back of the fabric. Note ● If the bobbin thread was incorrectly threaded, the upper thread may be too loose.
Users Manual - English and Spanish
Page 32
If it with the desired width. Put a button between the 1 buttonholes and set the pattern selection dial to the Zigzag Stitch with the bobbin thread. Pull the upper thread at the beginning of the stitching. X Use scissors to the button sewing foot 3 "M". The machine may be injured. Place the... darning plate on the machine while pressing down the foot controller. Turn off the machine. 2 Change the foot to cut the upper thread and the bobbin thread at the end of the fabric, and then tie it hits, see step 1. Turn on the machine. 5 CAUTION ● Do not turn on ...
If it with the desired width. Put a button between the 1 buttonholes and set the pattern selection dial to the Zigzag Stitch with the bobbin thread. Pull the upper thread at the beginning of the stitching. X Use scissors to the button sewing foot 3 "M". The machine may be injured. Place the... darning plate on the machine while pressing down the foot controller. Turn off the machine. 2 Change the foot to cut the upper thread and the bobbin thread at the end of the fabric, and then tie it hits, see step 1. Turn on the machine. 5 CAUTION ● Do not turn on ...
Users Manual - English and Spanish
Page 35
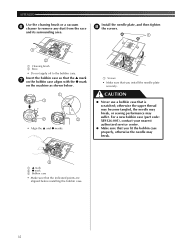
... the needle plate as difficulty turning the handwheel or an unusual noise, immediately stop using it may reduce its efficiency. 1 Use the screwdriver Grasp the bobbin case, and then lift it . 1 Raise the needle and the presser foot. 2 Loosen the presser foot screw and the 3 needle clamp screw to remove the...
... the needle plate as difficulty turning the handwheel or an unusual noise, immediately stop using it may reduce its efficiency. 1 Use the screwdriver Grasp the bobbin case, and then lift it . 1 Raise the needle and the presser foot. 2 Loosen the presser foot screw and the 3 needle clamp screw to remove the...
Users Manual - English and Spanish
Page 36
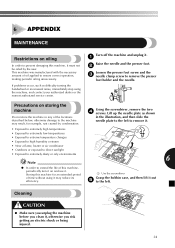
... to remove any dust from the race and its surrounding area. For a new bobbin case (part code: XE9326-001), contact your nearest authorized service center. ● Make sure that you fit the bobbin case properly, otherwise the needle may suffer. APPENDIX Use the cleaning brush or a... vacuum 6 cleaner to the bobbin case. Insert the bobbin case so that the ▲ mark 7 on the bobbin case aligns with the ● mark on the machine as shown below. 1 1 2 2 • Align the ▲ and ● ...
... to remove any dust from the race and its surrounding area. For a new bobbin case (part code: XE9326-001), contact your nearest authorized service center. ● Make sure that you fit the bobbin case properly, otherwise the needle may suffer. APPENDIX Use the cleaning brush or a... vacuum 6 cleaner to the bobbin case. Insert the bobbin case so that the ▲ mark 7 on the bobbin case aligns with the ● mark on the machine as shown below. 1 1 2 2 • Align the ▲ and ● ...
Users Manual - English and Spanish
Page 37
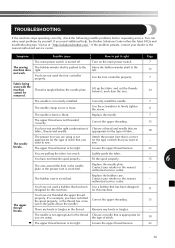
... Choose a needle that you need additional help, the Brother Solutions Center offers the latest FAQs and troubleshooting tips. You have not fitted the spool properly. Contact your retailer or the nearest authorized service center. - Turn on the main power switch. 7 The sewing The bobbin-winder shaft is scratched. You can solve most...
... Choose a needle that you need additional help, the Brother Solutions Center offers the latest FAQs and troubleshooting tips. You have not fitted the spool properly. Contact your retailer or the nearest authorized service center. - Turn on the main power switch. 7 The sewing The bobbin-winder shaft is scratched. You can solve most...
Users Manual - English and Spanish
Page 38
.... You have not attached the presser foot holder properly. You have not threaded the upper thread properly or fitted the bobbin properly. Contact your retailer or the nearest authorized service center. The fabric is incorrectly installed. The needle is wrinkled. You have not... right combination of stitch that has been designed for this machine. You have not wound the bobbin thread properly. Contact your retailer or the nearest authorized service center. Use a bobbin that has been designed for the type of stitch that are appropriate for this machine. Choose ...
.... You have not attached the presser foot holder properly. You have not threaded the upper thread properly or fitted the bobbin properly. Contact your retailer or the nearest authorized service center. The fabric is incorrectly installed. The needle is wrinkled. You have not... right combination of stitch that has been designed for this machine. You have not wound the bobbin thread properly. Contact your retailer or the nearest authorized service center. Use a bobbin that has been designed for the type of stitch that are appropriate for this machine. Choose ...

Users Manual - English and Spanish
Page 39
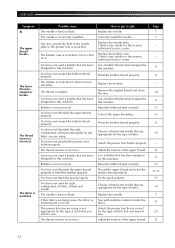
... used the right combination of stitch. You have not threaded the upper thread properly. Dust has accumulated under the needle plate or in the bobbin case, clean the bobbin case. Choose a thread and needle that are appropriate for the type of fabric, thread and needle. Page 15 18 7 7 34 - 21 34 ...- 18 34 29 6 38 You have not used the right combination of fabric. Remove the needle plate and clean the plate and the bobbin case. Adjust the tension of stitch that is tangled in the race. The darning plate is not appropriate for the type of fabric, thread and...
... used the right combination of stitch. You have not threaded the upper thread properly. Dust has accumulated under the needle plate or in the bobbin case, clean the bobbin case. Choose a thread and needle that are appropriate for the type of fabric, thread and needle. Page 15 18 7 7 34 - 21 34 ...- 18 34 29 6 38 You have not used the right combination of fabric. Remove the needle plate and clean the plate and the bobbin case. Adjust the tension of stitch that is tangled in the race. The darning plate is not appropriate for the type of fabric, thread and...
Users Manual - English and Spanish
Page 40
...18 Flat bed attachment 5 Foot controller 7 Free-arm style 21 G Gathering 30 H Handwheel 15 L Light switch 7 , Lower threading 13 quick-set bobbin 14 17 M Main parts 5 Main power 7 Maintenance 34 N Needle checking 7 combinations with fabric and thread ......... 18 replacing 7 O Overedge stitching ...25 P Pattern selection dial 9 Patterns 9 Presser foot changing 8 , Q Quick-set bobbin 14 17 39 R Race cleaning 34 Reverse sewing lever 10 , S Spool pin 11 15 Stitches built-in 23 names 9 Straight stitching 23 ...
...18 Flat bed attachment 5 Foot controller 7 Free-arm style 21 G Gathering 30 H Handwheel 15 L Light switch 7 , Lower threading 13 quick-set bobbin 14 17 M Main parts 5 Main power 7 Maintenance 34 N Needle checking 7 combinations with fabric and thread ......... 18 replacing 7 O Overedge stitching ...25 P Pattern selection dial 9 Patterns 9 Presser foot changing 8 , Q Quick-set bobbin 14 17 39 R Race cleaning 34 Reverse sewing lever 10 , S Spool pin 11 15 Stitches built-in 23 names 9 Straight stitching 23 ...


