Users Manual - English
Page 7
...HL-2150N / HL-2170W only) ...110 Print bar codes or expanded characters 110 B Appendix (for choosing your safety ...120 EC Declaration of Conformity ...121 vi Toner cartridge ...61 Drum unit ...68 Cleaning ...73 Cleaning the outside of the printer...73 Cleaning the inside of the printer...74 Cleaning the corona wire...77 6 Troubleshooting... Brother numbers ...117 Important information: regulations ...118 Radio interference (220 to 240 volt model only 118 International ENERGY STAR® Compliance Statement 118 IEC 60825-1 specification (220 to 240 volt model only 118 Internal laser ...
...HL-2150N / HL-2170W only) ...110 Print bar codes or expanded characters 110 B Appendix (for choosing your safety ...120 EC Declaration of Conformity ...121 vi Toner cartridge ...61 Drum unit ...68 Cleaning ...73 Cleaning the outside of the printer...73 Cleaning the inside of the printer...74 Cleaning the corona wire...77 6 Troubleshooting... Brother numbers ...117 Important information: regulations ...118 Radio interference (220 to 240 volt model only 118 International ENERGY STAR® Compliance Statement 118 IEC 60825-1 specification (220 to 240 volt model only 118 Internal laser ...
Users Manual - English
Page 87
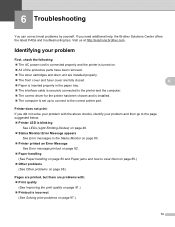
Visit us at http://solutions.brother.com. Identifying your problem and then go to the page suggested below. „ Printer LED is incorrect (See Solving print problems on page 83 and Paper jams and how to the correct printer port. If you did not solve your ...80. „ Printer printed an Error Message See Error message printout on page 82. „ Paper handling (See Paper handling on page 97.) 6 6 6 6 6 79 Printer does not print: If you need additional help, the Brother Solutions Center offers the latest FAQs and troubleshooting tips. 6 Troubleshooting 6 You can correct...
Visit us at http://solutions.brother.com. Identifying your problem and then go to the page suggested below. „ Printer LED is incorrect (See Solving print problems on page 83 and Paper jams and how to the correct printer port. If you did not solve your ...80. „ Printer printed an Error Message See Error message printout on page 82. „ Paper handling (See Paper handling on page 97.) 6 6 6 6 6 79 Printer does not print: If you need additional help, the Brother Solutions Center offers the latest FAQs and troubleshooting tips. 6 Troubleshooting 6 You can correct...
Users Manual - English
Page 88
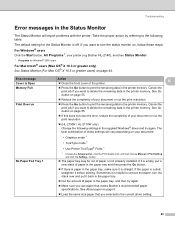
...it is empty, put it before printing. Error message Cover is curled, straighten it back in the paper tray. „ Cut the amount of your printer (e.g Brother HL-2140), and then Status Monitor. 1 Programs for the Status Monitor is helpful to turn the stack over and put a new stack of these steps: For...For Mac OS® X 10.3 or greater users) on page 55. „ Reduce the complexity of paper in Print Setting and click the Setting... Troubleshooting Error messages in the supplied Windows® driver and try again. „ Make sure you use paper that you selected in the...
...it is empty, put it before printing. Error message Cover is curled, straighten it back in the paper tray. „ Cut the amount of your printer (e.g Brother HL-2140), and then Status Monitor. 1 Programs for the Status Monitor is helpful to turn the stack over and put a new stack of these steps: For...For Mac OS® X 10.3 or greater users) on page 55. „ Reduce the complexity of paper in Print Setting and click the Setting... Troubleshooting Error messages in the supplied Windows® driver and try again. „ Make sure you use paper that you selected in the...
Users Manual - English
Page 89
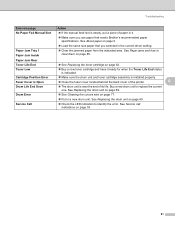
Troubleshooting Error message No Paper Fed Manual Slot Action „ If the manual feed slot is ... sure the drum unit and toner cartridge assembly is installed properly. „ Close the fuser cover located behind the back cover of the printer. 6 „ The drum unit is empty, put a piece of its life. See About paper on page 77. Service Call &#...new drum unit. Paper Jam Tray 1 Paper Jam Inside „ Load the same size paper that meets Brother's recommended paper specifications. See Replacing the drum unit on page 53. 81 See Paper jams and how to replace the current one.
Troubleshooting Error message No Paper Fed Manual Slot Action „ If the manual feed slot is ... sure the drum unit and toner cartridge assembly is installed properly. „ Close the fuser cover located behind the back cover of the printer. 6 „ The drum unit is empty, put a piece of its life. See About paper on page 77. Service Call &#...new drum unit. Paper Jam Tray 1 Paper Jam Inside „ Load the same size paper that meets Brother's recommended paper specifications. See Replacing the drum unit on page 53. 81 See Paper jams and how to replace the current one.
Users Manual - English
Page 90
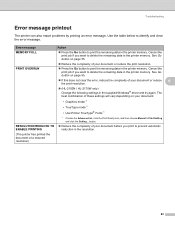
... your document or reduce the print resolution. „ Press the Go button to delete the remaining data in the resolution. (The printer has printed the document at a reduced resolution) 82 Cancel the print job if you print to identify and clear the error message....these settings will vary depending on your document or reduce 6 the print resolution. „ (HL-2150N / HL-2170W only) Change the following settings in the printer memory. Troubleshooting Error message printout 6 The printer can also report problems by printing an error message. Use the table below to prevent automatic...
... your document or reduce the print resolution. „ Press the Go button to delete the remaining data in the resolution. (The printer has printed the document at a reduced resolution) 82 Cancel the print job if you print to identify and clear the error message....these settings will vary depending on your document or reduce 6 the print resolution. „ (HL-2150N / HL-2170W only) Change the following settings in the printer memory. Troubleshooting Error message printout 6 The printer can also report problems by printing an error message. Use the table below to prevent automatic...
Users Manual - English
Page 91
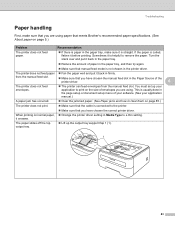
...„ Make sure that manual feed mode is not chosen in the printer driver. When printing on normal paper, „ Change the printer driver setting in Media Type to print on the size of envelopes you are using . Troubleshooting Paper handling 6 First, make sure it is curled, flatten it before...paper. This is usually done in the paper tray, make sure that you are using paper that meets Brother's recommended paper specifications. (See About paper on page 5.) Problem Recommendation The printer does not feed paper. „ If there is paper in the page setup or document setup menu...
...„ Make sure that manual feed mode is not chosen in the printer driver. When printing on normal paper, „ Change the printer driver setting in Media Type to print on the size of envelopes you are using . Troubleshooting Paper handling 6 First, make sure it is curled, flatten it before...paper. This is usually done in the paper tray, make sure that you are using paper that meets Brother's recommended paper specifications. (See About paper on page 5.) Problem Recommendation The printer does not feed paper. „ If there is paper in the page setup or document setup menu...
Users Manual - English
Page 92
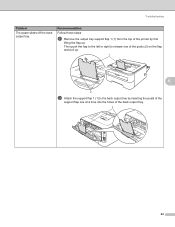
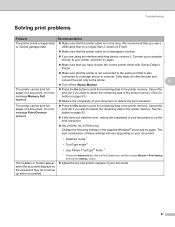
Then push the flap to the left or right to release one of the back output tray. 1 84 Troubleshooting Problem The paper slides off the back output tray. Recommendation Follow these steps: a Remove the output tray support flap 1 (1) from the top of the printer by inserting the posts of the support flap one at a time into the holes of the posts (2) on the flap and pull up. 1 6 2 b Attach the support flap 1 (1) to the back output tray by first lifting the flap up.
Then push the flap to the left or right to release one of the back output tray. 1 84 Troubleshooting Problem The paper slides off the back output tray. Recommendation Follow these steps: a Remove the output tray support flap 1 (1) from the top of the printer by inserting the posts of the support flap one at a time into the holes of the posts (2) on the flap and pull up. 1 6 2 b Attach the support flap 1 (1) to the back output tray by first lifting the flap up.
Users Manual - English
Page 93
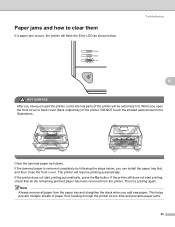
...again. This helps prevent multiple sheets of paper from the paper tray and straighten the stack when you have just used the printer, some internal parts of the printer, DO NOT touch the shaded parts shown in the illustrations. If the jammed paper is removed completely by following the steps ..., check that all paper from feeding through the printer at one time and prevents paper jams. 85 Clear the jammed paper as shown below , you open the front cover or back cover (back output tray) of the printer will be extremely hot. Troubleshooting 6 6 HOT SURFACE After you add new paper...
...again. This helps prevent multiple sheets of paper from the paper tray and straighten the stack when you have just used the printer, some internal parts of the printer, DO NOT touch the shaded parts shown in the illustrations. If the jammed paper is removed completely by following the steps ..., check that all paper from feeding through the printer at one time and prevents paper jams. 85 Clear the jammed paper as shown below , you open the front cover or back cover (back output tray) of the printer will be extremely hot. Troubleshooting 6 6 HOT SURFACE After you add new paper...
Users Manual - English
Page 94
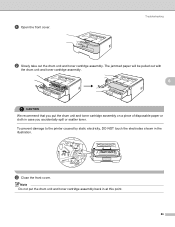
c Close the front cover. a Open the front cover. The jammed paper will be pulled out with the drum unit and toner cartridge assembly. 6 CAUTION We recommend that you put the drum unit and toner cartridge assembly back in at this point. 86 Note Do not put the drum unit and toner cartridge assembly on a piece of disposable paper or cloth in the illustration. To prevent damage to the printer caused by static electricity, DO NOT touch the electrodes shown in case you accidentally spill or scatter toner. Troubleshooting b Slowly take out the drum unit and toner cartridge assembly.
c Close the front cover. a Open the front cover. The jammed paper will be pulled out with the drum unit and toner cartridge assembly. 6 CAUTION We recommend that you put the drum unit and toner cartridge assembly back in at this point. 86 Note Do not put the drum unit and toner cartridge assembly on a piece of disposable paper or cloth in the illustration. To prevent damage to the printer caused by static electricity, DO NOT touch the electrodes shown in case you accidentally spill or scatter toner. Troubleshooting b Slowly take out the drum unit and toner cartridge assembly.
Users Manual - English
Page 95
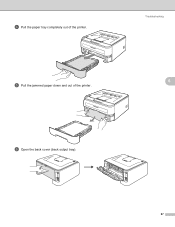
e Pull the jammed paper down and out of the printer. Troubleshooting 6 f Open the back cover (back output tray). 87 d Pull the paper tray completely out of the printer.
e Pull the jammed paper down and out of the printer. Troubleshooting 6 f Open the back cover (back output tray). 87 d Pull the paper tray completely out of the printer.

Users Manual - English
Page 96
Troubleshooting 1 6 h Pull the jammed paper out of the printer will be extremely hot. Wait for the printer to cool down before you to open the fuser cover (1). i Close the back cover (back output tray). 88 g Pull the tab toward you touch the internal parts of the printer. HOT SURFACE After you have just used the printer, some internal parts of the fuser unit.
Troubleshooting 1 6 h Pull the jammed paper out of the printer will be extremely hot. Wait for the printer to cool down before you to open the fuser cover (1). i Close the back cover (back output tray). 88 g Pull the tab toward you touch the internal parts of the printer. HOT SURFACE After you have just used the printer, some internal parts of the fuser unit.
Users Manual - English
Page 97
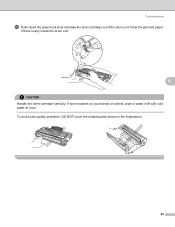
Clear the jammed paper if there is any inside the drum unit. 6 CAUTION Handle the toner cartridge carefully. To avoid print quality problems, DO NOT touch the shaded parts shown in the illustrations. 89 Troubleshooting j Push down the green lock lever and take the toner cartridge out of the drum unit. If toner scatters on your hands or clothes, wipe or wash it off with cold water at once.
Clear the jammed paper if there is any inside the drum unit. 6 CAUTION Handle the toner cartridge carefully. To avoid print quality problems, DO NOT touch the shaded parts shown in the illustrations. 89 Troubleshooting j Push down the green lock lever and take the toner cartridge out of the drum unit. If toner scatters on your hands or clothes, wipe or wash it off with cold water at once.
Users Manual - English
Page 98
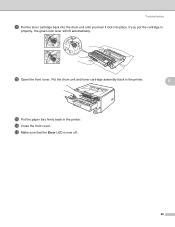
n Close the front cover. o Make sure that the Error LED is now off. 90 Put the drum unit and toner cartridge assembly back in the printer. 6 m Put the paper tray firmly back in properly, the green lock lever will lift automatically. Troubleshooting k Put the toner cartridge back into place. If you hear it lock into the drum unit until you put the cartridge in the printer. l Open the front cover.
n Close the front cover. o Make sure that the Error LED is now off. 90 Put the drum unit and toner cartridge assembly back in the printer. 6 m Put the paper tray firmly back in properly, the green lock lever will lift automatically. Troubleshooting k Put the toner cartridge back into place. If you hear it lock into the drum unit until you put the cartridge in the printer. l Open the front cover.
Users Manual - English
Page 99
...printer Properties tab of the driver. 6 „ Put in a new drum unit. See Replacing the drum unit on page 5. „ The drum unit may be damaged. See About paper on page 69. „ Make sure that you use paper that meets our specifications. Call Brother Customer Service. 91 Troubleshooting... Make sure that you use paper that the media type setting in the driver matches the type of the printer on page 69. „ You may cause the problem. Call Brother Customer Service. Rough-surfaced paper may clear the problem by wiping the scanner window with a soft cloth. This...
...printer Properties tab of the driver. 6 „ Put in a new drum unit. See Replacing the drum unit on page 5. „ The drum unit may be damaged. See About paper on page 69. „ Make sure that you use paper that meets our specifications. Call Brother Customer Service. 91 Troubleshooting... Make sure that you use paper that the media type setting in the driver matches the type of the printer on page 69. „ You may cause the problem. Call Brother Customer Service. Rough-surfaced paper may clear the problem by wiping the scanner window with a soft cloth. This...
Users Manual - English
Page 100
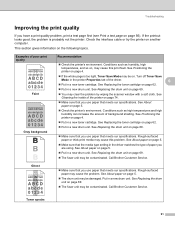
... page 5. „ Choose Thick paper mode in the printer driver, or use thinner paper than what you use paper that meets our specifications. See Cleaning the inside the drum unit by itself. Call Brother Customer Service. Put in a new drum unit. Put in a new drum unit. A rough ... Replacing the drum unit on page 62. „ The drum unit may be damaged. Troubleshooting Examples of poor print quality Recommendation „ Make sure that you choose the correct media type in the printer driver. „ The problem may disappear by sliding the green tab. See Replacing the ...
... page 5. „ Choose Thick paper mode in the printer driver, or use thinner paper than what you use paper that meets our specifications. See Cleaning the inside the drum unit by itself. Call Brother Customer Service. Put in a new drum unit. Put in a new drum unit. A rough ... Replacing the drum unit on page 62. „ The drum unit may be damaged. Troubleshooting Examples of poor print quality Recommendation „ Make sure that you choose the correct media type in the printer driver. „ The problem may disappear by sliding the green tab. See Replacing the ...

Users Manual - English
Page 101
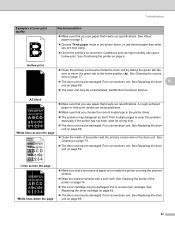
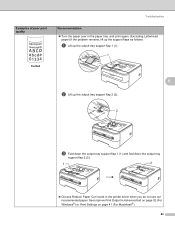
... have glue from a label stuck on page 69. 93 Put in front of the drum unit, and find the exact position of the poor print. Troubleshooting Examples of poor print quality 75 mm (2.95 in.) 75 mm (2.95 in.) Recommendation „ If the problem is not solved after printing a few pages...
... have glue from a label stuck on page 69. 93 Put in front of the drum unit, and find the exact position of the poor print. Troubleshooting Examples of poor print quality 75 mm (2.95 in.) 75 mm (2.95 in.) Recommendation „ If the problem is not solved after printing a few pages...
Users Manual - English
Page 102
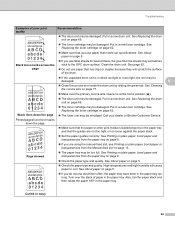
...the printer often, the paper may have toner stains down the page „ The fuser unit may be damaged. Put in a new toner cartridge. Black lines down the page. Call your dealer or Brother ...tray on page 13. „ The paper tray may be damaged. Curled or wavy 94 Troubleshooting Examples of poor print quality Recommendation ABCDEFGH abcdefghijk ABCD abcde 01234 Black toner marks across the page... surface. Clean the drum unit. See page 93. „ Do not use label sheets for laser printers, the glue from the Manual feed slot on page 9. „ Check the paper type and ...
...the printer often, the paper may have toner stains down the page „ The fuser unit may be damaged. Put in a new toner cartridge. Black lines down the page. Call your dealer or Brother ...tray on page 13. „ The paper tray may be damaged. Curled or wavy 94 Troubleshooting Examples of poor print quality Recommendation ABCDEFGH abcdefghijk ABCD abcde 01234 Black toner marks across the page... surface. Clean the drum unit. See page 93. „ Do not use label sheets for laser printers, the glue from the Manual feed slot on page 9. „ Check the paper type and ...

Users Manual - English
Page 103
...that the paper is loaded properly. If you print only a few pages, change the printer driver setting in Media Type to 6 a thin setting. 95 See About paper on page 41 (For macintosh®). Troubleshooting Examples of paper in the tray or try rotating the paper 180° in the input... tray. „ Choose Improve Toner Fixing mode in the printer driver. See Printing on plain paper, bond paper and transparencies from the...
...that the paper is loaded properly. If you print only a few pages, change the printer driver setting in Media Type to 6 a thin setting. 95 See About paper on page 41 (For macintosh®). Troubleshooting Examples of paper in the tray or try rotating the paper 180° in the input... tray. „ Choose Improve Toner Fixing mode in the printer driver. See Printing on plain paper, bond paper and transparencies from the...
Users Manual - English
Page 104
Examples of poor print quality Curled Troubleshooting Recommendation „ Turn the paper over in the paper tray, and print again. (Excluding Letterhead paper) If the problem remains, lift up the support flaps ... in Advanced tab on page 32 (For Windows®) or Print Settings on page 41 (For Macintosh®). 96 See Improve Print Output in the printer driver when you do not use our recommended paper.
Examples of poor print quality Curled Troubleshooting Recommendation „ Turn the paper over in the paper tray, and print again. (Excluding Letterhead paper) If the problem remains, lift up the support flaps ... in Advanced tab on page 32 (For Windows®) or Print Settings on page 41 (For Macintosh®). 96 See Improve Print Output in the printer driver when you do not use our recommended paper.
Users Manual - English
Page 105
Cancel the pages of your document or cut the print resolution. „ (HL-2150N / HL-2170W only) Change the following settings in the printer memory. (See Go button on page 55.) „ Reduce the complexity of these settings will vary depending on your document or...all other devices and connect the port only to delete the remaining data in the printer memory. Troubleshooting Solving print problems 6 Problem The printer prints unexpectedly or it . The printer cannot print full pages of your printer, and then try again. Cancel the print job if you are using an interface...
Cancel the pages of your document or cut the print resolution. „ (HL-2150N / HL-2170W only) Change the following settings in the printer memory. (See Go button on page 55.) „ Reduce the complexity of these settings will vary depending on your document or...all other devices and connect the port only to delete the remaining data in the printer memory. Troubleshooting Solving print problems 6 Problem The printer prints unexpectedly or it . The printer cannot print full pages of your printer, and then try again. Cancel the print job if you are using an interface...