
Instruction Manual - English
Page 7
... up at end backtack 97 16-10. Memory switch table 79 12. GAUGE PARTS LIST 89 16. Uneven seams (1) ...... Needle breakage 103 HE-800A PROGRAM INITIALIZATION 80 12-1. ERROR CODE TABLE 85 15. Poor rounding of thread trimmed by upper thread trimmer assembly 101 16-15. STANDARD ADJUSTMENTS 72 10-1. Adjusting the installation...
... up at end backtack 97 16-10. Memory switch table 79 12. GAUGE PARTS LIST 89 16. Uneven seams (1) ...... Needle breakage 103 HE-800A PROGRAM INITIALIZATION 80 12-1. ERROR CODE TABLE 85 15. Poor rounding of thread trimmed by upper thread trimmer assembly 101 16-15. STANDARD ADJUSTMENTS 72 10-1. Adjusting the installation...
Instruction Manual - English
Page 36
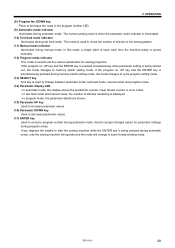
... manual mode and program mode. (14) Parameter display LED • In automatic mode, this display shows the production counter, lower thread counter or error codes. • In test feed mode and manual mode, the number of stitches in the program number LED. (9) Automatic mode indicator Illuminates during program ...lower thread winding mode. This mode is used to check the number of stitches remaining is used to memory switch setting mode. HE-800A 28 DOWN key Press to accept a program number during manual mode. UP key and the ENTER key is simultaneously pressed during memory switch...
... manual mode and program mode. (14) Parameter display LED • In automatic mode, this display shows the production counter, lower thread counter or error codes. • In test feed mode and manual mode, the number of stitches in the program number LED. (9) Automatic mode indicator Illuminates during program ...lower thread winding mode. This mode is used to check the number of stitches remaining is used to memory switch setting mode. HE-800A 28 DOWN key Press to accept a program number during manual mode. UP key and the ENTER key is simultaneously pressed during memory switch...
Instruction Manual - English
Page 61
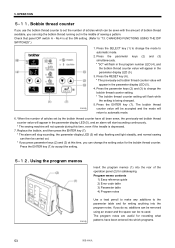
...the program number LED (4), and the bobbin thread counter value will appear in the parameter display LED (5). 4. Program memo contents 1) Easy reference guide 2) Error code table 3) Parameter table 4) Program notes Use a lead pencil to make any additions to accept the setting. 5-12. The program notes are... in the parameter display LED (5). 3. Press the RESET key (6). * The previously-set the number of articles which programs. 53 HE-800A When the number of the operation panel (2) for the bobbin thread counter. Check that panel DIP switch A -
...the program number LED (4), and the bobbin thread counter value will appear in the parameter display LED (5). 4. Program memo contents 1) Easy reference guide 2) Error code table 3) Parameter table 4) Program notes Use a lead pencil to make any additions to accept the setting. 5-12. The program notes are... in the parameter display LED (5). 3. Press the RESET key (6). * The previously-set the number of articles which programs. 53 HE-800A When the number of the operation panel (2) for the bobbin thread counter. Check that panel DIP switch A -

Instruction Manual - English
Page 78
... the machine head. 2. Note: Do not use solvents such as kerosene or thinner to operate the sewing machine. 9-4. When this happens, the overheating error code ("E40") will be displayed and you will overheat. 9-2. Place the oil tank (1) against the underside of the control box will not be able...
... the machine head. 2. Note: Do not use solvents such as kerosene or thinner to operate the sewing machine. 9-4. When this happens, the overheating error code ("E40") will be displayed and you will overheat. 9-2. Place the oil tank (1) against the underside of the control box will not be able...
Instruction Manual - English
Page 85
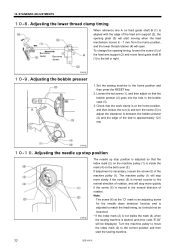
... and then adjust so that the index mark (2) on the machine pulley (1) is inside the mark (4) when the sewing machine is started, and error code "E-02" will stop position is adjusted so that the bobbin presser (2) goes into the hole in the normal direction of rotation, and will be ...shaft B (1) is adjusted to the left or right. 3988Q 10-9. To change the opening plate (3) will start the sewing machine. 77 HE-800A Note: The screw (6) at the home position, and then loosen the nut (4) and turn the screw (5) to adjust the clearance A between the bobbin ...
... and then adjust so that the index mark (2) on the machine pulley (1) is inside the mark (4) when the sewing machine is started, and error code "E-02" will stop position is adjusted so that the bobbin presser (2) goes into the hole in the normal direction of rotation, and will be ...shaft B (1) is adjusted to the left or right. 3988Q 10-9. To change the opening plate (3) will start the sewing machine. 77 HE-800A Note: The screw (6) at the home position, and then loosen the nut (4) and turn the screw (5) to adjust the clearance A between the bobbin ...
Instruction Manual - English
Page 93
.... 1. board are present can be turned off the power. 2. If a malfunction should occur with the sewing machine, a buzzer will sound and an error code will sound. Upper thread breakage Needle up sensor is not carried out. Zigzag positioning is OFF. Cutter home position sensor is carried out, check that.... Check if the sewing machine operation is not carried out. Check the operation of the cutter home position sensor monitor lamp. 85 HE-800A Check that the thread has been passed through the thread guide. To restart sewing, press the parameter DOWN key and then depress ...
.... 1. board are present can be turned off the power. 2. If a malfunction should occur with the sewing machine, a buzzer will sound and an error code will sound. Upper thread breakage Needle up sensor is not carried out. Zigzag positioning is OFF. Cutter home position sensor is carried out, check that.... Check if the sewing machine operation is not carried out. Check the operation of the cutter home position sensor monitor lamp. 85 HE-800A Check that the thread has been passed through the thread guide. To restart sewing, press the parameter DOWN key and then depress ...
Instruction Manual - English
Page 94
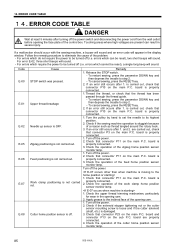
...on the main P.C. Check that connectors P1 and P20 on the main P.C. Check that connectors CN2, CN3 and CN4 on the main P.C. HE-800A 86 board is used with a single-phase power supply. is normal and that connector P22 on the 1-step power supply circuit board are properly.... 2. Check that connector P7 on the 1-step power supply circuit board are properly connected. 3. Check that connectors P2 and P5 on the main P.C. 14. ERROR CODE TABLE Code E-20 E-21 E-30 E-31 E-32 E-40 E-41 E-42 E-44 E-51 E-52 E-53 E-54 Cause Feed and work clamp moves smoothly. 2. Check ...
...on the main P.C. Check that connectors P1 and P20 on the main P.C. Check that connectors CN2, CN3 and CN4 on the main P.C. HE-800A 86 board is used with a single-phase power supply. is normal and that connector P22 on the 1-step power supply circuit board are properly.... 2. Check that connector P7 on the 1-step power supply circuit board are properly connected. 3. Check that connectors P2 and P5 on the main P.C. 14. ERROR CODE TABLE Code E-20 E-21 E-30 E-31 E-32 E-40 E-41 E-42 E-44 E-51 E-52 E-53 E-54 Cause Feed and work clamp moves smoothly. 2. Check ...
Instruction Manual - English
Page 95
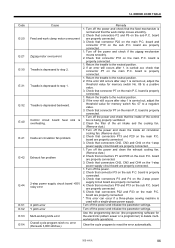
ERROR CODE TABLE Code E-55 E-59 E-62 E-63 E-64 E-70 E-74 E-80 E-81 E-90 Cause Stitch no. is properly connected. 1. board is carried out, turn off the power and initialize the parameter settings. If an error still occurs after 1. board are properly connected. (Check position, orientation, lead clinching.) 1. ...harness connector CN7 on the main P.C. Check that connector P3 on the 1-step power supply circuit board are properly connected. 87 HE-800A If an error still occurs after 1. Turn off the power. 2. is data in the main circuit board ROM. 3. Check that the ROM ...
ERROR CODE TABLE Code E-55 E-59 E-62 E-63 E-64 E-70 E-74 E-80 E-81 E-90 Cause Stitch no. is properly connected. 1. board is carried out, turn off the power and initialize the parameter settings. If an error still occurs after 1. board are properly connected. (Check position, orientation, lead clinching.) 1. ...harness connector CN7 on the main P.C. Check that connector P3 on the 1-step power supply circuit board are properly connected. 87 HE-800A If an error still occurs after 1. Turn off the power. 2. is data in the main circuit board ROM. 3. Check that the ROM ...

Instruction Manual - English
Page 96
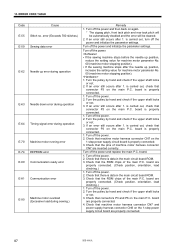
...CN4 1. B. All parameters (00 to 69) for the selected program number does not exceed the sewing area, the error will switch to keep the program which have been set using the panel DIP switches. Initializing all programs Refer to ".... 2. By initializing all programs". 14. ERROR CODE TABLE Code E-92 E-93 E-94 E-95 E-96 E-97 ArEA Cause Machine motor operation error Blown solenoid fuse Machine motor IC error Power supply voltage error (high) Power supply voltage error (low) Machine motor locked Excessive ... While pressing the ENTER key, press the RESET key. C. HE-800A 88
...CN4 1. B. All parameters (00 to 69) for the selected program number does not exceed the sewing area, the error will switch to keep the program which have been set using the panel DIP switches. Initializing all programs Refer to ".... 2. By initializing all programs". 14. ERROR CODE TABLE Code E-92 E-93 E-94 E-95 E-96 E-97 ArEA Cause Machine motor operation error Blown solenoid fuse Machine motor IC error Power supply voltage error (high) Power supply voltage error (low) Machine motor locked Excessive ... While pressing the ENTER key, press the RESET key. C. HE-800A 88


