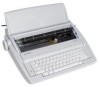
User Guide
Page 3
... Display Mode 29 Line-by-line processing 29 Correction in display mode 31 Functions requiring a special display 32 Functions triggering line printing 33 PART II SPELLING CHECKER 34 PART III TECHNICAL INFORMATION 36 Replacing the Ribbon, etc. 36 Replacing the cassette ribbon 36 ...Replacing the correction tape 37 Replacing the cassette daisy wheel 38 Troubleshooting 39 Problem 39 Care of Unit & Specifications 40 Care of unit 40 Specifications 41 Starter kit (SK-100) 42...
... Display Mode 29 Line-by-line processing 29 Correction in display mode 31 Functions requiring a special display 32 Functions triggering line printing 33 PART II SPELLING CHECKER 34 PART III TECHNICAL INFORMATION 36 Replacing the Ribbon, etc. 36 Replacing the cassette ribbon 36 ...Replacing the correction tape 37 Replacing the cassette daisy wheel 38 Troubleshooting 39 Problem 39 Care of Unit & Specifications 40 Care of unit 40 Specifications 41 Starter kit (SK-100) 42...
User Guide
Page 12
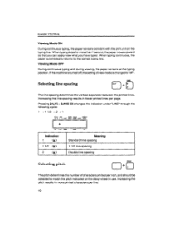
...setting ofview mode is changed to the correct typing line. Selecting line spacing LINE (ALT • The line spacing determines the vertical separation between the printed lines. Pressing [ALT] + [LINE] (2) changes the indication under "LINE" through the following cycle: 1 1 1/2 --) 2 1 PITCH LINE...Selecting pitch ALT The pitch determines the number of characters printed per page. BASIC TYPING Viewing Mode ON During continuous typing, the paper remains constant with the print unit on the daisy wheel in more printed characters per line. 10 Viewing Mode OFF During continuous ...
...setting ofview mode is changed to the correct typing line. Selecting line spacing LINE (ALT • The line spacing determines the vertical separation between the printed lines. Pressing [ALT] + [LINE] (2) changes the indication under "LINE" through the following cycle: 1 1 1/2 --) 2 1 PITCH LINE...Selecting pitch ALT The pitch determines the number of characters printed per page. BASIC TYPING Viewing Mode ON During continuous typing, the paper remains constant with the print unit on the daisy wheel in more printed characters per line. 10 Viewing Mode OFF During continuous ...

User Guide
Page 40
.... • Make sure the cassette daisy wheelis not inserted backwards. Replacing the cassette daisy wheel The daisy wheel is not necessary to remove the cassette ribbon when replacing the daisy wheel. To replace the cassette daisy wheel: 1) Open the top cover. NOTE Please check the shape of the cassette daisy wheelmay cause malfunction and incorrect printing. • It is housed in...
.... • Make sure the cassette daisy wheelis not inserted backwards. Replacing the cassette daisy wheel The daisy wheel is not necessary to remove the cassette ribbon when replacing the daisy wheel. To replace the cassette daisy wheel: 1) Open the top cover. NOTE Please check the shape of the cassette daisy wheelmay cause malfunction and incorrect printing. • It is housed in...
User Guide
Page 41
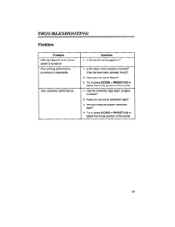
Is the daisy wheel properly installed? (Has the lever been pressed firmly?) 2. Are you run out of the carrier. 39 Has the correction tape been properly installed? 2. TROUBLESHOOTING Problem Problem Nothing happens when power switch is turned on Poor printing performance Or printout is impossible Poor correction performance Solution 1. Is the power cord plugged...
Is the daisy wheel properly installed? (Has the lever been pressed firmly?) 2. Are you run out of the carrier. 39 Has the correction tape been properly installed? 2. TROUBLESHOOTING Problem Problem Nothing happens when power switch is turned on Poor printing performance Or printout is impossible Poor correction performance Solution 1. Is the power cord plugged...


