User Guide
Page 3
...reverse index 9 View Mode 9 Selecting line spacing 10 Selecting pitch 10 Setting margins 11 Setting tabs 12 Clearing tabs 13 Setting decimal tabs 13 Cancelling the ... 25 Line indent 25 Centering 26 Cancelling the centering mode 27 Right margin flush 27 Cancelling the right margin flush mode 28 Display Mode 29 Line-by-line processing 29 Correction ... etc. 36 Replacing the cassette ribbon 36 Replacing the correction tape 37 Replacing the cassette daisy wheel 38 Troubleshooting 39 Problem 39 Care of Unit & Specifications 40 Care of unit 40 Specifications...
...reverse index 9 View Mode 9 Selecting line spacing 10 Selecting pitch 10 Setting margins 11 Setting tabs 12 Clearing tabs 13 Setting decimal tabs 13 Cancelling the ... 25 Line indent 25 Centering 26 Cancelling the centering mode 27 Right margin flush 27 Cancelling the right margin flush mode 28 Display Mode 29 Line-by-line processing 29 Correction ... etc. 36 Replacing the cassette ribbon 36 Replacing the correction tape 37 Replacing the cassette daisy wheel 38 Troubleshooting 39 Problem 39 Care of Unit & Specifications 40 Care of unit 40 Specifications...

User Guide
Page 5
IMF, MIL a tarai • TAB *LINE INDENT (NOT AVAILABLE FOR USA VERSION AX-475) SHIFT LOCK *CAPS (NOT AVAILABLE FOR USA VERSION AX-475) SHIFT *WHEEL RESET - a l L.IL $I . Tr • ! (# # % • IE i 1 2 3 4 5 8 &7 8 9 0 - I CAA MI OFGH J K ■ M.• PEW. U IIweIIr CI VV E R T Y U I .... SHIFT CORRECTION *MANUAL CORRECTION *INDEX - *SUBSCRIPT `REVERSE INDEX *SUPERSCRIPT *VIEW 3 ll L. KEYBOARD **TAB CLEAR "DECIMAL TAB SET **TAB SET **RIGHT MARGIN **LEFT MARGIN "MARGIN RELEASE **LINE "PITCH "WORD SPELL • ap '''''' "CENTERING - **RIGHT...
IMF, MIL a tarai • TAB *LINE INDENT (NOT AVAILABLE FOR USA VERSION AX-475) SHIFT LOCK *CAPS (NOT AVAILABLE FOR USA VERSION AX-475) SHIFT *WHEEL RESET - a l L.IL $I . Tr • ! (# # % • IE i 1 2 3 4 5 8 &7 8 9 0 - I CAA MI OFGH J K ■ M.• PEW. U IIweIIr CI VV E R T Y U I .... SHIFT CORRECTION *MANUAL CORRECTION *INDEX - *SUBSCRIPT `REVERSE INDEX *SUPERSCRIPT *VIEW 3 ll L. KEYBOARD **TAB CLEAR "DECIMAL TAB SET **TAB SET **RIGHT MARGIN **LEFT MARGIN "MARGIN RELEASE **LINE "PITCH "WORD SPELL • ap '''''' "CENTERING - **RIGHT...

User Guide
Page 8
... copy, which I understand you ; Centering (26) Institute of this typewriter are no longer familiar with easy operation. Newton 6 PP;Al'URES Your Brother electronic typewriter combines advanced performance with them. Some of the outstanding functions of Chemistry and Physics 100 Baker Street New York Right margin flush (27) Bold (25) December, 7th, 1994 Dear Sir...
... copy, which I understand you ; Centering (26) Institute of this typewriter are no longer familiar with easy operation. Newton 6 PP;Al'URES Your Brother electronic typewriter combines advanced performance with them. Some of the outstanding functions of Chemistry and Physics 100 Baker Street New York Right margin flush (27) Bold (25) December, 7th, 1994 Dear Sir...

User Guide
Page 10
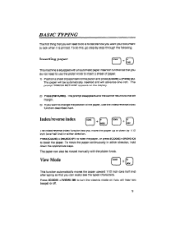
They will display your text until you finish typing the whole line. Just press [CODE] + (ALT) to the printing mode. PART T OVERVIEW OF YOUR TYPEWRITER PITCH 10, 12, 15 - word spell check WORD = word underlining CONT = continuous underlining BOLD = boldface AUTO = auto carrier return UL = line by -line function... or you choose to print it affords. The line is automatically selected when you reach a decimal tab, or when you choose the right margin flush feature. Since the text is because the machine needs to know the entire contents of the line to be printed after you may want...
They will display your text until you finish typing the whole line. Just press [CODE] + (ALT) to the printing mode. PART T OVERVIEW OF YOUR TYPEWRITER PITCH 10, 12, 15 - word spell check WORD = word underlining CONT = continuous underlining BOLD = boldface AUTO = auto carrier return UL = line by -line function... or you choose to print it affords. The line is automatically selected when you reach a decimal tab, or when you choose the right margin flush feature. Since the text is because the machine needs to know the entire contents of the line to be printed after you may want...
User Guide
Page 11
... [CODE] + [VIEW] (M) to change the position of paper behind the platen and press [CODE] [PINS] (A). The prompt disappears and the carrier returns to the left margin. 3) If you want your document to look when it is equipped with the platen knob. BASIC TYPING The first thing that you can also be...
... [CODE] + [VIEW] (M) to change the position of paper behind the platen and press [CODE] [PINS] (A). The prompt disappears and the carrier returns to the left margin. 3) If you want your document to look when it is equipped with the platen knob. BASIC TYPING The first thing that you can also be...

User Guide
Page 13
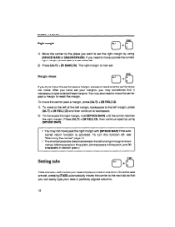
...[ALT] + [PITCH] (1) changes the indication below ). The left margin is limited by the left margin by using [SPACE BAR] or [BACKSPACE]. Setting margins The carrier movement is now set the left and right margins (unless you to set . 11 If you want to decide where... your text will be positioned on the paper. Setting the margins allows you press [ALT] + [M RELI (3) as explained below "PITCH" through the following cycle: 10 --> ... inch) Note: Be sure the selected pitch matches the pitch of the daisy wheel inserted in the unit.
...[ALT] + [PITCH] (1) changes the indication below ). The left margin is limited by the left margin by using [SPACE BAR] or [BACKSPACE]. Setting margins The carrier movement is now set the left and right margins (unless you to set . 11 If you want to decide where... your text will be positioned on the paper. Setting the margins allows you press [ALT] + [M RELI (3) as explained below "PITCH" through the following cycle: 10 --> ... inch) Note: Be sure the selected pitch matches the pitch of the daisy wheel inserted in the unit.
User Guide
Page 14
... moves the carrier to the next tab so that you can easily type your margins, you may sometimes find it necessary to type outsidethese margins. Margin release MRS. • ALT If you try to move outside the current right margin, press [ALT] + [M REL] (3). 2) Press (ALT] + [R MAR] (5). If...off, see "Returning the carrier" page 17. • Theshortest possible distancebetween the leftand rightmargins is heard and the carrier does not move past a margin, a beep is two inches (20 characters in Pica pitch, 24 characters in Elite pitch, and 30 characters in Micron pitch.) T SET Setting ...
... moves the carrier to the next tab so that you can easily type your margins, you may sometimes find it necessary to type outsidethese margins. Margin release MRS. • ALT If you try to move outside the current right margin, press [ALT] + [M REL] (3). 2) Press (ALT] + [R MAR] (5). If...off, see "Returning the carrier" page 17. • Theshortest possible distancebetween the leftand rightmargins is heard and the carrier does not move past a margin, a beep is two inches (20 characters in Pica pitch, 24 characters in Elite pitch, and 30 characters in Micron pitch.) T SET Setting ...
User Guide
Page 15
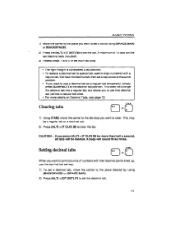
... their decimal points lined up, use the decimal tab set key. 1) To set a decimal tab, move the carrier to the tab stop . • The right margin is considered a tab position. • To replace a decimal tab (a special tab used to align numbers) with a regular tab, first clear the decimal tab, then set...
... their decimal points lined up, use the decimal tab set key. 1) To set a decimal tab, move the carrier to the tab stop . • The right margin is considered a tab position. • To replace a decimal tab (a special tab used to align numbers) with a regular tab, first clear the decimal tab, then set...
User Guide
Page 19
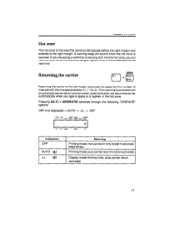
... hot zone, you type a space or a hyphen in the hot zone. If you are typing a word that starts six (6) spaces before the right margin and extends to the left margin advances the paper by -line), auto carrier return activated 17 This machine is provided with the line space selector (1, 1 1/2, 2). Returning the carrier... (ALT OPBINIE RELOC BS 112 Returning the carrier to the right margin. BASIC TYPING Hot zone The hot zone is the area that is too long to the next line.
... hot zone, you type a space or a hyphen in the hot zone. If you are typing a word that starts six (6) spaces before the right margin and extends to the left margin advances the paper by -line), auto carrier return activated 17 This machine is provided with the line space selector (1, 1 1/2, 2). Returning the carrier... (ALT OPBINIE RELOC BS 112 Returning the carrier to the right margin. BASIC TYPING Hot zone The hot zone is the area that is too long to the next line.
User Guide
Page 26
.../2 c.c.s CONT LA. LAYOUT FUNCTIONS Automatic underlining UNDLN ALT Cl You can be used together with the decimal tab, the automatic centering, boldface, and the right margin flush functions (p.13, 26, 25, 27). 24 Suggestion 3) To cancel the automatic underlining mode, press [ALT] + [UNDLN] (-) again, until nothing is displayed under "UNDLN". •...
.../2 c.c.s CONT LA. LAYOUT FUNCTIONS Automatic underlining UNDLN ALT Cl You can be used together with the decimal tab, the automatic centering, boldface, and the right margin flush functions (p.13, 26, 25, 27). 24 Suggestion 3) To cancel the automatic underlining mode, press [ALT] + [UNDLN] (-) again, until nothing is displayed under "UNDLN". •...

User Guide
Page 27
... carrier five (5) characters to cancel this mode. • This function can be used together with the decimal tab, the automatic centering, underline, and the right margin flush functions (p.13, 26, 24, 27). Thank you for your text. New York, N.Y. 2) Press [ALT] + [BOLD] (=) once again to the right. Boldface LAYOUT FUNCTIONS BOLD...
... carrier five (5) characters to cancel this mode. • This function can be used together with the decimal tab, the automatic centering, underline, and the right margin flush functions (p.13, 26, 24, 27). Thank you for your text. New York, N.Y. 2) Press [ALT] + [BOLD] (=) once again to the right. Boldface LAYOUT FUNCTIONS BOLD...

User Guide
Page 28
..., p.29.) Thecarrier will backspace one half-space for each character typed. • If the entered characters extend beyond the space between the margins, a beep sounds, and you to center a line of Chemistry and Physics 100 Metro Street New York, N.Y. 26 Institute of text between... the left and right margins. 1) To center between the margins: Move the carrier to the left margin. Centering between margins Left margin Right margin. When printing is not positioned on the display. The carrier will not be activated if...
..., p.29.) Thecarrier will backspace one half-space for each character typed. • If the entered characters extend beyond the space between the margins, a beep sounds, and you to center a line of Chemistry and Physics 100 Metro Street New York, N.Y. 26 Institute of text between... the left and right margins. 1) To center between the margins: Move the carrier to the left margin. Centering between margins Left margin Right margin. When printing is not positioned on the display. The carrier will not be activated if...

User Guide
Page 29
... press [TAB] or [RETURN] . The characters will not be printed immediately, but will go to escape from the mode. Right margin flush (ALT RMF 0 Your typewriter can still make corrections in display mode (for dates and other headings. 1) Press [ALT] + [RMF] (0). Then either retypeyour... text or press [ALT]+ [CTR] (9) to the right margin. 2) Type the text. Right margin December 7th, 1994 27 Cancelling the centering mode ...
... press [TAB] or [RETURN] . The characters will not be printed immediately, but will go to escape from the mode. Right margin flush (ALT RMF 0 Your typewriter can still make corrections in display mode (for dates and other headings. 1) Press [ALT] + [RMF] (0). Then either retypeyour... text or press [ALT]+ [CTR] (9) to the right margin. 2) Type the text. Right margin December 7th, 1994 27 Cancelling the centering mode ...

User Guide
Page 30
Otherwise, the carrier returns to the left margin. 28 Either retype your text or press [ALT] + [RMF] (0) to return to the last typing position if text has previously been entered on the line. LAYOUT FUNCTIONS Cancelling the right margin flush mode RMF ALT 1) Before you have entered some characters: If you have typed anything: To cancel the right margin flush mode before typing any text, press [ALT] + [RMF] (0). This returns the carrier to the last typing position or the left margin, 2) After entering some characters, press [CORRECT] until the display is blank.
Otherwise, the carrier returns to the left margin. 28 Either retype your text or press [ALT] + [RMF] (0) to return to the last typing position if text has previously been entered on the line. LAYOUT FUNCTIONS Cancelling the right margin flush mode RMF ALT 1) Before you have entered some characters: If you have typed anything: To cancel the right margin flush mode before typing any text, press [ALT] + [RMF] (0). This returns the carrier to the last typing position or the left margin, 2) After entering some characters, press [CORRECT] until the display is blank.
User Guide
Page 31
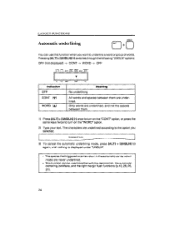
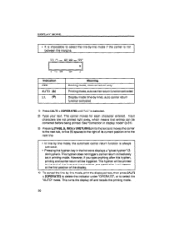
... functions. Keys ALT + M REL ALT + L MAR ALT + R MAR ALT + T SET ALT + T CLR ALT + DT SET Function To move past a margin To set the left margin To set the right margin To seta tab To clear a regular or decimal tab To set a decimal tab Line-by-line processing OPERATE ALT RELOC 85 112 "Line...
... functions. Keys ALT + M REL ALT + L MAR ALT + R MAR ALT + T SET ALT + T CLR ALT + DT SET Function To move past a margin To set the left margin To set the right margin To seta tab To clear a regular or decimal tab To set a decimal tab Line-by-line processing OPERATE ALT RELOC 85 112 "Line...
User Guide
Page 32
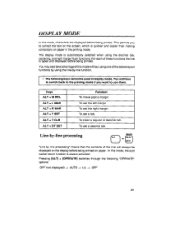
..., to five (5) spaces to the right of its current position or to select the line-by-line mode if the carrier is not between the margins. This turns the display off and recalls the printing mode. 30 DISPLAY MODE • It is impossible to the next line. • In line by...
..., to five (5) spaces to the right of its current position or to select the line-by-line mode if the carrier is not between the margins. This turns the display off and recalls the printing mode. 30 DISPLAY MODE • It is impossible to the next line. • In line by...

User Guide
Page 35
... keys will trigger line printing and clear the display: 1) [RETURN] The line is printed, the paper is fed and the carrier returns to the left margin. 2) [TAB] : The line is printed and the carrier moves to the next tab. 3) [CODE] + [L IND] : The line is deleted. The mark does not appear alone...
... keys will trigger line printing and clear the display: 1) [RETURN] The line is printed, the paper is fed and the carrier returns to the left margin. 2) [TAB] : The line is printed and the carrier moves to the next tab. 3) [CODE] + [L IND] : The line is deleted. The mark does not appear alone...

User Guide
Page 45
... Location, 40 L/L mode, 29 M Manual correction, 22 Margin release key, 12 Margins, setting, 11 Margin, left, 11 Margin, right, 12 Memory correction, 20 0 Operate, 17, 29 P Permanent hyphen, 18, 32 Permanent space, 18 Pica, 11 Pitch, 10 R Repeat, 4, 15 Replacing the correction tape, 37 Replacing the daisy wheel, 38 Replacing the ribbon, 36 Return, 17 Returning...
... Location, 40 L/L mode, 29 M Manual correction, 22 Margin release key, 12 Margins, setting, 11 Margin, left, 11 Margin, right, 12 Memory correction, 20 0 Operate, 17, 29 P Permanent hyphen, 18, 32 Permanent space, 18 Pica, 11 Pitch, 10 R Repeat, 4, 15 Replacing the correction tape, 37 Replacing the daisy wheel, 38 Replacing the ribbon, 36 Return, 17 Returning...


