
Users Manual - English
Page 12
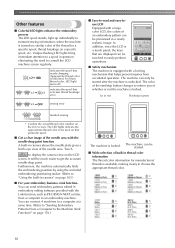
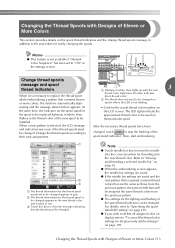
Other features ■ Colorful LED lights enhance the embroidery process The LED spool stands, light up individually to display the camera view on the LCD screen. when the machine is turned on page 103.) ■ For your embroidery business -...
Other features ■ Colorful LED lights enhance the embroidery process The LED spool stands, light up individually to display the camera view on the LCD screen. when the machine is turned on page 103.) ■ For your embroidery business -...
Users Manual - English
Page 16
... Setting up the machine...28 Remove the fixing plates ...29 Adjusting the operation panel position ...29 Preparing the thread guide assembly ...30 Preparing the spool stand ...31 Attaching the embroidery frame holder ...32 EMBROIDERING TUTORIAL 33 Operating Precautions...34 Power supply precautions ...34 Needle precautions ...35 Checking the needle ...35 Bobbin...
... Setting up the machine...28 Remove the fixing plates ...29 Adjusting the operation panel position ...29 Preparing the thread guide assembly ...30 Preparing the spool stand ...31 Attaching the embroidery frame holder ...32 EMBROIDERING TUTORIAL 33 Operating Precautions...34 Power supply precautions ...34 Needle precautions ...35 Checking the needle ...35 Bobbin...
Users Manual - English
Page 19
... of thread 227 Changing the screen saver settings ...227 Adjusting the brightness of the sewing light 229 Changing the speaker volume ...229 Specifying the spool stand LED setting ...230 Specifying thread sensor ...230 Changing the pointer shape when a USB mouse is used 231 Changing the units of measurements...231 Changing the...
... of thread 227 Changing the screen saver settings ...227 Adjusting the brightness of the sewing light 229 Changing the speaker volume ...229 Specifying the spool stand LED setting ...230 Specifying thread sensor ...230 Changing the pointer shape when a USB mouse is used 231 Changing the units of measurements...231 Changing the...
Users Manual - English
Page 21
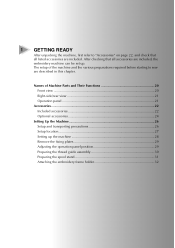
... set up the machine 28 Remove the fixing plates 29 Adjusting the operation panel position 29 Preparing the thread guide assembly 30 Preparing the spool stand 31 Attaching the embroidery frame holder 32 1 GETTING READY After unpacking the machine, first refer to sew are described in this chapter.
... set up the machine 28 Remove the fixing plates 29 Adjusting the operation panel position 29 Preparing the thread guide assembly 30 Preparing the spool stand 31 Attaching the embroidery frame holder 32 1 GETTING READY After unpacking the machine, first refer to sew are described in this chapter.
Users Manual - English
Page 22
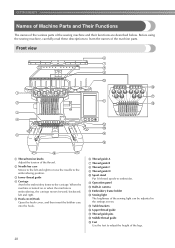
.... 5 Hook cover/Hook Open the hook cover, and then insert the bobbin case into the hook. 6 Thread guide A 7 Thread guide B 8 Thread guide C 9 Thread guide D 0 Spool stand Put 10 thread spools to learn the names of the legs. 20 Before using the sewing machine, carefully read these descriptions to embroider.
.... 5 Hook cover/Hook Open the hook cover, and then insert the bobbin case into the hook. 6 Thread guide A 7 Thread guide B 8 Thread guide C 9 Thread guide D 0 Spool stand Put 10 thread spools to learn the names of the legs. 20 Before using the sewing machine, carefully read these descriptions to embroider.
Users Manual - English
Page 28
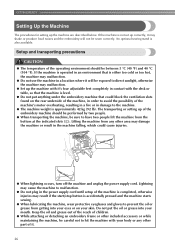
... other area may damage the machine or result in the machine falling, which could block the ventilation slots found on your mouth. An optional sewing stand is also available. GETTING READY Setting Up the Machine The procedures for setting up the machine with the desk or table, so that is either...
... other area may damage the machine or result in the machine falling, which could block the ventilation slots found on your mouth. An optional sewing stand is also available. GETTING READY Setting Up the Machine The procedures for setting up the machine with the desk or table, so that is either...

Users Manual - English
Page 29
... weighs approximately 42kg (92 lb), do not set it up machine near an electrical outlet • Use a level and stable surface, such as a desk or stand. • Use a surface that meets the following conditions.
... weighs approximately 42kg (92 lb), do not set it up machine near an electrical outlet • Use a level and stable surface, such as a desk or stand. • Use a surface that meets the following conditions.

Users Manual - English
Page 33
Setting Up the Machine 31 X Secure the spool stand in the opened up, 2 tighten the thumb screw. Grab the grips on the thread guide assembly 2...Use the included disc-shaped screwdriver. 1 Loosen the thumb screw two or three turns, 1 and then fold out the spool stand. Do not apply extreme force when moving the part. ● Be sure to tighten each thumb screw well enough that the ..., tighten the two thumb screws to move the thread guide assembly support. Preparing the spool stand Secure the spool stand in place. 1 Thumb screw 2 Spool stand After the spool stand is secured.
Setting Up the Machine 31 X Secure the spool stand in the opened up, 2 tighten the thumb screw. Grab the grips on the thread guide assembly 2...Use the included disc-shaped screwdriver. 1 Loosen the thumb screw two or three turns, 1 and then fold out the spool stand. Do not apply extreme force when moving the part. ● Be sure to tighten each thumb screw well enough that the ..., tighten the two thumb screws to move the thread guide assembly support. Preparing the spool stand Secure the spool stand in place. 1 Thumb screw 2 Spool stand After the spool stand is secured.
Users Manual - English
Page 40
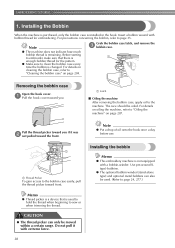
... When the machine is purchased, only the bobbin case is enough bobbin thread for embroidering. Use pre-wound (L type) bobbins. ● The optional bobbin winder (stand-alone type) and optional metal bobbins can only be oiled. For precautions concerning the bobbin, refer to page 24, 277.) For details on page 287...
... When the machine is purchased, only the bobbin case is enough bobbin thread for embroidering. Use pre-wound (L type) bobbins. ● The optional bobbin winder (stand-alone type) and optional metal bobbins can only be oiled. For precautions concerning the bobbin, refer to page 24, 277.) For details on page 287...
Users Manual - English
Page 58
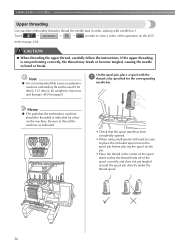
... is indicated by a line on the LCD (refer to bend or break. Be sure to thread the machine as indicated. • Check that the spool stand has been completely opened. • When using small spools of thread, be sure to place the included spool mat on the spool pin before placing... the spool on the pin. • Place the thread in the center of the spool stand so that the embroidery machine should be used (120 den/2, 135 dtex/2, 40 weight (in Americas and Europe), #50 (in Japan)). EMBROIDERING TUTORIAL Upper threading...
... is indicated by a line on the LCD (refer to bend or break. Be sure to thread the machine as indicated. • Check that the spool stand has been completely opened. • When using small spools of thread, be sure to place the included spool mat on the spool pin before placing... the spool on the pin. • Place the thread in the center of the spool stand so that the embroidery machine should be used (120 den/2, 135 dtex/2, 40 weight (in Americas and Europe), #50 (in Japan)). EMBROIDERING TUTORIAL Upper threading...

Users Manual - English
Page 110
Memo ● This function is different than the needle position thread color on the screen, the thread colors on the spool stand is not available when you set "Manual Color Sequence" to "ON" in settings screen. Touch . 1 Touch 4 colors. Touch the number of the first needle bar ... screen appears. OTHER BASIC PROCEDURES Switching the Thread Colors on the Screen If a thread color on the screen can be switched to match the spool stand thread color position.
Memo ● This function is different than the needle position thread color on the screen, the thread colors on the spool stand is not available when you set "Manual Color Sequence" to "ON" in settings screen. Touch . 1 Touch 4 colors. Touch the number of the first needle bar ... screen appears. OTHER BASIC PROCEDURES Switching the Thread Colors on the Screen If a thread color on the screen can be switched to match the spool stand thread color position.
Users Manual - English
Page 115
...indicates black thread color) 2 The thread does not need to be changed . Change the thread spools according to stop the flashing of the spool stand indicator. After the necessary thread spools have been changed, touch to their new assignments. Note ● Touch needle bar key to move the needle... are saved. ● If the needle bar settings are saved and the next pattern that is not flashing. For details, refer to "Specifying the spool stand LED setting" on page 230. ● If you if the thread spools must be changed. Then, start embroidering. 1 2 3 1 The thread information for...
...indicates black thread color) 2 The thread does not need to be changed . Change the thread spools according to stop the flashing of the spool stand indicator. After the necessary thread spools have been changed, touch to their new assignments. Note ● Touch needle bar key to move the needle... are saved. ● If the needle bar settings are saved and the next pattern that is not flashing. For details, refer to "Specifying the spool stand LED setting" on page 230. ● If you if the thread spools must be changed. Then, start embroidering. 1 2 3 1 The thread information for...

Users Manual - English
Page 117
... since the embroidery frame moves at the same time. 3 Memo ● When the thread breaks or the bobbin thread runs out while embroidering, the spool stand LEDs flash to zoom up the camera view twice the size of normal view.
... since the embroidery frame moves at the same time. 3 Memo ● When the thread breaks or the bobbin thread runs out while embroidering, the spool stand LEDs flash to zoom up the camera view twice the size of normal view.
Users Manual - English
Page 219
... of thread 227 Changing the screen saver settings 227 Adjusting the brightness of the sewing light 229 Changing the speaker volume 229 Specifying the spool stand LED setting 230 Specifying thread sensor 230 Changing the pointer shape when a USB mouse is used 231 Changing the units of the settings key, the...
... of thread 227 Changing the screen saver settings 227 Adjusting the brightness of the sewing light 229 Changing the speaker volume 229 Specifying the spool stand LED setting 230 Specifying thread sensor 230 Changing the pointer shape when a USB mouse is used 231 Changing the units of the settings key, the...

Users Manual - English
Page 221
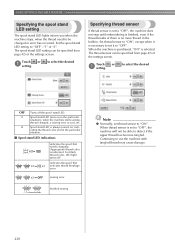
Spool stand LED informs when the machine starts sewing, needs changing thread and the error occurs, etc.(Refer to page 230.) F Light The brightness of the sewing ... Screen The machine can be set to "Reserved Needle Bar and Sewing Speed Settings" on page 145.) C D E F G H I Mouse Pointer Change the shape of spool stand LED function. E Spool Stand LED Specifies the setting of the pointer when a USB mouse is turned on. ■ Page 3 ■ Page 4 C C Reserved Needle A specific thread color can...
Spool stand LED informs when the machine starts sewing, needs changing thread and the error occurs, etc.(Refer to page 230.) F Light The brightness of the sewing ... Screen The machine can be set to "Reserved Needle Bar and Sewing Speed Settings" on page 145.) C D E F G H I Mouse Pointer Change the shape of spool stand LED function. E Spool Stand LED Specifies the setting of the pointer when a USB mouse is turned on. ■ Page 3 ■ Page 4 C C Reserved Needle A specific thread color can...
Users Manual - English
Page 232
...sensor is set thread sensor to "ON". Touch or 1 setting. indi- cating the thread color and in the particular situation. ■ Spool stand LED indications indicates the spool that activates thread breakage error OFF sewing error finished sewing Note ● Normally, set to "OFF", the machine ... there is set it is selected. Touch or 1 setting. The thread sensor can be changed , a sewing error occurs, etc. 2 Spool stand LED is indicated. when the machine starts sewing, thread changed or error has occurred. For black thread color, LED light turns off the spool...
...sensor is set thread sensor to "ON". Touch or 1 setting. indi- cating the thread color and in the particular situation. ■ Spool stand LED indications indicates the spool that activates thread breakage error OFF sewing error finished sewing Note ● Normally, set to "OFF", the machine ... there is set it is selected. Touch or 1 setting. The thread sensor can be changed , a sewing error occurs, etc. 2 Spool stand LED is indicated. when the machine starts sewing, thread changed or error has occurred. For black thread color, LED light turns off the spool...
Users Manual - English
Page 315
... 308 computer 83 Split (large-size) embroidery patterns 240 media 82 Spool 56 mouse 84 Spool change indicator 79, 111 USB media 173, 213 Spool stand 20, 31 Spool stand LED 10, 113, 230 Stabilizer 93, 247, 250 Standard (Pro Style) caps 259 V Ventilation slots 21 Index 313
... 308 computer 83 Split (large-size) embroidery patterns 240 media 82 Spool 56 mouse 84 Spool change indicator 79, 111 USB media 173, 213 Spool stand 20, 31 Spool stand LED 10, 113, 230 Stabilizer 93, 247, 250 Standard (Pro Style) caps 259 V Ventilation slots 21 Index 313

Kit 1 Instruction Manual - English
Page 9
...("RANDOM", "VIVID", "GRADIENT" and "SOFT") the sample for the selected effect is grayed out, select another pattern. • If you have on the spool stand b Thread table (64 colors) c Custom thread table (300 colors) d Select the number of the machine for the details. a Press . c Select the ... the desired effect. a Number of the brand you have not created a custom thread table, the color shuffling key will be available depending on the spool stand, 2 thread table (64 colors: preset color table) and 3 custom thread table (300 colors: color table that you have selected. a b Note &#...
...("RANDOM", "VIVID", "GRADIENT" and "SOFT") the sample for the selected effect is grayed out, select another pattern. • If you have on the spool stand b Thread table (64 colors) c Custom thread table (300 colors) d Select the number of the machine for the details. a Press . c Select the ... the desired effect. a Number of the brand you have not created a custom thread table, the color shuffling key will be available depending on the spool stand, 2 thread table (64 colors: preset color table) and 3 custom thread table (300 colors: color table that you have selected. a b Note &#...

KIT 1 OPERATION MANUAL - English
Page 9
...The Color Shuffling Function With the Color Shuffling function, the machine suggests new color schemes for the embroidery pattern that you have on the spool stand b Thread table (64 colors) c Custom thread table (300 colors) d Select the number of the machine for the details. c Select... selected. a b c → The thread color palette screen appears. a b Note • This function may not be available depending on the spool stand, 2 thread table (64 colors: preset color table) and 3 custom thread table (300 colors: color table that you can select the color shuffling function ...
...The Color Shuffling Function With the Color Shuffling function, the machine suggests new color schemes for the embroidery pattern that you have on the spool stand b Thread table (64 colors) c Custom thread table (300 colors) d Select the number of the machine for the details. c Select... selected. a b c → The thread color palette screen appears. a b Note • This function may not be available depending on the spool stand, 2 thread table (64 colors: preset color table) and 3 custom thread table (300 colors: color table that you can select the color shuffling function ...
