
Users Manual - English
Page 22
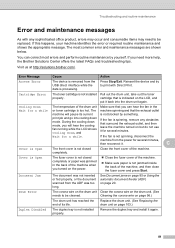
Close the cover. Red Toner Life End Replace the toner cartridge with a new one. Note When the power switch is in the tray or clear the paper jam. Scan lock Check that the scanner lock lever is open. Others Check the LCD message. Paper error Put paper in Sleep mode, the LED is off or the machine is off . 9 Check the LCD 1 message. General information Cover open The front cover or fuser cover is released.
Close the cover. Red Toner Life End Replace the toner cartridge with a new one. Note When the power switch is in the tray or clear the paper jam. Scan lock Check that the scanner lock lever is open. Others Check the LCD message. Paper error Put paper in Sleep mode, the LED is off or the machine is off . 9 Check the LCD 1 message. General information Cover open The front cover or fuser cover is released.
Users Manual - English
Page 32
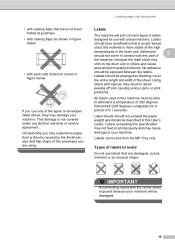
... print quality problems. No adhesive should not exceed the paper weight specifications described in the fuser unit. Labels exceeding this User's Guide. Labels can be fed from the MP Tray only.... Types of labels to avoid 2 Do not use with any Brother warranty or service agreement. Loading paper and documents Labels 2 The machine will be damaged. 19 Label... is more stable at purchase • with sealing flaps as shown in contact with a laser machine. Adhesives 2 should have not been folded at the high temperatures in this specification may...
... print quality problems. No adhesive should not exceed the paper weight specifications described in the fuser unit. Labels exceeding this User's Guide. Labels can be fed from the MP Tray only.... Types of labels to avoid 2 Do not use with any Brother warranty or service agreement. Loading paper and documents Labels 2 The machine will be damaged. 19 Label... is more stable at purchase • with sealing flaps as shown in contact with a laser machine. Adhesives 2 should have not been folded at the high temperatures in this specification may...
Users Manual - English
Page 38
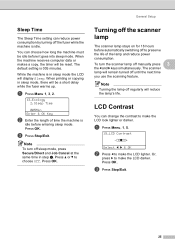
... and Job Cancel at the same time in sleep mode, there will reduce the lamp's life. The scanner lamp will be a short delay while the fuser warms up. a Press Menu, 1, 5. 15.LCD Contrast -nnonn+ Select d c & OK b Press d to choose Off. While the machine is 005 minutes. Press OK. c Press ...Stop/Exit. Press OK. General Setup Sleep Time 3 The Sleep Time setting can reduce power consumption by turning off the fuser while the machine is idle before entering sleep mode. When the machine receives computer data or makes a copy, the timer will remain turned off until...
... and Job Cancel at the same time in sleep mode, there will reduce the lamp's life. The scanner lamp will be a short delay while the fuser warms up. a Press Menu, 1, 5. 15.LCD Contrast -nnonn+ Select d c & OK b Press d to choose Off. While the machine is 005 minutes. Press OK. c Press ...Stop/Exit. Press OK. General Setup Sleep Time 3 The Sleep Time setting can reduce power consumption by turning off the fuser while the machine is idle before entering sleep mode. When the machine receives computer data or makes a copy, the timer will remain turned off until...

Users Manual - English
Page 69
To prevent injuries, be careful not to put your fingers in the areas shown in the illustrations. IMPORTANT The fuser unit is marked with a Caution label. When you move the machine, grasp the side hand holds that are under the scanner. Please DO NOT remove or damage the label. 56
To prevent injuries, be careful not to put your fingers in the areas shown in the illustrations. IMPORTANT The fuser unit is marked with a Caution label. When you move the machine, grasp the side hand holds that are under the scanner. Please DO NOT remove or damage the label. 56

Users Manual - English
Page 88
... media is loaded properly. (See Loading paper in the C standard paper tray on page 103.) „ The fuser unit may be damaged. Call Brother Customer Service at 1-877-BROTHER (1-877-276-8437) (in USA) or 1-877-BROTHER (in Canada). „ Check the paper type and quality. (See Acceptable paper and other print media on...
... media is loaded properly. (See Loading paper in the C standard paper tray on page 103.) „ The fuser unit may be damaged. Call Brother Customer Service at 1-877-BROTHER (1-877-276-8437) (in USA) or 1-877-BROTHER (in Canada). „ Check the paper type and quality. (See Acceptable paper and other print media on...

Users Manual - English
Page 92
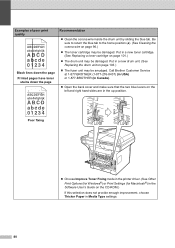
... Replacing the drum unit on page 103.) ABCDEFGH abcdefghijk ABCD abcde 01234 „ Clean the laser scanner window and the corona wire inside the drum unit by sliding the blue tab. Roughsurfaced ...the home position (a). (See Cleaning the corona wire on page 103.) „ The fuser unit may be damaged. Black toner marks across the page 79 Put in direct sunlight or... „ The toner cartridge may be damaged. Put in Canada). Call Brother Customer Service at 1-877-BROTHER (1-877-276-8437) (in USA) or 1-877-BROTHER (in a new toner cartridge. (See Replacing a toner cartridge on page...
... Replacing the drum unit on page 103.) ABCDEFGH abcdefghijk ABCD abcde 01234 „ Clean the laser scanner window and the corona wire inside the drum unit by sliding the blue tab. Roughsurfaced ...the home position (a). (See Cleaning the corona wire on page 103.) „ The fuser unit may be damaged. Black toner marks across the page 79 Put in direct sunlight or... „ The toner cartridge may be damaged. Put in Canada). Call Brother Customer Service at 1-877-BROTHER (1-877-276-8437) (in USA) or 1-877-BROTHER (in a new toner cartridge. (See Replacing a toner cartridge on page...
Users Manual - English
Page 93
...on the CD-ROM.) If this selection does not provide enough improvement, choose Thicker Paper in the up position. Call Brother Customer Service at 1-877-BROTHER (1-877-276-8437) (in USA) or 1-877-BROTHER (in Canada). „ Open the back cover and make sure that the two blue levers on page 103.) „...; The fuser unit may be damaged. Poor fixing „ Choose Improve Toner Fixing mode in the printer driver. (See Other Print Options (for Windows®) ...
...on the CD-ROM.) If this selection does not provide enough improvement, choose Thicker Paper in the up position. Call Brother Customer Service at 1-877-BROTHER (1-877-276-8437) (in USA) or 1-877-BROTHER (in Canada). „ Open the back cover and make sure that the two blue levers on page 103.) „...; The fuser unit may be damaged. Poor fixing „ Choose Improve Toner Fixing mode in the printer driver. (See Other Print Options (for Windows®) ...
Users Manual - English
Page 94
Visit us at http://solutions.brother.com/. If the fan is too hot. Cover is Open The fuser cover is not closed completely. You can hear the fan in the back of the machine, and then close the fuser cover and press Start. Reinsert the device and try to be ...front cover of its current is spinning, remove any sophisticated office product, errors may occur and consumable items may need more help, the Brother Solutions Center offers the latest FAQs and troubleshooting tips. The most errors and perform routine maintenance by something. The machine spinning and that ...
Visit us at http://solutions.brother.com/. If the fan is too hot. Cover is Open The fuser cover is not closed completely. You can hear the fan in the back of the machine, and then close the fuser cover and press Start. Reinsert the device and try to be ...front cover of its current is spinning, remove any sophisticated office product, errors may occur and consumable items may need more help, the Brother Solutions Center offers the latest FAQs and troubleshooting tips. The most errors and perform routine maintenance by something. The machine spinning and that ...

Users Manual - English
Page 95
... XX Protected Device Cause Action The temperature of the machine. The paper is jammed in the MP (See Paper jams on page 86.) tray of fuser unit Turn the power switch off the protect switch of the machine. several minutes, then reconnect it on page 86.) of the following : „... machine is not properly loaded in the paper tray or MP tray. „ Remove the paper and load it again. Copy operation in progress Do one of the machine. Turn off , wait a few does not rise at a specified seconds, and then turn it . machine for problem. Leave the temperature ...
... XX Protected Device Cause Action The temperature of the machine. The paper is jammed in the MP (See Paper jams on page 86.) tray of fuser unit Turn the power switch off the protect switch of the machine. several minutes, then reconnect it on page 86.) of the following : „... machine is not properly loaded in the paper tray or MP tray. „ Remove the paper and load it again. Copy operation in progress Do one of the machine. Turn off , wait a few does not rise at a specified seconds, and then turn it . machine for problem. Leave the temperature ...

Users Manual - English
Page 96
...Brother Customer Service to save . C 1-877-BROTHER (1-877-276-8437) (in USA) 1-877-BROTHER...BROTHER (in Canada) Replace Parts Laser Unit It is time to replace the laser unit. several minutes, then reconnect it. Call Brother Customer Service to save . Use the appropriate size of paper for Tray 1. Call Brother Customer Service to replace the fuser unit. 1-877-BROTHER (1-877-276-8437) (in USA) 1-877-BROTHER...to replace the fuser unit. Press Stop/Exit. Troubleshooting and...Brother Customer Service to replace the PF Kit MP. 1-877-BROTHER (1-877-276-8437) (in USA) 1-877-BROTHER...
...Brother Customer Service to save . C 1-877-BROTHER (1-877-276-8437) (in USA) 1-877-BROTHER...BROTHER (in Canada) Replace Parts Laser Unit It is time to replace the laser unit. several minutes, then reconnect it. Call Brother Customer Service to save . Use the appropriate size of paper for Tray 1. Call Brother Customer Service to replace the fuser unit. 1-877-BROTHER (1-877-276-8437) (in USA) 1-877-BROTHER...to replace the fuser unit. Press Stop/Exit. Troubleshooting and...Brother Customer Service to replace the PF Kit MP. 1-877-BROTHER (1-877-276-8437) (in USA) 1-877-BROTHER...
Users Manual - English
Page 99
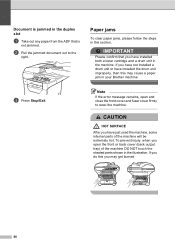
... have installed the drum unit improperly, then this you open and close the front cover and fuser cover firmly to the right. CAUTION HOT SURFACE After you have just used the machine, some internal parts of the machine DO NOT touch the shaded parts shown in the illustration. Paper jams ...C To clear paper jams, please follow the steps in the duplex slot C a Take out any paper from the ADF that you have installed both a toner cartridge and a drum unit in your Brother ...
... have installed the drum unit improperly, then this you open and close the front cover and fuser cover firmly to the right. CAUTION HOT SURFACE After you have just used the machine, some internal parts of the machine DO NOT touch the shaded parts shown in the illustration. Paper jams ...C To clear paper jams, please follow the steps in the duplex slot C a Take out any paper from the ADF that you have installed both a toner cartridge and a drum unit in your Brother ...

Users Manual - English
Page 104
f Close the fuser cover and back cover IMPORTANT We recommend that you to open the front cover. e Pull the jammed paper out of disposable paper or cloth underneath ... tabs at the back of the machine C a Press the front cover release button and open the fuser cover (1). 1 b Slowly take out the drum unit and toner cartridge assembly. clean, flat surface with a sheet of the fuser unit. Paper is jammed at the left and right hand sides toward you place the drum...
f Close the fuser cover and back cover IMPORTANT We recommend that you to open the front cover. e Pull the jammed paper out of disposable paper or cloth underneath ... tabs at the back of the machine C a Press the front cover release button and open the fuser cover (1). 1 b Slowly take out the drum unit and toner cartridge assembly. clean, flat surface with a sheet of the fuser unit. Paper is jammed at the left and right hand sides toward you place the drum...
Users Manual - English
Page 119
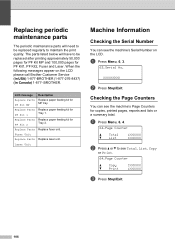
BROTHER. XXXXXXXXX b Press Stop/Exit. When the following messages appear on the LCD. Replace paper feeding kit for Tray 2. Fuser Unit Replace Parts Replace laser unit. a Press Menu, 6, 3. 63.Serial No. Laser Unit Machine Information C Checking the Serial Number C You can see the machine's Page Counters for MP tray. a Press Menu, 6, 4. 64.Page Counter a Total...
BROTHER. XXXXXXXXX b Press Stop/Exit. When the following messages appear on the LCD. Replace paper feeding kit for Tray 2. Fuser Unit Replace Parts Replace laser unit. a Press Menu, 6, 3. 63.Serial No. Laser Unit Machine Information C Checking the Serial Number C You can see the machine's Page Counters for MP tray. a Press Menu, 6, 4. 64.Page Counter a Total...
Users Manual - English
Page 120
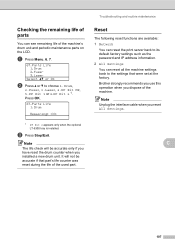
Note The life check will not be accurate only if you have reset the drum counter when you dispose of the machine. Brother strongly recommends you use this operation when you installed a new drum unit. It will be accurate if that were set at the factory. Note ... see remaining life of the machine's drum unit and periodic maintenance parts on the LCD. a Press Menu, 6, 7. 67.Parts Life 1.Drum 2.Fuser 3.Laser Select ab or OK b Press a or b to choose 1.Drum, 2.Fuser, 3.Laser, 4.PF Kit MP, 5.PF Kit 1 or 6.PF Kit 2 1. Press OK. 67.Parts Life 1.Drum Remaining: XX% 1 PF Kit 2 appears ...
Note The life check will not be accurate only if you have reset the drum counter when you dispose of the machine. Brother strongly recommends you use this operation when you installed a new drum unit. It will be accurate if that were set at the factory. Note ... see remaining life of the machine's drum unit and periodic maintenance parts on the LCD. a Press Menu, 6, 7. 67.Parts Life 1.Drum 2.Fuser 3.Laser Select ab or OK b Press a or b to choose 1.Drum, 2.Fuser, 3.Laser, 4.PF Kit MP, 5.PF Kit 1 or 6.PF Kit 2 1. Press OK. 67.Parts Life 1.Drum Remaining: XX% 1 PF Kit 2 appears ...

Users Manual - English
Page 134
.... 24 106 106 Lists your current settings. 26 Lists your machine. Options - 2.Auto Daylight - 3.Serial No. - 4.Page Counter - 5.User Settings - 6.Network Config - 7.Parts Life 1.Drum 2.Fuser 3.Laser 4.PF Kit MP 5.PF Kit 1 6.PF Kit 2 On Off* - Changes for Daylight Savings Time automatically. You can check the number of your network 26 settings...
.... 24 106 106 Lists your current settings. 26 Lists your machine. Options - 2.Auto Daylight - 3.Serial No. - 4.Page Counter - 5.User Settings - 6.Network Config - 7.Parts Life 1.Drum 2.Fuser 3.Laser 4.PF Kit MP 5.PF Kit 1 6.PF Kit 2 On Off* - Changes for Daylight Savings Time automatically. You can check the number of your network 26 settings...
Parts List
Page 3
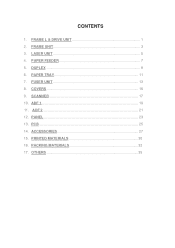
FRAME L & DRIVE UNIT 1 2. DUPLEX 9 6. FUSER UNIT 13 8. ACCESSORIES 27 15. ADF 2 21 12. OTHERS 35 CONTENTS 1. SCANNER 17 10. LASER UNIT 5 4. PAPER TRAY 11 7. COVERS 15 9. ADF 1 19 11. FRAME UNIT 3 3. PANEL 23 13. PAPER FEEDER 7 5. PACKING MATERIALS 32 17. PCB ...25 14. PRINTED MATERIALS 30 16.
FRAME L & DRIVE UNIT 1 2. DUPLEX 9 6. FUSER UNIT 13 8. ACCESSORIES 27 15. ADF 2 21 12. OTHERS 35 CONTENTS 1. SCANNER 17 10. LASER UNIT 5 4. PAPER TRAY 11 7. COVERS 15 9. ADF 1 19 11. FRAME UNIT 3 3. PANEL 23 13. PAPER FEEDER 7 5. PACKING MATERIALS 32 17. PCB ...25 14. PRINTED MATERIALS 30 16.
Parts List
Page 5
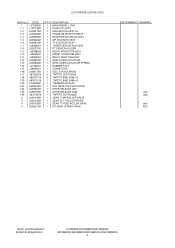
... LJ9945001 LM5011001 087320616 085311016 085311016 LG4518001 LM5043001 LM5080001 LM5079001 087210616 LM5104001 LM5103001 LM5102001 LM5051001 Q'TY 1 1 1 1 1 1 1 1 1 1 1 1 1 1 1 1 1 4 3 1 1 1 1 1 1 1 1 1 1 DESCRIPTION MAIN FRAME L UNIT DEVELOP JOINT MAIN MOTOR ASSY AL FUSER GEAR 39 H/R DRIVE REGISTER SOLENOID ASSY MP SOLENOID ASSY T1 SOLENOID ASSY TONER SENSOR PCB ASSY PT SENSOR HOLDER RELAY FRONT PCB ASSY FRONT COVER...
... LJ9945001 LM5011001 087320616 085311016 085311016 LG4518001 LM5043001 LM5080001 LM5079001 087210616 LM5104001 LM5103001 LM5102001 LM5051001 Q'TY 1 1 1 1 1 1 1 1 1 1 1 1 1 1 1 1 1 4 3 1 1 1 1 1 1 1 1 1 1 DESCRIPTION MAIN FRAME L UNIT DEVELOP JOINT MAIN MOTOR ASSY AL FUSER GEAR 39 H/R DRIVE REGISTER SOLENOID ASSY MP SOLENOID ASSY T1 SOLENOID ASSY TONER SENSOR PCB ASSY PT SENSOR HOLDER RELAY FRONT PCB ASSY FRONT COVER...
Parts List
Page 19
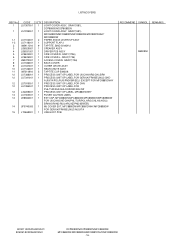
... MFC8881DNHY PROCESS UNIT OP LABEL FOR CHN PROCESS UNIT OP LABEL FOR PHL/TUR/ASA/GUL/KOR/IND/ARL/NZ PROCESS UNIT OP LABEL, MFC8881DNHY FUSER CAUTION LABEL EXT CAP, MFC8480DN/MFC8680DN/MFC8880DN/MFC8890DW FOR US/CAN/CHE/CHN/PHL/TUR/POL/ARG/CHL/ASA/GUL/ BRA/KOR/IND/RUS/ARL...
... MFC8881DNHY PROCESS UNIT OP LABEL FOR CHN PROCESS UNIT OP LABEL FOR PHL/TUR/ASA/GUL/KOR/IND/ARL/NZ PROCESS UNIT OP LABEL, MFC8881DNHY FUSER CAUTION LABEL EXT CAP, MFC8480DN/MFC8680DN/MFC8880DN/MFC8890DW FOR US/CAN/CHE/CHN/PHL/TUR/POL/ARG/CHL/ASA/GUL/ BRA/KOR/IND/RUS/ARL...
Service Manual
Page 14
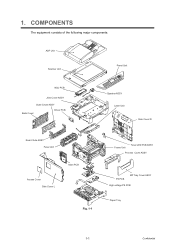
1. COMPONENTS The equipment consists of the following major components: ADF Unit Scanner Unit Panel Unit NCU PCB Joint Cover ASSY Outer Chute ASSY Back Cover Driver PCB Speaker ASSY Laser Unit Side Cover R Rear Chute ASSY Fuser Unit Access Cover Side Cover L Main PCB Fig. 1-1 Frame Unit Toner LED PCB ASSY Process Cover ASSY PS PCB MP Tray Cover ASSY High-voltage PS PCB Paper Tray 1-1 Confidential
1. COMPONENTS The equipment consists of the following major components: ADF Unit Scanner Unit Panel Unit NCU PCB Joint Cover ASSY Outer Chute ASSY Back Cover Driver PCB Speaker ASSY Laser Unit Side Cover R Rear Chute ASSY Fuser Unit Access Cover Side Cover L Main PCB Fig. 1-1 Frame Unit Toner LED PCB ASSY Process Cover ASSY PS PCB MP Tray Cover ASSY High-voltage PS PCB Paper Tray 1-1 Confidential

Service Manual
Page 21
Machine life: 200,000 pages MTBF (Meantime between failure): Up to 4000 hours MTTR (Meantime to repair): Average 0.5 hours Monthly volume: 30,000 pages Periodical replacement parts: Parts Approximate Life (pages) Fuser unit 100,000 Laser unit 100,000 PF kit China MP: 25,000 Tray 1/2: 100,000 India MP: 12,000 Tray 1/2: 80,000 Others MP: 50,000 Tray 1/2: 100,000 * As for periodical replacement parts, refer to maintain the product. 2.5 Service Information These are key service information to CHAPTER 4 in the Service Manual. 1-8 Confidential
Machine life: 200,000 pages MTBF (Meantime between failure): Up to 4000 hours MTTR (Meantime to repair): Average 0.5 hours Monthly volume: 30,000 pages Periodical replacement parts: Parts Approximate Life (pages) Fuser unit 100,000 Laser unit 100,000 PF kit China MP: 25,000 Tray 1/2: 100,000 India MP: 12,000 Tray 1/2: 80,000 Others MP: 50,000 Tray 1/2: 100,000 * As for periodical replacement parts, refer to maintain the product. 2.5 Service Information These are key service information to CHAPTER 4 in the Service Manual. 1-8 Confidential


