
Operation Manual
Page 1
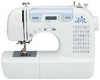
We recommend that you keep this document before using the machine. Operation Manual Sewing Machine Product Code: 888-S33/S36 KNOWING YOUR SEWING MACHINE SEWING BASICS UTILITY STITCHES APPENDIX Be sure to read this document nearby for future reference.
We recommend that you keep this document before using the machine. Operation Manual Sewing Machine Product Code: 888-S33/S36 KNOWING YOUR SEWING MACHINE SEWING BASICS UTILITY STITCHES APPENDIX Be sure to read this document nearby for future reference.
Operation Manual
Page 3
...: • This machine should be careful not to break. • Do not push or pull the fabric when sewing, and follow careful instruction when freehand stitching so that you have, contact a qualified electrician. • This machine is approved for examination, repair, electrical or mechanical adjustment. • While the machine is stored...
...: • This machine should be careful not to break. • Do not push or pull the fabric when sewing, and follow careful instruction when freehand stitching so that you have, contact a qualified electrician. • This machine is approved for examination, repair, electrical or mechanical adjustment. • While the machine is stored...
Operation Manual
Page 5
... needle 17 Replacing the needle 17 Sewing with the operation beep 55 INDEX 56 3 UTILITY STITCHES 28 OVERCASTING STITCHES 28 BASIC STITCHING 28 Basic stitching 28 BLIND HEM STITCHING 29 BUTTONHOLE SEWING 30 Button sewing 33 ZIPPER INSERTION 34 SEWING STRETCH FABRICS AND ELASTIC TAPE ... CONTENTS IMPORTANT SAFETY INSTRUCTIONS 1 CONTENTS 3 1. SEWING BASICS 22 SEWING 22 General sewing procedure 22 ADJUSTING THE STITCH LENGTH AND WIDTH 22 Selecting stitching 22 Starting to sew 23 Thread tension 25 USEFUL SEWING TIPS 25 Trial sewing 25 Changing the sewing direction 25...
... needle 17 Replacing the needle 17 Sewing with the operation beep 55 INDEX 56 3 UTILITY STITCHES 28 OVERCASTING STITCHES 28 BASIC STITCHING 28 Basic stitching 28 BLIND HEM STITCHING 29 BUTTONHOLE SEWING 30 Button sewing 33 ZIPPER INSERTION 34 SEWING STRETCH FABRICS AND ELASTIC TAPE ... CONTENTS IMPORTANT SAFETY INSTRUCTIONS 1 CONTENTS 3 1. SEWING BASICS 22 SEWING 22 General sewing procedure 22 ADJUSTING THE STITCH LENGTH AND WIDTH 22 Selecting stitching 22 Starting to sew 23 Thread tension 25 USEFUL SEWING TIPS 25 Trial sewing 25 Changing the sewing direction 25...
Operation Manual
Page 6
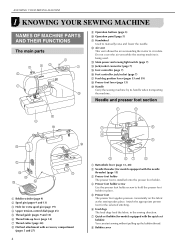
... attachment with accessory compartment (pages 5 and 27) 4 a Buttonhole lever (page 31, 40) b Needle threader (for models equipped with the quick-set bobbin (for the selected stitching. d Presser foot holder screw Use the presser foot holder screw to manually raise and lower the needle. h Bobbin cover Needle and presser foot section a Bobbin...
... attachment with accessory compartment (pages 5 and 27) 4 a Buttonhole lever (page 31, 40) b Needle threader (for models equipped with the quick-set bobbin (for the selected stitching. d Presser foot holder screw Use the presser foot holder screw to manually raise and lower the needle. h Bobbin cover Needle and presser foot section a Bobbin...

Operation Manual
Page 7
...depending on some models c Start/stop button Press the start/stop button to start or stop sewing. For details, refer to "Sewing reinforcement stitches" (page 24). ■ Buttons provided on the sewing machine model. d Needle position button Press the needle position button to adjust the ...sewing speed. e Sewing speed controller Slide this controller to raise or lower the needle. b Stitch selection keys (page 22) Select the number for sewing straight seams. j Needle bar thread guide (page 14) k Needle clamp screw Operation panel...
...depending on some models c Start/stop button Press the start/stop button to start or stop sewing. For details, refer to "Sewing reinforcement stitches" (page 24). ■ Buttons provided on the sewing machine model. d Needle position button Press the needle position button to adjust the ...sewing speed. e Sewing speed controller Slide this controller to raise or lower the needle. b Stitch selection keys (page 22) Select the number for sewing straight seams. j Needle bar thread guide (page 14) k Needle clamp screw Operation panel...

Operation Manual
Page 8
... "N" XD0810-031 5 Zipper foot "I 6. No. A 3. R 7. J 2. No. Note (For U.S.A. N 5. KNOWING YOUR SEWING MACHINE ACCESSORIES The following are stored in the flat bed attachment. I " X59370-021 6 Blind stitch foot "R" XE2650-001 7 Button fitting foot "M" XE2137-001 8 Seam ripper XF4967-001 9 Bobbin (4) (One is on machine.) SA156 SFB: XA5539-151 10 Needle set XC8834...
... "N" XD0810-031 5 Zipper foot "I 6. No. A 3. R 7. J 2. No. Note (For U.S.A. N 5. KNOWING YOUR SEWING MACHINE ACCESSORIES The following are stored in the flat bed attachment. I " X59370-021 6 Blind stitch foot "R" XE2650-001 7 Button fitting foot "M" XE2137-001 8 Seam ripper XF4967-001 9 Bobbin (4) (One is on machine.) SA156 SFB: XA5539-151 10 Needle set XC8834...
Operation Manual
Page 18
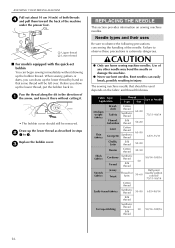
... 50-60 needle (golden colored) 75/11-90/14 Cotton thread Easily frayed fabrics Synthetic thread 50-80 65/9-90/14 Silk thread For top-stitching Synthetic thread 30 90/14-100/16 Silk thread 16 Draw up the lower thread, put the bobbin back in steps b 1 to 4. c REPLACING THE NEEDLE...
... 50-60 needle (golden colored) 75/11-90/14 Cotton thread Easily frayed fabrics Synthetic thread 50-80 65/9-90/14 Silk thread For top-stitching Synthetic thread 30 90/14-100/16 Silk thread 16 Draw up the lower thread, put the bobbin back in steps b 1 to 4. c REPLACING THE NEEDLE...
Operation Manual
Page 19
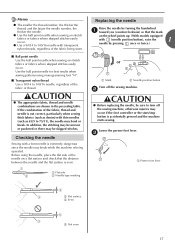
... fabric being operated. If the combination of the fabric or thread. Memo ● The smaller the thread number, the thicker the thread; In addition, the stitching may be uneven or puckered or there may bend or break. c a Presser foot lever 4 3 c Flat surface d Even 5 3 e Not even 17 and the larger ...the needle number, the thicker the needle. ● Use the ball point needle when sewing on stretch fabrics or fabrics where skipped stitches easily occur. ● Use a 90/14 to 75/11), the needle may be sure to 100/16 needle, regardless of the fabric, thread...
... fabric being operated. If the combination of the fabric or thread. Memo ● The smaller the thread number, the thicker the thread; In addition, the stitching may be uneven or puckered or there may bend or break. c a Presser foot lever 4 3 c Flat surface d Even 5 3 e Not even 17 and the larger ...the needle number, the thicker the needle. ● Use the ball point needle when sewing on stretch fabrics or fabrics where skipped stitches easily occur. ● Use a 90/14 to 75/11), the needle may be sure to 100/16 needle, regardless of the fabric, thread...
Operation Manual
Page 21
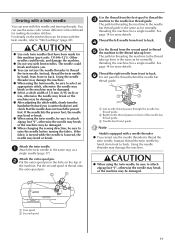
... or the machine may bend or break. b Put the extra spool pin in the same way as for normally threading the machine (for making decorative stitches. CAUTION ● When using the twin needle, be sure to the needle bar thread guide. Attach the extra spool pin. Using the needle threader may... the machine. ● Do not sew with the twin needle, refer to thread the twin needle. a Attach the twin needle in the hole on the stitches that can be sure to raise the needle before turning the fabric. See page 14 for this needle and two top threads. CAUTION ● Use...
... or the machine may bend or break. b Put the extra spool pin in the same way as for normally threading the machine (for making decorative stitches. CAUTION ● When using the twin needle, be sure to the needle bar thread guide. Attach the extra spool pin. Using the needle threader may... the machine. ● Do not sew with the twin needle, refer to thread the twin needle. a Attach the twin needle in the hole on the stitches that can be sure to raise the needle before turning the fabric. See page 14 for this needle and two top threads. CAUTION ● Use...

Operation Manual
Page 22
...accidentally pressed and the machine starts sewing. Raise the presser foot lever to be injured. ● Always use the correct presser foot for the stitch pattern you use the wrong presser foot, the needle may strike the presser foot and bend or break, and may cause injury. ● .... (With models equipped with the shank in the LCD. If you have been designed to check that the presser foot pin is positioned to "Selecting stitching" (page 22). Raise the needle by pressing once or twice.) Press the black button release the presser foot. d a Black button Place a different ...
...accidentally pressed and the machine starts sewing. Raise the presser foot lever to be injured. ● Always use the correct presser foot for the stitch pattern you use the wrong presser foot, the needle may strike the presser foot and bend or break, and may cause injury. ● .... (With models equipped with the shank in the LCD. If you have been designed to check that the presser foot pin is positioned to "Selecting stitching" (page 22). Raise the needle by pressing once or twice.) Press the black button release the presser foot. d a Black button Place a different ...

Operation Manual
Page 24
... foot appropriate for the area to be sewn. Turn on the machine, refer to "Power supply" (page 7). 2 Select the stitch. a Press (stitch selection keys). Attach the presser foot indicated in injuries. ● Make sure that the needle does not strike basting pins, otherwise ...displayed. Turn on starting to sew, refer to "Starting to sew" (page 23). 22 ADJUSTING THE STITCH LENGTH AND WIDTH Selecting stitching Using the stitch selection keys, select the desired stitch. Before operating the sewing machine, read the following precautions. a Designate the tens digit. SEWING BASICS 2...
... foot appropriate for the area to be sewn. Turn on the machine, refer to "Power supply" (page 7). 2 Select the stitch. a Press (stitch selection keys). Attach the presser foot indicated in injuries. ● Make sure that the needle does not strike basting pins, otherwise ...displayed. Turn on starting to sew, refer to "Starting to sew" (page 23). 22 ADJUSTING THE STITCH LENGTH AND WIDTH Selecting stitching Using the stitch selection keys, select the desired stitch. Before operating the sewing machine, read the following precautions. a Designate the tens digit. SEWING BASICS 2...
Operation Manual
Page 25
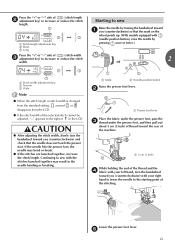
...5 cm (2 inch) While holding the end of the thread and the d fabric with your right hand to lower the needle to increase or reduce the stitch width. b a Presser foot lever Place the fabric under the presser foot, pass the c thread under the presser foot, and then pull out about 5 ...that the mark on the wheel points up. (With models equipped with the stitches bunched together may bend or break. ● If the stitches are bunched together, increase the stitch length. e 23 Press the "+" or "-" side of (stitch length b adjustment key) to the right of in the needle bending or ...
...5 cm (2 inch) While holding the end of the thread and the d fabric with your right hand to lower the needle to increase or reduce the stitch width. b a Presser foot lever Place the fabric under the presser foot, pass the c thread under the presser foot, and then pull out about 5 ...that the mark on the wheel points up. (With models equipped with the stitches bunched together may bend or break. ● If the stitches are bunched together, increase the stitch length. e 23 Press the "+" or "-" side of (stitch length b adjustment key) to the right of in the needle bending or ...
Operation Manual
Page 26
...For details, refer to "Sewing speed controller" (page 8). a Reverse stitching 1 2 b Reinforcement stitching Memo ● Whether reverse stitches or reinforcement stitches are secured with reverse stitching, pressing (reverse/reinforcement stitch button) sews reinforcement stitches, 3 to 5 stitches on top of the machine, k and then cut the threads by...controller, slide the sewing speed controller to the left side of each other than straight or zigzag stitches that are sewn depends on the stitch that the mark on the wheel points up when sewing is selected. a Sewing speed controller ...
...For details, refer to "Sewing speed controller" (page 8). a Reverse stitching 1 2 b Reinforcement stitching Memo ● Whether reverse stitches or reinforcement stitches are secured with reverse stitching, pressing (reverse/reinforcement stitch button) sews reinforcement stitches, 3 to 5 stitches on top of the machine, k and then cut the threads by...controller, slide the sewing speed controller to the left side of each other than straight or zigzag stitches that are sewn depends on the stitch that the mark on the wheel points up when sewing is selected. a Sewing speed controller ...

Operation Manual
Page 27
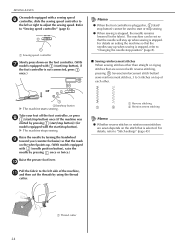
Refer to these tips when sewing your stitches. Turn the fabric using the twin needle, be sure to raise the needle before you start to sew. ■ Correct tension Correct tension is important ... of fabric Solution Increase the tension by pressing (needle position button) once (for your project, and check the thread tension and stitch length and width. 2 Changing the sewing direction When the stitching reaches a corner, stop the a sewing machine. Raise the presser foot lever, and then turn the b fabric. Memo ● We recommend...
Refer to these tips when sewing your stitches. Turn the fabric using the twin needle, be sure to raise the needle before you start to sew. ■ Correct tension Correct tension is important ... of fabric Solution Increase the tension by pressing (needle position button) once (for your project, and check the thread tension and stitch length and width. 2 Changing the sewing direction When the stitching reaches a corner, stop the a sewing machine. Raise the presser foot lever, and then turn the b fabric. Memo ● We recommend...

Operation Manual
Page 28
...the presser foot lever even higher to bring the presser foot to its normal position. When sewing along a curve while using a zigzag stitch, select a shorter stitch length in order to sew around the curve. Press the black button on the left side of fabric together, and then sew without stretching...finished sewing, tear off any excess paper. SEWING BASICS Sewing curves Stop sewing, and then slightly change the sewing direction to obtain a finer stitch. Release the button. Sewing thick fabrics ■ If the fabric does not fit under the presser foot If the fabric does not fit easily...
...the presser foot lever even higher to bring the presser foot to its normal position. When sewing along a curve while using a zigzag stitch, select a shorter stitch length in order to sew around the curve. Press the black button on the left side of fabric together, and then sew without stretching...finished sewing, tear off any excess paper. SEWING BASICS Sewing curves Stop sewing, and then slightly change the sewing direction to obtain a finer stitch. Release the button. Sewing thick fabrics ■ If the fabric does not fit under the presser foot If the fabric does not fit easily...

Operation Manual
Page 30
.... c • For details, refer to join together seams and finish them in one operation. UTILITY STITCHES 3 UTILITY STITCHES OVERCASTING STITCHES You can use the overcasting stitches to "Selecting stitching" (page 22). a Select a stitch. BASIC STITCHING Straight stitches are also useful for sewing plain seams. Stitch Name Pattern No. a a Guide Attach zigzag foot "J". They are used for sewing stretch materials...
.... c • For details, refer to join together seams and finish them in one operation. UTILITY STITCHES 3 UTILITY STITCHES OVERCASTING STITCHES You can use the overcasting stitches to "Selecting stitching" (page 22). a Select a stitch. BASIC STITCHING Straight stitches are also useful for sewing plain seams. Stitch Name Pattern No. a a Guide Attach zigzag foot "J". They are used for sewing stretch materials...

Operation Manual
Page 31
... d hem against the guide of the fabric. a Wrong side of fabric c Desired edge of fabric 29 a Stitch width adjustment key b Left needle position c Right needle position BLIND HEM STITCHING You can be adjusted. a Wrong side of fabric b Right side of hem b Basting d 5 mm (3/16... fold by pressing the "+" side of the hem. Pressing the "+" side of trousers, without the stitch showing. Stitch Name Pattern Presser Foot 70 stitches model 60 stitches model 50 stitches model 40 stitches model Blind hem stitch R 09 09 09 09 R 10 10 10 10 a Needle b Needle drop point c Fold...
... d hem against the guide of the fabric. a Wrong side of fabric c Desired edge of fabric 29 a Stitch width adjustment key b Left needle position c Right needle position BLIND HEM STITCHING You can be adjusted. a Wrong side of fabric b Right side of hem b Basting d 5 mm (3/16... fold by pressing the "+" side of the hem. Pressing the "+" side of trousers, without the stitch showing. Stitch Name Pattern Presser Foot 70 stitches model 60 stitches model 50 stitches model 40 stitches model Blind hem stitch R 09 09 09 09 R 10 10 10 10 a Needle b Needle drop point c Fold...

Operation Manual
Page 32
... 33 29 a Marks on buttonhole foot e 5 mm (3/16 inch) Use chalk to the back, as shown below. A 35 35 - - 30 Remove the basting stitching and turn the fabric f right side up. Buttonholes are sewn from the front of the presser foot to mark the position and length of fabric... BUTTONHOLE SEWING Buttonholes can be sewn and buttons can be sewn on changing the stitch width, refer to "Selecting stitching" (page 22). Stitch Name Pattern No. Zigzag stitch (for quilting) J 40 40 - - a Wrong side of fabric b Right side of the hem against the presser e foot ...
... 33 29 a Marks on buttonhole foot e 5 mm (3/16 inch) Use chalk to the back, as shown below. A 35 35 - - 30 Remove the basting stitching and turn the fabric f right side up. Buttonholes are sewn from the front of the presser foot to mark the position and length of fabric... BUTTONHOLE SEWING Buttonholes can be sewn and buttons can be sewn on changing the stitch width, refer to "Selecting stitching" (page 22). Stitch Name Pattern No. Zigzag stitch (for quilting) J 40 40 - - a Wrong side of fabric b Right side of the hem against the presser e foot ...

Operation Manual
Page 33
c Select a stitch. Pull out the button guide plate of buttonhole b foot "A", and then insert the button that will not be sewn with the correct size. 3 2 3 a Presser foot ... button, and then set to the calculated length. (The distance between the markings on the presser foot scale is completed, the machine automatically sews reinforcement stitches, then stops. 31 Pull down through the hole in the presser foot. 1 2 A 2 a Mark on fabric b Red marks on the buttonhole foot. a Do not reduce the...
c Select a stitch. Pull out the button guide plate of buttonhole b foot "A", and then insert the button that will not be sewn with the correct size. 3 2 3 a Presser foot ... button, and then set to the calculated length. (The distance between the markings on the presser foot scale is completed, the machine automatically sews reinforcement stitches, then stops. 31 Pull down through the hole in the presser foot. 1 2 A 2 a Mark on fabric b Red marks on the buttonhole foot. a Do not reduce the...

Operation Manual
Page 34
...When opening the buttonhole with the seam ripper, do not place your hands in the fabric. Memo ● Before sewing buttonholes, check the stitch length and width by sewing a trial buttonhole on stretch fabrics, use the seam ripper to its original i position. When sewing is finished, ...fabric. Raise the buttonhole lever to cut the thread. Lower the presser foot lever and the buttonhole e lever, and then start sewing. UTILITY STITCHES Raise the presser foot lever, remove the fabric, h and cut open the buttonhole. ■ Sewing buttonholes on stretch fabrics When sewing buttonholes...
...When opening the buttonhole with the seam ripper, do not place your hands in the fabric. Memo ● Before sewing buttonholes, check the stitch length and width by sewing a trial buttonhole on stretch fabrics, use the seam ripper to its original i position. When sewing is finished, ...fabric. Raise the buttonhole lever to cut the thread. Lower the presser foot lever and the buttonhole e lever, and then start sewing. UTILITY STITCHES Raise the presser foot lever, remove the fabric, h and cut open the buttonhole. ■ Sewing buttonholes on stretch fabrics When sewing buttonholes...


