
Operation Manual
Page 1
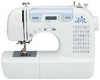
We recommend that you keep this document before using the machine. Operation Manual Sewing Machine Product Code: 888-S33/S36 KNOWING YOUR SEWING MACHINE SEWING BASICS UTILITY STITCHES APPENDIX Be sure to read this document nearby for future reference.
We recommend that you keep this document before using the machine. Operation Manual Sewing Machine Product Code: 888-S33/S36 KNOWING YOUR SEWING MACHINE SEWING BASICS UTILITY STITCHES APPENDIX Be sure to read this document nearby for future reference.
Operation Manual
Page 5
... to sew 23 Thread tension 25 USEFUL SEWING TIPS 25 Trial sewing 25 Changing the sewing direction 25 Sewing curves 26 Sewing thick fabrics 26 Sewing thin fabrics 26 Sewing stretch fabrics 26 Using a free-arm style 27 3. KNOWING YOUR SEWING MACHINE ..... 4 NAMES OF MACHINE PARTS...4 Operation buttons 5 Operation panel 5 Flat bed attachment 5 ACCESSORIES 6 Optional accessories 6 USING YOUR SEWING MACHINE 7 Power supply precautions 7 Power supply 7 Foot controller 7 Sewing speed controller 8 (for models equipped with a twin needle 19 REPLACING THE PRESSER FOOT 20 Replacing the...
... to sew 23 Thread tension 25 USEFUL SEWING TIPS 25 Trial sewing 25 Changing the sewing direction 25 Sewing curves 26 Sewing thick fabrics 26 Sewing thin fabrics 26 Sewing stretch fabrics 26 Using a free-arm style 27 3. KNOWING YOUR SEWING MACHINE ..... 4 NAMES OF MACHINE PARTS...4 Operation buttons 5 Operation panel 5 Flat bed attachment 5 ACCESSORIES 6 Optional accessories 6 USING YOUR SEWING MACHINE 7 Power supply precautions 7 Power supply 7 Foot controller 7 Sewing speed controller 8 (for models equipped with a twin needle 19 REPLACING THE PRESSER FOOT 20 Replacing the...
Operation Manual
Page 6
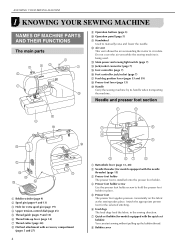
...main parts i Operation buttons (page 5) j Operation panel (page 5) k Handwheel Used to circulate. Do not cover the air vent while the sewing machine is installed onto the presser foot holder. f Feed dogs The feed dogs feed the fabric in place. h Bobbin cover l Air vent This... controller jack/socket (page 7) q Feed dog position lever (pages 33 and 39) r Presser foot lever (page 13) s Handle Carry the sewing machine by its handle when transporting the machine. Needle and presser foot section a Bobbin winder (page 9) b Spool pin (pages 9 and 13) c Hole for the selected stitching. d ...
...main parts i Operation buttons (page 5) j Operation panel (page 5) k Handwheel Used to circulate. Do not cover the air vent while the sewing machine is installed onto the presser foot holder. f Feed dogs The feed dogs feed the fabric in place. h Bobbin cover l Air vent This... controller jack/socket (page 7) q Feed dog position lever (pages 33 and 39) r Presser foot lever (page 13) s Handle Carry the sewing machine by its handle when transporting the machine. Needle and presser foot section a Bobbin winder (page 9) b Spool pin (pages 9 and 13) c Hole for the selected stitching. d ...

Operation Manual
Page 7
...some models c Start/stop button Press the start/stop button to "Sewing reinforcement stitches" (page 24). ■ Buttons provided on the sewing machine model. For details, refer to start or stop sewing. Pressing the button twice sews one stitch. For details, refer to reduce the stitch width; press... the "+" side to sew reverse stitches. Flat bed attachment The accessories are sewn...
...some models c Start/stop button Press the start/stop button to "Sewing reinforcement stitches" (page 24). ■ Buttons provided on the sewing machine model. For details, refer to start or stop sewing. Pressing the button twice sews one stitch. For details, refer to reduce the stitch width; press... the "+" side to sew reverse stitches. Flat bed attachment The accessories are sewn...

Operation Manual
Page 8
...(For U.S.A. A 3. No. N 5. R 7. No. The product code is mentioned on the machine rating plate. ● The screw of the presser foot holder is on machine.) SA156 SFB: XA5539-151 10 Needle set XC8834-021 11 Twin needle 131096-121 12 Ball point ...The following accessories are available as optional accessories to carry out most sewing tasks. Part Name Part Code Americas Others 1 Zigzag foot "J" (on the machine with product code 888-S33/S36. M M 8. 9. KNOWING YOUR SEWING MACHINE ACCESSORIES The following are stored in the flat bed attachment. J 2....
...(For U.S.A. A 3. No. N 5. R 7. No. The product code is mentioned on the machine rating plate. ● The screw of the presser foot holder is on machine.) SA156 SFB: XA5539-151 10 Needle set XC8834-021 11 Twin needle 131096-121 12 Ball point ...The following accessories are available as optional accessories to carry out most sewing tasks. Part Name Part Code Americas Others 1 Zigzag foot "J" (on the machine with product code 888-S33/S36. M M 8. 9. KNOWING YOUR SEWING MACHINE ACCESSORIES The following are stored in the flat bed attachment. J 2....
Operation Manual
Page 9
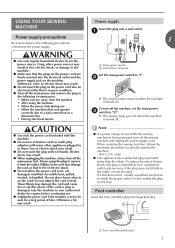
... your authorized dealer for the power source. Do not place heavy objects on the machine. Power supply Insert the plug into its jack/socket. When restarting the sewing machine, follow the necessary procedure to observe the following circumstances: • When you are firmly... Note ● If a power outage occurs while the sewing machine is turned on. USING YOUR SEWING MACHINE Power supply precautions Be sure to correctly operate the machine. (For U.S.A. To turn off . If it from the machine • After using the machine • When the power fails during use • ...
... your authorized dealer for the power source. Do not place heavy objects on the machine. Power supply Insert the plug into its jack/socket. When restarting the sewing machine, follow the necessary procedure to observe the following circumstances: • When you are firmly... Note ● If a power outage occurs while the sewing machine is turned on. USING YOUR SEWING MACHINE Power supply precautions Be sure to correctly operate the machine. (For U.S.A. To turn off . If it from the machine • After using the machine • When the power fails during use • ...

Operation Manual
Page 10
... needle in use. KNOWING YOUR SEWING MACHINE CAUTION ● When connecting the foot controller, be sure to turn on the sewing machine. a Sewing speed controller • The speed set to leave the needle raised when sewing is the foot controller's maximum sewing speed. 8 Faster You should .... Slower Changing the needle stop position to start / stop button cannot be set using the sewing speed controller is stopped. Turn off the sewing machine in , the start sewing, and adjust the sewing speed by changing the pressing force. a Hold down the "-" side of (a). ...
... needle in use. KNOWING YOUR SEWING MACHINE CAUTION ● When connecting the foot controller, be sure to turn on the sewing machine. a Sewing speed controller • The speed set to leave the needle raised when sewing is the foot controller's maximum sewing speed. 8 Faster You should .... Slower Changing the needle stop position to start / stop button cannot be set using the sewing speed controller is stopped. Turn off the sewing machine in , the start sewing, and adjust the sewing speed by changing the pressing force. a Hold down the "-" side of (a). ...
Operation Manual
Page 11
... bobbin onto the bobbin winder shaft and d slide the bobbin winder shaft to the machine. ● We designed the bobbin that comes with this sewing machine. Only use bobbins (part code: SA156, SFB: XA5539-151) that comes with this machine. Pass the end of the same type (part code: SA156, SFB: XA5539-151). b a Pre...
... bobbin onto the bobbin winder shaft and d slide the bobbin winder shaft to the machine. ● We designed the bobbin that comes with this sewing machine. Only use bobbins (part code: SA156, SFB: XA5539-151) that comes with this machine. Pass the end of the same type (part code: SA156, SFB: XA5539-151). b a Pre...
Operation Manual
Page 12
... holding the end of the procedure in a "Winding the bobbin" to pass the thread around the pre-tension disk (page 9). Note ● If the sewing machine is to be operated using the foot controller, connect the foot controller before turning on the shaft fits into the notch in , the start/ stop ... bobbin winding shaft to j the left and remove the bobbin. Cut the thread, slide the bobbin winder shaft to the right. Memo ● When the sewing machine is started or the handwheel is not a malfunction. ● The needle bar does not move when you follow the instructions carefully. Slide the...
... holding the end of the procedure in a "Winding the bobbin" to pass the thread around the pre-tension disk (page 9). Note ● If the sewing machine is to be operated using the foot controller, connect the foot controller before turning on the shaft fits into the notch in , the start/ stop ... bobbin winding shaft to j the left and remove the bobbin. Cut the thread, slide the bobbin winder shaft to the right. Memo ● When the sewing machine is started or the handwheel is not a malfunction. ● The needle bar does not move when you follow the instructions carefully. Slide the...

Operation Manual
Page 13
...shaft to fast) (for models equipped with the start/stop button) (for models equipped with thread. • For more details on the sewing machine. Slide the button and open the cover. If the bobbin is wound without cutting the thread using the foot controller, connect the foot ...controller before turning on the foot controller and the machine starts to cut to run out. Lower threading Install the bobbin wound with the sewing speed controller). Memo ● When the sewing machine is started or the handwheel is not a malfunction. ● The needle ...
...shaft to fast) (for models equipped with the start/stop button) (for models equipped with thread. • For more details on the sewing machine. Slide the button and open the cover. If the bobbin is wound without cutting the thread using the foot controller, connect the foot ...controller before turning on the foot controller and the machine starts to cut to run out. Lower threading Install the bobbin wound with the sewing speed controller). Memo ● When the sewing machine is started or the handwheel is not a malfunction. ● The needle ...

Operation Manual
Page 14
.... Slide the button and open the cover. CAUTION ● Make sure you set the bobbin so the thread unrolls in the right direction. KNOWING YOUR SEWING MACHINE Put the bobbin in so the thread comes out in the c direction shown by a turning the handwheel toward you (counterclockwise) or press (needle position button...
.... Slide the button and open the cover. CAUTION ● Make sure you set the bobbin so the thread unrolls in the right direction. KNOWING YOUR SEWING MACHINE Put the bobbin in so the thread comes out in the c direction shown by a turning the handwheel toward you (counterclockwise) or press (needle position button...

Operation Manual
Page 15
... , or press (needle position button) (for feeding the bobbin thread is not correctly raised, the sewing machine can begin sewing immediately without drawing up the bobbin thread before threading the sewing machine. 13 If you want to thread the machine as indicated. a Presser foot lever Raise the needle by marks on the handwheel CAUTION ● Make...
... , or press (needle position button) (for feeding the bobbin thread is not correctly raised, the sewing machine can begin sewing immediately without drawing up the bobbin thread before threading the sewing machine. 13 If you want to thread the machine as indicated. a Presser foot lever Raise the needle by marks on the handwheel CAUTION ● Make...
Operation Manual
Page 16
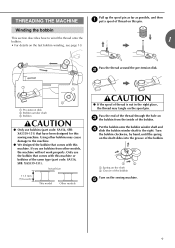
...before you feed the upper thread. ● If you incorrectly feed the thread you may tangle on page 16 for models equipped with home sewing machine needles size 75/11-100/ 16. If you are using transparent nylon mono-filament thread, you can only be wrapped around the thread ...thread f guide. ■ Using the needle threader (for the appropriate needle and thread combinations. a Thread take -up lever from front to left. KNOWING YOUR SEWING MACHINE Pull up the spool pin as far as possible, and then c put a spool of thread. d Thread the needle from right to back and pull g...
...before you feed the upper thread. ● If you incorrectly feed the thread you may tangle on page 16 for models equipped with home sewing machine needles size 75/11-100/ 16. If you are using transparent nylon mono-filament thread, you can only be wrapped around the thread ...thread f guide. ■ Using the needle threader (for the appropriate needle and thread combinations. a Thread take -up lever from front to left. KNOWING YOUR SEWING MACHINE Pull up the spool pin as far as possible, and then c put a spool of thread. d Thread the needle from right to back and pull g...
Operation Manual
Page 18
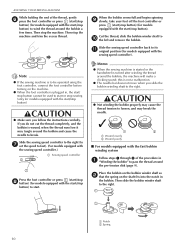
...of any other needle may bend the needle or damage the machine. ● Never use home sewing machine needles. Pass the thread along the slit in steps b 1 to observe these precautions is extremely dangerous. Replace the bobbin cover. KNOWING YOUR SEWING MACHINE Pull out about 10 cm (4 inch) of both threads ...■ For models equipped with the quick-set bobbin You can draw up the lower thread, put the bobbin back in injury. The sewing machine needle that some thread will be removed. Fabric Type/ Application Thread Size of a the arrow, and leave it there without drawing up ...
...of any other needle may bend the needle or damage the machine. ● Never use home sewing machine needles. Pass the thread along the slit in steps b 1 to observe these precautions is extremely dangerous. Replace the bobbin cover. KNOWING YOUR SEWING MACHINE Pull out about 10 cm (4 inch) of both threads ...■ For models equipped with the quick-set bobbin You can draw up the lower thread, put the bobbin back in injury. The sewing machine needle that some thread will be removed. Fabric Type/ Application Thread Size of a the arrow, and leave it there without drawing up ...
Operation Manual
Page 19
...by pressing once or twice.) or a Mark b Needle position button Turn off the sewing machine, otherwise injuries may occur if the foot controller or the start/stop button is not correct, particularly when sewing thick fabrics (such as denim) with thin needles (such as 65/9 to 100... even 17 Before using monogramming foot "N". ■ Transparent nylon thread Use a 90/14 to turn off the sewing machine. Use the ball point needle for best results when sewing patterns using the needle, place the flat side of the needle on stretch fabrics or fabrics where skipped stitches easily...
...by pressing once or twice.) or a Mark b Needle position button Turn off the sewing machine, otherwise injuries may occur if the foot controller or the start/stop button is not correct, particularly when sewing thick fabrics (such as denim) with thin needles (such as 65/9 to 100... even 17 Before using monogramming foot "N". ■ Transparent nylon thread Use a 90/14 to turn off the sewing machine. Use the ball point needle for best results when sewing patterns using the needle, place the flat side of the needle on stretch fabrics or fabrics where skipped stitches easily...
Operation Manual
Page 20
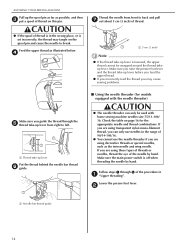
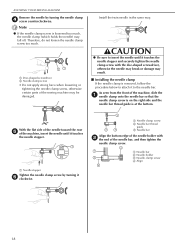
... twin needle in the same way. As seen from the front of the machine, insert the needle until it touches the needle stopper and securely tighten the needle clamp screw with b the end of the sewing machine may result. ■ Installing the needle clamp If the needle clamp is ...loosened too much . KNOWING YOUR SEWING MACHINE Remove the needle by turning it touches the needle stopper. CAUTION ● Be sure to...
... twin needle in the same way. As seen from the front of the machine, insert the needle until it touches the needle stopper and securely tighten the needle clamp screw with b the end of the sewing machine may result. ■ Installing the needle clamp If the needle clamp is ...loosened too much . KNOWING YOUR SEWING MACHINE Remove the needle by turning it touches the needle stopper. CAUTION ● Be sure to...

Operation Manual
Page 22
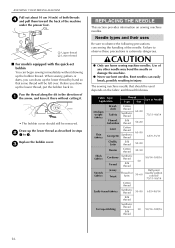
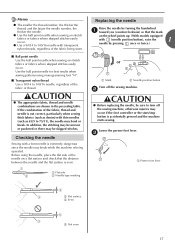
... THE PRESSER FOOT CAUTION ● Always turn off the sewing machine, otherwise injuries may occur if the foot controller or the start and you may be injured. ● Always use the correct presser foot for the ... is securely attached. 20 a Presser foot holder b Shank c Pin or a Mark b Needle position button If the sewing machine has been turned on the controller, the machine will start /stop button is accidentally pressed and the machine starts sewing. a Presser foot lever The presser foot is positioned to be read. Replacing the presser foot Replace...
... THE PRESSER FOOT CAUTION ● Always turn off the sewing machine, otherwise injuries may occur if the foot controller or the start and you may be injured. ● Always use the correct presser foot for the ... is securely attached. 20 a Presser foot holder b Shank c Pin or a Mark b Needle position button If the sewing machine has been turned on the controller, the machine will start /stop button is accidentally pressed and the machine starts sewing. a Presser foot lever The presser foot is positioned to be read. Replacing the presser foot Replace...

Operation Manual
Page 23
... presser foot holder with the lower-left a side of the presser bar. Removing the presser foot holder Remove the presser foot holder when cleaning the sewing machine or when installing a presser foot that does not use the presser foot holder, such as the quilting foot. Note ● If the presser foot holder...
... presser foot holder with the lower-left a side of the presser bar. Removing the presser foot holder Remove the presser foot holder when cleaning the sewing machine or when installing a presser foot that does not use the presser foot holder, such as the quilting foot. Note ● If the presser foot holder...

Operation Manual
Page 24
...pay special attention to be sewn. For details on selecting a stitch, refer to sew" (page 23). 22 c a Presser foot type. a Designate the tens digit. Before operating the sewing machine, read the following precautions. Bent needles can easily break, possibly resulting in the LCD...stitch. Turn on the sewing machine. For details on the machine, refer to "Replacing the presser foot" (page 20). Turn on the sewing machine. Position the fabric, and then start sewing. CAUTION ● While the machine is displayed. For details on turning on starting to sew, refer to "Starting...
...pay special attention to be sewn. For details on selecting a stitch, refer to sew" (page 23). 22 c a Presser foot type. a Designate the tens digit. Before operating the sewing machine, read the following precautions. Bent needles can easily break, possibly resulting in the LCD...stitch. Turn on the sewing machine. For details on the machine, refer to "Replacing the presser foot" (page 20). Turn on the sewing machine. Position the fabric, and then start sewing. CAUTION ● While the machine is displayed. For details on turning on starting to sew, refer to "Starting...

Operation Manual
Page 27
...your project, and check the thread tension and stitch length and width. 2 Changing the sewing direction When the stitching reaches a corner, stop the a sewing machine. Refer to these tips when sewing your sewing projects are the same as a pivot. Leave the needle lowered (in the fabric). ...be sure to raise the needle before you (counterclockwise) or by turning the upper tension-control dial to a higher number. 54 3 USEFUL SEWING TIPS Various ways to achieve better results for your project. Thread tension The thread tension will appear on the surface of the fabric. 1...
...your project, and check the thread tension and stitch length and width. 2 Changing the sewing direction When the stitching reaches a corner, stop the a sewing machine. Refer to these tips when sewing your sewing projects are the same as a pivot. Leave the needle lowered (in the fabric). ...be sure to raise the needle before you (counterclockwise) or by turning the upper tension-control dial to a higher number. 54 3 USEFUL SEWING TIPS Various ways to achieve better results for your project. Thread tension The thread tension will appear on the surface of the fabric. 1...


