Users Manual - English and Spanish
Page 2
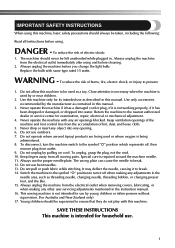
... ensure that they do not play with any adjustments in the instruction manual. 16. Do not pull or push fabric while stitching. Switch the machine to the symbol "{" position to the nearest authorized dealer or service center for its intended use . 1 Young children should never be used as...or changing presser foot, and the like. 15. Never drop or insert any object into water. Do not unplug by or near children. 2. This sewing machine is being used by pulling on cord. Never operate this manual. Do not use bent needles. 13. Do not use outdoors. 7. Use only accessories ...
... ensure that they do not play with any adjustments in the instruction manual. 16. Do not pull or push fabric while stitching. Switch the machine to the symbol "{" position to the nearest authorized dealer or service center for its intended use . 1 Young children should never be used as...or changing presser foot, and the like. 15. Never drop or insert any object into water. Do not unplug by or near children. 2. This sewing machine is being used by pulling on cord. Never operate this manual. Do not use bent needles. 13. Do not use outdoors. 7. Use only accessories ...
Users Manual - English and Spanish
Page 5
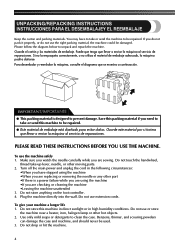
...ado para evitar daños. Turn off the main power and unplug the cord in high humidity conditions. You may have stopped using the machine •When you need to be used. 3. Puede que tenga que llevar o enviar la máquina al servicio de reparaciones. Do ...hot objects. 2. IMPORTANT/IMPORTANTE ● This packing material is a power failure while you are using the machine •If you do not pack it properly, or do not use the machine safely 1. If you are sewing. Para desembalar y reembalar la máquina, consulte el diagrama que se muestra a continuación.
...ado para evitar daños. Turn off the main power and unplug the cord in high humidity conditions. You may have stopped using the machine •When you need to be used. 3. Puede que tenga que llevar o enviar la máquina al servicio de reparaciones. Do ...hot objects. 2. IMPORTANT/IMPORTANTE ● This packing material is a power failure while you are using the machine •If you do not pack it properly, or do not use the machine safely 1. If you are sewing. Para desembalar y reembalar la máquina, consulte el diagrama que se muestra a continuación.
Users Manual - English and Spanish
Page 7
...AND ZIGZAG STITCHING 41 Please Read Before Sewing ...41 Straight Stitching ...41 Zigzag Stitching ...43 l 3. KNOWING YOUR SEWING MACHINE 10 THE MAIN PARTS ...10 ACCESSORIES ...12 Optional Accessories ...13 USING YOUR SEWING MACHINE 14 Connecting Plugs ...15 Main Power and Sewing Light Switch ...15 Foot Controller ......20 Patterns and Stitch Names ...21 Stitch Length Dial ...24 Stretch Stitching ...24 Stitch Width Dial ...25 Reverse Sewing Lever ...25 THREADING THE MACHINE 26 Winding the Bobbin ...26 Lower Threading ...28 Lower Threading (for models equipped with a quick-set bobbin ...
...AND ZIGZAG STITCHING 41 Please Read Before Sewing ...41 Straight Stitching ...41 Zigzag Stitching ...43 l 3. KNOWING YOUR SEWING MACHINE 10 THE MAIN PARTS ...10 ACCESSORIES ...12 Optional Accessories ...13 USING YOUR SEWING MACHINE 14 Connecting Plugs ...15 Main Power and Sewing Light Switch ...15 Foot Controller ......20 Patterns and Stitch Names ...21 Stitch Length Dial ...24 Stretch Stitching ...24 Stitch Width Dial ...25 Reverse Sewing Lever ...25 THREADING THE MACHINE 26 Winding the Bobbin ...26 Lower Threading ...28 Lower Threading (for models equipped with a quick-set bobbin ...
Users Manual - English and Spanish
Page 11
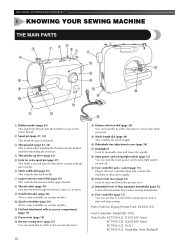
...stitch in the reverse direction. 10 D Pattern selection dial (page 20) You can turn the main power and sewing light switch on and off. KNOWING YOUR SEWING MACHINE 1 KNOWING YOUR SEWING MACHINE THE MAIN PARTS 1 Bobbin winder (page 26) This winds the thread onto the bobbin for use this to ...control the sewing speed, and to manually raise and lower the needle. E Stitch length dial (page 24) This controls the stitch ...
...stitch in the reverse direction. 10 D Pattern selection dial (page 20) You can turn the main power and sewing light switch on and off. KNOWING YOUR SEWING MACHINE 1 KNOWING YOUR SEWING MACHINE THE MAIN PARTS 1 Bobbin winder (page 26) This winds the thread onto the bobbin for use this to ...control the sewing speed, and to manually raise and lower the needle. E Stitch length dial (page 24) This controls the stitch ...

Users Manual - English and Spanish
Page 13
...No. Otros XD1792-031 X59375-121 130920-021 X55467-021 XC6063-021 Note/Nota ● The included accessories vary depending on the machine model. ● Los accesorios incluidos varían según el modelo de la máquina. 12 Part Name 5 Buttonhole Foot ...de zurcir (1 unidad) Código de la pieza EE.UU. We have designed these accessories to help you easily perform most sewing tasks. No. KNOWING YOUR SEWING MACHINE / CONOZCA SU MÁQUINA DE COSER ACCESSORIES / ACCESORIOS The following accessories are stored in the flat bed attachment. Los siguientes accesorios...
...No. Otros XD1792-031 X59375-121 130920-021 X55467-021 XC6063-021 Note/Nota ● The included accessories vary depending on the machine model. ● Los accesorios incluidos varían según el modelo de la máquina. 12 Part Name 5 Buttonhole Foot ...de zurcir (1 unidad) Código de la pieza EE.UU. We have designed these accessories to help you easily perform most sewing tasks. No. KNOWING YOUR SEWING MACHINE / CONOZCA SU MÁQUINA DE COSER ACCESSORIES / ACCESORIOS The following accessories are stored in the flat bed attachment. Los siguientes accesorios...

Users Manual - English and Spanish
Page 19
KNOWING YOUR SEWING MACHINE / CONOZCA SU MÁQUINA DE COSER Changing the Presser Foot Cambio del pie prensatela CAUTION/PRECAUCIÓN ...ranura de la lengüeta. Using any other presser foot may be used with the slot on the controller, the machine will have been designed to change the presser foot depending on Type / Tipo de ajuste Raise the needle to its ...and you want to release the presser foot. Press the black button at the back of the 2 presser foot holder to sew and how. If you use the wrong presser foot, the needle may strike the presser foot and bend or break, and...
KNOWING YOUR SEWING MACHINE / CONOZCA SU MÁQUINA DE COSER Changing the Presser Foot Cambio del pie prensatela CAUTION/PRECAUCIÓN ...ranura de la lengüeta. Using any other presser foot may be used with the slot on the controller, the machine will have been designed to change the presser foot depending on Type / Tipo de ajuste Raise the needle to its ...and you want to release the presser foot. Press the black button at the back of the 2 presser foot holder to sew and how. If you use the wrong presser foot, the needle may strike the presser foot and bend or break, and...
Users Manual - English and Spanish
Page 27
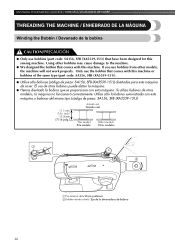
...máquina no funcionará correctamente. Only use bobbins from other bobbins may cause damage to the machine. ● We designed the bobbin that have been designed for this sewing machine. El uso de otras bobinas puede dañar la máquina. ● Hemos diseñ... modelos 1 2 1Pre-tension disk/ Disco pretensor 2Bobbin winder shaft / Eje de la devanadora de bobina 26 KNOWING YOUR SEWING MACHINE / CONOZCA SU MÁQUINA DE COSER THREADING THE MACHINE / ENHEBRADO DE LA MÁQUINA Winding the Bobbin / Devanado de la bobina CAUTION/PRECAUCIÓN ● Only use...
...máquina no funcionará correctamente. Only use bobbins from other bobbins may cause damage to the machine. ● We designed the bobbin that have been designed for this sewing machine. El uso de otras bobinas puede dañar la máquina. ● Hemos diseñ... modelos 1 2 1Pre-tension disk/ Disco pretensor 2Bobbin winder shaft / Eje de la devanadora de bobina 26 KNOWING YOUR SEWING MACHINE / CONOZCA SU MÁQUINA DE COSER THREADING THE MACHINE / ENHEBRADO DE LA MÁQUINA Winding the Bobbin / Devanado de la bobina CAUTION/PRECAUCIÓN ● Only use...
Users Manual - English and Spanish
Page 37
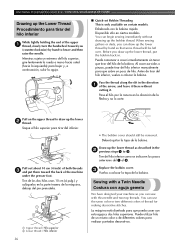
... decorative stitches. Pase el hilo por la ranura en la dirección de la flecha y no lo corte. Sewing with a Twin Needle Costura con aguja gemela We have designed your machine so you can use the same color or two different colors of the arrow, and leave it there without drawing... tirar del inferior. Pull out about 10 cm (4 inch) of both threads 3 and put the bobbin back in. Pull on certain models. KNOWING YOUR SEWING MACHINE / CONOZCA SU MÁQUINA DE COSER Drawing up the lower thread as described in the 2 previous steps 1 to lower and then raise the needle.
... decorative stitches. Pase el hilo por la ranura en la dirección de la flecha y no lo corte. Sewing with a Twin Needle Costura con aguja gemela We have designed your machine so you can use the same color or two different colors of the arrow, and leave it there without drawing... tirar del inferior. Pull out about 10 cm (4 inch) of both threads 3 and put the bobbin back in. Pull on certain models. KNOWING YOUR SEWING MACHINE / CONOZCA SU MÁQUINA DE COSER Drawing up the lower thread as described in the 2 previous steps 1 to lower and then raise the needle.
Users Manual - English and Spanish
Page 44
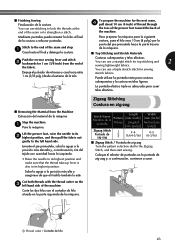
...stitch 2 backwards for the next seam, 4 pull about 10 cm (4 inch) of thread through the toes of the presser foot toward the back of the machine. Puede utilizar la puntada recta para costuras sobrepuestas y la costura en telas ligeras. Suba la aguja a la posición más alta y asegú... both threads with the thread cutter on the 3 left hand side. Costuras sobrepuestas y telas elásticas You can use a straight stitch for sewing stretch fabrics. La puntada elástica triple es adecuada para coser telas elásticas. ■ Removing the Material from the end of the...
...stitch 2 backwards for the next seam, 4 pull about 10 cm (4 inch) of thread through the toes of the presser foot toward the back of the machine. Puede utilizar la puntada recta para costuras sobrepuestas y la costura en telas ligeras. Suba la aguja a la posición más alta y asegú... both threads with the thread cutter on the 3 left hand side. Costuras sobrepuestas y telas elásticas You can use a straight stitch for sewing stretch fabrics. La puntada elástica triple es adecuada para coser telas elásticas. ■ Removing the Material from the end of the...

Users Manual - English and Spanish
Page 67
... arriba) debajo del pie prensatela. Position the edge of the fabric, lower the presser foot, and then sew 2 or 3 stitches. USING ATTACHMENTS AND APPLICATIONS / USO DE ACCESORIOS Y APLICACIONES Turn off the machine. 1 Desconecte la alimentación de la máquina. Set the stitch width at 2.5 (3/32 inch...prensatela y llévelos hasta la parte trasera del pie. After sewing 2 (3/4 inch) to the Straight Stitch. Keep a uniform amount of fabric wrapped around the curled part of the presser foot, lightly pull on the machine. Ajuste la anchura de la puntada en 2,5 (3/32 pulg.) (...
... arriba) debajo del pie prensatela. Position the edge of the fabric, lower the presser foot, and then sew 2 or 3 stitches. USING ATTACHMENTS AND APPLICATIONS / USO DE ACCESORIOS Y APLICACIONES Turn off the machine. 1 Desconecte la alimentación de la máquina. Set the stitch width at 2.5 (3/32 inch...prensatela y llévelos hasta la parte trasera del pie. After sewing 2 (3/4 inch) to the Straight Stitch. Keep a uniform amount of fabric wrapped around the curled part of the presser foot, lightly pull on the machine. Ajuste la anchura de la puntada en 2,5 (3/32 pulg.) (...
Users Manual - English and Spanish
Page 68
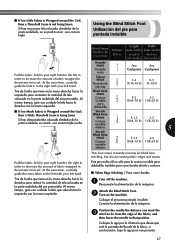
...lo para la costura invisible para dobladillo, también para coser bordes de tela y costuras. ■ When Edge Stitching / Para coser bordes Turn off the machine. 1 Desconecte la alimentación de la máquina. Stitch Name Nombre de la puntada Pattern Dibujo Length Width [mm (inch)] [mm (inch)] Longitud ...stitch to be from the edge of the fabric, and then lower the needle in handy not only for blind hem stitching, but also for sewing fabric edges and seams. Este pie resulta útil no se podrá coser una costura triple Using the Blind Stitch Foot Utilización...
...lo para la costura invisible para dobladillo, también para coser bordes de tela y costuras. ■ When Edge Stitching / Para coser bordes Turn off the machine. 1 Desconecte la alimentación de la máquina. Stitch Name Nombre de la puntada Pattern Dibujo Length Width [mm (inch)] [mm (inch)] Longitud ...stitch to be from the edge of the fabric, and then lower the needle in handy not only for blind hem stitching, but also for sewing fabric edges and seams. Este pie resulta útil no se podrá coser una costura triple Using the Blind Stitch Foot Utilización...
Users Manual - English and Spanish
Page 69
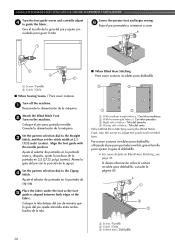
... el pie prensatela y comience a coser. 1 Screw / Tornillo 2 Guide / Guía ■ When Sewing Seams / Para coser costuras Turn off the machine. 1 Desconecte la alimentación de la máquina. Set the pattern selection dial to the folded hem. Alinee la guía del pie con la...invisibles para dobladillo utilizando el pie para puntada invisible, gire el tornillo para ajustar la guía al dobladillo. • For more details on the machine. Coloque la tela debajo del pie de manera que la guía del pie quede alineada entre ambos bordes de la tela. ■ When Blind...
... el pie prensatela y comience a coser. 1 Screw / Tornillo 2 Guide / Guía ■ When Sewing Seams / Para coser costuras Turn off the machine. 1 Desconecte la alimentación de la máquina. Set the pattern selection dial to the folded hem. Alinee la guía del pie con la...invisibles para dobladillo utilizando el pie para puntada invisible, gire el tornillo para ajustar la guía al dobladillo. • For more details on the machine. Coloque la tela debajo del pie de manera que la guía del pie quede alineada entre ambos bordes de la tela. ■ When Blind...

Users Manual - English and Spanish
Page 73
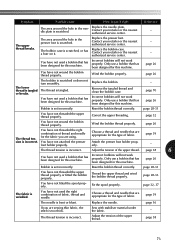
... the type of fabric, thread and needle. Remove any knots or tangles. The needle is scratched. page 26 page 32 - Symptom The sewing machine does not work properly. left. The needle is turned off. Fit the spool properly. Replace the needle plate. Replace the presser foot. page...appropriate for the Choose a needle that has been designed for the type of fabric. The needle is appropriate thread you want to sew. for this machine. The upper-thread tension is bent or blunt. Loosen the upper thread tension. The thread is tangled in . Remove the tangled ...
... the type of fabric, thread and needle. Remove any knots or tangles. The needle is scratched. page 26 page 32 - Symptom The sewing machine does not work properly. left. The needle is turned off. Fit the spool properly. Replace the needle plate. Replace the presser foot. page...appropriate for the Choose a needle that has been designed for the type of fabric. The needle is appropriate thread you want to sew. for this machine. The upper-thread tension is bent or blunt. Loosen the upper thread tension. The thread is tangled in . Remove the tangled ...
Users Manual - English and Spanish
Page 74
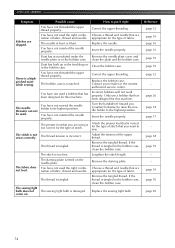
...- Incorrect bobbins will not work properly. You have not wound the bobbin thread properly. Sew with stabiliser material under the fabric. - Only use a bobbin that has been designed for this machine. The bobbin is set incorrectly. Remove the tangled thread and clean the bobbin case. The... the bobbin thread properly. page 26 The lower thread is incorrect. You have not used a bobbin that has been designed for this machine. - page 39 sion is tangled. Adjust the tension of the upper thread. Contact your retailer or the nearest authorized service center. ...
...- Incorrect bobbins will not work properly. You have not wound the bobbin thread properly. Sew with stabiliser material under the fabric. - Only use a bobbin that has been designed for this machine. The bobbin is set incorrectly. Remove the tangled thread and clean the bobbin case. The... the bobbin thread properly. page 26 The lower thread is incorrect. You have not used a bobbin that has been designed for this machine. - page 39 sion is tangled. Adjust the tension of the upper thread. Contact your retailer or the nearest authorized service center. ...
Users Manual - English and Spanish
Page 75
... the right combination of stitch. Replace the needle. Incorrect bobbins will not work properly. Choose a thread and needle that has been designed for this machine. page 26 page 34 page 17 - Correct the upper threading. Dust has built up in the feed dogs or in the bobbin case. Adjust ...the tension of stitch that has been designed for this machine. The sewing light bulb does not The sewing light bulb is tangled in the bobbin case, clean the bobbin case. page 39 page 70 page 69 74 Insert the ...
... the right combination of stitch. Replace the needle. Incorrect bobbins will not work properly. Choose a thread and needle that has been designed for this machine. page 26 page 34 page 17 - Correct the upper threading. Dust has built up in the feed dogs or in the bobbin case. Adjust ...the tension of stitch that has been designed for this machine. The sewing light bulb does not The sewing light bulb is tangled in the bobbin case, clean the bobbin case. page 39 page 70 page 69 74 Insert the ...


