
Users Manual - English and Spanish
Page 2
...mechanical adjustment. • While the machine is stored or in use if you may damage the machine or result in the machine falling, which could cause injuries. • When lifting the machine, be sure to carry it has been dropped or damaged, or water is required when sewing: • Always pay close ...attention to the needle. Lifting the machine by its handle. Do not use the machine. To reduce the risk of burns, fire, electric shock, or injury to turn it off, then ...
...mechanical adjustment. • While the machine is stored or in use if you may damage the machine or result in the machine falling, which could cause injuries. • When lifting the machine, be sure to carry it has been dropped or damaged, or water is required when sewing: • Always pay close ...attention to the needle. Lifting the machine by its handle. Do not use the machine. To reduce the risk of burns, fire, electric shock, or injury to turn it off, then ...
Users Manual - English and Spanish
Page 3
Special care is required around the machine needle. • Switch the machine to the symbol "O" position to turn it could cause the needle to break. • Do not push or pull the fabric when sewing, and follow the troubleshooting table in this manual. Use this manual. Use accessories ...in the needle area. • Do not use of . Benzene, thinner, and scouring powders can damage the case and machine, and should contact your local authorized Brother dealer. Never use plugs with the fuse cover omitted. • If the available electrical outlet is not intended for use ...
Special care is required around the machine needle. • Switch the machine to the symbol "O" position to turn it could cause the needle to break. • Do not push or pull the fabric when sewing, and follow the troubleshooting table in this manual. Use this manual. Use accessories ...in the needle area. • Do not use of . Benzene, thinner, and scouring powders can damage the case and machine, and should contact your local authorized Brother dealer. Never use plugs with the fuse cover omitted. • If the available electrical outlet is not intended for use ...

Users Manual - English and Spanish
Page 4
... quilting foot 42 Using the narrow hemmer foot 42 Using the blind stitch foot 44 6. KNOWING YOUR SEWING MACHINE 4 ACCESSORIES 4 Optional accessories 4 THE MAIN PARTS 5 Flat bed attachment 5 USING YOUR SEWING MACHINE 6 Connecting plugs 6 Main power and sewing light switch 7 Foot controller 7 Checking the needle 7 Replacing the needle 7 Changing the presser foot 8 THE CONTROLS 9 Pattern...
... quilting foot 42 Using the narrow hemmer foot 42 Using the blind stitch foot 44 6. KNOWING YOUR SEWING MACHINE 4 ACCESSORIES 4 Optional accessories 4 THE MAIN PARTS 5 Flat bed attachment 5 USING YOUR SEWING MACHINE 6 Connecting plugs 6 Main power and sewing light switch 7 Foot controller 7 Checking the needle 7 Replacing the needle 7 Changing the presser foot 8 THE CONTROLS 9 Pattern...
Users Manual - English and Spanish
Page 5
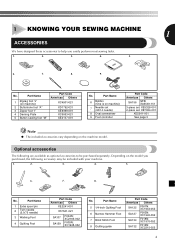
...SA134 F018N: XC1976-052 SA132 F016N: XC2215-052 4 1 KNOWING YOUR SEWING MACHINE 1 ACCESSORIES We have designed these accessories to be included with your machine. 1. 2. 3. 4. 5. 6. 7. 8. Part Name 1 Zigzag foot "J" (on the machine model. Depending on the model you purchased, the following are available ...: XE7064-001 XE5241-001 See page 5 Note ● The included accessories vary depending on machine) 2 Buttonhole foot "A" 3 Zipper foot "I" 4 Darning Plate 5 Button sewing foot "M" Part Code Americas Others XC4901-021 XD1792-031 XE9369-001 XC6063-021 XE2137-001 No.
...SA134 F018N: XC1976-052 SA132 F016N: XC2215-052 4 1 KNOWING YOUR SEWING MACHINE 1 ACCESSORIES We have designed these accessories to be included with your machine. 1. 2. 3. 4. 5. 6. 7. 8. Part Name 1 Zigzag foot "J" (on the machine model. Depending on the model you purchased, the following are available ...: XE7064-001 XE5241-001 See page 5 Note ● The included accessories vary depending on machine) 2 Buttonhole foot "A" 3 Zipper foot "I" 4 Darning Plate 5 Button sewing foot "M" Part Code Americas Others XC4901-021 XD1792-031 XE9369-001 XC6063-021 XE2137-001 No.
Users Manual - English and Spanish
Page 6
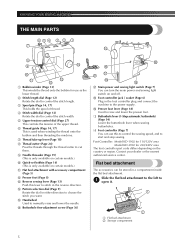
...Plug in the foot controller plug and connect the machine to 1 open it. 1 2 1 Flat bed attachment 2 Storage compartment 5 Foot Controller: Model KD-1902 for 110/120V area Model KD-2902 for use this lever to start and stop sewing. K Foot controller (Page 7) You can be... on certain models.) A Flat bed attachment with accessory compartment (Page 5) B Presser foot (Page 8) C Reverse sewing lever (Page 13) Push this to control the sewing speed, and to stitch in the reverse direction. KNOWING YOUR SEWING MACHINE THE MAIN PARTS 654 3 2 1 7 E 8 9 D 0 A C B 1 Bobbin winder (Page 13...
...Plug in the foot controller plug and connect the machine to 1 open it. 1 2 1 Flat bed attachment 2 Storage compartment 5 Foot Controller: Model KD-1902 for 110/120V area Model KD-2902 for use this lever to start and stop sewing. K Foot controller (Page 7) You can be... on certain models.) A Flat bed attachment with accessory compartment (Page 5) B Presser foot (Page 8) C Reverse sewing lever (Page 13) Push this to control the sewing speed, and to stitch in the reverse direction. KNOWING YOUR SEWING MACHINE THE MAIN PARTS 654 3 2 1 7 E 8 9 D 0 A C B 1 Bobbin winder (Page 13...
Users Manual - English and Spanish
Page 7
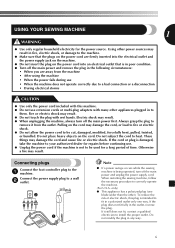
...has a polarized plug (one way. Always grasp the plug to a wall 2 outlet. 2 1 Note ● If a power outage occurs while the sewing machine is in poor condition. ● Turn off the main power and remove the plug in to be cut, damaged, modified, forcefully bent, pulled, twisted,... or bundled. USING YOUR SEWING MACHINE 1 WARNING ● Use only regular household electricity for repairs before continuing use extension cords or multi-plug adapters with many other power ...
...has a polarized plug (one way. Always grasp the plug to a wall 2 outlet. 2 1 Note ● If a power outage occurs while the sewing machine is in poor condition. ● Turn off the main power and remove the plug in to be cut, damaged, modified, forcefully bent, pulled, twisted,... or bundled. USING YOUR SEWING MACHINE 1 WARNING ● Use only regular household electricity for repairs before continuing use extension cords or multi-plug adapters with many other power ...
Users Manual - English and Spanish
Page 8
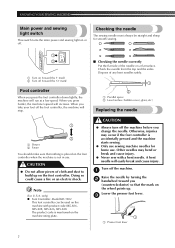
... needle will run at a low speed. KNOWING YOUR SEWING MACHINE Main power and sewing light switch This switch turns the main power and sewing light on or off the foot controller, the machine will increase. Checking the needle The sewing needle must always be used on (toward the 'I' ... if the foot controller is accidentally pressed and the machine starts sewing. ● Only use sewing machine needles for smooth sewing. 1 2 1 Turn on the machine with a bent needle. Otherwise, injuries may bend or break and cause injury. ● Never sew with product code 885-X06, 885-X08, 885-...
... needle will run at a low speed. KNOWING YOUR SEWING MACHINE Main power and sewing light switch This switch turns the main power and sewing light on or off the foot controller, the machine will increase. Checking the needle The sewing needle must always be used on (toward the 'I' ... if the foot controller is accidentally pressed and the machine starts sewing. ● Only use sewing machine needles for smooth sewing. 1 2 1 Turn on the machine with a bent needle. Otherwise, injuries may bend or break and cause injury. ● Never sew with product code 885-X06, 885-X08, 885-...
Users Manual - English and Spanish
Page 9
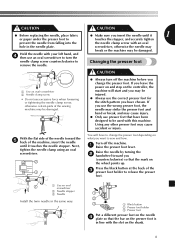
... 2 handwheel toward the 5 back of the needle toward you (counterclockwise) so that the mark on what you want to sew and how. Press the black button at the back of the sewing machine may be injured. ● Always use the correct presser foot for the stitch pattern you have been designed to be... used with your left hand, and 4 then use presser feet that the bar on the presser foot is in the needle plate. Turn off the machine before you change the presser foot depending on the wheel points up. CAUTION CAUTION ● Before replacing the needle, place fabric ● Make sure ...
... 2 handwheel toward the 5 back of the needle toward you (counterclockwise) so that the mark on what you want to sew and how. Press the black button at the back of the sewing machine may be injured. ● Always use the correct presser foot for the stitch pattern you have been designed to be... used with your left hand, and 4 then use presser feet that the bar on the presser foot is in the needle plate. Turn off the machine before you change the presser foot depending on the wheel points up. CAUTION CAUTION ● Before replacing the needle, place fabric ● Make sure ...
Users Manual - English and Spanish
Page 10
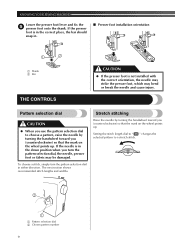
... that the mark on the wheel points up . If the needle is in the correct place, the bar should snap in either direction. KNOWING YOUR SEWING MACHINE Lower the presser foot lever and fix the 5 presser foot onto the shank. Stretch stitching Raise the needle by turning the handwheel toward you turn...
... that the mark on the wheel points up . If the needle is in the correct place, the bar should snap in either direction. KNOWING YOUR SEWING MACHINE Lower the presser foot lever and fix the 5 presser foot onto the shank. Stretch stitching Raise the needle by turning the handwheel toward you turn...
Users Manual - English and Spanish
Page 12
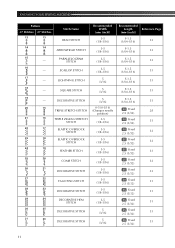
LIGHTNING STITCH 18 - KNOWING YOUR SEWING MACHINE Pattern 37 Stitches 27 Stitches 13 13 Stitch Name BEAD STITCH 14 14 ARROWHEAD STITCH 15 - PARALLELOGRAM STITCH 16 - DECORATIVE STITCH 20 15 TRIPLE STRETCH ...
LIGHTNING STITCH 18 - KNOWING YOUR SEWING MACHINE Pattern 37 Stitches 27 Stitches 13 13 Stitch Name BEAD STITCH 14 14 ARROWHEAD STITCH 15 - PARALLELOGRAM STITCH 16 - DECORATIVE STITCH 20 15 TRIPLE STRETCH ...
Users Manual - English and Spanish
Page 14
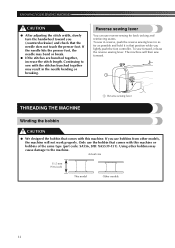
... the bobbin CAUTION ● We designed the bobbin that the needle does not touch the presser foot. The machine will not work properly. To sew forward, release the reverse sewing lever. Reverse sewing lever You can use bobbins from other bobbins may bend or break. ● If the stitches are bunched together, increase the...
... the bobbin CAUTION ● We designed the bobbin that the needle does not touch the presser foot. The machine will not work properly. To sew forward, release the reverse sewing lever. Reverse sewing lever You can use bobbins from other bobbins may bend or break. ● If the stitches are bunched together, increase the...

Users Manual - English and Spanish
Page 16
... Bobbin cover 15 this is turned after winding the thread around the bobbin, the machine will make a clicking sound; Remove the bobbin cover by turning the 2 handwheel toward you. 1 Note ● When the sewing machine is started or the handwheel is not a malfunction. ● The needle bar does... be injured. If you follow the instructions carefully. Raise the needle by sliding it may break the needle. Then stop the machine. KNOWING YOUR SEWING MACHINE While holding the end of the thread, 6 gently press the foot controller to wind the thread around the bobbin and cause...
... Bobbin cover 15 this is turned after winding the thread around the bobbin, the machine will make a clicking sound; Remove the bobbin cover by turning the 2 handwheel toward you. 1 Note ● When the sewing machine is started or the handwheel is not a malfunction. ● The needle bar does... be injured. If you follow the instructions carefully. Raise the needle by sliding it may break the needle. Then stop the machine. KNOWING YOUR SEWING MACHINE While holding the end of the thread, 6 gently press the foot controller to wind the thread around the bobbin and cause...
Users Manual - English and Spanish
Page 17
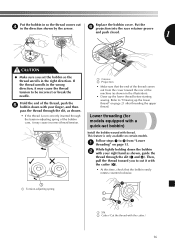
... cutter (3). • At this time, check that the end of the thread comes out from "Lower 1 threading" on page 15. Hold the end of the machine (as shown. • If the thread is only available on page 21 after threading the upper thread. This feature is not correctly inserted through the... 4 from the cover toward you set bobbin) Install the bobbin wound with the cutter.) 16 Follow steps 1 to "Drawing up the lower thread before starting sewing. Replace the bobbin cover.
... cutter (3). • At this time, check that the end of the thread comes out from "Lower 1 threading" on page 15. Hold the end of the machine (as shown. • If the thread is only available on page 21 after threading the upper thread. This feature is not correctly inserted through the... 4 from the cover toward you set bobbin) Install the bobbin wound with the cutter.) 16 Follow steps 1 to "Drawing up the lower thread before starting sewing. Replace the bobbin cover.
Users Manual - English and Spanish
Page 18
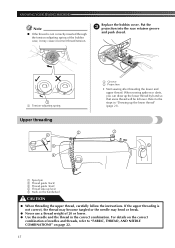
...can draw up lever 5 Mark on the handwheel CAUTION ● When threading the upper thread, carefully follow the instructions. KNOWING YOUR SEWING MACHINE Note ● If the thread is not correct, the thread may become tangled or the needle may cause incorrect thread tension. Put...into the race retainer groove and push closed. 12 1 1 Tension-adjusting spring Upper threading 2 2 3 4 1 Groove 2 Projection • Start sewing after threading the lower and upper thread. If the upper threading is not correctly inserted through the tension-adjusting spring of the bobbin case, it...
...can draw up lever 5 Mark on the handwheel CAUTION ● When threading the upper thread, carefully follow the instructions. KNOWING YOUR SEWING MACHINE Note ● If the thread is not correct, the thread may become tangled or the needle may cause incorrect thread tension. Put...into the race retainer groove and push closed. 12 1 1 Tension-adjusting spring Upper threading 2 2 3 4 1 Groove 2 Projection • Start sewing after threading the lower and upper thread. If the upper threading is not correctly inserted through the tension-adjusting spring of the bobbin case, it...
Users Manual - English and Spanish
Page 19
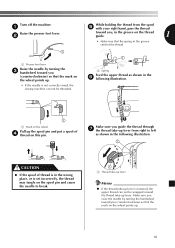
...turning the 3 handwheel toward you (counterclockwise) so that the mark on the wheel points up. • If the needle is not correctly raised, the sewing machine can not be threaded. 1 Spring Feed the upper thread as shown in the following illustration. 1 CAUTION ● If the spool of thread is ...following illustration. 1 1 Mark on the wheel Pull up the spool pin and put a spool of 4 thread on the wheel points up lever. Turn off the machine. 1 Raise the presser foot lever. 2 While holding the thread from right to left as shown in the groove catches the thread. 1 1 1 Presser foot ...
...turning the 3 handwheel toward you (counterclockwise) so that the mark on the wheel points up. • If the needle is not correctly raised, the sewing machine can not be threaded. 1 Spring Feed the upper thread as shown in the following illustration. 1 CAUTION ● If the spool of thread is ...following illustration. 1 1 Mark on the wheel Pull up the spool pin and put a spool of 4 thread on the wheel points up lever. Turn off the machine. 1 Raise the presser foot lever. 2 While holding the thread from right to left as shown in the groove catches the thread. 1 1 1 Presser foot ...
Users Manual - English and Spanish
Page 20
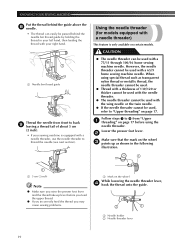
... on the wheel 3 points up lever before using special thread such as shown in your left hand, then feeding the thread with your sewing machine is only available on page 17 before you feed the upper thread. ● If you incorrectly feed the thread you may cause... threader can easily be passed behind the guide above the 8 needle. • The thread can be used with a 75/11 through 100/16 home sewing machine needle. KNOWING YOUR SEWING MACHINE Put the thread behind the needle bar thread guide by holding the thread in the following illustration. 1 1 1 5 cm (2 inch) Note ● ...
... on the wheel 3 points up lever before using special thread such as shown in your left hand, then feeding the thread with your sewing machine is only available on page 17 before you feed the upper thread. ● If you incorrectly feed the thread you may cause... threader can easily be passed behind the guide above the 8 needle. • The thread can be used with a 75/11 through 100/16 home sewing machine needle. KNOWING YOUR SEWING MACHINE Put the thread behind the needle bar thread guide by holding the thread in the following illustration. 1 1 1 5 cm (2 inch) Note ● ...
Users Manual - English and Spanish
Page 22
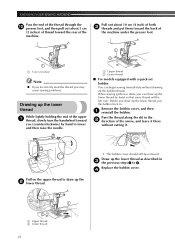
...upper thread to draw up the lower thread by hand to 3. When sewing gathers or darts, you can begin sewing immediately without cutting it there without drawing up the bobbin thread. Replace the bobbin cover. 4 21 KNOWING YOUR SEWING MACHINE Pass the end of the thread through the 0 presser foot, and ... as described in the 2 direction of the arrow, and leave it . Before you draw up the lower thread, put them toward the rear of the machine under the presser foot. 1 1 5 cm (2 inches) Note ● If you incorrectly feed the thread you (counterclockwise) by hand so that some ...
...upper thread to draw up the lower thread by hand to 3. When sewing gathers or darts, you can begin sewing immediately without cutting it there without drawing up the bobbin thread. Replace the bobbin cover. 4 21 KNOWING YOUR SEWING MACHINE Pass the end of the thread through the 0 presser foot, and ... as described in the 2 direction of the arrow, and leave it . Before you draw up the lower thread, put them toward the rear of the machine under the presser foot. 1 1 5 cm (2 inches) Note ● If you incorrectly feed the thread you (counterclockwise) by hand so that some ...
Users Manual - English and Spanish
Page 23
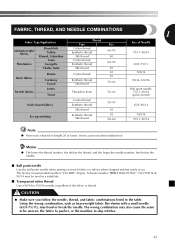
...BALL POINT" 130/705H SUK 90/14 may be uneven, the fabric to pucker, or the machine to 100/16 needle, regardless of weight 20 or lower. The wrong combination may cause machine malfunction. Memo ● The lower the thread number, the thicker the thread; Using the ...wrong combination, such as a substitute. ■ Transparent nylon thread Use a 90/14 to skip stitches. 22 and the larger the needle number, the thicker the needle. ■ Ball point needle Use the ball point needle when sewing...
...BALL POINT" 130/705H SUK 90/14 may be uneven, the fabric to pucker, or the machine to 100/16 needle, regardless of weight 20 or lower. The wrong combination may cause machine malfunction. Memo ● The lower the thread number, the thicker the thread; Using the ...wrong combination, such as a substitute. ■ Transparent nylon thread Use a 90/14 to skip stitches. 22 and the larger the needle number, the thicker the needle. ■ Ball point needle Use the ball point needle when sewing...
Users Manual - English and Spanish
Page 24
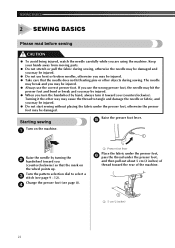
...; Take care that the mark on the wheel points up. If you (counterclockwise). Starting sewing Raise the presser foot lever. 5 Turn on the machine. 1 1 Raise the needle by hand, always turn it the other objects during sewing, otherwise the needle may be damaged and you may be injured. ● Do not ...hit the presser foot and bend or break and you may be injured. ● Do not start sewing without placing the fabric under the presser foot, and then pull out about 5 cm (2 inches) of the machine. 1 1 5 cm (2 inches) 23 Turn the pattern selection dial to tangle and damage the ...
...; Take care that the mark on the wheel points up. If you (counterclockwise). Starting sewing Raise the presser foot lever. 5 Turn on the machine. 1 1 Raise the needle by hand, always turn it the other objects during sewing, otherwise the needle may be damaged and you may be injured. ● Do not ...hit the presser foot and bend or break and you may be injured. ● Do not start sewing without placing the fabric under the presser foot, and then pull out about 5 cm (2 inches) of the machine. 1 1 5 cm (2 inches) 23 Turn the pattern selection dial to tangle and damage the ...
Users Manual - English and Spanish
Page 48
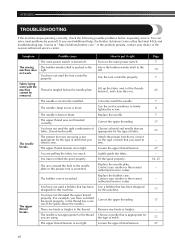
... in the thread. Replace the needle. Use a bobbin that has been designed for this machine. Choose a needle that are using . Visit us at " http://solutions.brother.com ". Possible cause The main power switch is incorrectly installed. Use the foot controller properly... 45 7 8 7 17 22 - 27 - 18, 25 - - 13 17 - 22 27 47 Symptom The sewing machine does not work. How to sew. APPENDIX TROUBLESHOOTING If the machine stops operating correctly, check the following possible problems before requesting service. The needle breaks. The upper thread breaks. Choose a ...
... in the thread. Replace the needle. Use a bobbin that has been designed for this machine. Choose a needle that are using . Visit us at " http://solutions.brother.com ". Possible cause The main power switch is incorrectly installed. Use the foot controller properly... 45 7 8 7 17 22 - 27 - 18, 25 - - 13 17 - 22 27 47 Symptom The sewing machine does not work. How to sew. APPENDIX TROUBLESHOOTING If the machine stops operating correctly, check the following possible problems before requesting service. The needle breaks. The upper thread breaks. Choose a ...


