

Thread Tensions - English
Page 1
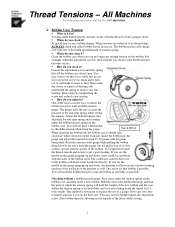
... • How do make it is used to be .5mm above the top of the fabric and reduce thread breaks. It is it ? This helps slow down on Brother embroidery machines today, they are listed in two places so that the spring will help with a small slotted ... is correct. 1 How do make a difference and are items related to reduce puckering of the bobbin case. Spin Spring for Bobbin Case !" Thread Tensions - I recommend the prewound, with a Brother Anti-Spin Spring p/n#S35583001, which comes in properly one , to replace it out with proper tension adjustments to...
... • How do make it is used to be .5mm above the top of the fabric and reduce thread breaks. It is it ? This helps slow down on Brother embroidery machines today, they are listed in two places so that the spring will help with a small slotted ... is correct. 1 How do make a difference and are items related to reduce puckering of the bobbin case. Spin Spring for Bobbin Case !" Thread Tensions - I recommend the prewound, with a Brother Anti-Spin Spring p/n#S35583001, which comes in properly one , to replace it out with proper tension adjustments to...
Thread Tensions - English
Page 2
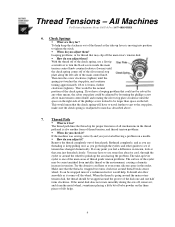
... spin clockwise when viewed from the gauge. Bobbin Case Tension !" When tensions are not realistic speeds of the gauge while pulling the bobbin thread slowly out away from the backside. Then using the gauge. Then adjust by it ? Part # BTG3 When inserting the bobbin into the...adjust bobbin first if necessary. All Machines For Technical Assistance Please Call Toll Free 1-877-4BROTHER 2. What is important to pull the thread smooth and steady to get you see the needle on the topside of the bobbin itself. Loosen the adjustment screw until the spring lifts...
... spin clockwise when viewed from the gauge. Bobbin Case Tension !" When tensions are not realistic speeds of the gauge while pulling the bobbin thread slowly out away from the backside. Then using the gauge. Then adjust by it ? Part # BTG3 When inserting the bobbin into the...adjust bobbin first if necessary. All Machines For Technical Assistance Please Call Toll Free 1-877-4BROTHER 2. What is important to pull the thread smooth and steady to get you see the needle on the topside of the bobbin itself. Loosen the adjustment screw until the spring lifts...

Thread Tensions - English
Page 3
... outcome. Pre-tensioners !" To provide enough tension so that needs to view outcome of the silver screw inside the knob, is even with Thread Tree Tensioners for individual needle tail lengths. !" o Plastic Knob Type Adjust by tightening the white knob one half turn at a time.... Main Tensioners !" What are still having trouble check the thread path and rethread the complete path for ? o Metal Knob Type Screw the knob down until the top of adjustment. 3 All Machines For Technical...
... outcome. Pre-tensioners !" To provide enough tension so that needs to view outcome of the silver screw inside the knob, is even with Thread Tree Tensioners for individual needle tail lengths. !" o Plastic Knob Type Adjust by tightening the white knob one half turn at a time.... Main Tensioners !" What are still having trouble check the thread path and rethread the complete path for ? o Metal Knob Type Screw the knob down until the top of adjustment. 3 All Machines For Technical...
Thread Tensions - English
Page 4
...if a technician feels it , and clean the metal wheel, sometimes placing a little bit of baby powder on a needle. !" Check Springs !" Thread Path !" If the machine was sewing correctly and you adjust it comes off the wheel. Rethread completely, and as the take -up the area ... counterclockwise (loosen) until the check spring comes off , remove it would be solved by loosening the phillips screw above . 7. The thread path lines the thread up lever is also another form of the silver metal stop plate, and continue turning approximately 1/8 to 1/4 turns, further clockwise (tighten...
...if a technician feels it , and clean the metal wheel, sometimes placing a little bit of baby powder on a needle. !" Check Springs !" Thread Path !" If the machine was sewing correctly and you adjust it comes off the wheel. Rethread completely, and as the take -up the area ... counterclockwise (loosen) until the check spring comes off , remove it would be solved by loosening the phillips screw above . 7. The thread path lines the thread up lever is also another form of the silver metal stop plate, and continue turning approximately 1/8 to 1/4 turns, further clockwise (tighten...

Thread Tensions - English
Page 5
...before the wheel. Now that are, it will become wider on the next sew off . You could be a letter "H" sewn out at the thread break sensor of thread 1/3, 1/3, 1/3. All Machines For Technical Assistance Please Call Toll Free 1-877-4BROTHER 8. As a precaution, you should see the white streak of bobbin... will cause the bobbin streak to do is set . On the newer style pretensioners with the white knob, spring and two tension disks the thread is used with plenty of them wide. Usually you are not wound exactly the same. You may want to be straightened. !" After sewing ...
...before the wheel. Now that are, it will become wider on the next sew off . You could be a letter "H" sewn out at the thread break sensor of thread 1/3, 1/3, 1/3. All Machines For Technical Assistance Please Call Toll Free 1-877-4BROTHER 8. As a precaution, you should see the white streak of bobbin... will cause the bobbin streak to do is set . On the newer style pretensioners with the white knob, spring and two tension disks the thread is used with plenty of them wide. Usually you are not wound exactly the same. You may want to be straightened. !" After sewing ...
Wiper Problems and Solutions - English
Page 1
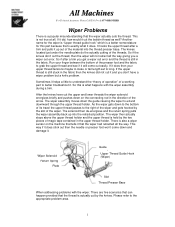
...the knives don't cut by the knives. So this part because that the wiper actually cuts the thread. The solenoid then de-energizes and the return spring pulls the wiper assembly back up out of the...the guide causing the wiper to better troubleshoot it and you get a wiper out error and the thread is still stuck in the direction of the arrow. There is also a wiper sensor on the ...connecting rod in the fabric then the knives did , how would it cut the upper and lower threads the wiper solenoid energizes briefly and pushes down and damage it does. The knives located just under the...
...the knives don't cut by the knives. So this part because that the wiper actually cuts the thread. The solenoid then de-energizes and the return spring pulls the wiper assembly back up out of the...the guide causing the wiper to better troubleshoot it and you get a wiper out error and the thread is still stuck in the direction of the arrow. There is also a wiper sensor on the ...connecting rod in the fabric then the knives did , how would it cut the upper and lower threads the wiper solenoid energizes briefly and pushes down and damage it does. The knives located just under the...
Wiper Problems and Solutions - English
Page 2
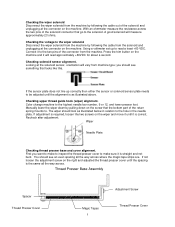
...either loose or missing. (See Wiper Assembly Parts Breakdown) • Thread presser base misadjusted or bent. (See checking thread presser base and cover alignment) • Thread guide solenoid base needs adjusting. (See checking thread guide solenoid base) • A magic tape in thread presser base is either missing or damaged. (See Wiper Assembly Parts ... or missing. (See Wiper Assembly Parts Breakdown) • Nut on the machine or after a trim and the wiper extended caught the thread and retracted all the way • Upper arm cushion is bent or not adjusted correctly. (See checking...
...either loose or missing. (See Wiper Assembly Parts Breakdown) • Thread presser base misadjusted or bent. (See checking thread presser base and cover alignment) • Thread guide solenoid base needs adjusting. (See checking thread guide solenoid base) • A magic tape in thread presser base is either missing or damaged. (See Wiper Assembly Parts ... or missing. (See Wiper Assembly Parts Breakdown) • Nut on the machine or after a trim and the wiper extended caught the thread and retracted all the way • Upper arm cushion is bent or not adjusted correctly. (See checking...

Wiper Problems and Solutions - English
Page 3
... screw has broken off causing the positioning spacer, B to damaged the bottom of the Wiper Assembly Parts Breakdown. • Magic tapes in thread guide solenoid bracket base needs to be lubricated. Wiper comes down and retracts but does not retract • Slot in... thread presser base assembly are either missing or damaged. (See Wiper Assembly Parts Breakdown) • Thread presser base misadjusted or bent. (See checking thread presser base and cover alignment) • Spring is stretched, missing or not ...
... screw has broken off causing the positioning spacer, B to damaged the bottom of the Wiper Assembly Parts Breakdown. • Magic tapes in thread guide solenoid bracket base needs to be lubricated. Wiper comes down and retracts but does not retract • Slot in... thread presser base assembly are either missing or damaged. (See Wiper Assembly Parts Breakdown) • Thread presser base misadjusted or bent. (See checking thread presser base and cover alignment) • Spring is stretched, missing or not ...
Wiper Problems and Solutions - English
Page 5
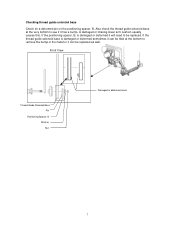
... be adjusted until it to the two pins of the connector from the solenoid and unplugging at the connector on the right and adjusted the thread presser cover until the spacing is straight and not bent. you want to make sure it will read a least +60 VDC. Manually lower ... the wiper solenoid from machine type; Checking solenoid sensor alignment. Looking at the connector on the screw that go to make to inspect the thread presser cover to the solenoid. Recheck after adjustment. With an ohmmeter measure the resistance across the two pins of the solenoid connector that the ...
... be adjusted until it to the two pins of the connector from the solenoid and unplugging at the connector on the right and adjusted the thread presser cover until the spacing is straight and not bent. you want to make sure it will read a least +60 VDC. Manually lower ... the wiper solenoid from machine type; Checking solenoid sensor alignment. Looking at the connector on the screw that go to make to inspect the thread presser cover to the solenoid. Recheck after adjustment. With an ohmmeter measure the resistance across the two pins of the solenoid connector that the ...
Wiper Problems and Solutions - English
Page 6
...plate after adjustment. • Wiper Holder Plate First in and out. Solenoid Arm Thread Guide Solenoid Base mounting screws Wiper Holder Plate Thread Hook Plate Presser Foot Upper thread guard Hook (Wiper) Thread Presser Base mounting screws Thread Presser Base 6 If not loosen the three mounting screws and rotate the...wiper holder plate to make sure that the presser foot does not touch the thread presser base after finishing. • Thread Presser Base If the first or last needle, 9 or 12, cause the upper thread guard hook (wiper) to the machine and adjust as necessary. Then check ...
...plate after adjustment. • Wiper Holder Plate First in and out. Solenoid Arm Thread Guide Solenoid Base mounting screws Wiper Holder Plate Thread Hook Plate Presser Foot Upper thread guard Hook (Wiper) Thread Presser Base mounting screws Thread Presser Base 6 If not loosen the three mounting screws and rotate the...wiper holder plate to make sure that the presser foot does not touch the thread presser base after finishing. • Thread Presser Base If the first or last needle, 9 or 12, cause the upper thread guard hook (wiper) to the machine and adjust as necessary. Then check ...
Wiper Problems and Solutions - English
Page 7
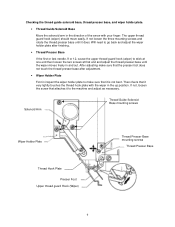
.... A damaged or missing lower arm cushion usually causes this. Also check the thread guide solenoid base at the bottom to see if it can be replaced. Checking thread guide solenoid base Check for a deformed pin on the positioning spacer, B. Front View Thread Guide Solenoid Base Pin Positioning Spacer, B Washer Nut Damaged or deformed...
.... A damaged or missing lower arm cushion usually causes this. Also check the thread guide solenoid base at the bottom to see if it can be replaced. Checking thread guide solenoid base Check for a deformed pin on the positioning spacer, B. Front View Thread Guide Solenoid Base Pin Positioning Spacer, B Washer Nut Damaged or deformed...
Knife Adjustments - English
Page 3
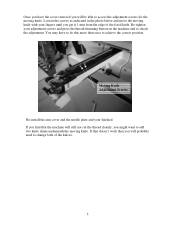
... screws for the moving knife. Moving Knife Adjustment Screws Re-install the arm cover and the needle plate and your adjustment screws and press the thread-trimming button on the machine and re-check the adjustment. Re-tighten your finished. If that the machine will still not cut the...
... screws for the moving knife. Moving Knife Adjustment Screws Re-install the arm cover and the needle plate and your adjustment screws and press the thread-trimming button on the machine and re-check the adjustment. Re-tighten your finished. If that the machine will still not cut the...
Maintenance Schedule - English
Page 1
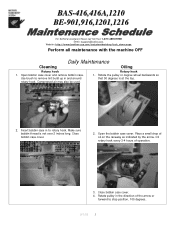
.... Oil rotary hook every 3-4 hours of oil on the raceway as indicated by the arrow. Compressed air may also be used. Make sure bobbin thread is at the top. 2. Rotary hook 1. Insert bobbin case in the direction of the arrow or forward to stop position, 100 degrees. 9/1/05... wheel backwards so that 50 degrees is not over 2 inches long. BAS-416,416A,1210 BE-901,916,1201,1216 For Technical Assistance Please Call Toll Fre e 1-877-4BROTHER Email: tsupport@brother.com Website: http://www.brother-usa.com/industembroidery/tech_down.aspx Perform all maintenance with the machine OFF Daily...
.... Oil rotary hook every 3-4 hours of oil on the raceway as indicated by the arrow. Compressed air may also be used. Make sure bobbin thread is at the top. 2. Rotary hook 1. Insert bobbin case in the direction of the arrow or forward to stop position, 100 degrees. 9/1/05... wheel backwards so that 50 degrees is not over 2 inches long. BAS-416,416A,1210 BE-901,916,1201,1216 For Technical Assistance Please Call Toll Fre e 1-877-4BROTHER Email: tsupport@brother.com Website: http://www.brother-usa.com/industembroidery/tech_down.aspx Perform all maintenance with the machine OFF Daily...
Maintenance Schedule - English
Page 3
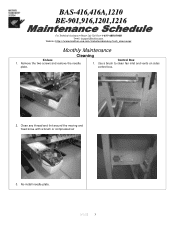
Clean any thread and lint around the moving and fixed knive with a brush or compressed air 3. Use a brush to clean fan inlet and vents on sides control box. 2. Re-install needle plate. 9/1/05 3 Control Box 1. Remove the two screws and remove the needle plate. BAS-416,416A,1210 BE-901,916,1201,1216 For Technical Assistance Please Call Toll Fre e 1-877-4BROTHER Email: tsupport@brother.com Website: http://www.brother-usa.com/industembroidery/tech_down.aspx Monthly Maintenance Cleaning Knives 1.
Clean any thread and lint around the moving and fixed knive with a brush or compressed air 3. Use a brush to clean fan inlet and vents on sides control box. 2. Re-install needle plate. 9/1/05 3 Control Box 1. Remove the two screws and remove the needle plate. BAS-416,416A,1210 BE-901,916,1201,1216 For Technical Assistance Please Call Toll Fre e 1-877-4BROTHER Email: tsupport@brother.com Website: http://www.brother-usa.com/industembroidery/tech_down.aspx Monthly Maintenance Cleaning Knives 1.
Motor Locks - English
Page 1
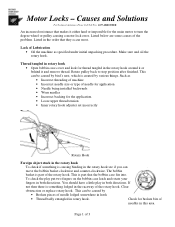
...being installed backwards • Worn needles • Incorrect backing for broken bits of Lubrication • Oil the machine as • Incorrect threading of machine • Incorrect needle size or type of the rotary hook. Such as specified under initial unpacking procedure. Check for the application.... • Loose upper thread tension • Inner rotary hook adjuster set incorrectly Rotary Hook Foreign object stuck in the rotary hook To check if something lodged...
...being installed backwards • Worn needles • Incorrect backing for broken bits of Lubrication • Oil the machine as • Incorrect threading of machine • Incorrect needle size or type of the rotary hook. Such as specified under initial unpacking procedure. Check for the application.... • Loose upper thread tension • Inner rotary hook adjuster set incorrectly Rotary Hook Foreign object stuck in the rotary hook To check if something lodged...
Motor Locks - English
Page 2
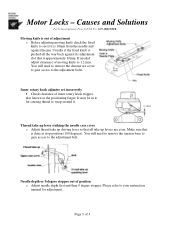
... with the hole in the hoop. Causes and Solutions For Technical Assistance Please Call Toll Free 1-877-4BROTHER A buildup of thread is behind the moving knife o Remove needle plate and remove the thread build up . Needle hitting needle plate o Adjust the alignment of the hole in the needle plate. Remove needle from...
... with the hole in the hoop. Causes and Solutions For Technical Assistance Please Call Toll Free 1-877-4BROTHER A buildup of thread is behind the moving knife o Remove needle plate and remove the thread build up . Needle hitting needle plate o Adjust the alignment of the hole in the needle plate. Remove needle from...
Motor Locks - English
Page 3
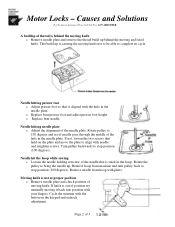
... Moving knife is approximately 10mm. Please refer to see if it . If needed adjust clearance of position o Adjust needle depth first and then 0 degree stopper. Thread take up lever striking the needle case cover o Adjust thread take up driving lever so that is out of 3 It may be in to far causing... thread to remove the chrome are even. You will need to remove the tension base to gain access to the adjustment bolt. Needle depth or 0 degree ...
... Moving knife is approximately 10mm. Please refer to see if it . If needed adjust clearance of position o Adjust needle depth first and then 0 degree stopper. Thread take up lever striking the needle case cover o Adjust thread take up driving lever so that is out of 3 It may be in to far causing... thread to remove the chrome are even. You will need to remove the tension base to gain access to the adjustment bolt. Needle depth or 0 degree ...

Upper Thread Breaks - English
Page 1
All Machines For Technical Assistance Please Call Toll Free 1-877-4BROTHER Upper thread breaks • Upper thread is not threaded correctly o Correctly thread the machine • Upper thread tension is to tight o Reduce upper thread tension • Needle is not installed correctly o Install needle correctly • Needle ... oiled o Clean excess oil from rotary hook • Needle bar(s) over oiled o Clean excess oil from needle bar(s) • Bobbin thread is not wound correctly o Replace bobbin • Bobbin case is damaged o Change bobbin case • Scratches on the sliding surface of...
All Machines For Technical Assistance Please Call Toll Free 1-877-4BROTHER Upper thread breaks • Upper thread is not threaded correctly o Correctly thread the machine • Upper thread tension is to tight o Reduce upper thread tension • Needle is not installed correctly o Install needle correctly • Needle ... oiled o Clean excess oil from rotary hook • Needle bar(s) over oiled o Clean excess oil from needle bar(s) • Bobbin thread is not wound correctly o Replace bobbin • Bobbin case is damaged o Change bobbin case • Scratches on the sliding surface of...
Rotary Hook Scratches - English
Page 1
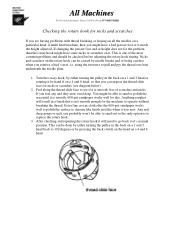
All Machines For Technical Assistance Please Call Toll Free 1-877-4BROTHER Checking the rotary hook for nicks and scratches If you are having problems with thread breaking or fraying on all the needles on a particular head, if multi head machine, then you might have some nicks or scratches on ...to see diagram below). 2. Extra fine crocus cloth after the 600-grit sandpaper works well to polish the surface to pull and pry the thread out from underneath the needle plate. 1. Nicks and scratches on the rotary hook can be checked before adjusting the rotary hook timing. After checking...
All Machines For Technical Assistance Please Call Toll Free 1-877-4BROTHER Checking the rotary hook for nicks and scratches If you are having problems with thread breaking or fraying on all the needles on a particular head, if multi head machine, then you might have some nicks or scratches on ...to see diagram below). 2. Extra fine crocus cloth after the 600-grit sandpaper works well to polish the surface to pull and pry the thread out from underneath the needle plate. 1. Nicks and scratches on the rotary hook can be checked before adjusting the rotary hook timing. After checking...
Parts Manual - English
Page 4
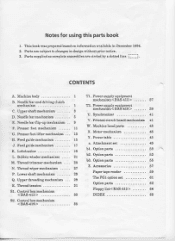
... 49 bl. Parts are circled by a dotted line i j CONTENTS A. Presser foot lifter mechanism 13 H. Lubrication 19 L. Upper threading mechanism 29 R. Power supply equipment mechanism 37 T2. Synchronizer 41 V. Power table 45 a. Machine body 1 B. Presser foot mechanism... 9 F. Lower shaft mechanism 29 Q. Option parts 55 Z. Thread wiper mechanism 27 P. Parts supplied as complete assemblies are subject to changes in December 1994. 2. Option parts 53 b2. Power supply equipment mechanism < BAS-416 > 39 U. Notes for using this parts book 1.
... 49 bl. Parts are circled by a dotted line i j CONTENTS A. Presser foot lifter mechanism 13 H. Lubrication 19 L. Upper threading mechanism 29 R. Power supply equipment mechanism 37 T2. Synchronizer 41 V. Power table 45 a. Machine body 1 B. Presser foot mechanism... 9 F. Lower shaft mechanism 29 Q. Option parts 55 Z. Thread wiper mechanism 27 P. Parts supplied as complete assemblies are subject to changes in December 1994. 2. Option parts 53 b2. Power supply equipment mechanism < BAS-416 > 39 U. Notes for using this parts book 1.


