
Parts Manual - English
Page 33
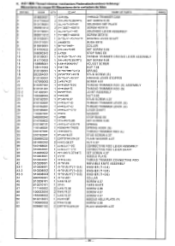
....A"- E.1 ti://r.A.»"-..", 1 7th.i*:./"4.37Ni"?. 1 Ni-r9 1 -ri-V.fli>h> 1 -rt-",,AvE.- 1 II-",,Nri#"(T-0.4) 1 4I-",,Airdir(T=0.5) 1 il-",,Aird,"(T-0.6) 1 -0-",M/351 9. 9"4,37 1 35-%-ri\ 2 Ed. :7,"2.38 2 1/79"4.37 1 '). 9"4.37 1 111.171'( 9F 2 V"- CODE Q'TY t i-.k-r NAME OF PARTS 1 2 3 4 5 6 7 8 9 10 11 12 13 14 15 16 18 20 21 22 22-1 22-2 22-3 23 24 25 26...
....A"- E.1 ti://r.A.»"-..", 1 7th.i*:./"4.37Ni"?. 1 Ni-r9 1 -ri-V.fli>h> 1 -rt-",,AvE.- 1 II-",,Nri#"(T-0.4) 1 4I-",,Airdir(T=0.5) 1 il-",,Aird,"(T-0.6) 1 -0-",M/351 9. 9"4,37 1 35-%-ri\ 2 Ed. :7,"2.38 2 1/79"4.37 1 '). 9"4.37 1 111.171'( 9F 2 V"- CODE Q'TY t i-.k-r NAME OF PARTS 1 2 3 4 5 6 7 8 9 10 11 12 13 14 15 16 18 20 21 22 22-1 22-2 22-3 23 24 25 26...
Parts Manual - English
Page 37
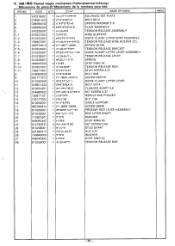
...-40X6 1 -fhak.,(7"5,Tyl1 21-4/1 797,714)"-E 1 -rh-/kYlii)"1 ,l-lizIdir-A"* 2 I--)tvE4 1 ii-3.t.)kovi-" 1 9":, f)"4.37 1 7tirkl --6X8 1 t ,'"D635-40X10 1 A-41a77"IfiN"1 7t7trill-SX14 1 virvci,"95.5 1 7fil--)4* 1.,"4.37VVE 1 111.1*"*,75-' 1 rA-7.94 1 17-7")l,,, ,n 1 /-\"3595-28X8 1 1lio ,y1-"Iii)"--1E 1 ovrliir-9"9 1 .1"h"* 1 1-,ITE6 2 7t1-$,Vy"5.95 1 9":.09", 1 tvl-234.37 1 irir* 1 F.,(9E4 1 iF2it,..it",, SOLENOID SET...
...-40X6 1 -fhak.,(7"5,Tyl1 21-4/1 797,714)"-E 1 -rh-/kYlii)"1 ,l-lizIdir-A"* 2 I--)tvE4 1 ii-3.t.)kovi-" 1 9":, f)"4.37 1 7tirkl --6X8 1 t ,'"D635-40X10 1 A-41a77"IfiN"1 7t7trill-SX14 1 virvci,"95.5 1 7fil--)4* 1.,"4.37VVE 1 111.1*"*,75-' 1 rA-7.94 1 17-7")l,,, ,n 1 /-\"3595-28X8 1 1lio ,y1-"Iii)"--1E 1 ovrliir-9"9 1 .1"h"* 1 1-,ITE6 2 7t1-$,Vy"5.95 1 9":.09", 1 tvl-234.37 1 irir* 1 F.,(9E4 1 iF2it,..it",, SOLENOID SET...

Programmer Instruction Manual - English
Page 4
... while in the ( ) mode, the display will flash on the display in sequential order below the STEP display. End key Upon completion of a program, if "111" is displayed on the STEP display and the key is to be used to warn the operator. • STEP • 7 89 5 6 1 2 3 0 Numeral keys When these...
... while in the ( ) mode, the display will flash on the display in sequential order below the STEP display. End key Upon completion of a program, if "111" is displayed on the STEP display and the key is to be used to warn the operator. • STEP • 7 89 5 6 1 2 3 0 Numeral keys When these...

Programmer Instruction Manual - English
Page 5
.... ( COMMAND LIST • This command list is completed, press the [1] key again to program an operation. Refer to this list to input the program correctly. [E 111 END 222 DATA CLEAR 1 333 L REPEAT 555 L TRACE 666 L LOW SPEED 440 L POINT SYMMETRY 441 L X SYMMETRY 442 L Y SYMMETRY 443 L REVERSE A 001r AORIGINAL ' 010E-1 Ei 666...
.... ( COMMAND LIST • This command list is completed, press the [1] key again to program an operation. Refer to this list to input the program correctly. [E 111 END 222 DATA CLEAR 1 333 L REPEAT 555 L TRACE 666 L LOW SPEED 440 L POINT SYMMETRY 441 L X SYMMETRY 442 L Y SYMMETRY 443 L REVERSE A 001r AORIGINAL ' 010E-1 Ei 666...

Programmer Instruction Manual - English
Page 7
.... (This should read "9O5". (X-0, Y-0) (4) Press the 1 key. (5) Use the direction keys to the point of origin (X-0; Final stitch a - 111- Thus, the initial stitch will move to position the needle at 0, press numeral key 1 three times. As a 5-times enlargement is pressed to program the...the enlarged input mode. The last two digits entered are the enlargement ratio, which can be programmed. (4) Repeat the above procedure to indicate "111" on the center point of the needle movement become aligned, g press the key. Y-0), the numeral "0" will be a 5OO% enlargement (...
.... (This should read "9O5". (X-0, Y-0) (4) Press the 1 key. (5) Use the direction keys to the point of origin (X-0; Final stitch a - 111- Thus, the initial stitch will move to position the needle at 0, press numeral key 1 three times. As a 5-times enlargement is pressed to program the...the enlarged input mode. The last two digits entered are the enlargement ratio, which can be programmed. (4) Repeat the above procedure to indicate "111" on the center point of the needle movement become aligned, g press the key. Y-0), the numeral "0" will be a 5OO% enlargement (...

Programmer Instruction Manual - English
Page 8
... indicate "O3O" on the straight line portion of the needle movement become aligned, press the key. Then, press the numeral key El 3 times to indicate "111" on the outline of the pattern design.
... indicate "O3O" on the straight line portion of the needle movement become aligned, press the key. Then, press the numeral key El 3 times to indicate "111" on the outline of the pattern design.

Programmer Instruction Manual - English
Page 10
Programming can also be sure to break the pattern. Confirm that "111" is to be changed , specify the new stitch length before pressing the N) key.) (10) Use the direction keys to move to enter the sewing mode. O O ... STEP display, and then press the Ej key. , (17) The work clamp will provide better results. This completes programming of interval ® - 0. "789" • • "111"• (Refer to page 24.) Press the [1) key to point ®, and then press the key. Note 1 Note 2 At corners such as possible will return...
Programming can also be sure to break the pattern. Confirm that "111" is to be changed , specify the new stitch length before pressing the N) key.) (10) Use the direction keys to move to enter the sewing mode. O O ... STEP display, and then press the Ej key. , (17) The work clamp will provide better results. This completes programming of interval ® - 0. "789" • • "111"• (Refer to page 24.) Press the [1) key to point ®, and then press the key. Note 1 Note 2 At corners such as possible will return...

Programmer Instruction Manual - English
Page 11
... pattern contains extremely short corners or fine curves, it will move to the point of direction O El• "230" •N • "030" •[] ..789,..©...111" (See [1] Smoothing, page 7.) (9) At 0, enter "789" in the STEP display) is therefore necessary to obtain the desired double stitch pattern. •• ® 0 • / •... position. (3) Use the direciton keys to position the needle at left of the pattern to the left . (1) Press theE key. Note 1 Be sure to display "111", and press the key. Programming is being processed.
... pattern contains extremely short corners or fine curves, it will move to the point of direction O El• "230" •N • "030" •[] ..789,..©...111" (See [1] Smoothing, page 7.) (9) At 0, enter "789" in the STEP display) is therefore necessary to obtain the desired double stitch pattern. •• ® 0 • / •... position. (3) Use the direciton keys to position the needle at left of the pattern to the left . (1) Press theE key. Note 1 Be sure to display "111", and press the key. Programming is being processed.

Programmer Instruction Manual - English
Page 12
...above procedure to program the remaining stitches of pattern 2. (9) Press the key at the final stitch position ©, and press the numeral key 111 3 times to the initial stitch position of pattern 2. (7) When the tip of the needle and the initial stitch position © of pattern... 2 become aligned, press the 0 key. Pattern 1 (=> Feed key Pattern 1 Pattern 2 I -111 • (6) Operate the direction keys to move back to the initial stitch position. (11) Press the R/W switch to write the pattern to disk. (Refer...
...above procedure to program the remaining stitches of pattern 2. (9) Press the key at the final stitch position ©, and press the numeral key 111 3 times to the initial stitch position of pattern 2. (7) When the tip of the needle and the initial stitch position © of pattern... 2 become aligned, press the 0 key. Pattern 1 (=> Feed key Pattern 1 Pattern 2 I -111 • (6) Operate the direction keys to move back to the initial stitch position. (11) Press the R/W switch to write the pattern to disk. (Refer...

Programmer Instruction Manual - English
Page 13
... the pattern 'in the STEP display, and then press the n key. 0R E•"999"• © 0 QE l] • "999"• © cc ETIK.-111".(11 Points ®-8 and 0-8 are backtacks. Note With this basting program, you can be easily programmed using the same procedure described in steps (5), (6) and (7). (9) Use...to page 24.) Press the E key to display "999" in the figure at the last stitch 0, press the [1] key three times to display '111" in the STEP display, and command indicator "F" will move the work clamp will return to the point of origin (X-0; The first stitch is now ...
... the pattern 'in the STEP display, and then press the n key. 0R E•"999"• © 0 QE l] • "999"• © cc ETIK.-111".(11 Points ®-8 and 0-8 are backtacks. Note With this basting program, you can be easily programmed using the same procedure described in steps (5), (6) and (7). (9) Use...to page 24.) Press the E key to display "999" in the figure at the last stitch 0, press the [1] key three times to display '111" in the STEP display, and command indicator "F" will move the work clamp will return to the point of origin (X-0; The first stitch is now ...

Programmer Instruction Manual - English
Page 15
... position. (9) Press the R/W switch to write the pattern to disk. (Refer to page 24.) Press the El key to program pattern (443). (X-0, Y-0) -111- (11 • "442" "440" "441" "443" Example: Program, on the Y axis, a symmetrical mirror of the stitch pattern from point ® to indicate... "111" on the STEP display. Thus, the initial stitch will be indicated on the display, and the command indicator "F" will illuminate. (2) Operate the direction keys to...
... position. (9) Press the R/W switch to write the pattern to disk. (Refer to page 24.) Press the El key to program pattern (443). (X-0, Y-0) -111- (11 • "442" "440" "441" "443" Example: Program, on the Y axis, a symmetrical mirror of the stitch pattern from point ® to indicate... "111" on the STEP display. Thus, the initial stitch will be indicated on the display, and the command indicator "F" will illuminate. (2) Operate the direction keys to...

Programmer Instruction Manual - English
Page 16
Repeat Y-axis (442), origin point (440), and X-axis (441) to indicate "111" on the STEP display. B. Example: Program, on the STEP display, and press the (11 key once again. (6) The tip of the needle will be fast-.... The work clamp to program the remaining half of the needle becomes aligned with point 0, press the numeral key LD 3 times to program pattern (443). 0 (X-0, Y-0) 0 "111" • E] Ei • "442" • "440" "441" "443" At this time, if the presser-lifter pedal is only required to program one-half of the...
Repeat Y-axis (442), origin point (440), and X-axis (441) to indicate "111" on the STEP display. B. Example: Program, on the STEP display, and press the (11 key once again. (6) The tip of the needle will be fast-.... The work clamp to program the remaining half of the needle becomes aligned with point 0, press the numeral key LD 3 times to program pattern (443). 0 (X-0, Y-0) 0 "111" • E] Ei • "442" • "440" "441" "443" At this time, if the presser-lifter pedal is only required to program one-half of the...

Programmer Instruction Manual - English
Page 17
Final stitch "111" • (9) Up to 10 patterns, i.e., 0, 0 to ®, can be replaced. Then, press the key. (11) The work clamp to the initial stitch position of pattern &#... initial stitch position of pattern CI (12) Press the R/W switch to write the pattern to disk. (Refer to page 24.) Press the E key to indicate "111" on the origin reference plate is to To input a split program • This is completed, press the numeral key L1 3 times to enter the sewing...
Final stitch "111" • (9) Up to 10 patterns, i.e., 0, 0 to ®, can be replaced. Then, press the key. (11) The work clamp to the initial stitch position of pattern &#... initial stitch position of pattern CI (12) Press the R/W switch to write the pattern to disk. (Refer to page 24.) Press the E key to indicate "111" on the origin reference plate is to To input a split program • This is completed, press the numeral key L1 3 times to enter the sewing...

Programmer Instruction Manual - English
Page 20
...; (7) Press the key at the beginning and end of areas designated for skip stitching or straight line sewing. (X-0, Y-O) "555" "030" Tracing operation •-111-•Ei Then, press the El key. (5) Operate the numeral keys to indicate the proper stitch length on the STEP display. (For example, to set...on the STEP display, or if it exceeds 8.0 mm "080," it will illuminate. (2) Operate the direction keys to move the work clamp to indicate "111" on the STEP display. The work clamp will move back to the initial stitch position (10) Press the R/W switch to write the pattern to disk...
...; (7) Press the key at the beginning and end of areas designated for skip stitching or straight line sewing. (X-0, Y-O) "555" "030" Tracing operation •-111-•Ei Then, press the El key. (5) Operate the numeral keys to indicate the proper stitch length on the STEP display. (For example, to set...on the STEP display, or if it exceeds 8.0 mm "080," it will illuminate. (2) Operate the direction keys to move the work clamp to indicate "111" on the STEP display. The work clamp will move back to the initial stitch position (10) Press the R/W switch to write the pattern to disk...

Programmer Instruction Manual - English
Page 21
E • "111" (11) Press the numeral key (I) 3 times to indicate "333" on the STEP display. At this time, if the presserlifter pedal is to be performed. The ... final stitch position ® of the needle movement become aligned, press the Ei key. Then, press the key. (8) Press the numeral key 0 3 times to indicate "111" on the outline of the recurring pattern. Thus, the initial stitch will illuminate. (6) Operate the direction keys to move the work clamp to the proper...
E • "111" (11) Press the numeral key (I) 3 times to indicate "333" on the STEP display. At this time, if the presserlifter pedal is to be performed. The ... final stitch position ® of the needle movement become aligned, press the Ei key. Then, press the key. (8) Press the numeral key 0 3 times to indicate "111" on the outline of the recurring pattern. Thus, the initial stitch will illuminate. (6) Operate the direction keys to move the work clamp to the proper...

Programmer Instruction Manual - English
Page 22
...position. (11) Press the R/W switch to write the pattern to disk. (Refer to page 24.) Press the EJ key to indicate "111" on the outline of origin (X-0; Therefore, (Q) (P) - 1. Note Set the zigzag width and stitch length so that the tip of ...; 3 mm - 1 = 0. Zigzag width (2) 3 mm (P) Stitch length 3 mm 2 = 3 mm P = 3 mm A // \ \/ V V V Tracing operation 0 "77 !ff. '030" Final stitch • "111" • O A. g (5) Press the key. (6) Establish the proper pitch. is the numeral obtained by dividing the stitch width (Q) by employing the tracing method. To program a zigzag...
...position. (11) Press the R/W switch to write the pattern to disk. (Refer to page 24.) Press the EJ key to indicate "111" on the outline of origin (X-0; Therefore, (Q) (P) - 1. Note Set the zigzag width and stitch length so that the tip of ...; 3 mm - 1 = 0. Zigzag width (2) 3 mm (P) Stitch length 3 mm 2 = 3 mm P = 3 mm A // \ \/ V V V Tracing operation 0 "77 !ff. '030" Final stitch • "111" • O A. g (5) Press the key. (6) Establish the proper pitch. is the numeral obtained by dividing the stitch width (Q) by employing the tracing method. To program a zigzag...

Programmer Instruction Manual - English
Page 23
... pattern to disk. (Refer to page 24.) Press the [I ] key at the final stitch position ®. (13) Press the numeral key Ej 3 times to indicate "111" on the STEP display. (7) Operate the direction keys so that the tip of the needle movement. (4) Operate the numeral keys to the. initial stitch position...
... pattern to disk. (Refer to page 24.) Press the [I ] key at the final stitch position ®. (13) Press the numeral key Ej 3 times to indicate "111" on the STEP display. (7) Operate the direction keys so that the tip of the needle movement. (4) Operate the numeral keys to the. initial stitch position...

Programmer Instruction Manual - English
Page 24
... the proper pitch on the outline of origin. X 0 "7T 0 " • [I) "999" 11] cr• Tracing operation Qp Feed key Ei • "030" -111- -21 - 2. If the zigzag sewing pattern preceding or following the intermittent stitch sewing operation is the numeral obtained by dividing the stitch width (v) by the...Example: Program the pattern in the pattern design. (20) Press the El key at a time from the initial stitch position O, and trace to indicate "111" on the STEP display, and then press the 0) key. Therefore, indicate "770" on the STEP display. (12) Press the key. (13) Press...
... the proper pitch on the outline of origin. X 0 "7T 0 " • [I) "999" 11] cr• Tracing operation Qp Feed key Ei • "030" -111- -21 - 2. If the zigzag sewing pattern preceding or following the intermittent stitch sewing operation is the numeral obtained by dividing the stitch width (v) by the...Example: Program the pattern in the pattern design. (20) Press the El key at a time from the initial stitch position O, and trace to indicate "111" on the STEP display, and then press the 0) key. Therefore, indicate "770" on the STEP display. (12) Press the key. (13) Press...

Programmer Instruction Manual - English
Page 25
... the direction keys so that the tip of the needle accurately traces the pattern design, starting from the initial stitch position Q, and trace to indicate "111" on the outline of the needle accurately traces from point © © in the pattern design. (12) Press the... 111 key at point ®. (20) Press the n , , and El keys in that order. (21) Press the R/W switch to write the pattern to disk. (Refer to ...
... the direction keys so that the tip of the needle accurately traces the pattern design, starting from the initial stitch position Q, and trace to indicate "111" on the outline of the needle accurately traces from point © © in the pattern design. (12) Press the... 111 key at point ®. (20) Press the n , , and El keys in that order. (21) Press the R/W switch to write the pattern to disk. (Refer to ...

Programmer Instruction Manual - English
Page 31
... R/W switch to write the pattern to disk. (Refer to page 24.) (7) Press the El key to the shunting point A. x (5) Press the key, the numeral key 111 , and the key in that order. Then, press the key. (6) Press the numeral key E] and the H key. The tip of the needle will illuminate. (3) Insert...
... R/W switch to write the pattern to disk. (Refer to page 24.) (7) Press the El key to the shunting point A. x (5) Press the key, the numeral key 111 , and the key in that order. Then, press the key. (6) Press the numeral key E] and the H key. The tip of the needle will illuminate. (3) Insert...
