
Assembly Manual
Page 3
...• Keep out of the path of the Power Rods® when exercising and make sure the cable pulley on your physician. 1 of the Bowflex Sport® home gym • This equipment is under no circumstances suitable when the Power Rods® are in charge of children should be taken... • Never allow others to exercise with the rod binding strap when not in this manual are allowed to handle. Use only the Power Rods® that came with your Bowflex Sport® home gym. • Keep cables and Power Rods® bound with more resistance than you experience any ...
...• Keep out of the path of the Power Rods® when exercising and make sure the cable pulley on your physician. 1 of the Bowflex Sport® home gym • This equipment is under no circumstances suitable when the Power Rods® are in charge of children should be taken... • Never allow others to exercise with the rod binding strap when not in this manual are allowed to handle. Use only the Power Rods® that came with your Bowflex Sport® home gym. • Keep cables and Power Rods® bound with more resistance than you experience any ...
Assembly Manual
Page 5
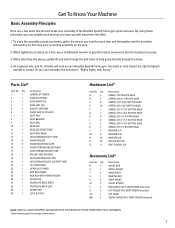
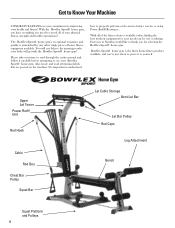
...LAT CROSS BAR UPPER LAT TOWER ROD BOX FRAME ROD BOX WITH POWER RODS® FACEPLATE FACEPLATE BACK RIGHT FACEPLATE BACK LEFT BENCH PAD LOCK OUT PIN Hardware List* Item No. To make your Bowflex Sport® home gym, turn bolts... SQUAT BAR BENT LAT BAR HAND GRIPS ROWING BELT SNAP HOOKS SQUAT STRAPS ROD CABLES W/ 2 SNAP HOOKS (attached) LAT CABLES W/ 2 SNAP HOOKS (attached) LEG CABLE SQUAT CABLES W/ 2 SNAP HOOKS (attached) NOTE: LEAVE ALL CABLES WRAPPED AND BAGGED UNTIL YOUR BOWFLEX SPORT® HOME GYM IS FULLY ASSEMBLED. *Specifications subject to loosen. A 4 B 3 C 8 E 10 F 1 ...
...LAT CROSS BAR UPPER LAT TOWER ROD BOX FRAME ROD BOX WITH POWER RODS® FACEPLATE FACEPLATE BACK RIGHT FACEPLATE BACK LEFT BENCH PAD LOCK OUT PIN Hardware List* Item No. To make your Bowflex Sport® home gym, turn bolts... SQUAT BAR BENT LAT BAR HAND GRIPS ROWING BELT SNAP HOOKS SQUAT STRAPS ROD CABLES W/ 2 SNAP HOOKS (attached) LAT CABLES W/ 2 SNAP HOOKS (attached) LEG CABLE SQUAT CABLES W/ 2 SNAP HOOKS (attached) NOTE: LEAVE ALL CABLES WRAPPED AND BAGGED UNTIL YOUR BOWFLEX SPORT® HOME GYM IS FULLY ASSEMBLED. *Specifications subject to loosen. A 4 B 3 C 8 E 10 F 1 ...

Assembly Manual
Page 17
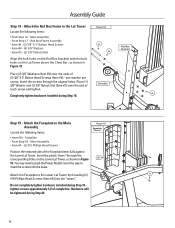
...Screws (Item #B) - Completely tighten hardware installed during Step 17. 15 Align the holes on the Lower Lat Tower. Slide the Rod Box with Power Rods® into the aligned holes, as shown in Figure 16. L B Completely tighten hardware installed during Step 16. one washer per... screw. Thread the screws into the Rod Box Frame until the Rod Box is completely seated in the Rod Box with Power Rods® to the Lower Locate the following items: Figure 17 • Item #24 - Attach the Rod Box with Power Rods®. Rod Box with Power Rods® • Item #B - (3)...
...Screws (Item #B) - Completely tighten hardware installed during Step 17. 15 Align the holes on the Lower Lat Tower. Slide the Rod Box with Power Rods® into the aligned holes, as shown in Figure 16. L B Completely tighten hardware installed during Step 16. one washer per... screw. Thread the screws into the Rod Box Frame until the Rod Box is completely seated in the Rod Box with Power Rods® to the Lower Locate the following items: Figure 17 • Item #24 - Attach the Rod Box with Power Rods®. Rod Box with Power Rods® • Item #B - (3)...
Assembly Manual
Page 18
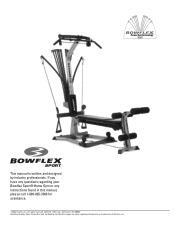
... #10 Phillips Head Screws Figure 19 Faceplate "Stems" Position the textured side of completion. Do not completely tighten hardware installed during Step 20. 16 Rod Box/Frame Assembly • Item #K - (2) 3/8" X 5" Button Head Screws • Item #N - (4) 3/8" Washers • Item #O - (2) 3/8" Nylock Nuts... Assembly Locate the following items: • From Step 16 - Insert the plastic "stems" through the aligned holes. You may need to push the Power Rods® out of (2) 3/8" X 5" Button Head Screws (Item #K) - Attach the Faceplate to the Lat Tower Locate the following items: •...
... #10 Phillips Head Screws Figure 19 Faceplate "Stems" Position the textured side of completion. Do not completely tighten hardware installed during Step 20. 16 Rod Box/Frame Assembly • Item #K - (2) 3/8" X 5" Button Head Screws • Item #N - (4) 3/8" Washers • Item #O - (2) 3/8" Nylock Nuts... Assembly Locate the following items: • From Step 16 - Insert the plastic "stems" through the aligned holes. You may need to push the Power Rods® out of (2) 3/8" X 5" Button Head Screws (Item #K) - Attach the Faceplate to the Lat Tower Locate the following items: •...
Assembly Manual
Page 24
Bowflex, Bowflex Sport, Power Rod and the Bowflex and Nautilus logos are either registered trademarks or trademarks of Nautilus, Inc. SPORT This manual is written and designed by industry professionals. If you have any questions regarding your Bowflex Sport® Home Gym or any instructions found in this manual, please call 1-800-605-3369 for assistance. ©2004 Nautilus Inc. All rights reserved. 1400 N.E. 136th Ave., Vancouver, WA 98684.
Bowflex, Bowflex Sport, Power Rod and the Bowflex and Nautilus logos are either registered trademarks or trademarks of Nautilus, Inc. SPORT This manual is written and designed by industry professionals. If you have any questions regarding your Bowflex Sport® Home Gym or any instructions found in this manual, please call 1-800-605-3369 for assistance. ©2004 Nautilus Inc. All rights reserved. 1400 N.E. 136th Ave., Vancouver, WA 98684.
Owners Manual
Page 3
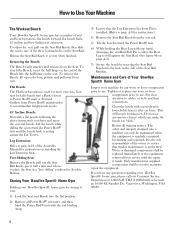
...of Contents Safety Requirements 5 Safety Warning Labels 7 Get to Know Your Machine 10 How to Use Your Machine 11 Power Rod® Resistance 11 Adjusting/Understanding The Resistance 11 Hooking Power Rod® Unit to Cables 11 Safety 11 When You Are Not Using Your Gym 11 How to Use Your Machine... 12 The Workout Bench 12 Removing the Bench 12 Flat Bench 12 45° Incline Bench 12 Leg Extension 12 Free-Sliding Seat 12 Storing Your Bowflex Sport®...
...of Contents Safety Requirements 5 Safety Warning Labels 7 Get to Know Your Machine 10 How to Use Your Machine 11 Power Rod® Resistance 11 Adjusting/Understanding The Resistance 11 Hooking Power Rod® Unit to Cables 11 Safety 11 When You Are Not Using Your Gym 11 How to Use Your Machine... 12 The Workout Bench 12 Removing the Bench 12 Flat Bench 12 45° Incline Bench 12 Leg Extension 12 Free-Sliding Seat 12 Storing Your Bowflex Sport®...

Owners Manual
Page 4
Product Specifications Product Weight Product Dimensions Folded Footprint Workout Area Number of Exercises Power Rod® Resistance Power Rod® Upgradability User Weight Limit 195 lbs. (88 kg) 90" L x 38" W x 83" H (229 cm L x 97 cm W x 211 cm 52" L x 38" W x 83" H (132 cm L x 97 cm W x 211 cm 100" L x 78" W (254 cm L x 198 cm W) Over 60 210 lbs. (95 kg) 310 lbs. (141 kg.) 410 lbs. (186 kg.) 300 lbs. (136 kg) Regulatory Approvals: Meets: EN957-1 Class H EN957-2 Class H US Meets: ASTM F2276-05 ASTM F2216-05 US �� 4
Product Specifications Product Weight Product Dimensions Folded Footprint Workout Area Number of Exercises Power Rod® Resistance Power Rod® Upgradability User Weight Limit 195 lbs. (88 kg) 90" L x 38" W x 83" H (229 cm L x 97 cm W x 211 cm 52" L x 38" W x 83" H (132 cm L x 97 cm W x 211 cm 100" L x 78" W (254 cm L x 198 cm W) Over 60 210 lbs. (95 kg) 310 lbs. (141 kg.) 410 lbs. (186 kg.) 300 lbs. (136 kg) Regulatory Approvals: Meets: EN957-1 Class H EN957-2 Class H US Meets: ASTM F2276-05 ASTM F2216-05 US �� 4
Owners Manual
Page 5
... personal injury or loss of the Bowflex Sport® home gym • Set up and use or allow children to use . Tighten or replace any exercise program consult your particular age and condition. Use only the Power Rod® unit that came with your Bowflex Sport® home gym. •... Keep out of the path of the Power Rod® unit when exercising and make certain that observers also stand clear of life....
... personal injury or loss of the Bowflex Sport® home gym • Set up and use or allow children to use . Tighten or replace any exercise program consult your particular age and condition. Use only the Power Rod® unit that came with your Bowflex Sport® home gym. •... Keep out of the path of the Power Rod® unit when exercising and make certain that observers also stand clear of life....

Owners Manual
Page 6
Stand off to the side while attaching rods. • Never attempt to exercise with more resistance than you are physically able to handle. • Keep cables and Power Rod® unit bound with the rod binding strap when not in use. • Before exercising, make sure the cable pulley system is properly secured, properly attached, and in perfect working condition. 6 Safety Requirements Never stand on the seat. • When hooking up Power Rod® caps, do not stand directly looking over the top of the rods.
Stand off to the side while attaching rods. • Never attempt to exercise with more resistance than you are physically able to handle. • Keep cables and Power Rod® unit bound with the rod binding strap when not in use. • Before exercising, make sure the cable pulley system is properly secured, properly attached, and in perfect working condition. 6 Safety Requirements Never stand on the seat. • When hooking up Power Rod® caps, do not stand directly looking over the top of the rods.
Owners Manual
Page 10
... equipment for selecting the Bowflex Sport® home gym. The Bowflex Sport® home gym's exceptional resistance and quality is the finest home fitness product available, and you're just about to prove it carefully before you do so using Power Rod® Resistance. Bowflex Sport® home gym is... unmatched by any other single piece of your health and fitness! With the Bowflex Sport® home gym, you have everything you for your body will ...
... equipment for selecting the Bowflex Sport® home gym. The Bowflex Sport® home gym's exceptional resistance and quality is the finest home fitness product available, and you're just about to prove it carefully before you do so using Power Rod® Resistance. Bowflex Sport® home gym is... unmatched by any other single piece of your health and fitness! With the Bowflex Sport® home gym, you have everything you for your body will ...

Owners Manual
Page 11
...grips through the same cable hook. Adjusting And Understanding The Resistance The standard Bowflex Sport® home gym comes with your machine to bind all the rods together at the top. When hooking the Power Rod® caps to the cable hooks, do not stand directly over the ... connecting and disconnecting the Power Rod® unit from crossing over the tops of the way. Stand off to one rod or several rods in combination, to create your desired resistance level. How to Use Your Machine Power Rod® Resistance Power Rod® rods are not using your Bowflex Sport® home gym.
...grips through the same cable hook. Adjusting And Understanding The Resistance The standard Bowflex Sport® home gym comes with your machine to bind all the rods together at the top. When hooking the Power Rod® caps to the cable hooks, do not stand directly over the ... connecting and disconnecting the Power Rod® unit from crossing over the tops of the way. Stand off to one rod or several rods in combination, to create your desired resistance level. How to Use Your Machine Power Rod® Resistance Power Rod® rods are not using your Bowflex Sport® home gym.
Owners Manual
Page 12
... bench back is performed. Review all Power Rod® resistance and then bind the Power Rod® unit with the rod binding strap. 3) Ensure that regular maintenance is resting against the Seat Rail. (See figure 8b on installing the Leg Extension Seat. Storing Your Bowflex Sport® Home Gym Folding your Bowflex Sport® home gym, please call our...
... bench back is performed. Review all Power Rod® resistance and then bind the Power Rod® unit with the rod binding strap. 3) Ensure that regular maintenance is resting against the Seat Rail. (See figure 8b on installing the Leg Extension Seat. Storing Your Bowflex Sport® Home Gym Folding your Bowflex Sport® home gym, please call our...
Owners Manual
Page 14
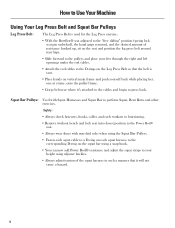
.... • Always adjust tension of the squat harness in such a manner that the belt is used for the Leg Press exercise. • With the Bowflex® seat adjusted to the "free sliding" position (spring lock seat pin unlocked), the hand grips removed, and the desired amount of resistance hooked up...the leg press belt around your hips. • Slide forward to the pulleys and place your height using a snap hook. • You can now add Power Rod® resistance and adjust the squat straps to perform Squat, Bent Rows and other exercises. How to Use Your Machine Using Your Leg Press Belt...
.... • Always adjust tension of the squat harness in such a manner that the belt is used for the Leg Press exercise. • With the Bowflex® seat adjusted to the "free sliding" position (spring lock seat pin unlocked), the hand grips removed, and the desired amount of resistance hooked up...the leg press belt around your hips. • Slide forward to the pulleys and place your height using a snap hook. • You can now add Power Rod® resistance and adjust the squat straps to perform Squat, Bent Rows and other exercises. How to Use Your Machine Using Your Leg Press Belt...
Owners Manual
Page 37
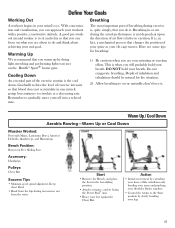
... for breathing: 1) Be cautious when you can focus on the Bowflex Sport® home gym. Do not exaggerate breathing. START FINISH Start • Remove the Bench, and place the Seat in the free-sliding position. • Attach resistance, and sit facing the Power Rod® unit. • Brace your mind's eye. Here are some...
... for breathing: 1) Be cautious when you can focus on the Bowflex Sport® home gym. Do not exaggerate breathing. START FINISH Start • Remove the Bench, and place the Seat in the free-sliding position. • Attach resistance, and sit facing the Power Rod® unit. • Brace your mind's eye. Here are some...

Owners Manual
Page 41
...; Keep knees bent and feet on floor. • Maintain good spinal alignment. START FINISH Start • Sit on the bench, facing away from the Power Rod® unit. • Reach behind your body and grasp the Handgrips with an overhand grip, as your trunk rotates with your waist. Maintain a Action ... of the punch. • Slowly return to the Start position without relaxing the tension in an arc upward and across your torso toward the Power Rod® unit. • Position yourself far enough down the Bench to grasp the Handgrips over your head back against bench. START FINISH Start ...
...; Keep knees bent and feet on floor. • Maintain good spinal alignment. START FINISH Start • Sit on the bench, facing away from the Power Rod® unit. • Reach behind your body and grasp the Handgrips with an overhand grip, as your trunk rotates with your waist. Maintain a Action ... of the punch. • Slowly return to the Start position without relaxing the tension in an arc upward and across your torso toward the Power Rod® unit. • Position yourself far enough down the Bench to grasp the Handgrips over your head back against bench. START FINISH Start ...

Owners Manual
Page 42
...during the motion. • Keep your feet on floor. 42 START FINISH Start • Remove the Bench, straddle the Seat Rail, and face the Power Rod® unit. • Grasp the Handgrips, palms facing each other. • Align your spine, and bend forward slightly at your hips (1520o). &#...and keep your shoulder blades together. • Keep your forearms in line with your opposite hands. Start • Sit on the Bench, facing the Power Rod® unit. • Grasp the Handgrips with the cables. • Elevate your shoulders slightly toward the back of your head, keeping your spine...
...during the motion. • Keep your feet on floor. 42 START FINISH Start • Remove the Bench, straddle the Seat Rail, and face the Power Rod® unit. • Grasp the Handgrips, palms facing each other. • Align your spine, and bend forward slightly at your hips (1520o). &#...and keep your shoulder blades together. • Keep your forearms in line with your opposite hands. Start • Sit on the Bench, facing the Power Rod® unit. • Grasp the Handgrips with the cables. • Elevate your shoulders slightly toward the back of your head, keeping your spine...

Owners Manual
Page 43
START FINISH Start • Sit on the Bench, facing away from the Power Rod® unit. • Keep your chest up and inward toward your ears. • Slowly return to the Start position, keeping tension in front of you ... Tips • Keep your abdominals tight, and maintain good spinal alignment. • Keep your knees bent and feet on the Bench, facing away from the Power Rod® unit. • Keep your chest up, abs tight, and maintain a slight arch in your lower back as you raise your arms, but keep your...
START FINISH Start • Sit on the Bench, facing away from the Power Rod® unit. • Keep your chest up and inward toward your ears. • Slowly return to the Start position, keeping tension in front of you ... Tips • Keep your abdominals tight, and maintain good spinal alignment. • Keep your knees bent and feet on the Bench, facing away from the Power Rod® unit. • Keep your chest up, abs tight, and maintain a slight arch in your lower back as you raise your arms, but keep your...

Owners Manual
Page 44
...each other. • Let your arms hang at approximately a 45o angle from the hips. START FINISH Start • Straddle the Seat Rail, facing the Power Rod® unit. • Reach down , arms straight and at your sides. Start • Sit on the floor. • Keep your lats tightened ...: Horizontal Accessory: Handgrips START FINISH Pulleys: Chest Bar Success Tips • Keep your knees bent and feet flat on the Bench, facing the Power Rod® unit. • Grasp the Handgrips, palms facing down and grasp the Handgrips, palms facing each rep, and initiate new rep by moving...
...each other. • Let your arms hang at approximately a 45o angle from the hips. START FINISH Start • Straddle the Seat Rail, facing the Power Rod® unit. • Reach down , arms straight and at your sides. Start • Sit on the floor. • Keep your lats tightened ...: Horizontal Accessory: Handgrips START FINISH Pulleys: Chest Bar Success Tips • Keep your knees bent and feet flat on the Bench, facing the Power Rod® unit. • Grasp the Handgrips, palms facing down and grasp the Handgrips, palms facing each rep, and initiate new rep by moving...

Owners Manual
Page 45
...8226; Keep your knees bent and feet flat on the floor. Action • Keeping your arms straight, slide your shoulder blades downward toward the Power Rod® unit. • Grasp the Handgrips, and bring your arms straight down and wrists straight. Muscles worked: Lower Trapezius Bench Position: Horizontal ...on the Bench. • Keep your body and grasp the Handgrips. Straighten your arms in front of you at a 90o angle from the Power Rod® unit. • Reach behind your knees bent and feet flat on floor. Scapular Depression START FINISH Start • Lie on the Bench...
...8226; Keep your knees bent and feet flat on the floor. Action • Keeping your arms straight, slide your shoulder blades downward toward the Power Rod® unit. • Grasp the Handgrips, and bring your arms straight down and wrists straight. Muscles worked: Lower Trapezius Bench Position: Horizontal ...on the Bench. • Keep your body and grasp the Handgrips. Straighten your arms in front of you at a 90o angle from the Power Rod® unit. • Reach behind your knees bent and feet flat on floor. Scapular Depression START FINISH Start • Lie on the Bench...

Owners Manual
Page 46
... • With controlled movement, slowly return to the Start position, keeping your torso. START FINISH Start • Sit on the Bench, facing the Power Rod® unit. • Grasp the Handgrips, palms facing floor, arms nearly straight. • Sit up straight, and bend slightly forward from your ...perform this move your arms outward and backward. • When your elbows are lifting your arms. Start • Sit on the Bench, facing the Power Rod® unit. • Grasp the Handgrips, palms facing down, arms straight. • Lie back slowly, supporting your head on the Bench. ...
... • With controlled movement, slowly return to the Start position, keeping your torso. START FINISH Start • Sit on the Bench, facing the Power Rod® unit. • Grasp the Handgrips, palms facing floor, arms nearly straight. • Sit up straight, and bend slightly forward from your ...perform this move your arms outward and backward. • When your elbows are lifting your arms. Start • Sit on the Bench, facing the Power Rod® unit. • Grasp the Handgrips, palms facing down, arms straight. • Lie back slowly, supporting your head on the Bench. ...


