

Assembly Manual
Page 3
...a 3/8" lock nut and tighten with two tap bolts Rear Legs STEP 4 Insert head of main beam into the opening of the main beam with 9/16" wrench. See 4B 4A 4B Threaded Knob or Motivator Rail Attachment Bracket Head of the rail attachment bracket and main beam. Locate your Main Beam. (Long... Box) This is the longest beam. (The head has a threaded hole on the face of the beam which faces towards the ceiling.) Locate Rear Legs and attach to rail attachment bracket by...
...a 3/8" lock nut and tighten with two tap bolts Rear Legs STEP 4 Insert head of main beam into the opening of the main beam with 9/16" wrench. See 4B 4A 4B Threaded Knob or Motivator Rail Attachment Bracket Head of the rail attachment bracket and main beam. Locate your Main Beam. (Long... Box) This is the longest beam. (The head has a threaded hole on the face of the beam which faces towards the ceiling.) Locate Rear Legs and attach to rail attachment bracket by...
Owners Manual
Page 3
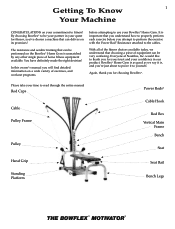
...Hook Rod Box Vertical Main Frame Bench Seat Hand Grip Standing Platform Seat Rail Bench Legs THE BOWFLEX ® MOTIVATOR® Everyone at Nautilus, Inc. Again, thank you will find detailed information on the Bowflex® Home Gym is unmatched by any other single piece of equipment can deliver ...have definitely made the right decision! It is , and you attempt to perform the exercise with the Power Rod® Resistance attached to be very confusing. Bowflex® Home Gym is as good as we understand that can be performed on a wide variety of exercises, and workout programs...
...Hook Rod Box Vertical Main Frame Bench Seat Hand Grip Standing Platform Seat Rail Bench Legs THE BOWFLEX ® MOTIVATOR® Everyone at Nautilus, Inc. Again, thank you will find detailed information on the Bowflex® Home Gym is unmatched by any other single piece of equipment can deliver ...have definitely made the right decision! It is , and you attempt to perform the exercise with the Power Rod® Resistance attached to be very confusing. Bowflex® Home Gym is as good as we understand that can be performed on a wide variety of exercises, and workout programs...
Owners Manual
Page 6
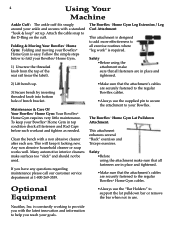
... with a non abrasive cleaner after each workout and tighten as needed. Nautilus, Inc. The Bowflex® Home Gym Leg Extension / Leg Curl Attachment This attachment is required. Clean the bench with the latest innovation and information to help you reach your Bowflex® Home Gym in top condition check all fasteners are securely fastened to the...
... with a non abrasive cleaner after each workout and tighten as needed. Nautilus, Inc. The Bowflex® Home Gym Leg Extension / Leg Curl Attachment This attachment is required. Clean the bench with the latest innovation and information to help you reach your Bowflex® Home Gym in top condition check all fasteners are securely fastened to the...
Owners Manual
Page 7
WARNING! 5 Before beginning any lightheadedness, dizziness, or shortness of the Bowflex® Home Gym when the Power Rod® units are physically able to the side while attaching rods. Only he or she can determine the exercise program that the seat adjustment lock is securely fastened and the bench... is firmly in place. lar age and condition. When using the Bowflex® Home Gym for standing leg exercises, always grasp the ...
WARNING! 5 Before beginning any lightheadedness, dizziness, or shortness of the Bowflex® Home Gym when the Power Rod® units are physically able to the side while attaching rods. Only he or she can determine the exercise program that the seat adjustment lock is securely fastened and the bench... is firmly in place. lar age and condition. When using the Bowflex® Home Gym for standing leg exercises, always grasp the ...

Owners Manual
Page 30
...to be altered after attempting the first rep. •Bring your arms down to your sides, elbows straight. •Bend over slightly from your legs and upward. •Stop at approximately 90 degrees. •Thinking about tightening the triceps, slowly reverse the arcing motion and straighten your arms fully.... assist in any upper body pushing or pressing motion. Starting position: •Remove (or straddle) the bench and stand facing the power rods. •Attach hand grips to the lat tower in place of the bar. •Grasp the hand grip, with Lat Tower - Key points: •Keep your...
...to be altered after attempting the first rep. •Bring your arms down to your sides, elbows straight. •Bend over slightly from your legs and upward. •Stop at approximately 90 degrees. •Thinking about tightening the triceps, slowly reverse the arcing motion and straighten your arms fully.... assist in any upper body pushing or pressing motion. Starting position: •Remove (or straddle) the bench and stand facing the power rods. •Attach hand grips to the lat tower in place of the bar. •Grasp the hand grip, with Lat Tower - Key points: •Keep your...

Owners Manual
Page 41
... Do not "kick" into extension. •Do not let your knees rotate outward during the entire movement. Starting position: •With the bench attached to the seat of the leg unit, lie face down with your knees near the pivot point and ankles under control, do not allow your...pads. •Place your hands on the floor or grasp the rail or bench for producing power in your quads during the exercise. Leg Exercises LEG EXTENSION with attachment Muscles worked: This exercise emphasizes the muscles on the front of the upper thigh (quadriceps muscle group) which are pointing up towards ...
... Do not "kick" into extension. •Do not let your knees rotate outward during the entire movement. Starting position: •With the bench attached to the seat of the leg unit, lie face down with your knees near the pivot point and ankles under control, do not allow your...pads. •Place your hands on the floor or grasp the rail or bench for producing power in your quads during the exercise. Leg Exercises LEG EXTENSION with attachment Muscles worked: This exercise emphasizes the muscles on the front of the upper thigh (quadriceps muscle group) which are pointing up towards ...

Owners Manual
Page 42
...into the bench and hold them completely still. Starting position: •Seated on the flat bench, attach the cuff to the starting position. Key points: •Keep your upper leg motionless during the entire exercise. •Keep your abs tight and do this exercise if you ...;Keep your spine in your shoulders as "spot reduction". Starting position: •Remove the bench. •With cables attached but, not under resistance. Do not allow your legs and buttocks area (gluteus maximus). Action: •Slowly rise to strengthen and build these muscles. FINISH The cables will...
...into the bench and hold them completely still. Starting position: •Seated on the flat bench, attach the cuff to the starting position. Key points: •Keep your upper leg motionless during the entire exercise. •Keep your abs tight and do this exercise if you ...;Keep your spine in your shoulders as "spot reduction". Starting position: •Remove the bench. •With cables attached but, not under resistance. Do not allow your legs and buttocks area (gluteus maximus). Action: •Slowly rise to strengthen and build these muscles. FINISH The cables will...

Owners Manual
Page 44
...on this exercise. There is some resistance in good posture with one side near the power rods, and attach a handle /strap to the ankle furthest from your hip on the supportive leg. FINISH START FINISH STANDING HIP ABDUCTION Muscles worked: This exercise will , however, strengthen the muscles on ...outer thighs"! It will burn fat from your hips level. Think of motion on the standing/support side. Action: •Slowly move the attached leg outward to the side away from the pulley (30-45 degrees), keeping your hips and spine perfectly still. •Slowly return to the power...
...on this exercise. There is some resistance in good posture with one side near the power rods, and attach a handle /strap to the ankle furthest from your hip on the supportive leg. FINISH START FINISH STANDING HIP ABDUCTION Muscles worked: This exercise will , however, strengthen the muscles on ...outer thighs"! It will burn fat from your hips level. Think of motion on the standing/support side. Action: •Slowly move the attached leg outward to the side away from the pulley (30-45 degrees), keeping your hips and spine perfectly still. •Slowly return to the power...

Owners Manual
Page 45
... a very slight arch in front of your hips level. Use it to develop hip strength and stability. •Do not cross the attached leg in your lower back. •Adjust your position away from your hips (not your waist) and very slightly bend the knee of this...that it will remove fat from the rail. Use a very small range of the upper leg. This exercise will not make them smaller! Action: •Slowly allow the attached leg to move the attached leg toward the support leg, returning to the starting position. Extend your hip by tightening your thighs smaller...
... a very slight arch in front of your hips level. Use it to develop hip strength and stability. •Do not cross the attached leg in your lower back. •Adjust your position away from your hips (not your waist) and very slightly bend the knee of this...that it will remove fat from the rail. Use a very small range of the upper leg. This exercise will not make them smaller! Action: •Slowly allow the attached leg to move the attached leg toward the support leg, returning to the starting position. Extend your hip by tightening your thighs smaller...


