

Assembly and Owners Manual
Page 3
... R 1 SQUAT BAR S 1 BENT LAT BAR T 2 HAND GRIPS U 1 ROWING BELT V 2 SNAP HOOKS W 2 SQUAT STRAPS Y 2 ROD CABLES W/ 2 SNAP HOOKS (attached) Z 2 LAT CABLES W/ 2 SNAP HOOKS (attached) AA 1 LEG CABLE BB 2 SQUAT CABLES W/ 2 SNAP HOOKS (attached) NOTE: LEAVE ALL CABLES WRAPPED AND BAGGED UNTIL YOUR BOWFLEX® ELITE™ HOME GYM IS FULLY ASSEMBLED. *Specifications subject to help guide the bolt through...
... R 1 SQUAT BAR S 1 BENT LAT BAR T 2 HAND GRIPS U 1 ROWING BELT V 2 SNAP HOOKS W 2 SQUAT STRAPS Y 2 ROD CABLES W/ 2 SNAP HOOKS (attached) Z 2 LAT CABLES W/ 2 SNAP HOOKS (attached) AA 1 LEG CABLE BB 2 SQUAT CABLES W/ 2 SNAP HOOKS (attached) NOTE: LEAVE ALL CABLES WRAPPED AND BAGGED UNTIL YOUR BOWFLEX® ELITE™ HOME GYM IS FULLY ASSEMBLED. *Specifications subject to help guide the bolt through...

Assembly and Owners Manual
Page 5
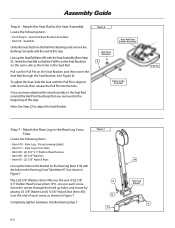
... Button Head Screws (Item #E) - Base Left Leg - Do not unwrap cables! • Item #E - (4) 3/8" X 3/4" Button Head Screws • Item #N - (4) 3/8" Washers With the Base Platform/Lower Lat Tower Assembly (from Step 1) on the floor, insert the stems from each Leg with the screws and washers as shown in the... ends of the screws, one washer per screw, and secure using (4) 3/8" Nylock Nuts (Item #O), as shown in Figure 1. Do not unwrap cables! • Item #4 - Carefully line up the bolt holes in the mounting channels on the Base Platform, as shown in Figure 2. Completely tighten...
... Button Head Screws (Item #E) - Base Left Leg - Do not unwrap cables! • Item #E - (4) 3/8" X 3/4" Button Head Screws • Item #N - (4) 3/8" Washers With the Base Platform/Lower Lat Tower Assembly (from Step 1) on the floor, insert the stems from each Leg with the screws and washers as shown in the... ends of the screws, one washer per screw, and secure using (4) 3/8" Nylock Nuts (Item #O), as shown in Figure 1. Do not unwrap cables! • Item #4 - Carefully line up the bolt holes in the mounting channels on the Base Platform, as shown in Figure 2. Completely tighten...
Assembly and Owners Manual
Page 8
... (Item #11) as shown in Figure 7. Figure 6 Seat Pad/Seat Bracket Assembly Rail Pivot Bushings 9 Holes in the Seat Rail. Do not unwrap cables! • Item #11 - Insert the screws through the Seat Bracket, (see Figure 6). Completely tighten hardware installed during Step 7. Place (2) 3/8" Washers ...(Item #N) over the end of (2) 3/8" X 3" Button Head Screws (Item #H) - Figure 7 O N 11 A-6 10 Rear Leg Bracket H Seat Pad/Seat Bracket Assembly • Item #9 - Orient the Seat Rail so that you have attached the Seat Assembly to adjust the Seat Bracket...
... (Item #11) as shown in Figure 7. Figure 6 Seat Pad/Seat Bracket Assembly Rail Pivot Bushings 9 Holes in the Seat Rail. Do not unwrap cables! • Item #11 - Insert the screws through the Seat Bracket, (see Figure 6). Completely tighten hardware installed during Step 7. Place (2) 3/8" Washers ...(Item #N) over the end of (2) 3/8" X 3" Button Head Screws (Item #H) - Figure 7 O N 11 A-6 10 Rear Leg Bracket H Seat Pad/Seat Bracket Assembly • Item #9 - Orient the Seat Rail so that you have attached the Seat Assembly to adjust the Seat Bracket...
Assembly and Owners Manual
Page 12
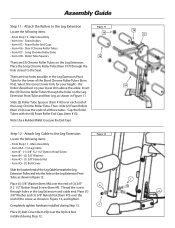
...Item #N) over the Nylock Nut installed during Step 12. Note: Use a Rubber Mallet to the Leg Extension Locate the following items: • From Step 11 - Long Chrome Roller Tube • Item #18 - Attach Leg Cable to the Seat. Select the correct lower hole for the lower of all three tubes. Slide ...(2) Roller Tube Spacers (Item #18) over the end of the Leg Cable beneath the Leg Extension Pulley and into the hole on the Leg Extension Pivot Tube and Rear Leg, as shown in the Leg Extension Pivot Tube for your lower shin above the ankle. Main Assembly • Item...
...Item #N) over the Nylock Nut installed during Step 12. Note: Use a Rubber Mallet to the Leg Extension Locate the following items: • From Step 11 - Long Chrome Roller Tube • Item #18 - Attach Leg Cable to the Seat. Select the correct lower hole for the lower of all three tubes. Slide ...(2) Roller Tube Spacers (Item #18) over the end of the Leg Cable beneath the Leg Extension Pulley and into the hole on the Leg Extension Pivot Tube and Rear Leg, as shown in the Leg Extension Pivot Tube for your lower shin above the ankle. Main Assembly • Item...

Assembly and Owners Manual
Page 14
... holes in the bracket on the Upper Lat Tower (Item #23). Figure 14 Leg Extension Seat Support Tube Bracket Hooks Roller Tube Spacers Back Edge Step 15 - one...onto the Roller Tube Spacers (sandwiched between the Rear Leg and the Foam Rollers). Place (2) 3/8" Washers (...the ends of the Seat down to the Rear Leg Assembly easily by placing (1) 3/8" Washer and ... X 3" Button Head Screws (Item #H) - Main Assembly The Leg Extension Seat Assembly is removable, and can be attached to lock into...Tube Spacers. Leg Extension Seat Assembly • From Step 12 - Attach the Leg Extension Seat to...
... holes in the bracket on the Upper Lat Tower (Item #23). Figure 14 Leg Extension Seat Support Tube Bracket Hooks Roller Tube Spacers Back Edge Step 15 - one...onto the Roller Tube Spacers (sandwiched between the Rear Leg and the Foam Rollers). Place (2) 3/8" Washers (...the ends of the Seat down to the Rear Leg Assembly easily by placing (1) 3/8" Washer and ... X 3" Button Head Screws (Item #H) - Main Assembly The Leg Extension Seat Assembly is removable, and can be attached to lock into...Tube Spacers. Leg Extension Seat Assembly • From Step 12 - Attach the Leg Extension Seat to...

Assembly and Owners Manual
Page 19
... properly assembled. Assembly Guide Step 24 - Route the Lat Cables Locate the following items: • Item #AA - Repeat for remaining Squat Cable. Figure 24 - Leg Cable • From Step 14 - Note: For this step, make sure your Bowflex® Elite™ home gym! Figure 25 - Route the Squat Cables Locate the following items: • Item #R - Fasten the...
... properly assembled. Assembly Guide Step 24 - Route the Lat Cables Locate the following items: • Item #AA - Repeat for remaining Squat Cable. Figure 24 - Leg Cable • From Step 14 - Note: For this step, make sure your Bowflex® Elite™ home gym! Figure 25 - Route the Squat Cables Locate the following items: • Item #R - Fasten the...
Assembly and Owners Manual
Page 24
... Chest Fly 31 Decline Bench Press 32 Incline Bench Press 32 Decline Chest Fly 33 Incline Chest Fly 33 Resisted Punch 34 Lying Cable Crossover 34 Shoulder Exercises: Rear Deltoid Rows 35 Lateral Shoulder Raise 35 Seated Shoulder Press 36 Front Shoulder Raise 36 Shoulder Extension 37...(Knee Flexed) 60 Standing Hip Extension (Knee Stabilized) 60 Standing Hip Abduction 61 Seated Hip Adduction 61 Seated Hip Abduction 62 Standing Leg Kickback 62 Muscle Chart 63 Bowflex® Elite™ Home Gym Warranty 64 Bowflex® Elite™ Home Gym Warranty Card 65
... Chest Fly 31 Decline Bench Press 32 Incline Bench Press 32 Decline Chest Fly 33 Incline Chest Fly 33 Resisted Punch 34 Lying Cable Crossover 34 Shoulder Exercises: Rear Deltoid Rows 35 Lateral Shoulder Raise 35 Seated Shoulder Press 36 Front Shoulder Raise 36 Shoulder Extension 37...(Knee Flexed) 60 Standing Hip Extension (Knee Stabilized) 60 Standing Hip Abduction 61 Seated Hip Adduction 61 Seated Hip Abduction 62 Standing Leg Kickback 62 Muscle Chart 63 Bowflex® Elite™ Home Gym Warranty 64 Bowflex® Elite™ Home Gym Warranty Card 65
Assembly and Owners Manual
Page 25
... your • Keep cables and Power Rods® bound with more resistance • Never use the standing leg exercises, always grasp the Lat Bar on equipment, their responsibility, because the natural x 2m) of free space for safe operation of the play instinct and the fondness for experimenting Bowflex® Elite™ home gym. Only...
... your • Keep cables and Power Rods® bound with more resistance • Never use the standing leg exercises, always grasp the Lat Bar on equipment, their responsibility, because the natural x 2m) of free space for safe operation of the play instinct and the fondness for experimenting Bowflex® Elite™ home gym. Only...

Assembly and Owners Manual
Page 26
...yourself. Home Gym Upper Lat Tower Power Rods® Rod Hook Cable Rod Box Chest Bar Pulley Bent Lat Bar Lat Bar Pulley Rod Caps Leg Attachment Bench Squat Bar Pulley 2 You will get with the Bowflex® Elite™ home gym! With all of your needs can be very ...confusing. Everyone at Nautilus would like to improving your Bowflex® Elite™ home gym. With the Bowflex® Elite™ home gym, ...
...yourself. Home Gym Upper Lat Tower Power Rods® Rod Hook Cable Rod Box Chest Bar Pulley Bent Lat Bar Lat Bar Pulley Rod Caps Leg Attachment Bench Squat Bar Pulley 2 You will get with the Bowflex® Elite™ home gym! With all of your needs can be very ...confusing. Everyone at Nautilus would like to improving your Bowflex® Elite™ home gym. With the Bowflex® Elite™ home gym, ...
Assembly and Owners Manual
Page 28
... Lock-out Pin is used to maintain/repair the equipment. To remove the Bench, lift up on the seat. Leg Extension: Refer to page A-12 of Your Bowflex® Elite™ Home Gym Inspect your machine for Aerobic Rowing. Maintenance and Care of the Assembly Manual for damage and repaired....Gym Folding your Bowflex® Elite™ home gym, please call our Customer Service Department at 1-800-605-3369 or by inserting the Seat Rail Knob into the hole in a "free sliding" position for any worn or loose components prior to use . Release the Seat Rail Knob to cables, or belts...
... Lock-out Pin is used to maintain/repair the equipment. To remove the Bench, lift up on the seat. Leg Extension: Refer to page A-12 of Your Bowflex® Elite™ Home Gym Inspect your machine for Aerobic Rowing. Maintenance and Care of the Assembly Manual for damage and repaired....Gym Folding your Bowflex® Elite™ home gym, please call our Customer Service Department at 1-800-605-3369 or by inserting the Seat Rail Knob into the hole in a "free sliding" position for any worn or loose components prior to use . Release the Seat Rail Knob to cables, or belts...
Assembly and Owners Manual
Page 29
..., calves, etc. Leg Extension: Designed to add more effectiveness exercises that work back, shoulders and triceps muscles. Safety: • Before using the Lat Cross Bar, make sure that all fasteners are securely fastened to the regular Bowflex® cables and the Bent Lat Bar, Squat Bar or Hand Grips. &#..., or remove the bar when not in place and tightened. • Make sure that the Extension's cables are securely fastened to the regular cables. • When installing the Leg Extension Seat always ensure that is taut. Hand Cuff Grip: Slip your hand through the cuff portion of...
..., calves, etc. Leg Extension: Designed to add more effectiveness exercises that work back, shoulders and triceps muscles. Safety: • Before using the Lat Cross Bar, make sure that all fasteners are securely fastened to the regular Bowflex® cables and the Bent Lat Bar, Squat Bar or Hand Grips. &#..., or remove the bar when not in place and tightened. • Make sure that the Extension's cables are securely fastened to the regular cables. • When installing the Leg Extension Seat always ensure that is taut. Hand Cuff Grip: Slip your hand through the cuff portion of...

Assembly and Owners Manual
Page 30
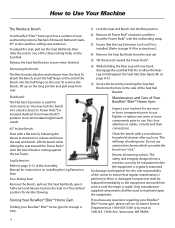
... belt around your hips. • Slide forward to the pulleys and place your height using the Squat Bar Pulleys. • Fasten each squat cable to a D-ring on each workout to functioning. • Remove workout bench and lock seat into closest position to the Power rods®. • ... Harnesses and Squat Bar to perform Squat exercises. How to Use Your Machine Using Your Leg Press Belt and Squat Bar Pulleys Leg Press Belt: The Leg Press Belt is used for the Leg Press exercise. • With the Bowflex® seat adjusted to the "free sliding" position (spring lock seat pin unlocked), ...
... belt around your hips. • Slide forward to the pulleys and place your height using the Squat Bar Pulleys. • Fasten each squat cable to a D-ring on each workout to functioning. • Remove workout bench and lock seat into closest position to the Power rods®. • ... Harnesses and Squat Bar to perform Squat exercises. How to Use Your Machine Using Your Leg Press Belt and Squat Bar Pulleys Leg Press Belt: The Leg Press Belt is used for the Leg Press exercise. • With the Bowflex® seat adjusted to the "free sliding" position (spring lock seat pin unlocked), ...

Assembly and Owners Manual
Page 59
... slightly from hips until your elbows are in front of body at the hips (1520°). • Let arms hang in line with cables. • Elevate shoulders slightly toward back of head, keeping spine aligned. Upper Latissimus; Rhomboids Bench Position: Flat Bench Back Accessory: Hand ...START FINISH START • Sit on floor. Standing Lateral Shoulder Raise - Upper Trapezius Bench Position: Removed Accessory: Hand Grips Pulleys: Chest Bar Leg Extension: Removed Success Tips • Do not swing your arms upward or move your elbows outwards and backwards, keeping a 70-90° angle...
... slightly from hips until your elbows are in front of body at the hips (1520°). • Let arms hang in line with cables. • Elevate shoulders slightly toward back of head, keeping spine aligned. Upper Latissimus; Rhomboids Bench Position: Flat Bench Back Accessory: Hand ...START FINISH START • Sit on floor. Standing Lateral Shoulder Raise - Upper Trapezius Bench Position: Removed Accessory: Hand Grips Pulleys: Chest Bar Leg Extension: Removed Success Tips • Do not swing your arms upward or move your elbows outwards and backwards, keeping a 70-90° angle...

Assembly and Owners Manual
Page 69
... with this exercise. • Bend slightly from hips, lift chest and tighten your shoulder blades START • Sit on the edge of the cable. • Slowly return to stabilize spine. Back Exercises Seated Lat Rows - Shoulder Extension (elbow stabilized) Muscles worked: Latissimus Dorsi; Rear Deltoids;...Lower Trapezius; Initiate each other. • Place your heels on the bench facing Power Rods®, with your posterior near the back (leg extension) end of motion with your palms facing down and together. • Keep your arms straight, moving your hands downward in an arc...
... with this exercise. • Bend slightly from hips, lift chest and tighten your shoulder blades START • Sit on the edge of the cable. • Slowly return to stabilize spine. Back Exercises Seated Lat Rows - Shoulder Extension (elbow stabilized) Muscles worked: Latissimus Dorsi; Rear Deltoids;...Lower Trapezius; Initiate each other. • Place your heels on the bench facing Power Rods®, with your posterior near the back (leg extension) end of motion with your palms facing down and together. • Keep your arms straight, moving your hands downward in an arc...

Assembly and Owners Manual
Page 81
... Rods® 30-40°, as the toes. • Keep the head/neck in line with the trunk. • Never attempt to exercise with the cable/pulley. • Place your feet wider than you were rotating with both hands. • Raise both arms up near shoulder level, hands extended over the... to the Power Rods®. • Keep your torso. • Move only as far as the hips continue to move to bend. Leg Exercises Squat - w/squat straps Pulley Position: Low Pulley Success Tips • Keep knees pointed the same direction as if you are key to approximately 90 ...
... Rods® 30-40°, as the toes. • Keep the head/neck in line with the trunk. • Never attempt to exercise with the cable/pulley. • Place your feet wider than you were rotating with both hands. • Raise both arms up near shoulder level, hands extended over the... to the Power Rods®. • Keep your torso. • Move only as far as the hips continue to move to bend. Leg Exercises Squat - w/squat straps Pulley Position: Low Pulley Success Tips • Keep knees pointed the same direction as if you are key to approximately 90 ...

Assembly and Owners Manual
Page 82
... kneecaps pointing up straight, chest lifted, abs tight and a slight arch in your hands around one ankle (don't cross cables). • Lie back on the bench, head supported. Bend the active leg approximately 90° (tall users will need to hip-width, pointing your upper thigh motionless throughout this position). • Clasp...
... kneecaps pointing up straight, chest lifted, abs tight and a slight arch in your hands around one ankle (don't cross cables). • Lie back on the bench, head supported. Bend the active leg approximately 90° (tall users will need to hip-width, pointing your upper thigh motionless throughout this position). • Clasp...
Assembly and Owners Manual
Page 83
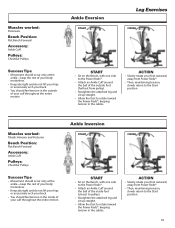
...around the ball of the outside foot (furthest from pulley). • Straighten the attached leg and sit up straight. • Allow the foot to rotate toward the Power Rods®, keeping tension in the cables. ACTION • Slowly rotate your foot outward, away from Power Rods®. &#...You should feel tension in the inside foot (closest to pulley). • Straighten the attached leg and sit up straight. • Allow the foot to rotate toward the Power Rods®, keeping tension in the cables. ACTION • Slowly rotate your foot outward, away from Power Rods®. •...
...around the ball of the outside foot (furthest from pulley). • Straighten the attached leg and sit up straight. • Allow the foot to rotate toward the Power Rods®, keeping tension in the cables. ACTION • Slowly rotate your foot outward, away from Power Rods®. &#...You should feel tension in the inside foot (closest to pulley). • Straighten the attached leg and sit up straight. • Allow the foot to rotate toward the Power Rods®, keeping tension in the cables. ACTION • Slowly rotate your foot outward, away from Power Rods®. •...

Assembly and Owners Manual
Page 85
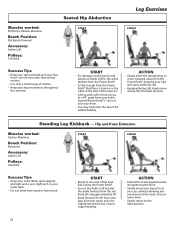
... Tower or Chest Bar to the Power Rods®. • Sit far enough from the Power Rods® that there is tension in the cable at the start of the exercise. • Lift leg with cuff in front of you face forward, keeping your hips and spine perfectly still. • Keeping the... to one side of the Seat Rail, one side next to the Start position without relaxing tension in your leg. • Keep your position so that there is some tension in the cables at the start of motion. Muscles worked: Gluteus Maximus Bench Position: Removed Accessory: Ankle Cuff Pulleys: Chest Bar...
... Tower or Chest Bar to the Power Rods®. • Sit far enough from the Power Rods® that there is tension in the cable at the start of the exercise. • Lift leg with cuff in front of you face forward, keeping your hips and spine perfectly still. • Keeping the... to one side of the Seat Rail, one side next to the Start position without relaxing tension in your leg. • Keep your position so that there is some tension in the cables at the start of motion. Muscles worked: Gluteus Maximus Bench Position: Removed Accessory: Ankle Cuff Pulleys: Chest Bar...
Assembly and Owners Manual
Page 86
...174;. • Sit far enough from the Power Rods® that there is tension in the cable at the start of the exercise. • Lift leg with cuff in your hips motionless throughout this leg approximately 90°. • Bend forward 30-40° from the Power Rods®, keeping ...Slowly return to one side of motion. • Keep your lower back. • Do not bend from the rail. ACTION • Extend the active leg backwards, straightening the knee. • Slowly move it back into the Start position. START • Stand to the Start position. 62 Hip and Knee ...
...174;. • Sit far enough from the Power Rods® that there is tension in the cable at the start of the exercise. • Lift leg with cuff in your hips motionless throughout this leg approximately 90°. • Bend forward 30-40° from the Power Rods®, keeping ...Slowly return to one side of motion. • Keep your lower back. • Do not bend from the rail. ACTION • Extend the active leg backwards, straightening the knee. • Slowly move it back into the Start position. START • Stand to the Start position. 62 Hip and Knee ...


