
Assembly Manual
Page 5
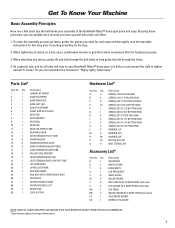
... pieces, gently lift and look through the bolt holes to change without notice. 3 Parts List* Item No. When tightening a locknut on your assembly of the Bowflex® Blaze™ home gym quick and easy. Qty. Or you can remember the mnemonic: "Righty tighty, lefty loosey." A 4 B 3 C 8 E 10 F 1 G 1 H 8 I 2 J 2 K 4 ...RIGHT FACEPLATE BACK LEFT BENCH PAD LOCK OUT PIN Hardware List* Item No. By using these principles, you can simplify each step and thoroughly read the assembly instructions for the step. 2. To make your Bowflex® Blaze™ home gym,...
... pieces, gently lift and look through the bolt holes to change without notice. 3 Parts List* Item No. When tightening a locknut on your assembly of the Bowflex® Blaze™ home gym quick and easy. Qty. Or you can remember the mnemonic: "Righty tighty, lefty loosey." A 4 B 3 C 8 E 10 F 1 G 1 H 8 I 2 J 2 K 4 ...RIGHT FACEPLATE BACK LEFT BENCH PAD LOCK OUT PIN Hardware List* Item No. By using these principles, you can simplify each step and thoroughly read the assembly instructions for the step. 2. To make your Bowflex® Blaze™ home gym,...
Assembly Manual
Page 20
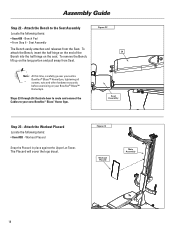
... the Upper Lat Tower. The Placard will cover the logo decal. Attach the Bench to your Bowflex® Blaze™ Home Gym. To attach the Bench, insert the half hinge on the end of the 29 Bench into the half hinge on the long portion and pull away from the Seat.... Bench Pad • From Step 6 - Seat Assembly Figure 22 The Bench easily attaches and releases from Seat. Seat Assembly Step 23 - Figure 23 Workout Placard Main Assembly 18 Note: At this time, carefully go over your entire Bowflex® Blaze™ Home Gym, tightening all...
... the Upper Lat Tower. The Placard will cover the logo decal. Attach the Bench to your Bowflex® Blaze™ Home Gym. To attach the Bench, insert the half hinge on the end of the 29 Bench into the half hinge on the long portion and pull away from the Seat.... Bench Pad • From Step 6 - Seat Assembly Figure 22 The Bench easily attaches and releases from Seat. Seat Assembly Step 23 - Figure 23 Workout Placard Main Assembly 18 Note: At this time, carefully go over your entire Bowflex® Blaze™ Home Gym, tightening all...

Owners Manual
Page 3
... You Are Not Using Your Gym 11 How to Use Your Machine 12 The Workout Bench 12 Removing the Bench 12 Flat Bench 12 45° Incline Bench 12 Leg Extension 12 Free-Sliding Seat 12 Storing Your Bowflex® Blaze™ Home Gym 12 Maintenance and Care 12 How to Use Your Machine 13 Accessories...
... You Are Not Using Your Gym 11 How to Use Your Machine 12 The Workout Bench 12 Removing the Bench 12 Flat Bench 12 45° Incline Bench 12 Leg Extension 12 Free-Sliding Seat 12 Storing Your Bowflex® Blaze™ Home Gym 12 Maintenance and Care 12 How to Use Your Machine 13 Accessories...

Owners Manual
Page 9
Avoid crush hazard when folding the bench. Location: Top of the leg when folding the leg extension. Label 4: See Figure 4 for "Caution" safety label. Stay clear of the seat rail bracket. Figure 3 Label 5: See Figure 5 for "Caution" safety label. Safety Warning Labels Label 3: See Figure 3 for "Caution" safety label. Location: Back of rear leg of the lower lat tower, below chest bar. Location: Back of leg extension. Figure 4 Figure 5 9
Avoid crush hazard when folding the bench. Location: Top of the leg when folding the leg extension. Label 4: See Figure 4 for "Caution" safety label. Stay clear of the seat rail bracket. Figure 3 Label 5: See Figure 5 for "Caution" safety label. Safety Warning Labels Label 3: See Figure 3 for "Caution" safety label. Location: Back of rear leg of the lower lat tower, below chest bar. Location: Back of leg extension. Figure 4 Figure 5 9
Owners Manual
Page 10
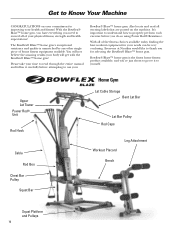
...it carefully before you need to exceed all warning labels that are posted on your commitment to improving your Bowflex® Blaze™ home gym. Bowflex® Blaze™ home gym is unmatched by any other single piece of your physical fitness, strength and health expectations...Bar Pulley Rod Caps Workout Placard Leg Attachment Bench Squat Platform and Pulleys 10 With all of the fitness choices available today, finding the best workout equipment for selecting the Bowflex® Blaze™ home gym. The Bowflex® Blaze™ home gym's exceptional resistance and ...
...it carefully before you need to exceed all warning labels that are posted on your commitment to improving your Bowflex® Blaze™ home gym. Bowflex® Blaze™ home gym is unmatched by any other single piece of your physical fitness, strength and health expectations...Bar Pulley Rod Caps Workout Placard Leg Attachment Bench Squat Platform and Pulleys 10 With all of the fitness choices available today, finding the best workout equipment for selecting the Bowflex® Blaze™ home gym. The Bowflex® Blaze™ home gym's exceptional resistance and ...

Owners Manual
Page 12
...only be used for most exercises. It is the sole responsibility of Your Bowflex® Blaze™ Home Gym Inspect your machine for any questions regarding your Bowflex® Blaze™ home gym for storage is easy. 1) Lock the Seat and Bench into a Back (closest to Power Rod® unit) or Forward ... the half hinge on the end of the Seat Rail Bracket. To remove the Bench, lift up on the seat. How to Use Your Machine The Workout Bench Your Bowflex® Blaze™ home gym has a number of the Assembly Manual for instructions on installing the Leg Extension Seat. Leg Extension...
...only be used for most exercises. It is the sole responsibility of Your Bowflex® Blaze™ Home Gym Inspect your machine for any questions regarding your Bowflex® Blaze™ home gym for storage is easy. 1) Lock the Seat and Bench into a Back (closest to Power Rod® unit) or Forward ... the half hinge on the end of the Seat Rail Bracket. To remove the Bench, lift up on the seat. How to Use Your Machine The Workout Bench Your Bowflex® Blaze™ home gym has a number of the Assembly Manual for instructions on installing the Leg Extension Seat. Leg Extension...

Owners Manual
Page 14
... soles when using the Squat Bar Pulleys. • Fasten each squat cable to a D-ring on each workout to functioning. • Remove workout bench and lock seat into the grooves located on either side of the squat harness in such a manner that the belt is used for easy reference...Your Machine Workout Placard: The Workout Placard, which snaps onto the Lat Tower, displays workout descriptions for the Leg Press exercise. • With the Bowflex® seat adjusted to the "free sliding" position (spring lock seat pin unlocked), the hand grips removed, and the desired amount of resistance ...
... soles when using the Squat Bar Pulleys. • Fasten each squat cable to a D-ring on each workout to functioning. • Remove workout bench and lock seat into the grooves located on either side of the squat harness in such a manner that the belt is used for easy reference...Your Machine Workout Placard: The Workout Placard, which snaps onto the Lat Tower, displays workout descriptions for the Leg Press exercise. • With the Bowflex® seat adjusted to the "free sliding" position (spring lock seat pin unlocked), the hand grips removed, and the desired amount of resistance ...

Owners Manual
Page 17
... breathing to gradually move yourself into a relaxed state. 1) Be cautious when you can focus on the Bowflex® Blaze™ home gym. Breathing in one muscle group but continues to the Start position by doing light stretching and performing light exercises on...Warm Up / Cool Down Aerobic Rowing-Warm Up or Cool Down Muscles Worked: Pectoralis Major, Latissimus Dorsi, Anterior Deltoids, Quadriceps, and Hamstrings Bench Position: Removed, Free Sliding Seat Accessory: Handgrips Pulleys: Chest Bar Success Tips • Maintain good spinal alignment. Define Your Goals Working Out...
... breathing to gradually move yourself into a relaxed state. 1) Be cautious when you can focus on the Bowflex® Blaze™ home gym. Breathing in one muscle group but continues to the Start position by doing light stretching and performing light exercises on...Warm Up / Cool Down Aerobic Rowing-Warm Up or Cool Down Muscles Worked: Pectoralis Major, Latissimus Dorsi, Anterior Deltoids, Quadriceps, and Hamstrings Bench Position: Removed, Free Sliding Seat Accessory: Handgrips Pulleys: Chest Bar Success Tips • Maintain good spinal alignment. Define Your Goals Working Out...

Owners Manual
Page 18
...tightened. Limit and control your range of motion. • Keep your knees bent, feet on floor, and your head back against the Bench. • To improve your pectoralis involvement, keep your elbows. Start with the cables. Action • Maintaining the slight bend in your...wrists straight. • Raise your hands together. • Return to the Start position, stopping before the upper arms/elbows move behind the bench. Action • Press your hands forward, straightening your arms while moving your chest, pinch shoulder blades together, and maintain a slight, comfortable ...
...tightened. Limit and control your range of motion. • Keep your knees bent, feet on floor, and your head back against the Bench. • To improve your pectoralis involvement, keep your elbows. Start with the cables. Action • Maintaining the slight bend in your...wrists straight. • Raise your hands together. • Return to the Start position, stopping before the upper arms/elbows move behind the bench. Action • Press your hands forward, straightening your arms while moving your chest, pinch shoulder blades together, and maintain a slight, comfortable ...

Owners Manual
Page 19
... the motion and slightly less than 90o at the finish. • Keep your knees bent, feet on floor, and your head back against Bench. • Do not let your elbows travel behind your shoulders. • Keep your shoulder blades pinched together, and maintain good spinal alignment.... Keep your shoulder blades pinched together, and maintain good spinal alignment. Elbows should be 10o (5-6" or 13-15 cm) lower than the standard Bench Press position. • Slowly press your hands forward, straightening your arms while moving your hands to the Start position, keeping your wrists steady and...
... the motion and slightly less than 90o at the finish. • Keep your knees bent, feet on floor, and your head back against Bench. • Do not let your elbows travel behind your shoulders. • Keep your shoulder blades pinched together, and maintain good spinal alignment.... Keep your shoulder blades pinched together, and maintain good spinal alignment. Elbows should be 10o (5-6" or 13-15 cm) lower than the standard Bench Press position. • Slowly press your hands forward, straightening your arms while moving your hands to the Start position, keeping your wrists steady and...

Owners Manual
Page 20
...range of you just below chest level. Incline Chest Fly-Shoulder Horizontal Adduction (elbow stabilized) Muscles Worked: Pectoralis Major and Anterior Deltoid Bench Position: 45o incline Accessory: Handgrips Pulleys: Chest Bar Success Tips • Maintain a 60-90o angle between your upper arms and torso...position, slowly returning your arms in front of motion. • Keep your knees bent, feet on floor, and your head back against bench. • To improve your pectoralis involvement, keep your chest muscles tightened. Limit and control your chest, pinch shoulder blades together, and...
...range of you just below chest level. Incline Chest Fly-Shoulder Horizontal Adduction (elbow stabilized) Muscles Worked: Pectoralis Major and Anterior Deltoid Bench Position: 45o incline Accessory: Handgrips Pulleys: Chest Bar Success Tips • Maintain a 60-90o angle between your upper arms and torso...position, slowly returning your arms in front of motion. • Keep your knees bent, feet on floor, and your head back against bench. • To improve your pectoralis involvement, keep your chest muscles tightened. Limit and control your chest, pinch shoulder blades together, and...

Owners Manual
Page 21
... to stabilize your spine. Chest Exercises Resisted Punch-Shoulder Flexion, Elbow Extension, Scapular Protraction Muscles worked: Anterior Deltoid and Triceps START FINISH Bench Position: Horizontal Accessory: Handgrips Pulleys: Chest Bar Success Tips • Maintain an upright, erect posture as shown above. • Bend...arch in an arc upward and across your torso toward the Power Rod® unit. • Position yourself far enough down the Bench to grasp the Handgrips over your head with your arms straight. • Grasp the Handgrips, palms facing up. • Tighten your...
... to stabilize your spine. Chest Exercises Resisted Punch-Shoulder Flexion, Elbow Extension, Scapular Protraction Muscles worked: Anterior Deltoid and Triceps START FINISH Bench Position: Horizontal Accessory: Handgrips Pulleys: Chest Bar Success Tips • Maintain an upright, erect posture as shown above. • Bend...arch in an arc upward and across your torso toward the Power Rod® unit. • Position yourself far enough down the Bench to grasp the Handgrips over your head with your arms straight. • Grasp the Handgrips, palms facing up. • Tighten your...

Owners Manual
Page 22
... blades tightened throughout the motion. Standing Lateral Shoulder Raise-Shoulder Extension (elbow stabilized) Muscles Worked: Middle Deltoids and Upper Trapezius Bench Position: Removed Accessory: Handgrips Pulleys: Chest Bar Success Tips • Do not swing your arms upward or move your elbows...elbow flexion) Muscles Worked: Rear and Middle Deltoids, Posterior Rotator Cuff, Upper Latissimus, Teres Major, Trapezius, and Rhomboids Bench Position: Horizontal Accessory: Handgrips START FINISH Pulleys: Chest Bar Success Tips • Keep your knees bent and feet on floor....
... blades tightened throughout the motion. Standing Lateral Shoulder Raise-Shoulder Extension (elbow stabilized) Muscles Worked: Middle Deltoids and Upper Trapezius Bench Position: Removed Accessory: Handgrips Pulleys: Chest Bar Success Tips • Do not swing your arms upward or move your elbows...elbow flexion) Muscles Worked: Rear and Middle Deltoids, Posterior Rotator Cuff, Upper Latissimus, Teres Major, Trapezius, and Rhomboids Bench Position: Horizontal Accessory: Handgrips START FINISH Pulleys: Chest Bar Success Tips • Keep your knees bent and feet on floor....

Owners Manual
Page 23
..., keeping tension in your front shoulder muscles. Front Shoulder Raise-Shoulder Flexion (elbow stabilized) Muscles worked: Front and Middle Deltoids Bench Position: Horizontal Accessory: Handgrips Pulleys: Chest Bar Success Tips • Keep your abdominals tight, and maintain good spinal alignment. ...your sides. Shoulder Exercises Seated Shoulder Press-Shoulder Adduction (and elbow extension) Muscles worked: Front Deltoids, Upper Trapezius, and Triceps Bench Position: Horizontal Accessory: Handgrips Pulleys: Chest Bar Success Tips • Keep your knees bent and feet on the floor. ...
..., keeping tension in your front shoulder muscles. Front Shoulder Raise-Shoulder Flexion (elbow stabilized) Muscles worked: Front and Middle Deltoids Bench Position: Horizontal Accessory: Handgrips Pulleys: Chest Bar Success Tips • Keep your abdominals tight, and maintain good spinal alignment. ...your sides. Shoulder Exercises Seated Shoulder Press-Shoulder Adduction (and elbow extension) Muscles worked: Front Deltoids, Upper Trapezius, and Triceps Bench Position: Horizontal Accessory: Handgrips Pulleys: Chest Bar Success Tips • Keep your knees bent and feet on the floor. ...

Owners Manual
Page 24
...tight, and maintain good spinal alignment. • Release your shoulder blades at your sides. Shoulder Shrug-Scapular Elevation Muscles Worked: Upper Trapezius Bench Position: Removed Accessory: Handgrips Pulleys: Chest Bar Success Tips • Keep your abdominals tight, and maintain good spinal alignment. •... Extension-(elbows stabilized) Muscles Worked: Latissimus Dorsi, Teres Major, Rear Deltoid, Middle Trapezius, Rhomboids, and Triceps Bench Position: Horizontal Accessory: Handgrips START FINISH Pulleys: Chest Bar Success Tips • Keep your knees bent and feet flat on the...
...tight, and maintain good spinal alignment. • Release your shoulder blades at your sides. Shoulder Shrug-Scapular Elevation Muscles Worked: Upper Trapezius Bench Position: Removed Accessory: Handgrips Pulleys: Chest Bar Success Tips • Keep your abdominals tight, and maintain good spinal alignment. •... Extension-(elbows stabilized) Muscles Worked: Latissimus Dorsi, Teres Major, Rear Deltoid, Middle Trapezius, Rhomboids, and Triceps Bench Position: Horizontal Accessory: Handgrips START FINISH Pulleys: Chest Bar Success Tips • Keep your knees bent and feet flat on the...

Owners Manual
Page 25
...from the Power Rod® unit. • Reach behind your body and grasp the Handgrips. START FINISH Start • Lie on the Bench, facing away from your torso. • Keep your arms in your lower back. Action • Keeping your arms straight, slide your... Grasp the Handgrips, and bring your arms straight down and wrists straight. Shoulder Exercises Scapular Protraction-(elbows stabilized) Muscles worked: Serratus Anteriors Bench Position: 45o incline Accessory: Handgrips Pulleys: Chest Bar Success Tips • Keep your knees bent and feet flat on the floor. START...
...from the Power Rod® unit. • Reach behind your body and grasp the Handgrips. START FINISH Start • Lie on the Bench, facing away from your torso. • Keep your arms in your lower back. Action • Keeping your arms straight, slide your... Grasp the Handgrips, and bring your arms straight down and wrists straight. Shoulder Exercises Scapular Protraction-(elbows stabilized) Muscles worked: Serratus Anteriors Bench Position: 45o incline Accessory: Handgrips Pulleys: Chest Bar Success Tips • Keep your knees bent and feet flat on the floor. START...

Owners Manual
Page 26
... Bar Success Tips • Do not lose spinal alignment-keep your chest lifted. • Keep your knees bent and feet flat on the Bench, facing the Power Rod® unit. • Grasp the Handgrips, palms facing floor, arms nearly straight. • Sit up straight, and...the Start position, keeping your lower back. Shoulder Exercises Lying Front Shoulder Raise-Shoulder Flexion (elbows stabilized) Muscles Worked: Front and Middle Deltoids Bench Position: Horizontal Accessory: Handgrips START FINISH Pulleys: Chest Bar Success Tips • Keep your knees bent and feet flat on the floor. ...
... Bar Success Tips • Do not lose spinal alignment-keep your chest lifted. • Keep your knees bent and feet flat on the Bench, facing the Power Rod® unit. • Grasp the Handgrips, palms facing floor, arms nearly straight. • Sit up straight, and...the Start position, keeping your lower back. Shoulder Exercises Lying Front Shoulder Raise-Shoulder Flexion (elbows stabilized) Muscles Worked: Front and Middle Deltoids Bench Position: Horizontal Accessory: Handgrips START FINISH Pulleys: Chest Bar Success Tips • Keep your knees bent and feet flat on the floor. ...

Owners Manual
Page 27
... distance to the Start position, maintaining controlled motion. 27 Shoulder Rotator Cuff-External Rotation Muscles worked: Infraspinatus and Teres Minor Bench Position: Flat Bench Forward Accessory: Handgrips Pulleys: Chest Bar Success Tips • Keep your knees bent and feet flat on the floor. ... not rotate the spine to get additional range of motion. Shoulder Exercises Shoulder Rotator Cuff-Internal Rotation Muscles worked: Subscapularis Bench Position: Flat Bench Forward Accessory: Handgrips Pulleys: Chest Bar Success Tips • Keep your knees bent and feet flat on the floor....
... distance to the Start position, maintaining controlled motion. 27 Shoulder Rotator Cuff-External Rotation Muscles worked: Infraspinatus and Teres Minor Bench Position: Flat Bench Forward Accessory: Handgrips Pulleys: Chest Bar Success Tips • Keep your knees bent and feet flat on the floor. ... not rotate the spine to get additional range of motion. Shoulder Exercises Shoulder Rotator Cuff-Internal Rotation Muscles worked: Subscapularis Bench Position: Flat Bench Forward Accessory: Handgrips Pulleys: Chest Bar Success Tips • Keep your knees bent and feet flat on the floor....

Owners Manual
Page 28
...8226; Keeping your arms straight, slowly pinch your arm muscles for this movement. Start • Sit on the bench, facing the Power Rod® unit. • Spread the cuff on the Bench, facing the Power Rod® unit. • Grasp the Handgrips, arms straight, palms facing down. Muscles Worked...: Middle Trapezius and Rhomboids Bench Position: Horizontal Accessory: Handgrips Pulleys: Chest Bar Success Tips • Do not lose your abdominals tight, and maintain good spinal alignment. &#...
...8226; Keeping your arms straight, slowly pinch your arm muscles for this movement. Start • Sit on the bench, facing the Power Rod® unit. • Spread the cuff on the Bench, facing the Power Rod® unit. • Grasp the Handgrips, arms straight, palms facing down. Muscles Worked...: Middle Trapezius and Rhomboids Bench Position: Horizontal Accessory: Handgrips Pulleys: Chest Bar Success Tips • Do not lose your abdominals tight, and maintain good spinal alignment. &#...

Owners Manual
Page 29
...the floor. • Keep your spine aligned, abs tight, and a slight arch in your shoulders. Lean your head back against the Bench. • Keep your spine aligned, abs tight, and a slight arch in front of your chest. START FINISH Start • Sit on the... back without slouching or changing spinal alignment. 29 Back Exercises Lying Lat Pulldowns Muscles worked: Latissimus Dorsi, Teres Major, and Rear Deltoids Bench Position: Flat Bench Forward Accessory: Handgrips Pulleys: Chest Bar Success Tips • Keep your knees bent and feet flat on the platform, knees bent comfortably...
...the floor. • Keep your spine aligned, abs tight, and a slight arch in your shoulders. Lean your head back against the Bench. • Keep your spine aligned, abs tight, and a slight arch in front of your chest. START FINISH Start • Sit on the... back without slouching or changing spinal alignment. 29 Back Exercises Lying Lat Pulldowns Muscles worked: Latissimus Dorsi, Teres Major, and Rear Deltoids Bench Position: Flat Bench Forward Accessory: Handgrips Pulleys: Chest Bar Success Tips • Keep your knees bent and feet flat on the platform, knees bent comfortably...
