
User Manual
Page 4
...damage and/or fire due to the speaker (-) terminal. Please use the mounting brackets and screws supplied for DC 12V negative ground operation system. To ensure safety and operate the device normally, installation of incompatible discs, or it will damage the device and/or shorten the ...technician is designed only for installation. Never connect the left and right channel speaker wires together or to DC 12V negative ground electrical system. The normal temperature for further reference. Do not put the device in extreme high or low temperature and block vents or radiator...
...damage and/or fire due to the speaker (-) terminal. Please use the mounting brackets and screws supplied for DC 12V negative ground operation system. To ensure safety and operate the device normally, installation of incompatible discs, or it will damage the device and/or shorten the ...technician is designed only for installation. Never connect the left and right channel speaker wires together or to DC 12V negative ground electrical system. The normal temperature for further reference. Do not put the device in extreme high or low temperature and block vents or radiator...
User Manual
Page 9
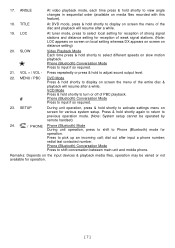
... shortly to shift conversation between main unit and mobile phone. SETUP During unit operation, press & hold shortly to Phone (Bluetooth) mode for various system setup. dial out after a while. 19. TITLE At DVD mode, press & hold shortly to select different speeds on distance setting) 20. ...DX appears on screen on slow motion playback. Press repeatedly or press & hold shortly again to return to previous operation mode. (Note: System setup cannot be varied or not available for reception of strong signal stations and distance setting for operation. [ 7 ] LOC At tuner ...
... shortly to shift conversation between main unit and mobile phone. SETUP During unit operation, press & hold shortly to Phone (Bluetooth) mode for various system setup. dial out after a while. 19. TITLE At DVD mode, press & hold shortly to select different speeds on distance setting) 20. ...DX appears on screen on slow motion playback. Press repeatedly or press & hold shortly again to return to previous operation mode. (Note: System setup cannot be varied or not available for reception of strong signal stations and distance setting for operation. [ 7 ] LOC At tuner ...
User Manual
Page 12
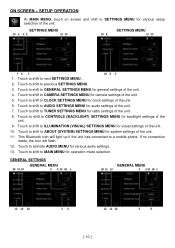
... MENU for radio settings of the unit. 8. Touch to shift to TUNER SETTINGS MENU for system settings of the unit. 5. Touch to shift to a mobile phone. Touch to shift to CONTROLS (BACKLIGHT) SETTINGS MENU for camera settings of the unit. 11.... icon will flash. 12. SETTINGS MENU SETTINGS MENU 1. Touch to shift to GENERAL SETTINGS MENU for operation mode selection. Touch to shift to activate AUDIO MENU for various audio settings. 13. Touch to shift to MAIN MENU for general settings of the unit. 9. GENERAL SETTINGS GENERAL MENU GENERAL MENU [ 10 ] SETUP OPERATION...
... MENU for radio settings of the unit. 8. Touch to shift to TUNER SETTINGS MENU for system settings of the unit. 5. Touch to shift to a mobile phone. Touch to shift to CONTROLS (BACKLIGHT) SETTINGS MENU for camera settings of the unit. 11.... icon will flash. 12. SETTINGS MENU SETTINGS MENU 1. Touch to shift to GENERAL SETTINGS MENU for operation mode selection. Touch to shift to activate AUDIO MENU for various audio settings. 13. Touch to shift to MAIN MENU for general settings of the unit. 9. GENERAL SETTINGS GENERAL MENU GENERAL MENU [ 10 ] SETUP OPERATION...
User Manual
Page 13
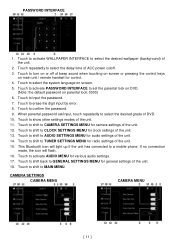
...select the desired grade of ACC power cutoff. 3. Touch to select the delay time of DVD. 10. Touch to shift to activate AUDIO MENU for various audio settings. 17. Touch to CLOCK SETTINGS MENU for radio settings of the unit. 13. Touch to TUNER SETTINGS MENU for clock settings... up if the unit has connected to erase the digit input by error. 8. Touch to CAMERA SETTINGS MENU for audio settings of the unit. 2. Touch to shift back to select the system language on screen. 5. Touch to GENERAL SETTINGS MENU for control. 4. Touch to a mobile phone. This Bluetooth ...
...select the desired grade of ACC power cutoff. 3. Touch to select the delay time of DVD. 10. Touch to shift to activate AUDIO MENU for various audio settings. 17. Touch to CLOCK SETTINGS MENU for radio settings of the unit. 13. Touch to TUNER SETTINGS MENU for clock settings... up if the unit has connected to erase the digit input by error. 8. Touch to CAMERA SETTINGS MENU for audio settings of the unit. 2. Touch to shift back to select the system language on screen. 5. Touch to GENERAL SETTINGS MENU for control. 4. Touch to a mobile phone. This Bluetooth ...
User Manual
Page 17
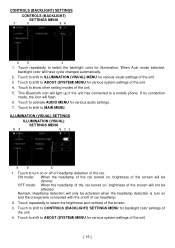
...for backlight color settings of car headlamp 2. Touch to ABOUT (SYSTEM) MENU for various visual settings of the car. Touch to shift to show other setting modes of the unit. 4. Touch to select the backlight color for various audio settings. 7. CONTROLS (BACKLIGHT) SETTINGS CONTROLS (BACKLIGHT) SETTINGS MENU...connected with the on/off of headlamp detection of the unit. 3. Touch to ILLUMINATION (VISUAL) MENU for various system settings of the unit. 5. Touch to shift to activate AUDIO MENU for illumination. ON mode: When the headlamp of the car turned on or off of the unit. ...
...for backlight color settings of car headlamp 2. Touch to ABOUT (SYSTEM) MENU for various visual settings of the car. Touch to shift to show other setting modes of the unit. 4. Touch to select the backlight color for various audio settings. 7. CONTROLS (BACKLIGHT) SETTINGS CONTROLS (BACKLIGHT) SETTINGS MENU...connected with the on/off of headlamp detection of the unit. 3. Touch to ILLUMINATION (VISUAL) MENU for various system settings of the unit. 5. Touch to shift to activate AUDIO MENU for illumination. ON mode: When the headlamp of the car turned on or off of the unit. ...
User Manual
Page 18
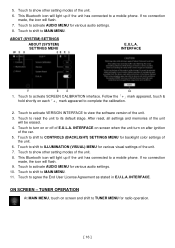
ABOUT (SYSTEM) SETTINGS ABOUT (SYSTEM) SETTINGS MENU E.U.L.A. Follow the「+」mark appeared, touch & hold shortly on or off of the unit. 6. Touch to turn on screen and shift to ... on each「+」mark appeared to TUNER MENU for radio operation. [ 16 ] Touch to shift to activate AUDIO MENU for backlight color settings of E.U.L.A. Touch to CONTROLS (BACKLIGHT) SETTINGS MENU for various audio settings. 10. ON SCREEN - 5. Touch to view the software version of the car. 5. Touch to activate VERSION INTERFACE...
ABOUT (SYSTEM) SETTINGS ABOUT (SYSTEM) SETTINGS MENU E.U.L.A. Follow the「+」mark appeared, touch & hold shortly on or off of the unit. 6. Touch to turn on screen and shift to ... on each「+」mark appeared to TUNER MENU for radio operation. [ 16 ] Touch to shift to activate AUDIO MENU for backlight color settings of E.U.L.A. Touch to CONTROLS (BACKLIGHT) SETTINGS MENU for various audio settings. 10. ON SCREEN - 5. Touch to view the software version of the car. 5. Touch to activate VERSION INTERFACE...
User Manual
Page 30
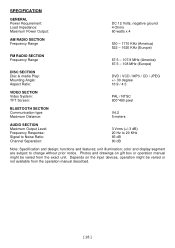
... & media Play: Mounting Angle: Aspect Ratio: DVD / VCD / MP3 / CD / JPEG +/- 30 degree 16:9 / 4:3 VIDEO SECTION Video System: TFT Screen: PAL / NTSC 800*480 pixel BLUETOOTH SECTION Communication type: Maximum Distance: V4.2 5 meters AUDIO SECTION Maximum Output Level: Frequency Response: Signal to Noise Ratio: Channel Separation: 3 Vrms (+/-3 dB) 20 Hz to change...
... & media Play: Mounting Angle: Aspect Ratio: DVD / VCD / MP3 / CD / JPEG +/- 30 degree 16:9 / 4:3 VIDEO SECTION Video System: TFT Screen: PAL / NTSC 800*480 pixel BLUETOOTH SECTION Communication type: Maximum Distance: V4.2 5 meters AUDIO SECTION Maximum Output Level: Frequency Response: Signal to Noise Ratio: Channel Separation: 3 Vrms (+/-3 dB) 20 Hz to change...


