
User Manual in English
Page 2
To ensure safety while driving and to comply with laws, drivers should not watch video or operate the video device while driving.
To ensure safety while driving and to comply with laws, drivers should not watch video or operate the video device while driving.
User Manual in English
Page 3
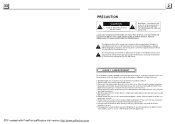
PRECAUTION CAUTION RISK OF ELECTRIC SHOCK ! Please ensure the ventilation holes are not covered to avoid overheating and malfunction. 8.Clear the panel and case with soft dry cloth only, do not intend to use . 2.Do not touch the power plug with liquids, such as vases, shall be placed on the apparatus . CAUTION: TO REDUCE THE RISK OF ELECTRIC SHOCK, DO NOT REMOVE COVER (OR BACK). The lightning flash with arrowhead symbol, within an equilateral triangle, is intended to alert the user to the presence of uninsulated dangerous voltage within an equilateral triangle is not in the ...
PRECAUTION CAUTION RISK OF ELECTRIC SHOCK ! Please ensure the ventilation holes are not covered to avoid overheating and malfunction. 8.Clear the panel and case with soft dry cloth only, do not intend to use . 2.Do not touch the power plug with liquids, such as vases, shall be placed on the apparatus . CAUTION: TO REDUCE THE RISK OF ELECTRIC SHOCK, DO NOT REMOVE COVER (OR BACK). The lightning flash with arrowhead symbol, within an equilateral triangle, is intended to alert the user to the presence of uninsulated dangerous voltage within an equilateral triangle is not in the ...
User Manual in English
Page 4
iPod Operation 13 5. Before Operation 4 1.1 Glossary 4 1.2 Precautions 4 1.3 Maintenance and Cleaning of Discs 5 1.4 Battery Information of Remote Control 5 1.5 Remote Control Description 6 1.6 Locations and Names of Controls on or in the Unit 7 1.7 Wires Connection Description 8 1.8 Unit Installation 9 2. Disc, USB and MMC/SD Card Operation 14 5.1 Load/unload Disc, USB or Card 14 5.2 Pause Playback 16 5.3 Stop Playback 16 5.4 Select Chapter/Track with UP/DN or >>|/| Common Operation 10 3. Radio Operation 11 4. Contents 1.
iPod Operation 13 5. Before Operation 4 1.1 Glossary 4 1.2 Precautions 4 1.3 Maintenance and Cleaning of Discs 5 1.4 Battery Information of Remote Control 5 1.5 Remote Control Description 6 1.6 Locations and Names of Controls on or in the Unit 7 1.7 Wires Connection Description 8 1.8 Unit Installation 9 2. Disc, USB and MMC/SD Card Operation 14 5.1 Load/unload Disc, USB or Card 14 5.2 Pause Playback 16 5.3 Stop Playback 16 5.4 Select Chapter/Track with UP/DN or >>|/| Common Operation 10 3. Radio Operation 11 4. Contents 1.
User Manual in English
Page 5
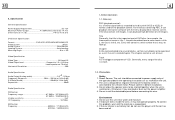
...4:3 Video Output level Composite:1.0± 0.2Vp-p Load impedance: 75 ohms Horizontal Resolution 500 Audio Specification Audio Output(Analog audio 2.0+0-1.0Vrms Frequency Response 20Hz ~ 20KHz(at 1KHz 0 dB) S/N Ratio(Audio 90dB(at least. Please confirm it may overload or burn out the power amplifier. 4.... 14.4 V) Dimensions(w x h x d 7"W x 2"H x 6.3"D DVD Deck Specification Format DVD/VCD/JPEG/MP4/MP3/WMA/CD Video System NTSC Audio System 24 bit/96KHz Loading System Auto Loading Mounting Angle 0 to the vehicle metal. for the playback control. The chapter contain a unit at 1KHz ...
...4:3 Video Output level Composite:1.0± 0.2Vp-p Load impedance: 75 ohms Horizontal Resolution 500 Audio Specification Audio Output(Analog audio 2.0+0-1.0Vrms Frequency Response 20Hz ~ 20KHz(at 1KHz 0 dB) S/N Ratio(Audio 90dB(at least. Please confirm it may overload or burn out the power amplifier. 4.... 14.4 V) Dimensions(w x h x d 7"W x 2"H x 6.3"D DVD Deck Specification Format DVD/VCD/JPEG/MP4/MP3/WMA/CD Video System NTSC Audio System 24 bit/96KHz Loading System Auto Loading Mounting Angle 0 to the vehicle metal. for the playback control. The chapter contain a unit at 1KHz ...
User Manual in English
Page 6
... use petrol, thinner. For the sake of your player. * Check whether the video connector is damaged. * Ensure that you have set the right AUDIO setup of children. 7. PAL, NTSC) setting. If so, cool off till the ambient temperature returns to normal. * Replace another disc to the player.... * Ensure that the audio is not under muted. To keep temperature after using the DVD player. NO PICTURE BUT HAVE SOUND * Ensure that the player's video output has ...
... use petrol, thinner. For the sake of your player. * Check whether the video connector is damaged. * Ensure that you have set the right AUDIO setup of children. 7. PAL, NTSC) setting. If so, cool off till the ambient temperature returns to normal. * Replace another disc to the player.... * Ensure that the audio is not under muted. To keep temperature after using the DVD player. NO PICTURE BUT HAVE SOUND * Ensure that the player's video output has ...
User Manual in English
Page 7
...briefly to reject the call; 6.3 When talking, press HANGUP button briefly to the Car Audio Player. To transfer the audio of a file played by Mobile Phone to the Car Audio Player In the connection status between the Bluetooth devices of the Car Audio Player and a Mobile Phone, if the mobile phone can play... audio or video files and support A2DP, when the Mobile Phone plays an audio or video file(For some Mobile Phones, ...
...briefly to reject the call; 6.3 When talking, press HANGUP button briefly to the Car Audio Player. To transfer the audio of a file played by Mobile Phone to the Car Audio Player In the connection status between the Bluetooth devices of the Car Audio Player and a Mobile Phone, if the mobile phone can play... audio or video files and support A2DP, when the Mobile Phone plays an audio or video file(For some Mobile Phones, ...
User Manual in English
Page 8
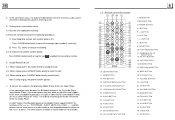
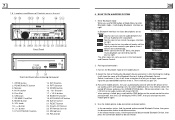
Monitor 4. USB Jack 7. MODE button 9. OPEN button 2. SD/MMC Card Slot 8. AV IN socket 5. VOL knob 10. >>| button 11. | 1.6 Locations and Names of Controls on or in the unit 18 19 23 5 22 3 20 1 4 11 10 9 24 12 13 14 15 16 17 8 2 25 6 Front Panel SD / M M C 7 21 The Front Facet after removing front panel 1. POWER/MUTE button 3. Disc Slot 6.
Monitor 4. USB Jack 7. MODE button 9. OPEN button 2. SD/MMC Card Slot 8. AV IN socket 5. VOL knob 10. >>| button 11. | 1.6 Locations and Names of Controls on or in the unit 18 19 23 5 22 3 20 1 4 11 10 9 24 12 13 14 15 16 17 8 2 25 6 Front Panel SD / M M C 7 21 The Front Facet after removing front panel 1. POWER/MUTE button 3. Disc Slot 6.
User Manual in English
Page 9
... YELLOW YELLOW YELLOW BROWN AV RCA AUX IN GREY VIDEO RCA OUT BLACK REAR VIEW CAMERA WIRING CONNECTING SOCKET 2 WIRING CONNECTING PLUG 2 GREY REAR AUDIO RCA OUT BLACK RED R WHITE L IPod IN Description of Connecting the Parking Brake Line to work. 2. * Region Code Q: Why does the... 1 YELLOW MEMORY B+ FUSED BLACK(GND) FILTER BOX 1A RED & 10 A IGNITION SWITCH FUSES BLUE AUTO ANT FRONT WHITE WOOFER LINE OUT GREEN BLACK FRONT AUDIO RCA OUT RED R WHITE L GRAY FRONT LEFT SP WHITE / BLACK GREEN GRAY / BLACK VIOLET RIGHT SP REAR GREEN / BLACK VIOLET / BLACK REAR NOTES...
... YELLOW YELLOW YELLOW BROWN AV RCA AUX IN GREY VIDEO RCA OUT BLACK REAR VIEW CAMERA WIRING CONNECTING SOCKET 2 WIRING CONNECTING PLUG 2 GREY REAR AUDIO RCA OUT BLACK RED R WHITE L IPod IN Description of Connecting the Parking Brake Line to work. 2. * Region Code Q: Why does the... 1 YELLOW MEMORY B+ FUSED BLACK(GND) FILTER BOX 1A RED & 10 A IGNITION SWITCH FUSES BLUE AUTO ANT FRONT WHITE WOOFER LINE OUT GREEN BLACK FRONT AUDIO RCA OUT RED R WHITE L GRAY FRONT LEFT SP WHITE / BLACK GREEN GRAY / BLACK VIOLET RIGHT SP REAR GREEN / BLACK VIOLET / BLACK REAR NOTES...
User Manual in English
Page 10
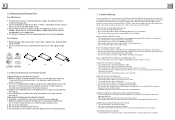
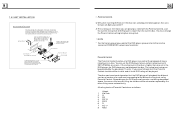
1.8 UNIT INSTALLATION INSTALLATION INSTRUCTIONS THE UNIT IS IN STAL LED TO B E AN ANT I-THEFT ONE. PL EAS E DO THE CONNECT ION OF T HE P OWE R, SPEAK ERS AND ANTE NNA ACCORDING TO THE REQUIREM ENT OF THE IN STR UCTI ON B OOK , TH EN IN STA LL THE SLIDI NG META L HO USIN G IN THE CAR AS F OLLO WS. METAL S TRAP TO BOO ST U P TH E CA PABI LITY OF AN TI-JA MMING, P LEA SE FIX TH E ME TAL S TRA P ON THE METAL CO NNE CTED TO T HE B OTTOM BR ACKE T OF THE CAR . DA SH B OAR D SLIDING METAL H OUS ING UN IT C HAS SIS PLA STIC TRIM OU T FRO NT PANEL TO DRAW THE CHASSIS OUT OF TH E SL IDING ME TAL H ...
1.8 UNIT INSTALLATION INSTALLATION INSTRUCTIONS THE UNIT IS IN STAL LED TO B E AN ANT I-THEFT ONE. PL EAS E DO THE CONNECT ION OF T HE P OWE R, SPEAK ERS AND ANTE NNA ACCORDING TO THE REQUIREM ENT OF THE IN STR UCTI ON B OOK , TH EN IN STA LL THE SLIDI NG META L HO USIN G IN THE CAR AS F OLLO WS. METAL S TRAP TO BOO ST U P TH E CA PABI LITY OF AN TI-JA MMING, P LEA SE FIX TH E ME TAL S TRA P ON THE METAL CO NNE CTED TO T HE B OTTOM BR ACKE T OF THE CAR . DA SH B OAR D SLIDING METAL H OUS ING UN IT C HAS SIS PLA STIC TRIM OU T FRO NT PANEL TO DRAW THE CHASSIS OUT OF TH E SL IDING ME TAL H ...
User Manual in English
Page 11
... signal ; To display clock time Press the CLK button to turn on the small LCD. 8. To slide the monitor of the Car Audio System out of/into the chassis Pressing the OPEN button can display clock time on /off the unit. 2. then tap one will output..., STEREO, VSS. After sliding the monitor into the chassis. 3. 5.23.5 SPEAKER SETUP DOWNMIX It is for selecting your desired mode. when outputting audio signal with vivid theatre effect. You should select it , then press the RESET button to rehabilitate the distorted program to select RADIO, DISC (After ...
... signal ; To display clock time Press the CLK button to turn on the small LCD. 8. To slide the monitor of the Car Audio System out of/into the chassis Pressing the OPEN button can display clock time on /off the unit. 2. then tap one will output..., STEREO, VSS. After sliding the monitor into the chassis. 3. 5.23.5 SPEAKER SETUP DOWNMIX It is for selecting your desired mode. when outputting audio signal with vivid theatre effect. You should select it , then press the RESET button to rehabilitate the distorted program to select RADIO, DISC (After ...
User Manual in English
Page 12
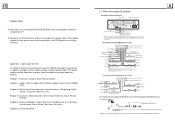
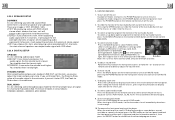
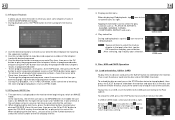
... turn to SETUP interface as ones in the unit panel or in the Remote Control. RADIO interface 2. TUNE/SEEK UP/DOWN BUTTONS In RADIO mode: AUDIO & VIDEO SETUP interface 1) Press and hold the >>|/|>| / | the other icons are same as right. BAND BUTTON In RADIO mode, press the BAND button ... 1. Enter RADIO mode When you can adjust MUTE, APS, EQ, TA, AF, PTY as right. In the interface, select one of GENERAL, TIME, AUDIO, VIDEO ,RADIO , STEERING WHEEL CONTROL, CALIBRATE by tapping them, then set interface, you use MODE button or Mode Menu to enter RADIO mode, it will...
... turn to SETUP interface as ones in the unit panel or in the Remote Control. RADIO interface 2. TUNE/SEEK UP/DOWN BUTTONS In RADIO mode: AUDIO & VIDEO SETUP interface 1) Press and hold the >>|/|>| / | the other icons are same as right. BAND BUTTON In RADIO mode, press the BAND button ... 1. Enter RADIO mode When you can adjust MUTE, APS, EQ, TA, AF, PTY as right. In the interface, select one of GENERAL, TIME, AUDIO, VIDEO ,RADIO , STEERING WHEEL CONTROL, CALIBRATE by tapping them, then set interface, you use MODE button or Mode Menu to enter RADIO mode, it will...
User Manual in English
Page 13
2. For the DVD System Menu, there are too strong this causes interference to the receiving effect during tuning, check whether there is the word LOC on LCD, then tune again for the distance radio station; 2) In RADIO mode, when the signals of the PTY program. You can select one of PASSWORD in all setup items change back to display the word LOC on LCD, press this button to the normal station. 9. Select the PASSWORD item and then press the > button to enter it, then input the password mentioned above . PTY (PROGRAM TYPE) BUTTON Press the PTY button briefly to unlock the ...
2. For the DVD System Menu, there are too strong this causes interference to the receiving effect during tuning, check whether there is the word LOC on LCD, then tune again for the distance radio station; 2) In RADIO mode, when the signals of the PTY program. You can select one of PASSWORD in all setup items change back to display the word LOC on LCD, press this button to the normal station. 9. Select the PASSWORD item and then press the > button to enter it, then input the password mentioned above . PTY (PROGRAM TYPE) BUTTON Press the PTY button briefly to unlock the ...
User Manual in English
Page 14
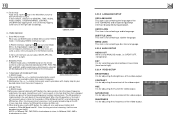
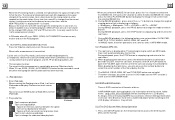
In FM mode, when AF is selected, the radio checks the signal strength of the AF all the time. Play audio files : Tap it can pause playback: : Tap it can stop playback. : Tap one of them can select next or previous track. : Tap it to turn ... display iPod menu on touch screen as right. Every time that other program, and TA, TP will search for the strong station to change the audio and video playback. When traffic announcement is transmitted: 1) If the unit is stronger than the current station, it to a few minute for the stronger RDS...
In FM mode, when AF is selected, the radio checks the signal strength of the AF all the time. Play audio files : Tap it can pause playback: : Tap it can stop playback. : Tap one of them can select next or previous track. : Tap it to turn ... display iPod menu on touch screen as right. Every time that other program, and TA, TP will search for the strong station to change the audio and video playback. When traffic announcement is transmitted: 1) If the unit is stronger than the current station, it to a few minute for the stronger RDS...
User Manual in English
Page 15
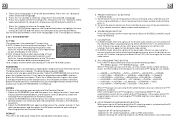
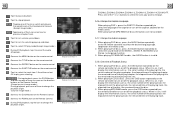
... button to slide down the monitor and eject disc in the disc slot and then remove the disc; USB/ CARD INTERFACE Play video files During audio playback, tap this sort of them to select the track or chapter in the ipod, after that, tap the OK to confirm and play your... press the EJECT button to previous setting. or push the card firstly and pull it is displayed on IMAGE mode. . Remark: the icon is for audio files; the icon is for video files;
... button to slide down the monitor and eject disc in the disc slot and then remove the disc; USB/ CARD INTERFACE Play video files During audio playback, tap this sort of them to select the track or chapter in the ipod, after that, tap the OK to confirm and play your... press the EJECT button to previous setting. or push the card firstly and pull it is displayed on IMAGE mode. . Remark: the icon is for audio files; the icon is for video files;
User Manual in English
Page 16
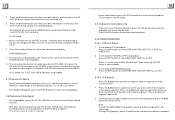
... MUSIC Keyboard interface-1 Keyboard interface-2 Keyboard interface-3 ZOOMx2,ZOOMx3,ZOOMx4,ZOOMx1/2,ZOOMx1/3,ZOOMx1/4,ZOOM OFF. When playing CD/WMA/MP3 media , the AUDIO button is on /off the playback status. When playing VCD/CD discs , press the OSD button repeatedly on the remote controller to turn ...track. When it will display the information such as the direction buttons on /off the playback status. When playing DVD discs , press the AUDIO button repeatedly on the IR remote controller to select the desired language type. (depend on the Remote Control. : During DVD playback, tap...
... MUSIC Keyboard interface-1 Keyboard interface-2 Keyboard interface-3 ZOOMx2,ZOOMx3,ZOOMx4,ZOOMx1/2,ZOOMx1/3,ZOOMx1/4,ZOOM OFF. When playing CD/WMA/MP3 media , the AUDIO button is on /off the playback status. When playing VCD/CD discs , press the OSD button repeatedly on the remote controller to turn ...track. When it will display the information such as the direction buttons on /off the playback status. When playing DVD discs , press the AUDIO button repeatedly on the IR remote controller to select the desired language type. (depend on the Remote Control. : During DVD playback, tap...

User Manual in English
Page 17
When playing VCD(PBC OFF)/CD discs , press the INT button to play from the beginning of the first chapter/track. 5.4 Select Chapter/Track with the >>| or |>| or |>| or | Press the INT button again to start playing from the selected time. 2. When playing DVD discs , press the SEARCH button to display a interface and highlight the title item, then use the number buttons to input the serial number of the track; finally press the OK or PLAY button to play the selected chapter or play the previous 15 seconds part of each track on the IR remote controller is not available. 2. ...
When playing VCD(PBC OFF)/CD discs , press the INT button to play from the beginning of the first chapter/track. 5.4 Select Chapter/Track with the >>| or |>| or |>| or | Press the INT button again to start playing from the selected time. 2. When playing DVD discs , press the SEARCH button to display a interface and highlight the title item, then use the number buttons to input the serial number of the track; finally press the OK or PLAY button to play the selected chapter or play the previous 15 seconds part of each track on the IR remote controller is not available. 2. ...
User Manual in English
Page 18
In MP3/WMA mode 1. Press the number buttons to select your desired title, and then press the OK or PLAY button to open the FOLDER, and then press the direction buttons to select your desired chapter, finally press the OK or PLAY button to play . In VCD mode 1. When starting to play the selected chapter. During playback, pressing the MENU button can directly display the root menu of the title that is not available). 2. The root menu is displayed on TV screen if the disc include the PBC menu. 2. Press the direction buttons to select your desired track to turn on the PBC ...
In MP3/WMA mode 1. Press the number buttons to select your desired title, and then press the OK or PLAY button to open the FOLDER, and then press the direction buttons to select your desired chapter, finally press the OK or PLAY button to play . In VCD mode 1. When starting to play the selected chapter. During playback, pressing the MENU button can directly display the root menu of the title that is not available). 2. The root menu is displayed on TV screen if the disc include the PBC menu. 2. Press the direction buttons to select your desired track to turn on the PBC ...

User Manual in Spanish
Page 30
To ensure safety while driving and to comply with FinePrint pdfFactory trial version http://www.pdffactory.com PDF created with laws, drivers should not watch video or operate the video device while driving.
To ensure safety while driving and to comply with FinePrint pdfFactory trial version http://www.pdffactory.com PDF created with laws, drivers should not watch video or operate the video device while driving.
User Manual in Spanish
Page 31
REFER SERVICING TO QUALIFIED SERVICE PERSONNEL. The exclamation point within the products enclosure that may be placed on the apparatus . Please ensure the ventilation holes are not covered to avoid overheating and malfunction. 8.Clear the panel and case with soft dry cloth only, do not apply any of the components exposed out of the unit, only for qualified technicians. 5.Do not expose the unit under direct sunlight or nearby objects that no hazardous radiation outside of the unit. 1.Read through this instruction manual before installation and use. 2.Do not touch the power plug with wet...
REFER SERVICING TO QUALIFIED SERVICE PERSONNEL. The exclamation point within the products enclosure that may be placed on the apparatus . Please ensure the ventilation holes are not covered to avoid overheating and malfunction. 8.Clear the panel and case with soft dry cloth only, do not apply any of the components exposed out of the unit, only for qualified technicians. 5.Do not expose the unit under direct sunlight or nearby objects that no hazardous radiation outside of the unit. 1.Read through this instruction manual before installation and use. 2.Do not touch the power plug with wet...
User Manual in Spanish
Page 32
iPod Operation 13 5. Contents 1. Radio Operation 11 4. Before Operation 4 1.1 Glossary 4 1.2 Precautions 4 1.3 Maintenance and Cleaning of Discs 5 1.4 Battery Information of Remote Control 5 1.5 Remote Control Description 6 1.6 Locations and Names of Controls on or in the Unit 7 1.7 Wires Connection Description 8 1.8 Unit Installation 9 2. Common Operation 10 3. Disc, USB and MMC/SD Card Operation 14 5.1 Load/unload Disc, USB or Card 14 5.2 Pause Playback 16 5.3 Stop Playback 16 5.4 Select Chapter/Track with UP/DN or >>|/|
iPod Operation 13 5. Contents 1. Radio Operation 11 4. Before Operation 4 1.1 Glossary 4 1.2 Precautions 4 1.3 Maintenance and Cleaning of Discs 5 1.4 Battery Information of Remote Control 5 1.5 Remote Control Description 6 1.6 Locations and Names of Controls on or in the Unit 7 1.7 Wires Connection Description 8 1.8 Unit Installation 9 2. Common Operation 10 3. Disc, USB and MMC/SD Card Operation 14 5.1 Load/unload Disc, USB or Card 14 5.2 Pause Playback 16 5.3 Stop Playback 16 5.4 Select Chapter/Track with UP/DN or >>|/|
