User Guide
Page 1
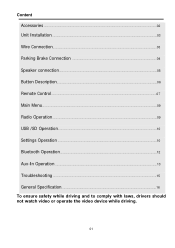
Content Accessories ...02 Unit Installation...03 Wire Connection...03 Parking Brake Connection ...04 Speaker connection...05 Button Description...06 Remote Control...07 Main Menu...09 Radio Operation...09 USB /SD Operation...10 Settings Operation ...10 Bluetooth Operation...12 Aux-In Operation ...13 Troubleshooting ...15 General Specification...16 To ensure safety while driving and to comply with laws, drivers should not watch video or operate the video device while driving. 01
Content Accessories ...02 Unit Installation...03 Wire Connection...03 Parking Brake Connection ...04 Speaker connection...05 Button Description...06 Remote Control...07 Main Menu...09 Radio Operation...09 USB /SD Operation...10 Settings Operation ...10 Bluetooth Operation...12 Aux-In Operation ...13 Troubleshooting ...15 General Specification...16 To ensure safety while driving and to comply with laws, drivers should not watch video or operate the video device while driving. 01

User Guide
Page 2
Accessories Package contains the following accessories for installation and operation of the unit. (1) Washer, Spring (2) Washer, 1 M5 Nut (5) Rubber Cushion 1 (3) Screw 1 (6) Screw 8 (4) Bolt 1 (5) Mounting Strap 1 1 (7)installation bracket 1 Left Right Remote Control Power Cable Trim Ring User Manual 02
Accessories Package contains the following accessories for installation and operation of the unit. (1) Washer, Spring (2) Washer, 1 M5 Nut (5) Rubber Cushion 1 (3) Screw 1 (6) Screw 8 (4) Bolt 1 (5) Mounting Strap 1 1 (7)installation bracket 1 Left Right Remote Control Power Cable Trim Ring User Manual 02

User Guide
Page 3
Use screws to fix the brackets to the left and right side of the Rear Chassis. 03 Unit Installation Bracket Screw 1. Put the 2 brackets to the unit. Wire Connection The Description of the Input/output Interface of the unit; 2.
Use screws to fix the brackets to the left and right side of the Rear Chassis. 03 Unit Installation Bracket Screw 1. Put the 2 brackets to the unit. Wire Connection The Description of the Input/output Interface of the unit; 2.
User Guide
Page 4
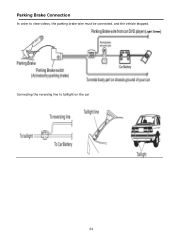
Connecting the reversing line to view videos, the parking brake wire must be connected, and the vehicle stopped. Parking Brake Connection In order to taillight on the car 04
Connecting the reversing line to view videos, the parking brake wire must be connected, and the vehicle stopped. Parking Brake Connection In order to taillight on the car 04
User Guide
Page 5
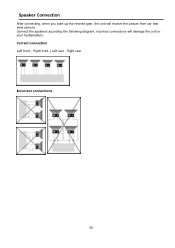
Connect the speakers according the following diagram, incorrect connections will receive the picture from car rear view camera. Right rear Incorrect connections 05 Correct connection Left front - Right front | Left rear - Speaker Connection After connecting, when you start up the reverse gear, the unit will damage the unit or your loudspeakers.
Connect the speakers according the following diagram, incorrect connections will receive the picture from car rear view camera. Right rear Incorrect connections 05 Correct connection Left front - Right front | Left rear - Speaker Connection After connecting, when you start up the reverse gear, the unit will damage the unit or your loudspeakers.
User Guide
Page 6
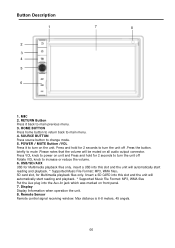
... change mode. 5. SOURCE BUTTON Press source button to main menu. 4. Press VOL knob to power on the unit. SD card slot, for Multimedia playback files only. POWER / MUTE Button /VOL Press it back to turn on unit and Press and hold for 2 seconds to turn the unit off Rotate VOL knob to increase or reduce the volume. 6. Display Display Information when operation the unit. 8. Remote Sensor Remote control signal receiving window. USB/SD/AUX USB for Multimedia playback files only. MIC 2. Button...
... change mode. 5. SOURCE BUTTON Press source button to main menu. 4. Press VOL knob to power on the unit. SD card slot, for Multimedia playback files only. POWER / MUTE Button /VOL Press it back to turn on unit and Press and hold for 2 seconds to turn the unit off Rotate VOL knob to increase or reduce the volume. 6. Display Display Information when operation the unit. 8. Remote Sensor Remote control signal receiving window. USB/SD/AUX USB for Multimedia playback files only. MIC 2. Button...
User Guide
Page 7
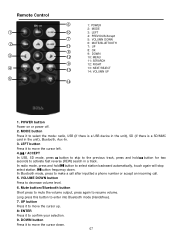
... the cursor left. 4. / ACCEPT In USB, SD mode, press button to skip to the previous track, press and hold button to make a call after inputted a phone number or accept an incoming call. 5. POWER button Power on or power off. 2. LEFT button Press it to activate fast reverse (REW) search in the unit), Bluetooth, Aux-In. 3. In Bluetooth mode, press to select station backward automatically, touch again will stop select station. button frequency down . 07
... the cursor left. 4. / ACCEPT In USB, SD mode, press button to skip to the previous track, press and hold button to make a call after inputted a phone number or accept an incoming call. 5. POWER button Power on or power off. 2. LEFT button Press it to activate fast reverse (REW) search in the unit), Bluetooth, Aux-In. 3. In Bluetooth mode, press to select station backward automatically, touch again will stop select station. button frequency down . 07
User Guide
Page 8
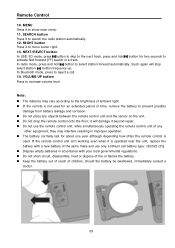
... the brightness of time, remove the battery to show main menu. 11. SEARCH button Press it to prevent possible damage from battery leakage and corrosion. „ Do not place any other equipment; RIGHT button Press it is used. If the remote control unit isn't working even when it to increase volume level. In Bluetooth mode, press to select station forward automatically, touch again will damage it beyond repair. „...
... the brightness of time, remove the battery to show main menu. 11. SEARCH button Press it to prevent possible damage from battery leakage and corrosion. „ Do not place any other equipment; RIGHT button Press it is used. If the remote control unit isn't working even when it to increase volume level. In Bluetooth mode, press to select station forward automatically, touch again will damage it beyond repair. „...
User Guide
Page 9
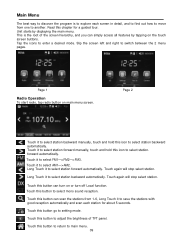
... detail, and to find out how to move from 1-6, Long Touch it to select mono sound reception. forward automatically. Long Touch it to select station backward manually, touch and hold this button to return to another. Touch this chapter for about 5 seconds. Touch this button go to switch between the 2 menu pages. Touch this button can turn off Local function. Slip the screen left and right to setting mode.
... detail, and to find out how to move from 1-6, Long Touch it to select mono sound reception. forward automatically. Long Touch it to select station backward manually, touch and hold this button to return to another. Touch this chapter for about 5 seconds. Touch this button go to switch between the 2 menu pages. Touch this button can turn off Local function. Slip the screen left and right to setting mode.
User Guide
Page 10
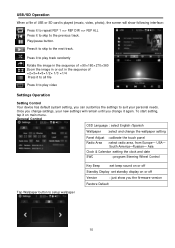
... all file Press it to play track randomly Rotate the image in the sequence of ×90×180×270×360 Zoom the image in or out in the sequence of USB or SD card is played (music, video, photo), the screen will remain until you change settings, your personal needs. Play/pause button. Once you change the wallpaper setting Panel Adjust :calibrate the touch panel Radio...
... all file Press it to play track randomly Rotate the image in the sequence of ×90×180×270×360 Zoom the image in or out in the sequence of USB or SD card is played (music, video, photo), the screen will remain until you change settings, your personal needs. Play/pause button. Once you change the wallpaper setting Panel Adjust :calibrate the touch panel Radio...
User Guide
Page 11
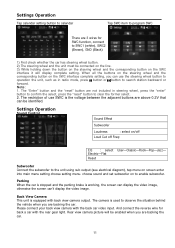
... view camera with the rear gear light. And connect the reverse wire for SWC function, connect to observe the situation behind the vehicle when you are backing the car. Parking When the car is stopped and the parking brake is equipped with back view camera output. Settings Operation Sound Control Sound Effect Subwoofer Loudness : select on to search station backward or forward. Rear view camera picture will display complete setting. The "Enter" button and the "reset" button are not included in radio mode, press button or button...
... view camera with the rear gear light. And connect the reverse wire for SWC function, connect to observe the situation behind the vehicle when you are backing the car. Parking When the car is stopped and the parking brake is equipped with back view camera output. Settings Operation Sound Control Sound Effect Subwoofer Loudness : select on to search station backward or forward. Rear view camera picture will display complete setting. The "Enter" button and the "reset" button are not included in radio mode, press button or button...
User Guide
Page 12
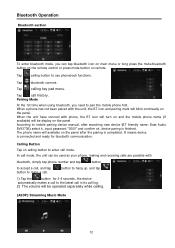
... will turn on and the mobile phone name (if available) will be used as your phone, making and receiving calls are possible with the unit, the BT icon and pairing mark will blink continually on remote. According to the latest call in its call history. In call mode, the unit can tap bluetooth icon on main menu or long press the mute/bluetooth button on the remote control...
... will turn on and the mobile phone name (if available) will be used as your phone, making and receiving calls are possible with the unit, the BT icon and pairing mark will blink continually on remote. According to the latest call in its call history. In call mode, the unit can tap bluetooth icon on main menu or long press the mute/bluetooth button on the remote control...
User Guide
Page 13
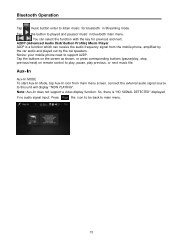
... Mode, tap Aux-In icon from the mobile phone, amplified by the car audio and played out by the car speakers. You can receive the audio frequency signal from main menu screen. Tap the buttons on the screen as shown, or press corresponding buttons (pause/play previous, or next music file. Bluetooth Operation Tap music button enter to play, pause, play , stop, previous/next) on remote control to listen music for previous and next. Note: Aux-In does not support a video display function...
... Mode, tap Aux-In icon from the mobile phone, amplified by the car audio and played out by the car speakers. You can receive the audio frequency signal from main menu screen. Tap the buttons on the screen as shown, or press corresponding buttons (pause/play previous, or next music file. Bluetooth Operation Tap music button enter to play, pause, play , stop, previous/next) on remote control to listen music for previous and next. Note: Aux-In does not support a video display function...
User Guide
Page 14
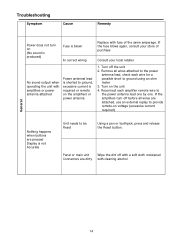
... unit 4. Reconnect each wire for a possible short to ground using an ohm meter 3. Turn on (No sound is produced) Fuse is blown In correct wiring Replace with cleaning alcohol 14 If the fuse blows again, consult your store of the same amperage. Troubleshooting Symptom Cause Remedy General Power does not turn off before all wires attached to the power antenna lead, check each amplifier remote wire to the power antenna...
... unit 4. Reconnect each wire for a possible short to ground using an ohm meter 3. Turn on (No sound is produced) Fuse is blown In correct wiring Replace with cleaning alcohol 14 If the fuse blows again, consult your store of the same amperage. Troubleshooting Symptom Cause Remedy General Power does not turn off before all wires attached to the power antenna lead, check each amplifier remote wire to the power antenna...
User Guide
Page 15
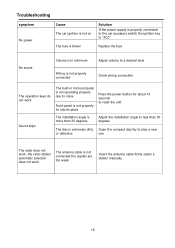
... car accessory switch the ignition key to "ACC" Replace the fuse No sound Volume is in minimum Adjust volume to a desired level Wiring is not properly connected Check wiring connection The operation keys do not work The built-in microcomputer is not operating properly due to noise Front panel is not properly fix into its place Press the power button for about 10 seconds to reset the unit Sound skips The installation...
... car accessory switch the ignition key to "ACC" Replace the fuse No sound Volume is in minimum Adjust volume to a desired level Wiring is not properly connected Check wiring connection The operation keys do not work The built-in microcomputer is not operating properly due to noise Front panel is not properly fix into its place Press the power button for about 10 seconds to reset the unit Sound skips The installation...
User Guide
Page 16
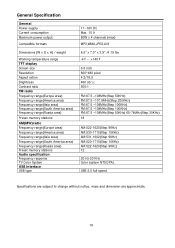
...Specification General Power supply Current consumption Maximum power output Compatible formats Dimensions (W x D x H) / weight Working temperature range TFT display Screen size Resolution Aspect ration Brightness Contrast ratio FM radio Frequency range(Europe area) Frequency range(America area) Frequency range(Asia area) Frequency range(South America area) Frequency range(Russia area) Preset memory stations AM(MW)radio...) AM:522-1620(Step 9KHz) 12 20 Hz-20 KHz Color system NTSC/PAL USB 2.0 full speed Specifications are subject to change without notice, mass and dimension are approximate. 16
...Specification General Power supply Current consumption Maximum power output Compatible formats Dimensions (W x D x H) / weight Working temperature range TFT display Screen size Resolution Aspect ration Brightness Contrast ratio FM radio Frequency range(Europe area) Frequency range(America area) Frequency range(Asia area) Frequency range(South America area) Frequency range(Russia area) Preset memory stations AM(MW)radio...) AM:522-1620(Step 9KHz) 12 20 Hz-20 KHz Color system NTSC/PAL USB 2.0 full speed Specifications are subject to change without notice, mass and dimension are approximate. 16


