User Manual in English
Page 7
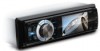
y Before finally installing the unit, connect the wiring temporarily and make sure it . 5. y Install the unit where it does not get in any dashboard having an opening as shown below: Installing the unit ... from "Front" (conventional DIN Front-mount) or "Rear" (DIN Rear-mount installation, utilizing threaded screw holes at the sides of the unit chassis). Disconnect the wire harness and the antenna. 3. The use of "removing the front panel"). 4. TAKE OUT SCREW BEFORE INSTALLATION Before Installing the unit, please remove the two screws...
y Before finally installing the unit, connect the wiring temporarily and make sure it . 5. y Install the unit where it does not get in any dashboard having an opening as shown below: Installing the unit ... from "Front" (conventional DIN Front-mount) or "Rear" (DIN Rear-mount installation, utilizing threaded screw holes at the sides of the unit chassis). Disconnect the wire harness and the antenna. 3. The use of "removing the front panel"). 4. TAKE OUT SCREW BEFORE INSTALLATION Before Installing the unit, please remove the two screws...
User Manual in English
Page 8
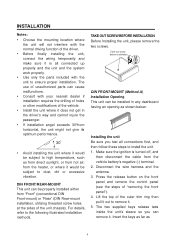
...strap to secure the back of the vehicle under the dashboard. This strap also helps ensure proper electrical grounding of the unit. Reconnect the wire harness and the antenna and be most effective. Mount the sleeve by inserting the sleeve into the opening of the dashboard and bend open... slots at the middle left and right sides of the unit (if attached). 7 Removing the unit 1. INSTALLATION they will be careful not to pinch any wires or cables. 8. If necessary, bend the metal strap to make contact, so examine which ones will go (with a screwdriver. Use the (1) Metal Strap; ...
...strap to secure the back of the vehicle under the dashboard. This strap also helps ensure proper electrical grounding of the unit. Reconnect the wire harness and the antenna and be most effective. Mount the sleeve by inserting the sleeve into the opening of the dashboard and bend open... slots at the middle left and right sides of the unit (if attached). 7 Removing the unit 1. INSTALLATION they will be careful not to pinch any wires or cables. 8. If necessary, bend the metal strap to make contact, so examine which ones will go (with a screwdriver. Use the (1) Metal Strap; ...
User Manual in English
Page 16
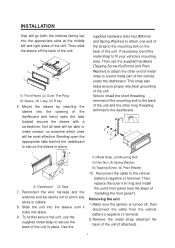
... on the remote control to enter into the setup menu. ON or OFF When TIME OFF, the CLOCK will turn the unit off When all wiring is a remote sensor on the front panel or VOL+/- ON or OFF The subwoofer output jack is on the remote control to adjust the Brightness...
... on the remote control to enter into the setup menu. ON or OFF When TIME OFF, the CLOCK will turn the unit off When all wiring is a remote sensor on the front panel or VOL+/- ON or OFF The subwoofer output jack is on the remote control to adjust the Brightness...
User Manual in English
Page 17
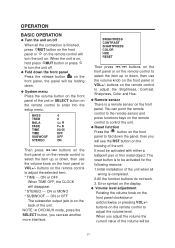
...or on the screen in . When button on the front panel or on the remote control is EQ function. ƹ Brake function If the brake wire (pink wire) isn't connected to the ground (when driving), the picture will not be displayed. ƹ Rearview function On the back of the minute and press... volume button to confirm. ƹ Equalization In radio mode, press AUDIO button on the remote control or EQ button on the front panel to turn on ...
...or on the screen in . When button on the front panel or on the remote control is EQ function. ƹ Brake function If the brake wire (pink wire) isn't connected to the ground (when driving), the picture will not be displayed. ƹ Rearview function On the back of the minute and press... volume button to confirm. ƹ Equalization In radio mode, press AUDIO button on the remote control or EQ button on the front panel to turn on ...
User Manual in English
Page 25
...pressed. ¾ Battery capacity is faulty, first consult this player. The power does not turn on. ¾ The lead wires are not wired correctly. „ Reconnect the speaker wires so that each output terminal is connected to each source is not connected yet. „ Connect the optional unit correctly. ...correct buttons on the housing of higher quality. ¾ The disc installed is not supported by a screw in the car. „ Check the speaker wiring. ¾ The speakers are not connected properly to the connectors. „ Make sure the connection is correct. ¾ The fuse has blown. ...
...pressed. ¾ Battery capacity is faulty, first consult this player. The power does not turn on. ¾ The lead wires are not wired correctly. „ Reconnect the speaker wires so that each output terminal is connected to each source is not connected yet. „ Connect the optional unit correctly. ...correct buttons on the housing of higher quality. ¾ The disc installed is not supported by a screw in the car. „ Check the speaker wiring. ¾ The speakers are not connected properly to the connectors. „ Make sure the connection is correct. ¾ The fuse has blown. ...

