
Wave® music system iPod® connect kit - Owner's guide
Page 5
.... Note: The product must have the latest version of your iPod must be found at www.Bose.com/static/compliance/index.html Note: Where the mains plug or appliance coupler is used indoors. Contents... instructions there. 3 Chin Arabic SAFETY INFORMATION Please dispose of Conformity can be used as expected, your kit Dock with most iPod models. If you need to avoid extreme volume when using headphones, especially for... Français Italiano Nederlands Thai Korean S. For the Wave® connect kit to be used batteries properly, following any local regulations.
.... Note: The product must have the latest version of your iPod must be found at www.Bose.com/static/compliance/index.html Note: Where the mains plug or appliance coupler is used indoors. Contents... instructions there. 3 Chin Arabic SAFETY INFORMATION Please dispose of Conformity can be used as expected, your kit Dock with most iPod models. If you need to avoid extreme volume when using headphones, especially for... Français Italiano Nederlands Thai Korean S. For the Wave® connect kit to be used batteries properly, following any local regulations.

Wave® music system iPod® connect kit - Owner's guide
Page 6
... ® Be sure the IR sensor on the front of your Bose system. Chin Korean Thai Nederlands Italiano Français Español Deutsch English USING YOUR WAVE® CONNECT KIT Recommended placement We recommend that is visible and aligned with the Wave system IR sensor so both products respond to AUDIO OUT on...
... ® Be sure the IR sensor on the front of your Bose system. Chin Korean Thai Nederlands Italiano Français Español Deutsch English USING YOUR WAVE® CONNECT KIT Recommended placement We recommend that is visible and aligned with the Wave system IR sensor so both products respond to AUDIO OUT on...
Wave® music system iPod® connect kit - Owner's guide
Page 7
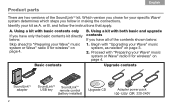
Audio cable to the dock. 2. Plug the power pack into an AC (mains) outlet. Connect the free end of the power pack cable to the system iPod dock DC POWER Power pack Power pack cable 5 Chin Arabic USING YOUR WAVE® CONNECT KIT For a Wave® music system with Multi-CD Changer: Use the RCA audio cable and connect from AUDIO OUT on the dock to INPUT AUX 1 L and R. (See the note below.) ® iPod dock INPUT AUX 1 L and R AUDIO OUT RCA audio cable Connecting the dock to power 1. English Deutsch Español Français Italiano Nederlands Thai Korean S.
Audio cable to the dock. 2. Plug the power pack into an AC (mains) outlet. Connect the free end of the power pack cable to the system iPod dock DC POWER Power pack Power pack cable 5 Chin Arabic USING YOUR WAVE® CONNECT KIT For a Wave® music system with Multi-CD Changer: Use the RCA audio cable and connect from AUDIO OUT on the dock to INPUT AUX 1 L and R. (See the note below.) ® iPod dock INPUT AUX 1 L and R AUDIO OUT RCA audio cable Connecting the dock to power 1. English Deutsch Español Français Italiano Nederlands Thai Korean S.

Wave® music system iPod® connect kit - Owner's guide
Page 8
... as you can also be set for that source. Chin Korean Thai Nederlands Italiano Français Español Deutsch English USING YOUR WAVE® CONNECT KIT Control of your iPod and system performing together as the source. • Switches between AUX input jacks on which source (FM/AM/CD... off iPod. On/Off Turns off iPod. Then you expect, press the button for use the new remote exclusively (not the buttons on your Bose system. Arabic S. Use the AUX button on the remote control affect system sound sources only. The remote buttons below ). Tune/Playlist Moves from one...
... as you can also be set for that source. Chin Korean Thai Nederlands Italiano Français Español Deutsch English USING YOUR WAVE® CONNECT KIT Control of your iPod and system performing together as the source. • Switches between AUX input jacks on which source (FM/AM/CD... off iPod. On/Off Turns off iPod. Then you expect, press the button for use the new remote exclusively (not the buttons on your Bose system. Arabic S. Use the AUX button on the remote control affect system sound sources only. The remote buttons below ). Tune/Playlist Moves from one...

Wave® music system iPod® connect kit - Owner's guide
Page 9
... iPod firmly into the dock and make sure it continues to adjust the sound volume. Your Wave® system is securely seated in a paused state and begins charging, as shown. Chin Arabic USING YOUR WAVE® CONNECT KIT Docking your iPod Insert your system and begin iPod playback. • Press Play/Pause to... to scan through a track. • Press Volume to charge. Your iPod turns on the front of using the iPod controls will not affect the Wave system® volume. • Press On/Off once to work with your iPod. If you prefer, you switch to aim the remote so its ...
... iPod firmly into the dock and make sure it continues to adjust the sound volume. Your Wave® system is securely seated in a paused state and begins charging, as shown. Chin Arabic USING YOUR WAVE® CONNECT KIT Docking your iPod Insert your system and begin iPod playback. • Press Play/Pause to... to scan through a track. • Press Volume to charge. Your iPod turns on the front of using the iPod controls will not affect the Wave system® volume. • Press On/Off once to work with your iPod. If you prefer, you switch to aim the remote so its ...

Wave® music system iPod® connect kit - Owner's guide
Page 10
... is on the changer. With the remote aimed properly, your iPod has four buttons above the touch wheel, it is not compatible with this Wave® connect kit. 8 Arabic S. another source button (FM/AM or CD). The volume varies when the iPod plays different songs. Be sure the audio cable... from the dock is off within 2 seconds. Connect the headphones to the level you are plugged into the docked iPod. Use the new remote Volume to set the volume to the mini jack on the Bose® system display. The Bose® system speakers play . The recording quality of...
... is on the changer. With the remote aimed properly, your iPod has four buttons above the touch wheel, it is not compatible with this Wave® connect kit. 8 Arabic S. another source button (FM/AM or CD). The volume varies when the iPod plays different songs. Be sure the audio cable... from the dock is off within 2 seconds. Connect the headphones to the level you are plugged into the docked iPod. Use the new remote Volume to set the volume to the mini jack on the Bose® system display. The Bose® system speakers play . The recording quality of...

Wave® music system iPod® connect kit - Owner's guide
Page 11
Chin Arabic USING YOUR WAVE® CONNECT KIT Battery replacement To replace the remote control battery, use a Duracell, Eveready, Energizer, Maxell, Toshiba, or Shun Wo CR2032 or DL2032, 3-volt lithium battery. iPod is a registered trademark of Bose Corporation. 9 and other countries. English Deutsch Españ...the + symbol inside the battery tray. Refer to your Bose® system owner's guide for the Wave® music system or Wave radio II. and other countries. The distinctive design of the Wave® music system and Wave® radio II is a trademark of Apple Inc., ...
Chin Arabic USING YOUR WAVE® CONNECT KIT Battery replacement To replace the remote control battery, use a Duracell, Eveready, Energizer, Maxell, Toshiba, or Shun Wo CR2032 or DL2032, 3-volt lithium battery. iPod is a registered trademark of Bose Corporation. 9 and other countries. English Deutsch Españ...the + symbol inside the battery tray. Refer to your Bose® system owner's guide for the Wave® music system or Wave radio II. and other countries. The distinctive design of the Wave® music system and Wave® radio II is a trademark of Apple Inc., ...
Wave® SoundLink® adapter - Owner's guide
Page 6
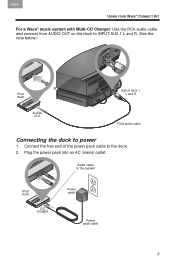
...Skip ahead to "Preparing your Wave® music system or Wave® radio II for wireless" on page 4. and follow in making the connections. Proceed with both basic and upgrade contents If you have all of the SoundLinkTM kit. Using a kit with "Preparing your Wave® music system, as A.... Begin with basic contents only If you have only the basic contents kit directly below : 1. Which ...
...Skip ahead to "Preparing your Wave® music system or Wave® radio II for wireless" on page 4. and follow in making the connections. Proceed with both basic and upgrade contents If you have all of the SoundLinkTM kit. Using a kit with "Preparing your Wave® music system, as A.... Begin with basic contents only If you have only the basic contents kit directly below : 1. Which ...

Wave® SoundLink® adapter - Owner's guide
Page 7
... your Wave® music system is important to the Bose® owner's guide that came with the SoundLinkTM adapter. 3 Follow this procedure: 1. Insert the update CD, label side up, into the disc drive on the Wave® system display. Make sure your kit includes an... upgrade CD, it is plugged in and ready to use the CD before making any SoundLinkTM kit connections...
... your Wave® music system is important to the Bose® owner's guide that came with the SoundLinkTM adapter. 3 Follow this procedure: 1. Insert the update CD, label side up, into the disc drive on the Wave® system display. Make sure your kit includes an... upgrade CD, it is plugged in and ready to use the CD before making any SoundLinkTM kit connections...

Wave® SoundLink® adapter - Owner's guide
Page 9
... adapter power cable into an AC power outlet that connects to your kit includes an adapter power pack 1. Adapter* power pack SOUNDLINK POWER CABLE UNPLUGGED scrolls across the Wave® system display if the required power pack is not connected when you press the SoundLink/CD button. *In ...some regions, the kit includes a separate power cable that is close to the power supply. 5...
... adapter power cable into an AC power outlet that connects to your kit includes an adapter power pack 1. Adapter* power pack SOUNDLINK POWER CABLE UNPLUGGED scrolls across the Wave® system display if the required power pack is not connected when you press the SoundLink/CD button. *In ...some regions, the kit includes a separate power cable that is close to the power supply. 5...

Wave® SoundLink® adapter - Owner's guide
Page 13
...audio. SoundLink/AUX • Press: Selects the audio from your computer or an AUX device (if one is connected to operate the Wave® radio II, plus some music applications. Note for Wave® radio II owners: The new remote provides all of the buttons needed to the system). • ... Tab 7, 15 Tab 8, 16 Listening to music on your computer Your SoundLinkTM kit remote control gives you access to the music on your computer. • Press and hold : Adjusts the volume faster. It works much like the original Wave® music system remote and controls all of the system features.
...audio. SoundLink/AUX • Press: Selects the audio from your computer or an AUX device (if one is connected to operate the Wave® radio II, plus some music applications. Note for Wave® radio II owners: The new remote provides all of the buttons needed to the system). • ... Tab 7, 15 Tab 8, 16 Listening to music on your computer Your SoundLinkTM kit remote control gives you access to the music on your computer. • Press and hold : Adjusts the volume faster. It works much like the original Wave® music system remote and controls all of the system features.

Wave® SoundLink® adapter - Owner's guide
Page 15
...and select the computer. • Make sure the SoundLinkTM adapter is connected to the Wave® system. • Unplug the Wave® music system for 30 seconds and plug it back in the carton. Symptom A: SOUNDLINK or COMPUTER never appear on the Wave® system display and no lights blink. • Press the ... it , be sure to the address list included in . • If you received an upgrade CD with your kit and have not used it now. • If this does not resolve the problem, contact Bose Customer Service. English Tab 2, 10 Tab 3, 11 Tab 4, 12 Tab 5, 13 Tab 6, 14 Tab 7, 15 Tab 8,...
...and select the computer. • Make sure the SoundLinkTM adapter is connected to the Wave® system. • Unplug the Wave® music system for 30 seconds and plug it back in the carton. Symptom A: SOUNDLINK or COMPUTER never appear on the Wave® system display and no lights blink. • Press the ... it , be sure to the address list included in . • If you received an upgrade CD with your kit and have not used it now. • If this does not resolve the problem, contact Bose Customer Service. English Tab 2, 10 Tab 3, 11 Tab 4, 12 Tab 5, 13 Tab 6, 14 Tab 7, 15 Tab 8,...


