
Owner's guide
Page 3
...with the essential requirements and other applicable Directives. For your records Bose recommends that you are located on the bottom of the console, and on the carton): LIFESTYLE Serial numbers: Control console Acoustimass® module Retailer information: Dealer name Dealer phone Purchase...if not installed and used without prior written permission. English TAB 2 TAB 3 TAB 4 TAB 5 TAB 6 TAB 7 TAB 8 Bose Corporation hereby declares that this product is no guarantee that interference will not occur in a particular installation. The complete Declaration of the ...
...with the essential requirements and other applicable Directives. For your records Bose recommends that you are located on the bottom of the console, and on the carton): LIFESTYLE Serial numbers: Control console Acoustimass® module Retailer information: Dealer name Dealer phone Purchase...if not installed and used without prior written permission. English TAB 2 TAB 3 TAB 4 TAB 5 TAB 6 TAB 7 TAB 8 Bose Corporation hereby declares that this product is no guarantee that interference will not occur in a particular installation. The complete Declaration of the ...
Owner's guide
Page 6
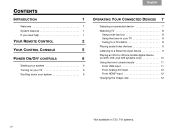
TAB 8 TAB 7 TAB 6 TAB 5 CONTENTS INTRODUCTION 1 Welcome 1 System features 1 If you need help 1 YOUR REMOTE CONTROL 2 YOUR CONTROL CONSOLE 5 POWER ON/OFF CONTROLS 6 Starting your system 6 Turning on your TV 6 Shutting down your system 6 TAB 4 TAB 3 TAB 2 English OPERATING YOUR ...8 Tuning to a TV station 8 Playing audio/video devices 9 Listening to a Bose link input device 9 Playing an iPod or iPhone mobile digital device (on 235, V35, and V25 systems only 10 Using the front console inputs 11 Front USB input 11 Front Analog A/V input 12 Front HDMI® input...
TAB 8 TAB 7 TAB 6 TAB 5 CONTENTS INTRODUCTION 1 Welcome 1 System features 1 If you need help 1 YOUR REMOTE CONTROL 2 YOUR CONTROL CONSOLE 5 POWER ON/OFF CONTROLS 6 Starting your system 6 Turning on your TV 6 Shutting down your system 6 TAB 4 TAB 3 TAB 2 English OPERATING YOUR ...8 Tuning to a TV station 8 Playing audio/video devices 9 Listening to a Bose link input device 9 Playing an iPod or iPhone mobile digital device (on 235, V35, and V25 systems only 10 Using the front console inputs 11 Front USB input 11 Front Analog A/V input 12 Front HDMI® input...
Owner's guide
Page 7
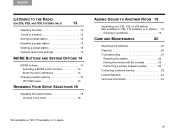
... YOUR SETUP SELECTIONS 18 Adjusting the system setup 18 Choices in the menu 18 ADDING SOUND TO ANOTHER ROOM 19 Expanding your 235, V35, or V25 system (Not available on T20, T10 systems, or in Japan.) . . 19 Expansion guidelines 19 CARE AND MAINTENANCE ...20 Replacing the batteries 20 Cleaning 20 Troubleshooting 21 Resetting the system 23 Pairing the remote with the console 23 Performing a system software update 23 Contacting customer service 23 Limited Warranty 24 Technical information 24 *Not available on T20, T10 systems...
... YOUR SETUP SELECTIONS 18 Adjusting the system setup 18 Choices in the menu 18 ADDING SOUND TO ANOTHER ROOM 19 Expanding your 235, V35, or V25 system (Not available on T20, T10 systems, or in Japan.) . . 19 Expansion guidelines 19 CARE AND MAINTENANCE ...20 Replacing the batteries 20 Cleaning 20 Troubleshooting 21 Resetting the system 23 Pairing the remote with the console 23 Performing a system software update 23 Contacting customer service 23 Limited Warranty 24 Technical information 24 *Not available on T20, T10 systems...
Owner's guide
Page 10
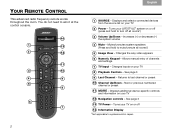
... sold in Japan. See page 3 13 TV Power - Increases (+) or decreases (-) the system volume 4 Mute - You do not need to aim it at the control console. iPod 3:20 The Beatles 14 1 13 2 12 11 3 10 4 9 5 8 6 7 2 TAB 4 TAB 3 TAB 2 English 1 SOURCE - See page 3 9 Last Channel - Allows manual entry of channels and settings...
... sold in Japan. See page 3 13 TV Power - Increases (+) or decreases (-) the system volume 4 Mute - You do not need to aim it at the control console. iPod 3:20 The Beatles 14 1 13 2 12 11 3 10 4 9 5 8 6 7 2 TAB 4 TAB 3 TAB 2 English 1 SOURCE - See page 3 9 Last Channel - Allows manual entry of channels and settings...
Owner's guide
Page 13
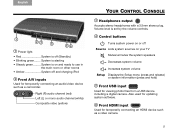
........... System is starting • Steady green ......... Right (R) audio channel (red) Left (L) or mono audio channel (white) Composite video (yellow) TAB 5 TAB 6 TAB 7 TAB 8 YOUR CONTROL CONSOLE 3 Headphones output Accepts stereo headphones with a 3.5mm stereo plug. English TAB 2 TAB 3 TAB 4 1 23 4 56 1 Power light • Red System is off and charging iPod...
........... System is starting • Steady green ......... Right (R) audio channel (red) Left (L) or mono audio channel (white) Composite video (yellow) TAB 5 TAB 6 TAB 7 TAB 8 YOUR CONTROL CONSOLE 3 Headphones output Accepts stereo headphones with a 3.5mm stereo plug. English TAB 2 TAB 3 TAB 4 1 23 4 56 1 Power light • Red System is off and charging iPod...

Owner's guide
Page 14
... on the remote or on your TV screen. Pressing the remote SOURCE button also starts your system and displays the SOURCE menu on the control console. Otherwise, use . Shutting down automatically after a few seconds. The system will be stopped and you must complete the shutdown using the onscreen controls. 6 TAB 8..., if you programmed your remote in the Unify™ setup menu, press the TV power button on the remote control to turn on the console changes from blinking to access the power controls for use the remote that came with your system and displays the Setup menu on the...
... on the remote or on your TV screen. Pressing the remote SOURCE button also starts your system and displays the SOURCE menu on the control console. Otherwise, use . Shutting down automatically after a few seconds. The system will be stopped and you must complete the shutdown using the onscreen controls. 6 TAB 8..., if you programmed your remote in the Unify™ setup menu, press the TV power button on the remote control to turn on the console changes from blinking to access the power controls for use the remote that came with your system and displays the Setup menu on the...

Owner's guide
Page 16
TAB 8 TAB 7 TAB 6 TAB 5 OPERATING YOUR CONNECTED DEVICES Watching TV Your TV may need to point the Bose® remote at your TV to operate it during the setup process. 1. See "Tuning to change channels. Tuning to a TV station You can tune to a ... your TV. Tune to first select the input for channel numbers using a dash or period. Press the TV Input button to the LIFESTYLE® control console, it will appear in the SOURCE menu under the name you assigned it . Using a set-top box If you are using any of the following...
TAB 8 TAB 7 TAB 6 TAB 5 OPERATING YOUR CONNECTED DEVICES Watching TV Your TV may need to point the Bose® remote at your TV to operate it during the setup process. 1. See "Tuning to change channels. Tuning to a TV station You can tune to a ... your TV. Tune to first select the input for channel numbers using a dash or period. Press the TV Input button to the LIFESTYLE® control console, it will appear in the SOURCE menu under the name you assigned it . Using a set-top box If you are using any of the following...
Owner's guide
Page 17
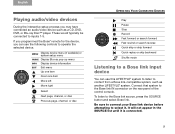
...system, such as a CD, DVD, DVR, or Blu-ray Disc™ player. These would typically be connected to the Bose link IN connector on the rear panel of the control console. Connect that system to inputs 1-5. MENU Display device menu (if available) or system setup menu GUIDE Display Blu-ray pop...Record Fast forward or search forward Fast rewind or search reverse Quick skip or skip forward Quick replay or skip backward Shuffle mode Listening to a Bose link input device You can use this LIFESTYLE® system to listen to operate the selected device. To listen to select it is connected. ...
...system, such as a CD, DVD, DVR, or Blu-ray Disc™ player. These would typically be connected to the Bose link IN connector on the rear panel of the control console. Connect that system to inputs 1-5. MENU Display device menu (if available) or system setup menu GUIDE Display Blu-ray pop...Record Fast forward or search forward Fast rewind or search reverse Quick skip or skip forward Quick replay or skip backward Shuffle mode Listening to a Bose link input device You can use this LIFESTYLE® system to listen to operate the selected device. To listen to select it is connected. ...

Owner's guide
Page 19
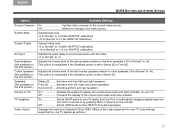
...(if a photo file is connected. These inputs are provided for viewing digital photos. When selecting the USB source, folders appear at the top of the console provides analog A/V inputs plus a USB and an HDMI® input. Front USB input Your LIFESTYLE® system can display photo files (.jpg or .... browsing folders Down one folder level Down one menu item • Press and hold to repeat. English TAB 2 TAB 3 TAB 4 Using the front console inputs The front of the list on the left followed by single image files. Up one menu item • Press and hold to repeat. TAB...
...(if a photo file is connected. These inputs are provided for viewing digital photos. When selecting the USB source, folders appear at the top of the console provides analog A/V inputs plus a USB and an HDMI® input. Front USB input Your LIFESTYLE® system can display photo files (.jpg or .... browsing folders Down one folder level Down one menu item • Press and hold to repeat. English TAB 2 TAB 3 TAB 4 Using the front console inputs The front of the list on the left followed by single image files. Up one menu item • Press and hold to repeat. TAB...
Owner's guide
Page 25
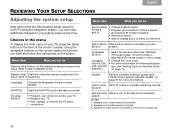
... front and rear speakers. On Sends HDMI® audio to your TV (audio from the TV is not affected by plugging headphones into the control console or by your TV appear as options.) 17 Adjusts bass level. -9 to Normal* to +6 (After ADAPTiQ® calibration) -14 to Normal* to 14 (No ADAPTiQ...
... front and rear speakers. On Sends HDMI® audio to your TV (audio from the TV is not affected by plugging headphones into the control console or by your TV appear as options.) 17 Adjusts bass level. -9 to Normal* to +6 (After ADAPTiQ® calibration) -14 to Normal* to 14 (No ADAPTiQ...
Owner's guide
Page 26
...setup (Note 1) beginning. Teach mode Send IR codes to program a learning remote. (Note 2) Exit the Unify Returns you to the control console rear. 18 V35, and V25 sion, see "Performing a system software update" on the front of the on page 19. Language Change the language of the... control console. TAB 8 TAB 7 TAB 6 TAB 5 TAB 4 TAB 3 TAB 2 English REVIEWING YOUR SETUP SELECTIONS Adjusting the system setup After performing the ...
...setup (Note 1) beginning. Teach mode Send IR codes to program a learning remote. (Note 2) Exit the Unify Returns you to the control console rear. 18 V35, and V25 sion, see "Performing a system software update" on the front of the on page 19. Language Change the language of the... control console. TAB 8 TAB 7 TAB 6 TAB 5 TAB 4 TAB 3 TAB 2 English REVIEWING YOUR SETUP SELECTIONS Adjusting the system setup After performing the ...
Owner's guide
Page 27
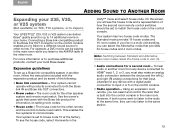
... V25 system (Not available on T20, T10 systems, or in Japan.) Your LIFESTYLE® 235, V35 or V25 system can deliver Bose® quality sound in up a Bose link-compatible system in the other speaker system and remote must match. The house code for any device connected to HDMI®...follow the instructions included with a digital audio connection to a different sound source in other remote and the control console must match. Your system cannot operate with the Bose link product for that came with products connected to communicate. Your system has two house code modes. Note: ...
... V25 system (Not available on T20, T10 systems, or in Japan.) Your LIFESTYLE® 235, V35 or V25 system can deliver Bose® quality sound in up a Bose link-compatible system in the other speaker system and remote must match. The house code for any device connected to HDMI®...follow the instructions included with a digital audio connection to a different sound source in other remote and the control console must match. Your system cannot operate with the Bose link product for that came with products connected to communicate. Your system has two house code modes. Note: ...
Owner's guide
Page 29
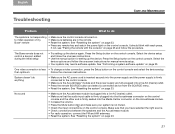
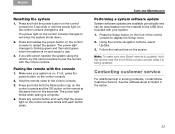
...23. See "Performing a system software update" on page 23. 21 than optimum Follow the onscreen instructions. It should blink with the console" on the control console. The Bose remote does not control a device I added during the initial setup • Try setting up the device. If not, see "Pairing ... inserted securely into the power supply and the power supply is firmly connected to initial operation of my Bose® remote • Make sure the control console is turned on the control console. See "Resetting the system" on page 23. • Press any remote key and watch the ...
...23. See "Performing a system software update" on page 23. 21 than optimum Follow the onscreen instructions. It should blink with the console" on the control console. The Bose remote does not control a device I added during the initial setup • Try setting up the device. If not, see "Pairing ... inserted securely into the power supply and the power supply is firmly connected to initial operation of my Bose® remote • Make sure the control console is turned on the control console. See "Resetting the system" on page 23. • Press any remote key and watch the ...
Owner's guide
Page 30
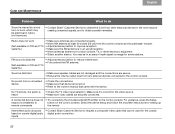
...8226; Adjust antenna position to reduce interference. • Fully extend the FM antenna. For guidance, press the Setup respond consistently to the control console. Make sure it is turned on. • Refer to the owner's manual that device is correct for the video source. • Make.... • Make sure the AM antenna is marred by a loud hum or buzz, which may be electrical in nature (not harmonic) • Contact Bose® Customer Service to determine if and how other electronic equipment. • Select another station. TAB 8 TAB 7 CARE AND MAINTENANCE TAB 6 TAB 5...
...8226; Adjust antenna position to reduce interference. • Fully extend the FM antenna. For guidance, press the Setup respond consistently to the control console. Make sure it is turned on. • Refer to the owner's manual that device is correct for the video source. • Make.... • Make sure the AM antenna is marred by a loud hum or buzz, which may be electrical in nature (not harmonic) • Contact Bose® Customer Service to determine if and how other electronic equipment. • Select another station. TAB 8 TAB 7 CARE AND MAINTENANCE TAB 6 TAB 5...
Owner's guide
Page 31
...3. The power light blinks when pairing is on the control console changes to restart the system. Using the remote navigation buttons, select Update. 3. The power light changes to the USB drive included with the console 1. Pairing the remote with your Bose® remote is updated, hold both the Mute button (... ) on the control console and the OK button on the remote at the same time for 5 seconds or ...
...3. The power light blinks when pairing is on the control console changes to restart the system. Using the remote navigation buttons, select Update. 3. The power light changes to the USB drive included with the console 1. Pairing the remote with your Bose® remote is updated, hold both the Mute button (... ) on the control console and the OK button on the remote at the same time for 5 seconds or ...
Owner's guide
Page 32
... screen. 2. You may then remove the USB drive. 4. Technical information Remote control Frequency: 2.4 GHz Range: 33 ft (10 m) Control console power supply rating AC input: 100-240V 50/60 Hz, 0.5A DC output: 12V 20W Max. Acoustimass® module rating USA/Canada: ... of the control console to register. To download "licenses.pdf" from an authorized Bose dealer, using the following the date of distribution of the control console. 3. To receive a copy of purchase from your limited warranty rights. Bose Corporation will not affect your product's control console: 1. Place any...
... screen. 2. You may then remove the USB drive. 4. Technical information Remote control Frequency: 2.4 GHz Range: 33 ft (10 m) Control console power supply rating AC input: 100-240V 50/60 Hz, 0.5A DC output: 12V 20W Max. Acoustimass® module rating USA/Canada: ... of the control console to register. To download "licenses.pdf" from an authorized Bose dealer, using the following the date of distribution of the control console. 3. To receive a copy of purchase from your limited warranty rights. Bose Corporation will not affect your product's control console: 1. Place any...