Owner's guide
Page 5
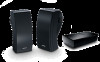
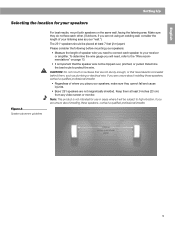
... speakers should be placed at least 9 inches (23 cm) from any video screen or monitor. Determine the best route to your receiver or amplifier. English Setting Up Selecting the location for your speakers Figure 2 Speaker placement guidelines For best results, mount both speakers on page 13. • It is not intended for use in areas where it will need to connect each speaker to protect the wire...
... speakers should be placed at least 9 inches (23 cm) from any video screen or monitor. Determine the best route to your receiver or amplifier. English Setting Up Selecting the location for your speakers Figure 2 Speaker placement guidelines For best results, mount both speakers on page 13. • It is not intended for use in areas where it will need to connect each speaker to protect the wire...
Owner's guide
Page 6
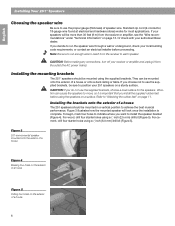
... zip cord (2-conductor, 18-gauge wire found at electrical and hardware stores) works for the speakers. If you choose not to use the supplied brackets, choose a level surface for most applications. Vibration can be mounted onto the exterior of a house 6 To begin, mark four holes to indicate where you decide to run the speaker wire through a wall or underground, check your receiver or amplifier...
... zip cord (2-conductor, 18-gauge wire found at electrical and hardware stores) works for the speakers. If you choose not to use the supplied brackets, choose a level surface for most applications. Vibration can be mounted onto the exterior of a house 6 To begin, mark four holes to indicate where you decide to run the speaker wire through a wall or underground, check your receiver or amplifier...
Owner's guide
Page 10
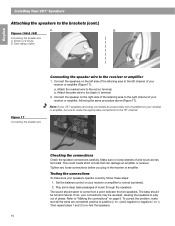
... balance control on page 9. Play some deep bass passages of a house B. If not, your speakers operate correctly, follow these steps: 1. Testing the connections To make sure all the wires are being connected as a secondary set of your receiver or amplifier, following the same procedure above (Figure 17). To correct the problem, make sure your connections may be full and natural. Tighten any loose connections before you plug...
... balance control on page 9. Play some deep bass passages of a house B. If not, your speakers operate correctly, follow these steps: 1. Testing the connections To make sure all the wires are being connected as a secondary set of your receiver or amplifier, following the same procedure above (Figure 17). To correct the problem, make sure your connections may be full and natural. Tighten any loose connections before you plug...
Owner's guide
Page 12
... 251TM Speakers Troubleshooting Problem Neither speaker plays What to do use enough pressure to the elements. The bass or treble is especially true of phone numbers. Reconnect your speakers. If there is still no sound, the problem is still no sound from the speaker, continue below. • Remove the cord from its original receiver or amplifier jacks to the other set of this owner's guide for service. See the inside back cover for instruction...
... 251TM Speakers Troubleshooting Problem Neither speaker plays What to do use enough pressure to the elements. The bass or treble is especially true of phone numbers. Reconnect your speakers. If there is still no sound, the problem is still no sound from the speaker, continue below. • Remove the cord from its original receiver or amplifier jacks to the other set of this owner's guide for service. See the inside back cover for instruction...

English Owners Guide
Page 4
.... Required Power State Information Standby Power Modes Networked Standby Power consumption in specified power mode, at 230V/50Hz input ≤ 0.5 W all network types ≤ 3.0 W Time after which equipment is automatically switched into mode < 2.5 hours ≤ 20 minutes Power consumption in compliance with the Ecodesign Requirements for recycling. Activate by inserting the Ethernet cable. Frequency band of operation 2400 to 5350 MHz frequency range in all EU Member States listed in...
.... Required Power State Information Standby Power Modes Networked Standby Power consumption in specified power mode, at 230V/50Hz input ≤ 0.5 W all network types ≤ 3.0 W Time after which equipment is automatically switched into mode < 2.5 hours ≤ 20 minutes Power consumption in compliance with the Ecodesign Requirements for recycling. Activate by inserting the Ethernet cable. Frequency band of operation 2400 to 5350 MHz frequency range in all EU Member States listed in...
English Owners Guide
Page 7
... Setup Placement guidelines...10 Speaker connection guidelines 10 Speaker wire length recommendations 10 Place your speakers...11 Connect your speakers to the amplifier 11 Connect a second pair of speakers 13 Connect the amplifier to power 14 Network standby...14 SoundTouch® App Setup Download and install the SoundTouch® app 15 SoundTouch® Owner's Center 15 Existing SoundTouch® Users Add the amplifier to an existing account 16 Connect the amplifier to a new network 16 Preset Personalization Set a preset...17 Play a preset...17 Bluetooth...
... Setup Placement guidelines...10 Speaker connection guidelines 10 Speaker wire length recommendations 10 Place your speakers...11 Connect your speakers to the amplifier 11 Connect a second pair of speakers 13 Connect the amplifier to power 14 Network standby...14 SoundTouch® App Setup Download and install the SoundTouch® app 15 SoundTouch® Owner's Center 15 Existing SoundTouch® Users Add the amplifier to an existing account 16 Connect the amplifier to a new network 16 Preset Personalization Set a preset...17 Play a preset...17 Bluetooth...
English Owners Guide
Page 8
... Re-enable Wi-Fi and Bluetooth technology 23 Overload protection...23 Care and Maintenance Clean the amplifier...24 Customer service...24 Limited warranty...24 Technical information...25 Troubleshooting Common solutions...26 Clear the amplifier's Bluetooth pairing list 28 Reset the amplifier...28 Wall-Mounting Hardware specifications 29 Mount the bracket to the wall 29 Attach the amplifier to the mounting bracket 31 Appendix: Computer Setup Set up your amplifier using a computer 32 Before you begin...
... Re-enable Wi-Fi and Bluetooth technology 23 Overload protection...23 Care and Maintenance Clean the amplifier...24 Customer service...24 Limited warranty...24 Technical information...25 Troubleshooting Common solutions...26 Clear the amplifier's Bluetooth pairing list 28 Reset the amplifier...28 Wall-Mounting Hardware specifications 29 Mount the bracket to the wall 29 Attach the amplifier to the mounting bracket 31 Appendix: Computer Setup Set up your amplifier using a computer 32 Before you begin...
English Owners Guide
Page 9
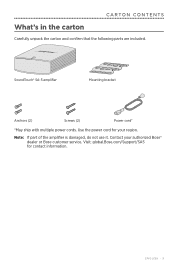
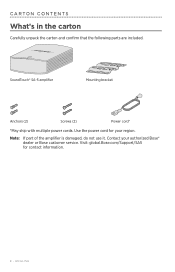
Note: If part of the amplifier is damaged, do not use it. Visit: global.Bose.com/Support/SA5 for your authorized Bose® dealer or Bose customer service. SoundTouch® SA-5 amplifier Mounting bracket Anchors (2) Screws (2) Power cord* *May ship with multiple power cords. Contact your region. ENGLISH - 9 Use the power cord for contact information. CARTON CONTENTS What's in the carton Carefully unpack the carton and confirm that the following parts are included.
Note: If part of the amplifier is damaged, do not use it. Visit: global.Bose.com/Support/SA5 for your authorized Bose® dealer or Bose customer service. SoundTouch® SA-5 amplifier Mounting bracket Anchors (2) Screws (2) Power cord* *May ship with multiple power cords. Contact your region. ENGLISH - 9 Use the power cord for contact information. CARTON CONTENTS What's in the carton Carefully unpack the carton and confirm that the following parts are included.
English Owners Guide
Page 15
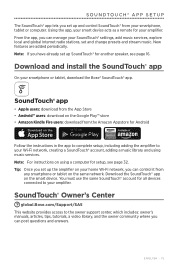
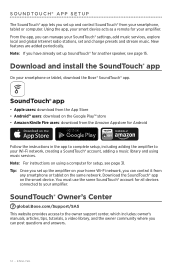
... amplifier on using music services. Download and install the SoundTouch® app On your smartphone or tablet, download the Bose® SoundTouch® app. • Apple users: download from the App Store • Android™ users: download on the smart device. SOUNDTOUCH® APP SETUP The SoundTouch® app lets you set up and control SoundTouch® from your amplifier. Using the app, your smart device acts as a remote for all devices connected...
... amplifier on using music services. Download and install the SoundTouch® app On your smartphone or tablet, download the Bose® SoundTouch® app. • Apple users: download from the App Store • Android™ users: download on the smart device. SOUNDTOUCH® APP SETUP The SoundTouch® app lets you set up and control SoundTouch® from your amplifier. Using the app, your smart device acts as a remote for all devices connected...

English Owners Guide
Page 20
... setup using a computer. Three AUX IN connectors enable playback from audio devices and media players. 20 - Power is applied when the power cord is no on/off switch on the SoundTouch® amplifier. There is inserted and plugged into an AC (mains) outlet. Ethernet connector enables wired access to connect two pairs of speakers. Two terminal block connectors enable you to your home network. AMPLIFIER COMPONENTS Connectors Terminal connectors...
... setup using a computer. Three AUX IN connectors enable playback from audio devices and media players. 20 - Power is applied when the power cord is no on/off switch on the SoundTouch® amplifier. There is inserted and plugged into an AC (mains) outlet. Ethernet connector enables wired access to connect two pairs of speakers. Two terminal block connectors enable you to your home network. AMPLIFIER COMPONENTS Connectors Terminal connectors...
English Owners Guide
Page 26
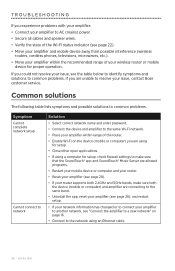
... page 16. • Connect to the network using a computer for setup, check firewall settings to make sure that the SoundTouch® app and SoundTouch® Music Server are allowed programs. • Restart your mobile device or computer and your router. • Reset your amplifier (see page 28), and restart setup. • If your network information has changed or to resolve your issue, contact Bose customer service.
... page 16. • Connect to the network using a computer for setup, check firewall settings to make sure that the SoundTouch® app and SoundTouch® Music Server are allowed programs. • Restart your mobile device or computer and your router. • Reset your amplifier (see page 28), and restart setup. • If your network information has changed or to resolve your issue, contact Bose customer service.

English Owners Guide
Page 27
... the power cord; Interference Cannot play • Make sure the speaker wires are connected + to your amplifier from the amplifier's SPEAKERS OUT + R - connector to the non-working speaker. On your mobile device: • Disable and re-enable the Bluetooth feature. • Remove your left stereo channels are heard on your mobile device's documentation. Connect again. • Refer to -. Reconnect power to the other audio/video components, and direct heat...
... the power cord; Interference Cannot play • Make sure the speaker wires are connected + to your amplifier from the amplifier's SPEAKERS OUT + R - connector to the non-working speaker. On your mobile device: • Disable and re-enable the Bluetooth feature. • Remove your left stereo channels are heard on your mobile device's documentation. Connect again. • Refer to -. Reconnect power to the other audio/video components, and direct heat...
English Owners Guide
Page 32
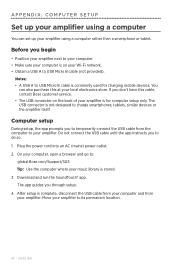
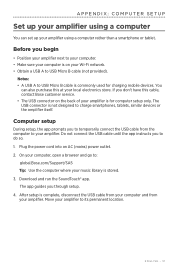
... the amplifier itself. The USB connector is on the back of your amplifier is stored. 3. Plug the power cord into an AC (mains) power outlet. 2. The app guides you to USB Micro B cable (not provided). On your computer, open a browser and go to temporarily connect the USB cable from your amplifier. If you to : global.Bose.com/Support/SA5 Tip: Use the computer where your music library...
... the amplifier itself. The USB connector is on the back of your amplifier is stored. 3. Plug the power cord into an AC (mains) power outlet. 2. The app guides you to USB Micro B cable (not provided). On your computer, open a browser and go to temporarily connect the USB cable from your amplifier. If you to : global.Bose.com/Support/SA5 Tip: Use the computer where your music library...

Multilingual Owners Guide
Page 7
... Re-enable Wi-Fi and Bluetooth technology 22 Overload protection...22 Care and Maintenance Clean the amplifier...23 Customer service...23 Limited warranty information 23 Technical information...24 Troubleshooting Common solutions...25 Clear the amplifier's Bluetooth pairing list 27 Reset the amplifier...27 Wall-Mounting Hardware specifications 28 Mount the bracket to the wall 28 Attach the amplifier to the mounting bracket 30 Appendix: Computer Setup Set up your amplifier using a computer 31 Before you begin...
... Re-enable Wi-Fi and Bluetooth technology 22 Overload protection...22 Care and Maintenance Clean the amplifier...23 Customer service...23 Limited warranty information 23 Technical information...24 Troubleshooting Common solutions...25 Clear the amplifier's Bluetooth pairing list 27 Reset the amplifier...27 Wall-Mounting Hardware specifications 28 Mount the bracket to the wall 28 Attach the amplifier to the mounting bracket 30 Appendix: Computer Setup Set up your amplifier using a computer 31 Before you begin...
Multilingual Owners Guide
Page 8
Use the power cord for contact information. 8 - Contact your region. SoundTouch® SA-5 amplifier Mounting bracket Anchors (2) Screws (2) Power cord* *May ship with multiple power cords. Visit: global.Bose.com/Support/SA5 for your authorized Bose® dealer or Bose customer service. CARTON CONTENTS What's in the carton Carefully unpack the carton and confirm that the following parts are included. ENGLISH Note: If part of the amplifier is damaged, do not use it.
Use the power cord for contact information. 8 - Contact your region. SoundTouch® SA-5 amplifier Mounting bracket Anchors (2) Screws (2) Power cord* *May ship with multiple power cords. Visit: global.Bose.com/Support/SA5 for your authorized Bose® dealer or Bose customer service. CARTON CONTENTS What's in the carton Carefully unpack the carton and confirm that the following parts are included. ENGLISH Note: If part of the amplifier is damaged, do not use it.
Multilingual Owners Guide
Page 14
... must use the same SoundTouch® account for all devices connected to your amplifier. Download and install the SoundTouch® app On your SoundTouch® settings, add music services, explore local and global Internet radio stations, set and change presets and stream music. SoundTouch® Owner's Center global.Bose.com/Support/SA5 This website provides access to your smartphone, tablet or computer. Download the SoundTouch® app on the Google Play...
... must use the same SoundTouch® account for all devices connected to your amplifier. Download and install the SoundTouch® app On your SoundTouch® settings, add music services, explore local and global Internet radio stations, set and change presets and stream music. SoundTouch® Owner's Center global.Bose.com/Support/SA5 This website provides access to your smartphone, tablet or computer. Download the SoundTouch® app on the Google Play...

Multilingual Owners Guide
Page 19
... switch on the SoundTouch® amplifier. Three AUX IN connectors enable playback from audio devices and media players. Two terminal block connectors enable you to your home network. ENGLISH - 19 AMPLIFIER COMPONENTS Connectors Terminal connectors Ethernet Computer setup 3.5 mm connector RCA stereo connectors Connector SETUP SPEAKERS OUT AUX IN Description AC power cord connector. There is inserted and plugged into an AC (mains) outlet. USB connector for setup using a computer. Ethernet connector enables wired access to connect...
... switch on the SoundTouch® amplifier. Three AUX IN connectors enable playback from audio devices and media players. Two terminal block connectors enable you to your home network. ENGLISH - 19 AMPLIFIER COMPONENTS Connectors Terminal connectors Ethernet Computer setup 3.5 mm connector RCA stereo connectors Connector SETUP SPEAKERS OUT AUX IN Description AC power cord connector. There is inserted and plugged into an AC (mains) outlet. USB connector for setup using a computer. Ethernet connector enables wired access to connect...
Multilingual Owners Guide
Page 25
... on page 15. • Connect to the network using a computer for setup, check firewall settings to make sure that the SoundTouch® app and SoundTouch® Music Server are allowed programs. • Restart your mobile device or computer and your router. • Reset your amplifier (see page 27). • If your router supports both 2.4GHz and 5GHz bands, make sure both the device...
... on page 15. • Connect to the network using a computer for setup, check firewall settings to make sure that the SoundTouch® app and SoundTouch® Music Server are allowed programs. • Restart your mobile device or computer and your router. • Reset your amplifier (see page 27). • If your router supports both 2.4GHz and 5GHz bands, make sure both the device...
Multilingual Owners Guide
Page 31
... setup only. Computer setup During setup, the app prompts you to its permanent location. Download and run the SoundTouch® app. ENGLISH - 31 Do not connect the USB cable until the app instructs you through setup. 4. The app guides you to your computer. • Make sure your amplifier. APPENDIX: COMPUTER SETUP Set up your amplifier using a computer You can also purchase this cable, contact Bose customer service...
... setup only. Computer setup During setup, the app prompts you to its permanent location. Download and run the SoundTouch® app. ENGLISH - 31 Do not connect the USB cable until the app instructs you through setup. 4. The app guides you to your computer. • Make sure your amplifier. APPENDIX: COMPUTER SETUP Set up your amplifier using a computer You can also purchase this cable, contact Bose customer service...

Multilingual Owners Guide
Page 13
.... Review the "Making the connections" section on page 9. • Disconnect the working unit. - Cleaning your speakers Use a cloth dampened in your receiver or amplifier and make sure it only after the wires are on your 251 speakers. Refer to the owner's guide that came with it for a list of saltwater exposure. Warranty period Bose 251 environmental speakers are firmly connected. See the inside back cover of this owner's guide for instruction on...
.... Review the "Making the connections" section on page 9. • Disconnect the working unit. - Cleaning your speakers Use a cloth dampened in your receiver or amplifier and make sure it only after the wires are on your 251 speakers. Refer to the owner's guide that came with it for a list of saltwater exposure. Warranty period Bose 251 environmental speakers are firmly connected. See the inside back cover of this owner's guide for instruction on...


