Owner's guide
Page 3
... complies with the manufacturer's instructions - Keep these instructions - on the product. Follow all servicing to correct the interference by Bose Corporation. Install in a position and location that interference will not interfere with the apparatus. Do not put the product in accordance... not block any way: such as radiators, heat registers, stoves or other hazards. Do not let objects or liquids enter the product - Protect the power cord from overheating, put it in a built-in a fire or electric shock. 16. English TAB 2 TAB 3 TAB 4 1. Read these instructions -...
... complies with the manufacturer's instructions - Keep these instructions - on the product. Follow all servicing to correct the interference by Bose Corporation. Install in a position and location that interference will not interfere with the apparatus. Do not put the product in accordance... not block any way: such as radiators, heat registers, stoves or other hazards. Do not let objects or liquids enter the product - Protect the power cord from overheating, put it in a built-in a fire or electric shock. 16. English TAB 2 TAB 3 TAB 4 1. Read these instructions -...
Owner's guide
Page 4
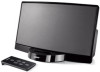
.... To use your insert into the dock. ❏ SoundDock digital music system 2 ❏ Power pack ❏ Power cord Press your insert, follow these steps: 1. It provides the best means to repack the system for transporting it attracts a wide audience of the SoundDock® digital music system from Bose. Don't be surprised if it outside your residence...
.... To use your insert into the dock. ❏ SoundDock digital music system 2 ❏ Power pack ❏ Power cord Press your insert, follow these steps: 1. It provides the best means to repack the system for transporting it attracts a wide audience of the SoundDock® digital music system from Bose. Don't be surprised if it outside your residence...
Owner's guide
Page 5
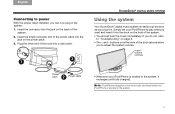
.../iPhone to play what you want and insert it in the system. 1. If you can now plug in . Plug the other end of this cord into the jack on the back of the system. • You should hear the music immediately. Note: iPod/iPhone navigation controls are fully functional ... docked in the system, it recharges (until fully charged). Insert the small connector end of the power cable into a wall outlet. 3 1 TAB 5 TAB 6 TAB 7 TAB 8 SOUNDDOCK® DIGITAL MUSIC SYSTEM Using the system Your SoundDock® digital music system is ready to go as soon as you to adjust the system volume...
.../iPhone to play what you want and insert it in the system. 1. If you can now plug in . Plug the other end of this cord into the jack on the back of the system. • You should hear the music immediately. Note: iPod/iPhone navigation controls are fully functional ... docked in the system, it recharges (until fully charged). Insert the small connector end of the power cable into a wall outlet. 3 1 TAB 5 TAB 6 TAB 7 TAB 8 SOUNDDOCK® DIGITAL MUSIC SYSTEM Using the system Your SoundDock® digital music system is ready to go as soon as you to adjust the system volume...
Owner's guide
Page 8
... iPod/iPhone from the dock, wait five seconds, then firmly reseat it. Refer to "Connecting to power" on page 3. • Make sure your iPod is a compatible model (one on the back of the SoundDock® system. Then reseat it in the dock and on your iPod/iPhone from the dock and.... • Press the Play/Pause button on the remote control. • Make sure your iPod/iPhone is running updated software. • Make sure the power cord is securely plugged into a functioning wall outlet and the symbol on the connectors in the dock. • Remove your iPod/iPhone. You may need to...
... iPod/iPhone from the dock, wait five seconds, then firmly reseat it. Refer to "Connecting to power" on page 3. • Make sure your iPod is a compatible model (one on the back of the SoundDock® system. Then reseat it in the dock and on your iPod/iPhone from the dock and.... • Press the Play/Pause button on the remote control. • Make sure your iPod/iPhone is running updated software. • Make sure the power cord is securely plugged into a functioning wall outlet and the symbol on the connectors in the dock. • Remove your iPod/iPhone. You may need to...


