
Multilingual Owners Guide
Page 4
...: Where the mains plug is connected to the system or accessories. The complete Declaration of electrical shock. Note: The product must be found at www.Bose.com/static/compliance. CAUTION: Make no modifications to the mains. ©2009...
...: Where the mains plug is connected to the system or accessories. The complete Declaration of electrical shock. Note: The product must be found at www.Bose.com/static/compliance. CAUTION: Make no modifications to the mains. ©2009...
Multilingual Owners Guide
Page 5
Protect the power cord from being walked on or pinched, particularly at his own expense. Unplug this apparatus during lightning storms or when unused for a Class A digital device, pursuant to correct the interference at plugs, convenience receptacles, and the point where they may cause harmful interference to dripping or splashing, and no objects filled with the apparatus. To prevent risk of time. 14. See product enclosure for replacement of the obsolete outlet. 10. Follow all warnings. 4. Do not defeat the safety purpose of the FCC rules. The wider blade or ...
Protect the power cord from being walked on or pinched, particularly at his own expense. Unplug this apparatus during lightning storms or when unused for a Class A digital device, pursuant to correct the interference at plugs, convenience receptacles, and the point where they may cause harmful interference to dripping or splashing, and no objects filled with the apparatus. To prevent risk of time. 14. See product enclosure for replacement of the obsolete outlet. 10. Follow all warnings. 4. Do not defeat the safety purpose of the FCC rules. The wider blade or ...
Multilingual Owners Guide
Page 6
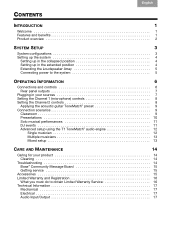
... SETUP 3 System configurations 3 Setting up the system 4 Setting up in the collapsed position 4 Setting up in the extended position 4 Extending the Loudspeaker Array 5 Connecting power to the system 5 OPERATING INFORMATION 6 Connections and controls 6 Rear panel outputs 7 Plugging in your sources 7 Setting the Channel 1 ...12 Multiple musicians 13 Mixed setup 13 CARE AND MAINTENANCE 14 Caring for your product 14 Cleaning 14 Troubleshooting 14 Bose® Community Message Board 15 Getting service 15 Accessories 15 Limited Warranty and Registration 16 What you must do ...
... SETUP 3 System configurations 3 Setting up the system 4 Setting up in the collapsed position 4 Setting up in the extended position 4 Extending the Loudspeaker Array 5 Connecting power to the system 5 OPERATING INFORMATION 6 Connections and controls 6 Rear panel outputs 7 Plugging in your sources 7 Setting the Channel 1 ...12 Multiple musicians 13 Mixed setup 13 CARE AND MAINTENANCE 14 Caring for your product 14 Cleaning 14 Troubleshooting 14 Bose® Community Message Board 15 Getting service 15 Accessories 15 Limited Warranty and Registration 16 What you must do ...
Multilingual Owners Guide
Page 7
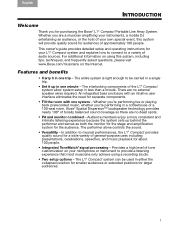
...separate components. • Fill the room with one trip - The interlocking components of the L1® Compact system allow system setup in a coffeehouse or a 100-seat room, Bose® Spatial Dispersion™ loudspeaker technology provides nearly 180º of tonally balanced sound coverage ...for a wide variety of audio sources. An integrated bass enclosure with an intuitive user interface eliminates the need for purchasing the Bose® L1® Compact Portable Line Array System. English TAB TAB TAB 4, 11 TAB 5, 12 TAB 2, 9, 16 TAB 1, 8, 15 INTRODUCTION Welcome Thank you ...
...separate components. • Fill the room with one trip - The interlocking components of the L1® Compact system allow system setup in a coffeehouse or a 100-seat room, Bose® Spatial Dispersion™ loudspeaker technology provides nearly 180º of tonally balanced sound coverage ...for a wide variety of audio sources. An integrated bass enclosure with an intuitive user interface eliminates the need for purchasing the Bose® L1® Compact Portable Line Array System. English TAB TAB TAB 4, 11 TAB 5, 12 TAB 2, 9, 16 TAB 1, 8, 15 INTRODUCTION Welcome Thank you ...
Multilingual Owners Guide
Page 8
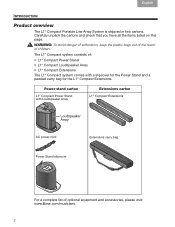
... TAB 2, 9, 16 English INTRODUCTION Product overview The L1® Compact Portable Line Array System is shipped in two cartons. WARNING: To avoid danger of suffocation, keep the plastic bags out of the reach of optional equipment and accessories, please visit: www.Bose.com/musicians. 2 Power stand carton L1® Compact Power Stand with a slipcover for the Power Stand...
... TAB 2, 9, 16 English INTRODUCTION Product overview The L1® Compact Portable Line Array System is shipped in two cartons. WARNING: To avoid danger of suffocation, keep the plastic bags out of the reach of optional equipment and accessories, please visit: www.Bose.com/musicians. 2 Power stand carton L1® Compact Power Stand with a slipcover for the Power Stand...
Multilingual Owners Guide
Page 9
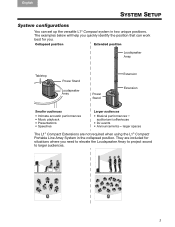
... where you quickly identify the position that can set up the versatile L1® Compact system in the collapsed position. They are not required when using the L1® Compact Portable Line Array System in two unique positions. The examples below will help you need... to elevate the Loudspeaker Array to project sound to larger audiences. 3 larger spaces The L1® Compact Extensions are included for you. auditorium/coffeehouse...
... where you quickly identify the position that can set up the versatile L1® Compact system in the collapsed position. They are not required when using the L1® Compact Portable Line Array System in two unique positions. The examples below will help you need... to elevate the Loudspeaker Array to project sound to larger audiences. 3 larger spaces The L1® Compact Extensions are included for you. auditorium/coffeehouse...
Multilingual Owners Guide
Page 10
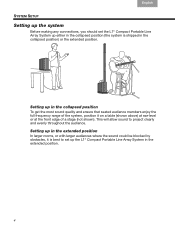
... front edge of the system, position it is shipped in the collapsed position) or the extended position. This will allow sound to set the L1® Compact Portable Line Array System up either in the collapsed position (the system is best to project clearly and evenly throughout the audience. Setting up in the collapsed position...). TAB TAB TAB TAB 4, 11 TAB 3, 10 TAB 2, 9, 16 English SYSTEM SETUP Setting up the system Before making any connections, you should set up the L1® Compact Portable Line Array System in the extended position. 4
... front edge of the system, position it is shipped in the collapsed position) or the extended position. This will allow sound to set the L1® Compact Portable Line Array System up either in the collapsed position (the system is best to project clearly and evenly throughout the audience. Setting up in the collapsed position...). TAB TAB TAB TAB 4, 11 TAB 3, 10 TAB 2, 9, 16 English SYSTEM SETUP Setting up the system Before making any connections, you should set up the L1® Compact Portable Line Array System in the extended position. 4
Multilingual Owners Guide
Page 11
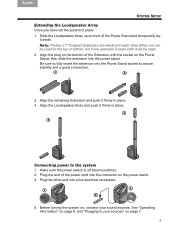
...the Power Stand socket to each other end into the power stand. Align the remaining Extension and push it aside. Slide the Loudspeaker Array up and out of the Power Stand and temporarily lay it firmly in place. 4 3 Connecting power to the system 1. Before ...end of the Extension with the socket on page 6, and "Plugging in place: 1. Either one extension is off (down position). 2. Note: The two L1® Compact Extensions are identical to assure stability and a good connection. 1 2 3. See "Operating Information" on the Power Stand, then slide the extension into a...
...the Power Stand socket to each other end into the power stand. Align the remaining Extension and push it aside. Slide the Loudspeaker Array up and out of the Power Stand and temporarily lay it firmly in place. 4 3 Connecting power to the system 1. Before ...end of the Extension with the socket on page 6, and "Plugging in place: 1. Either one extension is off (down position). 2. Note: The two L1® Compact Extensions are identical to assure stability and a good connection. 1 2 3. See "Operating Information" on the Power Stand, then slide the extension into a...
Multilingual Owners Guide
Page 12
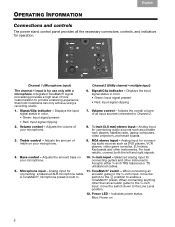
... consoles, DJ mixers, Keyboards and other instruments. ToneMatch® switch - acoustic guitar to Channel 2. • Red: Input signal clipping 2. switch to the position to the Line Level position. 12. When connecting anything other than an acoustic guitar to the ¼-inch input, move the A ToneMatch® microphone preset is for connecting...
... consoles, DJ mixers, Keyboards and other instruments. ToneMatch® switch - acoustic guitar to Channel 2. • Red: Input signal clipping 2. switch to the position to the Line Level position. 12. When connecting anything other than an acoustic guitar to the ¼-inch input, move the A ToneMatch® microphone preset is for connecting...

Multilingual Owners Guide
Page 13
...line level analog output for connecting audio devices such as your sources Before plugging in your personal monitor. For best results, connect both the left and right signals. Mono analog output that accepts either ¼ inch TRS balanced or TS unbalanced cables. You can also use the L1® Compact...188;-inch output RCA output Rear panel outputs ¼-inch output - Can be used to link multiple L1® Compact systems together by connecting the ¼-inch output from one L1® Compact system to a house PA system and use the ¼-inch output to connect to the ¼-...
...line level analog output for connecting audio devices such as your sources Before plugging in your personal monitor. For best results, connect both the left and right signals. Mono analog output that accepts either ¼ inch TRS balanced or TS unbalanced cables. You can also use the L1® Compact...188;-inch output RCA output Rear panel outputs ¼-inch output - Can be used to link multiple L1® Compact systems together by connecting the ¼-inch output from one L1® Compact system to a house PA system and use the ¼-inch output to connect to the ¼-...
Multilingual Owners Guide
Page 14
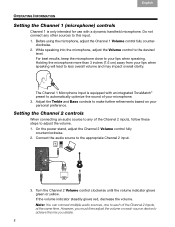
Before using the microphone, adjust the Channel 1 Volume control fully counterclockwise. 2. Adjust the Treble and Bass controls to achieve the mix you must then adjust the volume on your microphone. 3. Connect the audio source to the desired level. Note: You can connect multiple audio sources, one to each source device to make further refinements based on each of your personal preference. While speaking into the microphone, adjust the Volume control to the appropriate Channel 2 input. 3. On the power stand, adjust the Channel 2 Volume control fully counterclockwise. 2. ...
Before using the microphone, adjust the Channel 1 Volume control fully counterclockwise. 2. Adjust the Treble and Bass controls to achieve the mix you must then adjust the volume on your microphone. 3. Connect the audio source to the desired level. Note: You can connect multiple audio sources, one to each source device to make further refinements based on each of your personal preference. While speaking into the microphone, adjust the Volume control to the appropriate Channel 2 input. 3. On the power stand, adjust the Channel 2 Volume control fully counterclockwise. 2. ...

Multilingual Owners Guide
Page 15
...® preset switch only affects the ¼-inch input. The ToneMatch® preset is designed specifically for a classroom could include a DVD player connected to the L1® Compact system. 9 Connection scenarios There are not affected. English TAB TAB TAB 4, 11 TAB 5, 12 TAB 2, 9, 16 TAB 1, 8, 15 OPERATING INFORMATION Applying the acoustic guitar...
...® preset switch only affects the ¼-inch input. The ToneMatch® preset is designed specifically for a classroom could include a DVD player connected to the L1® Compact system. 9 Connection scenarios There are not affected. English TAB TAB TAB 4, 11 TAB 5, 12 TAB 2, 9, 16 TAB 1, 8, 15 OPERATING INFORMATION Applying the acoustic guitar...

Multilingual Owners Guide
Page 16
Within auditoriums, the setup could include two L1® Compact systems, several microphones, and a small mixer. TAB TAB TAB TAB 4, 11 TAB 3, 10 TAB 2, 9, 16 English OPERATING INFORMATION Presentations Connect the audio output from your laptop computer and deliver multimedia presentations. Wireless Wired 10
Within auditoriums, the setup could include two L1® Compact systems, several microphones, and a small mixer. TAB TAB TAB TAB 4, 11 TAB 3, 10 TAB 2, 9, 16 English OPERATING INFORMATION Presentations Connect the audio output from your laptop computer and deliver multimedia presentations. Wireless Wired 10
Multilingual Owners Guide
Page 17
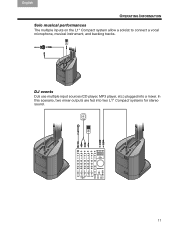
DJ events DJs use multiple input sources (CD player, MP3 player, etc.) plugged into two L1® Compact systems for stereo sound. 11 In this scenario, two mixer outputs are fed into a mixer. English TAB TAB TAB 4, 11 TAB 5, 12 TAB 2, 9, 16 TAB 1, 8, 15 OPERATING INFORMATION Solo musical performances The multiple inputs on the L1® Compact system allow a soloist to connect a vocal microphone, musical instrument, and backing tracks.
DJ events DJs use multiple input sources (CD player, MP3 player, etc.) plugged into two L1® Compact systems for stereo sound. 11 In this scenario, two mixer outputs are fed into a mixer. English TAB TAB TAB 4, 11 TAB 5, 12 TAB 2, 9, 16 TAB 1, 8, 15 OPERATING INFORMATION Solo musical performances The multiple inputs on the L1® Compact system allow a soloist to connect a vocal microphone, musical instrument, and backing tracks.

Multilingual Owners Guide
Page 18
... 2, 9, 16 English OPERATING INFORMATION Advanced setup using the T1 ToneMatch® audio engine For more about the T1 ToneMatch® audio engine, please visit www.Bose.com/musicians. The T1 offers expanded inputs and outputs, access to quality effects, dynamics processing, and our most advanced tone-shaping library.
... 2, 9, 16 English OPERATING INFORMATION Advanced setup using the T1 ToneMatch® audio engine For more about the T1 ToneMatch® audio engine, please visit www.Bose.com/musicians. The T1 offers expanded inputs and outputs, access to quality effects, dynamics processing, and our most advanced tone-shaping library.

Multilingual Owners Guide
Page 19
English TAB TAB TAB 4, 11 TAB 5, 12 TAB 2, 9, 16 TAB 1, 8, 15 OPERATING INFORMATION Multiple musicians In this scenario, a keyboard-guitar duo sings and plays through a single T1 ToneMatch® audio engine and an L1® Compact system. This scenario employs two L1® Compact systems and a T1 ToneMatch® audio engine. 13 Mixed setup A more elaborate multiple musician setup could be as shown below.
English TAB TAB TAB 4, 11 TAB 5, 12 TAB 2, 9, 16 TAB 1, 8, 15 OPERATING INFORMATION Multiple musicians In this scenario, a keyboard-guitar duo sings and plays through a single T1 ToneMatch® audio engine and an L1® Compact system. This scenario employs two L1® Compact systems and a T1 ToneMatch® audio engine. 13 Mixed setup A more elaborate multiple musician setup could be as shown below.
Multilingual Owners Guide
Page 20
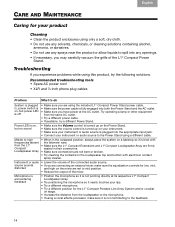
...• Try cleaning the contacts on the loudspeaker top and bottom with the listeners' ears. • Make sure the L1® Compact Extensions and L1® Compact Loudspeaker Array are firmly seated in , power switch is on, but no sound • Make sure the Volume control is turned ...liquids to spill into any openings. • If necessary, you are connecting an external mixer, make sure the equalization controls for the L1® Compact Portable Line Array System and/or vocalist on stage. • Increase the distance from the loudspeaker to the microphone. • If using a vocal ...
...• Try cleaning the contacts on the loudspeaker top and bottom with the listeners' ears. • Make sure the L1® Compact Extensions and L1® Compact Loudspeaker Array are firmly seated in , power switch is on, but no sound • Make sure the Volume control is turned ...liquids to spill into any openings. • If necessary, you are connecting an external mixer, make sure the equalization controls for the L1® Compact Portable Line Array System and/or vocalist on stage. • Increase the distance from the loudspeaker to the microphone. • If using a vocal ...

Multilingual Owners Guide
Page 21
... and Technical Support Team at (877) 335-2673 or visit our support area online at : http://Bose.infopop.cc/eve. Accessories Visit www.Bose.com/musicians, or call (800) 905-0886 for tips on getting the most out of your L1® Compact Portable Line Array System, please visit the Bose® Musicians Community Message Board at www...
... and Technical Support Team at (877) 335-2673 or visit our support area online at : http://Bose.infopop.cc/eve. Accessories Visit www.Bose.com/musicians, or call (800) 905-0886 for tips on getting the most out of your L1® Compact Portable Line Array System, please visit the Bose® Musicians Community Message Board at www...
Multilingual Owners Guide
Page 22
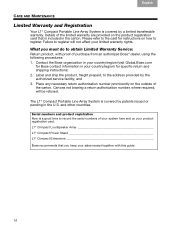
... on how to register. Place any necessary return authorization number prominently on the outside of purchase from an authorized Bose® dealer, using the following procedures: 1. What you keep your sales receipt together with proof of the carton...product registration Now is covered by a limited transferable warranty. L1® Compact Loudspeaker Array L1® Compact Power Stand L1® Compact Extensions Bose recommends that is covered by the authorized service facility; The L1® Compact Portable Line Array System is included in the U.S. Details of the limited warranty...
... on how to register. Place any necessary return authorization number prominently on the outside of purchase from an authorized Bose® dealer, using the following procedures: 1. What you keep your sales receipt together with proof of the carton...product registration Now is covered by a limited transferable warranty. L1® Compact Loudspeaker Array L1® Compact Power Stand L1® Compact Extensions Bose recommends that is covered by the authorized service facility; The L1® Compact Portable Line Array System is included in the U.S. Details of the limited warranty...

Multilingual Owners Guide
Page 23
...TAB TAB 4, 11 TAB 5, 12 TAB 2, 9, 16 TAB 1, 8, 15 Technical Information Mechanical Part L1® Compact Power Stand with Loudspeaker Array L1® Compact Loudspeaker Array L1® Compact Extensions (2) Collapsed position (assembled) Extended position (assembled) CARE AND MAINTENANCE Dimensions 16½" H x ...L1® Compact loudspeakers L1® Compact extensions Electrical • AC power rating 100-240V 50/60Hz 200W max • Peak inrush current 230V: 18.2 Amps 120V: 9.7 Amps Weight 30.4 lbs. (13.8 kg) 7.5 lbs. (3.4 kg) BOSE, L1, and TONEMATCH are registered trademarks of Bose...
...TAB TAB 4, 11 TAB 5, 12 TAB 2, 9, 16 TAB 1, 8, 15 Technical Information Mechanical Part L1® Compact Power Stand with Loudspeaker Array L1® Compact Loudspeaker Array L1® Compact Extensions (2) Collapsed position (assembled) Extended position (assembled) CARE AND MAINTENANCE Dimensions 16½" H x ...L1® Compact loudspeakers L1® Compact extensions Electrical • AC power rating 100-240V 50/60Hz 200W max • Peak inrush current 230V: 18.2 Amps 120V: 9.7 Amps Weight 30.4 lbs. (13.8 kg) 7.5 lbs. (3.4 kg) BOSE, L1, and TONEMATCH are registered trademarks of Bose...
