Owner's guide
Page 2
...;RE). S'ADRESSER À UN RÉPARATEUR COMPÉTENT. Batteries Batteries Please dispose of important operating and maintenance instructions in the Bose® FreeStyle® powered speaker system. The exclamation point within an equilateral triangle, as vases, shall not be reproduced, modified, distributed ... RISK OF ELECTRICAL SHOCK DO NOT OPEN CAUTION: TO REDUCE THE RISK OF ELECTRIC SHOCK, DO NOT REMOVE COVER (OR BACK). Bose FreeStyle speaker system is intended to alert the user to read and follow this owner's guide Please take the time to the presence of...
...;RE). S'ADRESSER À UN RÉPARATEUR COMPÉTENT. Batteries Batteries Please dispose of important operating and maintenance instructions in the Bose® FreeStyle® powered speaker system. The exclamation point within an equilateral triangle, as vases, shall not be reproduced, modified, distributed ... RISK OF ELECTRICAL SHOCK DO NOT OPEN CAUTION: TO REDUCE THE RISK OF ELECTRIC SHOCK, DO NOT REMOVE COVER (OR BACK). Bose FreeStyle speaker system is intended to alert the user to read and follow this owner's guide Please take the time to the presence of...
Owner's guide
Page 3
Safety Information 2 Introduction 4 Before you begin 4 For your records 4 System Setup 5 Unpacking 5 Selecting locations for your FreeStyle® speakers and Interface module 6 Positioning the Interface module 6 Placing the speakers 7 Selecting a location for the Acoustimass® module 8 Make ...14 Operation 15 Using the system 15 Using the mute button 15 Using the source buttons 15 Reference 16 Taking care of your FreeStyle speaker system 16 Cleaning the speakers 16 Replacing the remote control battery 16 Troubleshooting 17 Customer service 18 Warranty 18 Accessories 18 ...
Safety Information 2 Introduction 4 Before you begin 4 For your records 4 System Setup 5 Unpacking 5 Selecting locations for your FreeStyle® speakers and Interface module 6 Positioning the Interface module 6 Placing the speakers 7 Selecting a location for the Acoustimass® module 8 Make ...14 Operation 15 Using the system 15 Using the mute button 15 Using the source buttons 15 Reference 16 Taking care of your FreeStyle speaker system 16 Cleaning the speakers 16 Replacing the remote control battery 16 Troubleshooting 17 Customer service 18 Warranty 18 Accessories 18 ...
Owner's guide
Page 4
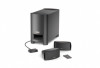
...you keep your records The serial number is located on the rear of equipment. Using Dolby* Digital® and Bose VideoStage® signal processing technology, FreeStyle speakers provide improved spaciousness for bold 3-D effects from game audio, movie-like a game console, VCR, DSS, ... reserved. 4 AM267190_00_V_pdf • July 24, 2002 Manufactured under license from surround encoded DVDs, and a natural soundstage for purchasing a Bose® FreeStyle® speaker system, which delivers the superior acoustic performance needed to -use, aim-and-press infrared (IR) remote control •...
...you keep your records The serial number is located on the rear of equipment. Using Dolby* Digital® and Bose VideoStage® signal processing technology, FreeStyle speakers provide improved spaciousness for bold 3-D effects from game audio, movie-like a game console, VCR, DSS, ... reserved. 4 AM267190_00_V_pdf • July 24, 2002 Manufactured under license from surround encoded DVDs, and a natural soundstage for purchasing a Bose® FreeStyle® speaker system, which delivers the superior acoustic performance needed to -use, aim-and-press infrared (IR) remote control •...

Owner's guide
Page 5
... strip © Remote control Stereo cable Speaker cable 5 AM267190_00_V_pdf • July 24, 2002 If any part of children. Copy that number onto your system. Notify Bose or your authorized Bose® dealer immediately. Note: Now is a good time to the address sheet included in Figure 1.
... strip © Remote control Stereo cable Speaker cable 5 AM267190_00_V_pdf • July 24, 2002 If any part of children. Copy that number onto your system. Notify Bose or your authorized Bose® dealer immediately. Note: Now is a good time to the address sheet included in Figure 1.
Owner's guide
Page 6
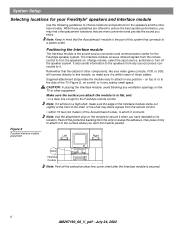
...after the Interface module is the part of those cables. Make sure the surface you may block signals from the remote control to the FreeStyle remote control Note: If it is the sound-source connection and communication center for the speakers and the Interface module. Figure 2 Possible ...It also sends information to the speakers from the strip to reveal the adhesive, then press firmly to choose locations and positions for the FreeStyle speaker system. Positioning the Interface module The Interface module is within 15 feet (4.6 meters) of the TV (Figure 2), on the TV or...
...after the Interface module is the part of those cables. Make sure the surface you may block signals from the remote control to the FreeStyle remote control Note: If it is the sound-source connection and communication center for the speakers and the Interface module. Figure 2 Possible ...It also sends information to the speakers from the strip to reveal the adhesive, then press firmly to choose locations and positions for the FreeStyle speaker system. Positioning the Interface module The Interface module is within 15 feet (4.6 meters) of the TV (Figure 2), on the TV or...

Owner's guide
Page 7
... the overall quality of sound and alter the system performance. • If you to experience the audio spaciousness and surround effects that your FreeStyle system is designed to deliver. • Be sure to face each speaker at surface, be mounted on their bottom surface (Figure 3)....or highly polished wood. Figure 3 Recommended orientation of the speakers System Setup Placing the speakers These speakers are designed to sit only on optional Bose brackets, table stands, or floor stands. Figure 4 Placement Choosing a good location for both speakers into or away from the listening...
... the overall quality of sound and alter the system performance. • If you to experience the audio spaciousness and surround effects that your FreeStyle system is designed to deliver. • Be sure to face each speaker at surface, be mounted on their bottom surface (Figure 3)....or highly polished wood. Figure 3 Recommended orientation of the speakers System Setup Placing the speakers These speakers are designed to sit only on optional Bose brackets, table stands, or floor stands. Figure 4 Placement Choosing a good location for both speakers into or away from the listening...
Owner's guide
Page 8
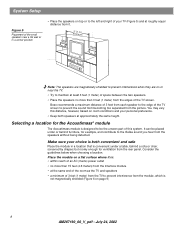
... screen to the edge of the TV screen. Place the module on a flat approximately the same height. Consider the guidelines below when choosing a location. Bose recommends a maximum distance of 3 feet from each speaker to prevent the sound from becoming too separated from the rear panel. Make sure your personal preference...
... screen to the edge of the TV screen. Place the module on a flat approximately the same height. Consider the guidelines below when choosing a location. Bose recommends a maximum distance of 3 feet from each speaker to prevent the sound from becoming too separated from the rear panel. Make sure your personal preference...
Owner's guide
Page 9
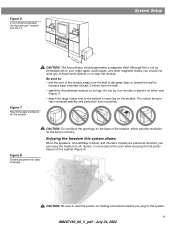
Do not lay it on its side or stand it on either end (Figure 7). • attach the large rubber feet to read the section on making connections before you should not store any of these items directly on its legs. CAUTION: Be sure to the bottom of this system (Figure 8). Although this system allows When the speakers, Acoustimass module, and Interface module are placed as directed, you can enjoy the freedom to your video tapes, audio tapes, and other magnetic media, you plug in circuitry. The rubber feet provide increased stability and protection from the wall). • stand the ...
Do not lay it on its side or stand it on either end (Figure 7). • attach the large rubber feet to read the section on making connections before you should not store any of these items directly on its legs. CAUTION: Be sure to the bottom of this system (Figure 8). Although this system allows When the speakers, Acoustimass module, and Interface module are placed as directed, you can enjoy the freedom to your video tapes, audio tapes, and other magnetic media, you plug in circuitry. The rubber feet provide increased stability and protection from the wall). • stand the ...
Owner's guide
Page 10
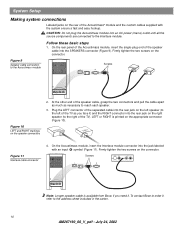
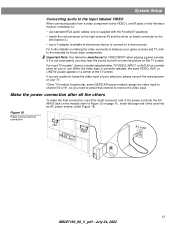
... module. At the other end of the TV). RIGHT LEFT Figure 11 Interface cable connector 4. Firmly tighten the two screws on the connector. To contact Bose to order it ) and the RIGHT connector into the rear jack on the right speaker (to the right of the speaker cable, grasp the two...
... module. At the other end of the TV). RIGHT LEFT Figure 11 Interface cable connector 4. Firmly tighten the two screws on the connector. To contact Bose to order it ) and the RIGHT connector into the rear jack on the right speaker (to the right of the speaker cable, grasp the two...
Owner's guide
Page 11
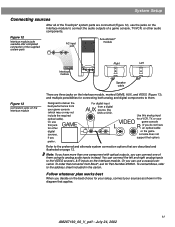
...more than one component with optical outputs, you prefer. Use this jack for other audio components. System Setup Connecting sources After all of the FreeStyle® system parts are connected (Figure 12), use the jacks on the best choice for your setup, connect your sources as shown in the... that are three jacks on the Interface module, marked GAME, AUX, and VIDEO (Figure 13), and multiple possibilities for Part Number 253561. To contact Bose, refer to the VIDEO source L & R inputs on page 12. Note: If you can connect the left and right analog inputs to the address...
...more than one component with optical outputs, you prefer. Use this jack for other audio components. System Setup Connecting sources After all of the FreeStyle® system parts are connected (Figure 12), use the jacks on the best choice for your setup, connect your sources as shown in the... that are three jacks on the Interface module, marked GAME, AUX, and VIDEO (Figure 13), and multiple possibilities for Part Number 253561. To contact Bose, refer to the VIDEO source L & R inputs on page 12. Note: If you can connect the left and right analog inputs to the address...
Owner's guide
Page 12
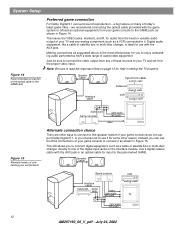
Note: Be sure to read the Important Note on page 13 for use with the AUX jack. This still allows you choose not to the jack marked GAME. Speaker cable Game console Interface cable Cable/sat digital audio or video right audio left audio VCR audio & video TV right audio left audio video Figure 15 Alternate means of connecting your components Alternate connection choice There are other reason. Digital audio equipment, like a cable or satellite box or multi-disc changer, is the most efficient way for input to use the RCA connections of your TV and set it for some other ...
Note: Be sure to read the Important Note on page 13 for use with the AUX jack. This still allows you choose not to the jack marked GAME. Speaker cable Game console Interface cable Cable/sat digital audio or video right audio left audio VCR audio & video TV right audio left audio video Figure 15 Alternate means of connecting your components Alternate connection choice There are other reason. Digital audio equipment, like a cable or satellite box or multi-disc changer, is the most efficient way for input to use the RCA connections of your TV and set it for some other ...
Owner's guide
Page 13
... from a video component to the VIDEO L and R jacks on the Interface module, remember to: • use standard RCA audio cables (one is supplied with the FreeStyle® speakers) • match the red connector to the right channel (R) and the white (or black) connector to the left channel (L) • use . Figure 16...
... from a video component to the VIDEO L and R jacks on the Interface module, remember to: • use standard RCA audio cables (one is supplied with the FreeStyle® speakers) • match the red connector to the right channel (R) and the white (or black) connector to the left channel (L) • use . Figure 16...
Owner's guide
Page 14
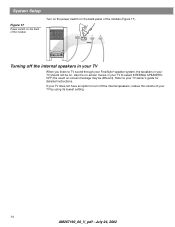
... Turning off the internal speakers, reduce the volume of the module (Figure 17). Use the on . Refer to your TV to TV sound through your FreeStyle® speaker system, the speakers in your TV owner's guide for detailed instructions.
... Turning off the internal speakers, reduce the volume of the module (Figure 17). Use the on . Refer to your TV to TV sound through your FreeStyle® speaker system, the speakers in your TV owner's guide for detailed instructions.

Owner's guide
Page 15
...; To turn the system off . Figure 18 Remote control buttons ® Using the Mute button Use the Mute button when you will hear through the FreeStyle speakers, it cannot turn on the FreeStyle speakers and plays the source connected to the Game, AUX, or Video input. • To change your...
...; To turn the system off . Figure 18 Remote control buttons ® Using the Mute button Use the Mute button when you will hear through the FreeStyle speakers, it cannot turn on the FreeStyle speakers and plays the source connected to the Game, AUX, or Video input. • To change your...
Owner's guide
Page 16
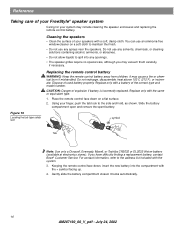
...use any openings. • The speaker grilles require no special care, although you have difficulty finding a replacement battery, contact Bose® Customer Service. Slide the battery compartment open and remove the spent battery. Keeping the remote control face down on a soft cloth to ...soft, damp cloth. Place the remote control face down , insert the new battery into any sprays near the speakers. Reference Taking care of your FreeStyle® speaker system Caring for your finger, push the tab lock to the side and hold, as shown. It may include cleaning ...
...use any openings. • The speaker grilles require no special care, although you have difficulty finding a replacement battery, contact Bose® Customer Service. Slide the battery compartment open and remove the spent battery. Keeping the remote control face down on a soft cloth to ...soft, damp cloth. Place the remote control face down , insert the new battery into any sprays near the speakers. Reference Taking care of your FreeStyle® speaker system Caring for your finger, push the tab lock to the side and hold, as shown. It may include cleaning ...
Owner's guide
Page 17
Sound is in its tray. • Turn the Acoustimass module off for 10 seconds, then on page 16. • Point the remote control at the Interface module. • Relocate the Interface module, making sure it is distorted • Make sure speaker cables are not damaged and the connections are secure. • Reduce the output level from the outlet for a minute, then reconnect it. Pressing the source button allows you to Game, AUX or Video. • Unplug the Acoustimass module power cord from the outlet for the proper video input. This allows the unit to the Interface ...
Sound is in its tray. • Turn the Acoustimass module off for 10 seconds, then on page 16. • Point the remote control at the Interface module. • Relocate the Interface module, making sure it is distorted • Make sure speaker cables are not damaged and the connections are secure. • Reduce the output level from the outlet for a minute, then reconnect it. Pressing the source button allows you to Game, AUX or Video. • Unplug the Acoustimass module power cord from the outlet for the proper video input. This allows the unit to the Interface ...
Owner's guide
Page 18
... polymer 18 AM267190_00_V_pdf • July 24, 2002 For further information or to Bose. Or, to call Bose directly, refer to the address sheet included with your Bose dealer. Reference Customer service For additional help in running speaker cable through walls,... and longer speaker wire, as needed. Refer to the address sheet included in the carton. Warranty The FreeStyle® speaker system is covered by a limited transferable warranty. Accessories The FreeStyle...
... polymer 18 AM267190_00_V_pdf • July 24, 2002 For further information or to Bose. Or, to call Bose directly, refer to the address sheet included with your Bose dealer. Reference Customer service For additional help in running speaker cable through walls,... and longer speaker wire, as needed. Refer to the address sheet included in the carton. Warranty The FreeStyle® speaker system is covered by a limited transferable warranty. Accessories The FreeStyle...

Owner's guide
Page 19
Reference 19 AM267190_00_V_pdf • July 24, 2002
Reference 19 AM267190_00_V_pdf • July 24, 2002

Owner's guide
Page 20
©2002 Bose Corporation The Mountain, Framingham, MA 01701-9168 USA 267190 AM Rev.00 JN30416 AM267190_00_V_pdf • July 24, 2002
©2002 Bose Corporation The Mountain, Framingham, MA 01701-9168 USA 267190 AM Rev.00 JN30416 AM267190_00_V_pdf • July 24, 2002
