
Owner's guide
Page 3
English DEsepuatsñcohl FItralniaçnaois Nederlands Svenska INTRODUCTION 2 Before you begin 2 Unpacking 3 SYSTEM SETUP 4 1 Placing the system components 4 2 Connecting the speakers to the Acoustimass® module 7 3 Connecting the interface module 9 4 ... 20 Switching control from one device to another 20 Using the CineMate® GS series II remote control 21 CARE AND MAINTENANCE 25 Replacing the CineMate® series II remote battery 25 Replacing the CineMate® GS series II remote batteries 26 Cleaning your speaker system 26 Troubleshooting 27 Customer ...
English DEsepuatsñcohl FItralniaçnaois Nederlands Svenska INTRODUCTION 2 Before you begin 2 Unpacking 3 SYSTEM SETUP 4 1 Placing the system components 4 2 Connecting the speakers to the Acoustimass® module 7 3 Connecting the interface module 9 4 ... 20 Switching control from one device to another 20 Using the CineMate® GS series II remote control 21 CARE AND MAINTENANCE 25 Replacing the CineMate® series II remote battery 25 Replacing the CineMate® GS series II remote batteries 26 Cleaning your speaker system 26 Troubleshooting 27 Customer ...
Owner's guide
Page 4
...Bose® CineMate® system, which delivers the superb acoustic performance needed to enjoy the full audio impact of this owner's guide 2 Using our TrueSpace® signal processing technology, the CineMate system speakers provide improved spaciousness for deep bass sound and an interface module that provides simple audio connections to your CineMate... system, the following items are provided: • Quick Setup Guide • Setup DVD • Detailed instructions in two configurations: • CineMate series II - In fact, they ...
...Bose® CineMate® system, which delivers the superb acoustic performance needed to enjoy the full audio impact of this owner's guide 2 Using our TrueSpace® signal processing technology, the CineMate system speakers provide improved spaciousness for deep bass sound and an interface module that provides simple audio connections to your CineMate... system, the following items are provided: • Quick Setup Guide • Setup DVD • Detailed instructions in two configurations: • CineMate series II - In fact, they ...
Owner's guide
Page 6
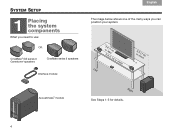
SYSTEM SETUP 1 Placing the system components What you need to use: Svenska Nederlands FItralniaçnaois DEsepuatsñcohl English The image below shows one of the many ways you can position your system. OR CineMate® GS series II Gemstone® speakers CineMate series II speakers Interface module o33rffltet(s(11smm)) or more Left 3 or mft o(1rem) Acoustimass® module Right See Steps 1-5 for details. 4
SYSTEM SETUP 1 Placing the system components What you need to use: Svenska Nederlands FItralniaçnaois DEsepuatsñcohl English The image below shows one of the many ways you can position your system. OR CineMate® GS series II Gemstone® speakers CineMate series II speakers Interface module o33rffltet(s(11smm)) or more Left 3 or mft o(1rem) Acoustimass® module Right See Steps 1-5 for details. 4
Owner's guide
Page 7
... openings on a surface that connects to prevent interference with the screen • at least 3 feet (1 meter) apart • within reach of small rubber feet. 2. SYSTEM SETUP 4. Place the left and right speakers: • at least 2.5 feet (.8 meters) from the TV to a power outlet. 5 On the legs of this system that can...
... openings on a surface that connects to prevent interference with the screen • at least 3 feet (1 meter) apart • within reach of small rubber feet. 2. SYSTEM SETUP 4. Place the left and right speakers: • at least 2.5 feet (.8 meters) from the TV to a power outlet. 5 On the legs of this system that can...
Owner's guide
Page 8
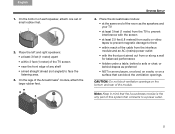
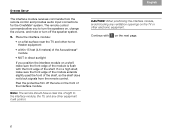
... slightly past the front of the shelf, so the shelf does not block signals from the remote control and provides audio input connections for the CineMate® system. If on a high shelf, make sure the front edge of the module is flush with 2 on the TV or other equipment it will... the next page. 6 CAUTION: When positioning the interface module, avoid blocking any other electronic equipment. Svenska Nederlands FItralniaçnaois DEsepuatsñcohl English SYSTEM SETUP The interface module receives commands from the remote control.
... slightly past the front of the shelf, so the shelf does not block signals from the remote control and provides audio input connections for the CineMate® system. If on a high shelf, make sure the front edge of the module is flush with 2 on the TV or other equipment it will... the next page. 6 CAUTION: When positioning the interface module, avoid blocking any other electronic equipment. Svenska Nederlands FItralniaçnaois DEsepuatsñcohl English SYSTEM SETUP The interface module receives commands from the remote control.
Owner's guide
Page 9
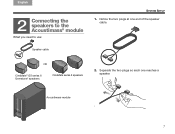
Separate the two plugs so each one end of the speaker cable. Acoustimass module 7 English DEsepuatsñcohl FItralniaçnaois Nederlands Svenska SYSTEM SETUP 2 Connecting the speakers to the Acoustimass® module What you need to use: 1. Notice the two plugs at one reaches a speaker. Speaker cable OR CineMate® GS series II Gemstone® speakers CineMate series II speakers 2.
Separate the two plugs so each one end of the speaker cable. Acoustimass module 7 English DEsepuatsñcohl FItralniaçnaois Nederlands Svenska SYSTEM SETUP 2 Connecting the speakers to the Acoustimass® module What you need to use: 1. Notice the two plugs at one reaches a speaker. Speaker cable OR CineMate® GS series II Gemstone® speakers CineMate series II speakers 2.
Owner's guide
Page 10
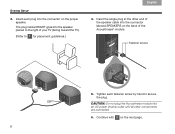
... until all other end of the speaker cable into the connector on the next page. 8 Svenska Nederlands FItralniaçnaois DEsepuatsñcohl English SYSTEM SETUP 3.
... until all other end of the speaker cable into the connector on the next page. 8 Svenska Nederlands FItralniaçnaois DEsepuatsñcohl English SYSTEM SETUP 3.
Owner's guide
Page 11
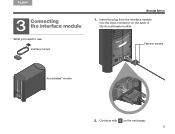
Insert the plug from the interface module into the input connector on the next page. 9 Continue with 4 on the back of the Acoustimass module. What you need to use: Interface module Fastener screws Acoustimass® module 2. English DEsepuatsñcohl FItralniaçnaois Nederlands Svenska SYSTEM SETUP 3 Connecting the interface module 1.
Insert the plug from the interface module into the input connector on the next page. 9 Continue with 4 on the back of the Acoustimass module. What you need to use: Interface module Fastener screws Acoustimass® module 2. English DEsepuatsñcohl FItralniaçnaois Nederlands Svenska SYSTEM SETUP 3 Connecting the interface module 1.
Owner's guide
Page 12
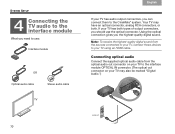
... of output connectors, you should use : Interface module OR If your TV has audio output connectors, you can connect them to the CineMate® system. Svenska Nederlands FItralniaçnaois DEsepuatsñcohl English SYSTEM SETUP 4 Connecting the TV audio to the interface module What you need to use the optical connector.
... of output connectors, you should use : Interface module OR If your TV has audio output connectors, you can connect them to the CineMate® system. Svenska Nederlands FItralniaçnaois DEsepuatsñcohl English SYSTEM SETUP 4 Connecting the TV audio to the interface module What you need to use the optical connector.
Owner's guide
Page 13
...to its lowest setting. To enjoy the full benefit of hearing TV audio through the CineMate® system, the internal speakers in the setup menu of the highest volume. 11 Older TVs may have a setup menu item for turning the TV speakers on the rear panel near the audio output ...your TV should be used as a second audio input. Using a speaker on/off . English DEsepuatsñcohl FItralniaçnaois Nederlands Svenska SYSTEM SETUP Note: The interface module has both fixed (FIX) and variable (VAR) audio output connectors, use the supplied stereo audio cable to connect from your...
...to its lowest setting. To enjoy the full benefit of hearing TV audio through the CineMate® system, the internal speakers in the setup menu of the highest volume. 11 Older TVs may have a setup menu item for turning the TV speakers on the rear panel near the audio output ...your TV should be used as a second audio input. Using a speaker on/off . English DEsepuatsñcohl FItralniaçnaois Nederlands Svenska SYSTEM SETUP Note: The interface module has both fixed (FIX) and variable (VAR) audio output connectors, use the supplied stereo audio cable to connect from your...
Owner's guide
Page 14
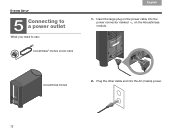
What you need to a power outlet 1. Plug the other cable end into the power connector marked on the power cable into the AC (mains) power. 12 Insert the large plug on the Acoustimass module. Svenska Nederlands FItralniaçnaois DEsepuatsñcohl English SYSTEM SETUP 5 Connecting to use: Acoustimass® module power cable Acoustimass module 2.
What you need to a power outlet 1. Plug the other cable end into the power connector marked on the power cable into the AC (mains) power. 12 Insert the large plug on the Acoustimass module. Svenska Nederlands FItralniaçnaois DEsepuatsñcohl English SYSTEM SETUP 5 Connecting to use: Acoustimass® module power cable Acoustimass module 2.
Owner's guide
Page 15
...CineMate® system to a power source, the green LED on the front of the interface module flashes for 10 seconds, then extinguishes, indicating that the system has been connected to power. Voltage variations and spikes can damage electronic components in any system. 13 Continue with 6 on all electronic equipment. CAUTION: Bose... recommends using a safety agencyapproved surge protector on the next page. English DEsepuatsñcohl FItralniaçnaois Nederlands Svenska SYSTEM SETUP When you press the remote control On-Off,...
...CineMate® system to a power source, the green LED on the front of the interface module flashes for 10 seconds, then extinguishes, indicating that the system has been connected to power. Voltage variations and spikes can damage electronic components in any system. 13 Continue with 6 on all electronic equipment. CAUTION: Bose... recommends using a safety agencyapproved surge protector on the next page. English DEsepuatsñcohl FItralniaçnaois Nederlands Svenska SYSTEM SETUP When you press the remote control On-Off,...
Owner's guide
Page 16
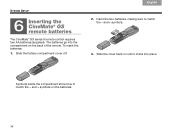
and + symbols. 3. Slide the cover back on until it clicks into the compartment on the batteries. 14 To insert the batteries: 1. and + symbols on the back of the remote. Slide the battery compartment cover off. 2. Insert the two batteries, making sure to match the - The batteries go into place. Symbols inside the compartment show how to match the - Svenska Nederlands FItralniaçnaois DEsepuatsñcohl English SYSTEM SETUP 6 Inserting the CineMate® GS remote batteries The CineMate® GS series II remote control requires two AA batteries (supplied).
and + symbols. 3. Slide the cover back on until it clicks into the compartment on the batteries. 14 To insert the batteries: 1. and + symbols on the back of the remote. Slide the battery compartment cover off. 2. Insert the two batteries, making sure to match the - The batteries go into place. Symbols inside the compartment show how to match the - Svenska Nederlands FItralniaçnaois DEsepuatsñcohl English SYSTEM SETUP 6 Inserting the CineMate® GS remote batteries The CineMate® GS series II remote control requires two AA batteries (supplied).
Owner's guide
Page 20
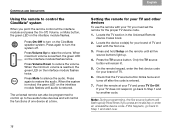
Press again to raise the volume. Press and hold Setup on the interface module flashes. Check that the TV source button blinks...section in the Universal Remote Device Codes book. 2. When maximum volume is muted, the green LED on the CineMate speaker system. Press Volume Down to silence the audio. Press Mute to reduce the volume. Only the TV...18 Svenska Nederlands FItralniaçnaois DEsepuatsñcohl English CONTROLS AND INDICATORS Using the remote to control the CineMate® system When you point the remote control at your TV and press TV On-Off. Press again ...
Press again to raise the volume. Press and hold Setup on the interface module flashes. Check that the TV source button blinks...section in the Universal Remote Device Codes book. 2. When maximum volume is muted, the green LED on the CineMate speaker system. Press Volume Down to silence the audio. Press Mute to reduce the volume. Only the TV...18 Svenska Nederlands FItralniaçnaois DEsepuatsñcohl English CONTROLS AND INDICATORS Using the remote to control the CineMate® system When you point the remote control at your TV and press TV On-Off. Press again ...
Owner's guide
Page 24
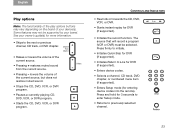
... control only one source at a time, depending on which source is selected on your remote (TV, CBL-SAT, DVD, VCR, or AUX). • Exits the Setup mode. • Exits the menu or Electronic Program Guide of the currently selected source (if supported). • Skips ahead one page in the Electronic Program...
... control only one source at a time, depending on which source is selected on your remote (TV, CBL-SAT, DVD, VCR, or AUX). • Exits the Setup mode. • Exits the menu or Electronic Program Guide of the currently selected source (if supported). • Skips ahead one page in the Electronic Program...
Owner's guide
Page 25
... on the brand of the current source. • Pressing + restores muted sound from the current source. • Pressing - Press and hold for 3 seconds to enter Setup mode. • Returns to Live for DVR (if supported). • Enters device codes. • Selects a channel, CD track, DVD chapter, or numbered menu item (if...
... on the brand of the current source. • Pressing + restores muted sound from the current source. • Pressing - Press and hold for 3 seconds to enter Setup mode. • Returns to Live for DVR (if supported). • Enters device codes. • Selects a channel, CD track, DVD chapter, or numbered menu item (if...


