Owner's guide
Page 8
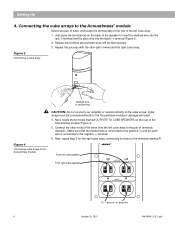
...marked OUTPUTS TO CUBE SPEAKERS on the rear of the Acoustimass module (Figure 4). 5. Now, repeat step 5 for... Release the terminal tab and both wires will be connected directly to the Acoustimass® module Select one pair of wires, and locate the terminal tab on...rear of the left cube array. 1. Connecting the cube arrays to the Acoustimass module or damage will result. 4. Repeat this process with the other ends ...cube array Marked wire to red terminal Figure 4 Connecting cube arrays to the Acoustimass module CAUTION: Do not connect your amplifier or receiver directly to insert the ...
...marked OUTPUTS TO CUBE SPEAKERS on the rear of the Acoustimass module (Figure 4). 5. Now, repeat step 5 for... Release the terminal tab and both wires will be connected directly to the Acoustimass® module Select one pair of wires, and locate the terminal tab on...rear of the left cube array. 1. Connecting the cube arrays to the Acoustimass module or damage will result. 4. Repeat this process with the other ends ...cube array Marked wire to red terminal Figure 4 Connecting cube arrays to the Acoustimass module CAUTION: Do not connect your amplifier or receiver directly to insert the ...
Owner's guide
Page 9
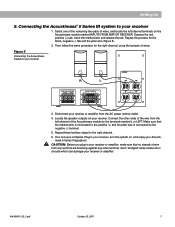
...wire from the left channel terminals on , and enjoy your receiver, turn the system on the Acoustimass module marked INPUTS FROM AMP OR RECEIVER. Connecting the Acoustimass® 5 Series III system to the terminals marked L or LEFT. Repeat the process for the right channel. 6. Plug... the speaker outputs on your receiver R L 3. Repeat these last two steps for the black, negative (-) tab and the plain wire (Figure 5). 2. CAUTION: Before you plug in your Acoustimass 5 Series III speakers! Such "bridged" wires create short circuits which can damage your receiver or amplifier, make...
...wire from the left channel terminals on , and enjoy your receiver, turn the system on the Acoustimass module marked INPUTS FROM AMP OR RECEIVER. Connecting the Acoustimass® 5 Series III system to the terminals marked L or LEFT. Repeat the process for the right channel. 6. Plug... the speaker outputs on your receiver R L 3. Repeat these last two steps for the black, negative (-) tab and the plain wire (Figure 5). 2. CAUTION: Before you plug in your Acoustimass 5 Series III speakers! Such "bridged" wires create short circuits which can damage your receiver or amplifier, make...
Owner's guide
Page 14
...shipping weight: 30.8 lb (14 kg) Available Accessories Floor stands: UFS-20B (black), UFS-20W (white) Wall brackets: UB-20B (black), UB-20W (white) Warranty period The Bose® Acoustimass 5 Series III speaker system is covered by a limited 5-year transferable warranty. See the inside back...system. Details of the warranty are provided on the card and mail it to Bose. English Product Information Technical Information Features Direct/Reflecting® speaker design Acoustimass® speaker system Syncom® II computerized quality control Automatic system protection circuitry Driver...
...shipping weight: 30.8 lb (14 kg) Available Accessories Floor stands: UFS-20B (black), UFS-20W (white) Wall brackets: UB-20B (black), UB-20W (white) Warranty period The Bose® Acoustimass 5 Series III speaker system is covered by a limited 5-year transferable warranty. See the inside back...system. Details of the warranty are provided on the card and mail it to Bose. English Product Information Technical Information Features Direct/Reflecting® speaker design Acoustimass® speaker system Syncom® II computerized quality control Automatic system protection circuitry Driver...
