Owner's guide
Page 8
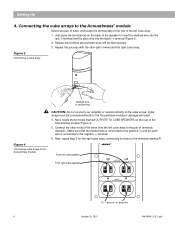
...terminal tab and both wires will result. 4. Figure 3 Connecting a cube array Marked wire to red terminal Figure 4 Connecting cube arrays to the Acoustimass module CAUTION: Do not connect your amplifier or receiver directly to the negative (-) terminal. 6. Cube arrays must be held securely. 3. Next, ..., connecting its wires to insert the marked wire into the red (+) terminal and the plain wire into the black (-) terminal (Figure 3). 2. Connect the other pair of the speaker to the terminals marked R. English Setting Up 4. Just press the terminal tab on the rear of the left...
...terminal tab and both wires will result. 4. Figure 3 Connecting a cube array Marked wire to red terminal Figure 4 Connecting cube arrays to the Acoustimass module CAUTION: Do not connect your amplifier or receiver directly to the negative (-) terminal. 6. Cube arrays must be held securely. 3. Next, ..., connecting its wires to insert the marked wire into the red (+) terminal and the plain wire into the black (-) terminal (Figure 3). 2. Connect the other pair of the speaker to the terminals marked R. English Setting Up 4. Just press the terminal tab on the rear of the left...
Owner's guide
Page 9
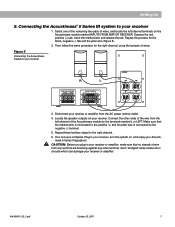
... on the Acoustimass module marked INPUTS FROM AMP OR RECEIVER. Your set-up is connected to your receiver 1. Then follow the same procedure for the black, negative (-) tab and the plain wire (Figure 5). 2. Such "bridged" wires create short circuits which can damage your ..., turn the system on, and enjoy your receiver. Connect the other ends of wire from the left channel terminals on your Acoustimass 5 Series III speakers! AM196451_05_V.pdf October 23, 2001 7 English Setting Up 5. Disconnect your receiver or amplifier. Repeat these last two steps for the right...
... on the Acoustimass module marked INPUTS FROM AMP OR RECEIVER. Your set-up is connected to your receiver 1. Then follow the same procedure for the black, negative (-) tab and the plain wire (Figure 5). 2. Such "bridged" wires create short circuits which can damage your ..., turn the system on, and enjoy your receiver. Connect the other ends of wire from the left channel terminals on your Acoustimass 5 Series III speakers! AM196451_05_V.pdf October 23, 2001 7 English Setting Up 5. Disconnect your receiver or amplifier. Repeat these last two steps for the right...
Owner's guide
Page 14
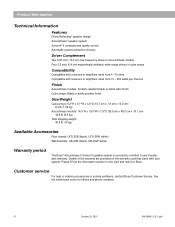
....0 cm x 19.1 cm) 18.8 lb (8.5 kg) Total shipping weight: 30.8 lb (14 kg) Available Accessories Floor stands: UFS-20B (black), UFS-20W (white) Wall brackets: UB-20B (black), UB-20W (white) Warranty period The Bose® Acoustimass 5 Series III speaker system is covered by a limited 5-year transferable warranty. English Product Information Technical Information Features Direct/Reflecting®...
....0 cm x 19.1 cm) 18.8 lb (8.5 kg) Total shipping weight: 30.8 lb (14 kg) Available Accessories Floor stands: UFS-20B (black), UFS-20W (white) Wall brackets: UB-20B (black), UB-20W (white) Warranty period The Bose® Acoustimass 5 Series III speaker system is covered by a limited 5-year transferable warranty. English Product Information Technical Information Features Direct/Reflecting®...


