Owner's guide
Page 5
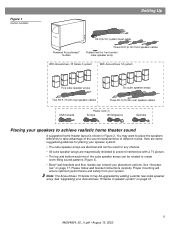
...1m) system input cable Powered Acoustimass® module Three 20-ft (6.1m) front speaker cables Rubber feet for front center cube speaker array With Acoustimass 15 Series II system With Acoustimass 16 system Five cube speaker arrays Six cube speaker arrays Two 50-ft (15.2m) rear speaker cables Three 50-... be upgraded by adding a center rear cube speaker array. Note: The Acoustimass 15 Series II may want to place the speakers differently to create room-filling sound patterns (Figure 3). • Bose® wall brackets and floor stands can extend your placement options....
...1m) system input cable Powered Acoustimass® module Three 20-ft (6.1m) front speaker cables Rubber feet for front center cube speaker array With Acoustimass 15 Series II system With Acoustimass 16 system Five cube speaker arrays Six cube speaker arrays Two 50-ft (15.2m) rear speaker cables Three 50-... be upgraded by adding a center rear cube speaker array. Note: The Acoustimass 15 Series II may want to place the speakers differently to create room-filling sound patterns (Figure 3). • Bose® wall brackets and floor stands can extend your placement options....
Owner's guide
Page 8
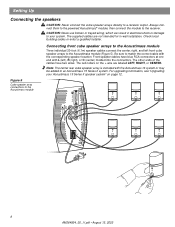
...Series II system. Note: The center rear cube speaker array is included with the Acoustimass 16 system or may be added to match the correct cable with L (left front cube speaker arrays to your Acoustimass 15 Series II speaker system" on the + wire are not intended for in ...Output Left Center Right Rear Rear Rear Audio Input Left Center Right Front Front Front Setting Up Connecting the speakers CAUTION: Never connect the cube speaker arrays directly to the Acoustimass module 8 AM264924_00 _V.pdf • August 13, 2002 The supplied cables are labeled LEFT, RIGHT, or CENTER. ...
...Series II system. Note: The center rear cube speaker array is included with the Acoustimass 16 system or may be added to match the correct cable with L (left front cube speaker arrays to your Acoustimass 15 Series II speaker system" on the + wire are not intended for in ...Output Left Center Right Rear Rear Rear Audio Input Left Center Right Front Front Front Setting Up Connecting the speakers CAUTION: Never connect the cube speaker arrays directly to the Acoustimass module 8 AM264924_00 _V.pdf • August 13, 2002 The supplied cables are labeled LEFT, RIGHT, or CENTER. ...
Owner's guide
Page 10
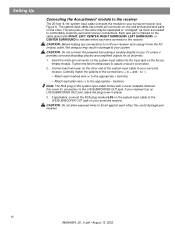
... to comfortably reach the surround receiver connections. CAUTION: Do not connect the powered Acoustimass module directly to your system. this cover for all channels. 1. Setting Up Connecting the Acoustimass® module to the receiver The 20-foot (6.1m) system input cable connects the module to your receiver. 10 AM264924_00 _V.pdf • August 13...
... to comfortably reach the surround receiver connections. CAUTION: Do not connect the powered Acoustimass module directly to your system. this cover for all channels. 1. Setting Up Connecting the Acoustimass® module to the receiver The 20-foot (6.1m) system input cable connects the module to your receiver. 10 AM264924_00 _V.pdf • August 13...
Owner's guide
Page 11
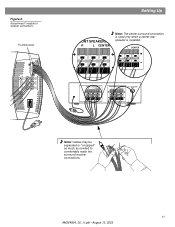
R L CENTER FRONT SPEAKERS A R L CENTER SURROUND SPEAKERS R L CENTER LFE/SUBWOOFER OUT Note: Cables may be separated or "unzipped" as much as needed to receiver connections Thumbscrews Setting Up FRONT SPEAKERS A R L CENTER Note: The center surround connection is used only when a center rear speaker is installed. Audio Output Left Center Right Rear Rear Rear Audio Input Left Center Right Front Front Front Figure 6 Acoustimass® module to comfortably reach the surround receiver connections. 11 AM264924_00 _V.pdf • August 13, 2002
R L CENTER FRONT SPEAKERS A R L CENTER SURROUND SPEAKERS R L CENTER LFE/SUBWOOFER OUT Note: Cables may be separated or "unzipped" as much as needed to receiver connections Thumbscrews Setting Up FRONT SPEAKERS A R L CENTER Note: The center surround connection is used only when a center rear speaker is installed. Audio Output Left Center Right Rear Rear Rear Audio Input Left Center Right Front Front Front Figure 6 Acoustimass® module to comfortably reach the surround receiver connections. 11 AM264924_00 _V.pdf • August 13, 2002
Owner's guide
Page 15
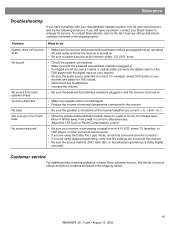
... be sure a coaxial or optical cable connects the digital output of fices and phone numbers enclosed in solving problems, contact Bose customer service. To contact Bose directly, refer to the receiver. No... that surround-sound is turned on. • If you still have a problem with the digital input on your receiver. • Be sure the audio source selected is processing a signal from a ... What to do System does not function • Make sure the receiver and powered Acoustimass module are plugged into an operating at the receiver/amplifier are correct at the...
... be sure a coaxial or optical cable connects the digital output of fices and phone numbers enclosed in solving problems, contact Bose customer service. To contact Bose directly, refer to the receiver. No... that surround-sound is turned on. • If you still have a problem with the digital input on your receiver. • Be sure the audio source selected is processing a signal from a ... What to do System does not function • Make sure the receiver and powered Acoustimass module are plugged into an operating at the receiver/amplifier are correct at the...
Owner's guide
Page 17
... (black), UFS-20W (white) • Wall brackets: UB-20B (black), UB-20W (white) • Module input cable adapter for use with existing wiring: PN267138-001 (black) PN267138-002 (white) • Module-to Bose. Reference Warranty period Your Bose® Acoustimass® speaker system is covered by a limited transferable warranty. Please fill out the information...
... (black), UFS-20W (white) • Wall brackets: UB-20B (black), UB-20W (white) • Module input cable adapter for use with existing wiring: PN267138-001 (black) PN267138-002 (white) • Module-to Bose. Reference Warranty period Your Bose® Acoustimass® speaker system is covered by a limited transferable warranty. Please fill out the information...


