Owner's guide
Page 2
... Safety Information WARNING: To reduce the risk of fire or electric shock, do not expose the Acoustimass® module to wide slot, insert fully. NO USER-SERVICABLE PARTS INSIDE. Please save your sales receipt ... OU SOUS-ENSEMBLE POUVANT ÊTRE DEPANNÉ PAR L'UTILISATEUR. It will help you set up and operate your records The system serial number is intended to alert the user to follow this owner's... guide. ©2002 Bose Corporation. Please read this owner's guide Please take the time to the presence of important...
... Safety Information WARNING: To reduce the risk of fire or electric shock, do not expose the Acoustimass® module to wide slot, insert fully. NO USER-SERVICABLE PARTS INSIDE. Please save your sales receipt ... OU SOUS-ENSEMBLE POUVANT ÊTRE DEPANNÉ PAR L'UTILISATEUR. It will help you set up and operate your records The system serial number is intended to alert the user to follow this owner's... guide. ©2002 Bose Corporation. Please read this owner's guide Please take the time to the presence of important...
Owner's guide
Page 3
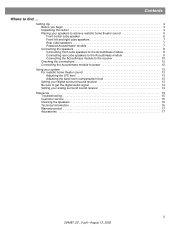
... rear cube speakers to the Acoustimass module 9 Connecting the Acoustimass module to the receiver 10 Checking the connections 12 Connecting the Acoustimass module to power 12 Using your system 13 For realistic home theater sound 13 Adjusting the LFE level 13 Adjusting the bass/room compensation level 13 Setting your analog surround sound receiver 14...
... rear cube speakers to the Acoustimass module 9 Connecting the Acoustimass module to the receiver 10 Checking the connections 12 Connecting the Acoustimass module to power 12 Using your system 13 For realistic home theater sound 13 Adjusting the LFE level 13 Adjusting the bass/room compensation level 13 Setting your analog surround sound receiver 14...
Owner's guide
Page 4
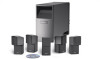
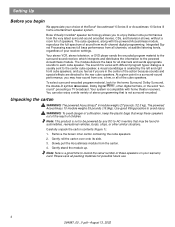
... performance from the very latest surround-sound encoded movies, CDs, and television shows, without a room full of the Bose® Acoustimass® 6 Series III or Acoustimass 10 Series III home entertainment speaker system. The module delivers the bass for all packing materials for the terms Surround, Dolby Surround, the...TV broadcast. Note: This product is not to each cube speaker. Remove the brown inner carton containing the cube speakers. 2. Setting Up Before you begin We appreciate your warranty card. Please save all channels and sends appropriate sounds to be found in the...
... performance from the very latest surround-sound encoded movies, CDs, and television shows, without a room full of the Bose® Acoustimass® 6 Series III or Acoustimass 10 Series III home entertainment speaker system. The module delivers the bass for all packing materials for the terms Surround, Dolby Surround, the...TV broadcast. Note: This product is not to each cube speaker. Remove the brown inner carton containing the cube speakers. 2. Setting Up Before you begin We appreciate your warranty card. Please save all channels and sends appropriate sounds to be found in the...
Owner's guide
Page 5
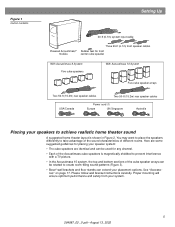
...wall bracket instructions carefully. You may want to place the speakers differently to create room-filling sound patterns (Figure 3). • Bose® wall brackets and floor stands can extend your system. 5 264887_00 _V.pdf • August 13, 2002 See "Accessories... placement options. Figure 1 Carton contents Setting Up 20-ft (6.1m) system input cable Powered Acoustimass® module Three 20-ft (6.1m) front speaker cables Rubber feet for front center cube speaker With Acoustimass 6 System Five cube speakers With Acoustimass 10 System Five cube speaker arrays Two 50...
...wall bracket instructions carefully. You may want to place the speakers differently to create room-filling sound patterns (Figure 3). • Bose® wall brackets and floor stands can extend your system. 5 264887_00 _V.pdf • August 13, 2002 See "Accessories... placement options. Figure 1 Carton contents Setting Up 20-ft (6.1m) system input cable Powered Acoustimass® module Three 20-ft (6.1m) front speaker cables Rubber feet for front center cube speaker With Acoustimass 6 System Five cube speakers With Acoustimass 10 System Five cube speaker arrays Two 50...
Owner's guide
Page 6
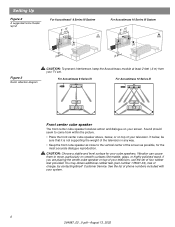
...four rubber feet provided. CAUTION: Choose a stable and level surface for the most accurate dialogue reproduction. Setting Up Figure 2 A suggested home theater layout For Acoustimass® 6 Series III System (26'--51m5)' CR RR L LR (0.26'm+ +) For Acoustimass 10 Series III System (26'--51m5)' CR RR L LR (0.26'm+ +) Figure 3 Room reflection diagram ... to the vertical center of the screen as possible, for your screen. See the list of charge, by contacting Bose® Customer Service. Sound should seem to move, particularly on top of your television, use the...
...four rubber feet provided. CAUTION: Choose a stable and level surface for the most accurate dialogue reproduction. Setting Up Figure 2 A suggested home theater layout For Acoustimass® 6 Series III System (26'--51m5)' CR RR L LR (0.26'm+ +) For Acoustimass 10 Series III System (26'--51m5)' CR RR L LR (0.26'm+ +) Figure 3 Room reflection diagram ... to the vertical center of the screen as possible, for your screen. See the list of charge, by contacting Bose® Customer Service. Sound should seem to move, particularly on top of your television, use the...
Owner's guide
Page 7
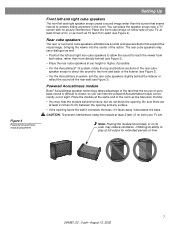
Figure 4 Powered Acoustimass module placement Setting Up Front left and right cube speakers The front left and right rear cube speakers to allow the sound to reach...; 10 system, rotate the top and bottom sections of the rear cube speaker arrays to direct the sound to locate, so you can place the speaker arrays near a TV screen with no picture interference. Powered Acoustimass module Bose® Acoustimass speaker technology takes advantage of the fact that expand the... arrays on its ability to viewers sitting anywhere in the room. Place the module at the same end of your TV set.
Figure 4 Powered Acoustimass module placement Setting Up Front left and right cube speakers The front left and right rear cube speakers to allow the sound to reach...; 10 system, rotate the top and bottom sections of the rear cube speaker arrays to direct the sound to locate, so you can place the speaker arrays near a TV screen with no picture interference. Powered Acoustimass module Bose® Acoustimass speaker technology takes advantage of the fact that expand the... arrays on its ability to viewers sitting anywhere in the room. Place the module at the same end of your TV set.
Owner's guide
Page 8
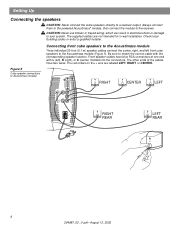
... wire are not intended for in electrical shock or damage to match the correct cable with L (left front cube speakers to the Acoustimass module (Figure 5). The other ends of the cables have blue RCA connectors at one end with the corresponding speaker location. Check local...two wires. Be sure to your system. Figure 5 Cube speaker connections to a receiver output. Setting Up Connecting the speakers CAUTION: Never connect the cube speakers directly to Acoustimass module RIGHT CENTER LEFT Audio Input Left Center Right Front Front Front Right Rear Audio Output Left Rear...
... wire are not intended for in electrical shock or damage to match the correct cable with L (left front cube speakers to the Acoustimass module (Figure 5). The other ends of the cables have blue RCA connectors at one end with the corresponding speaker location. Check local...two wires. Be sure to your system. Figure 5 Cube speaker connections to a receiver output. Setting Up Connecting the speakers CAUTION: Never connect the cube speakers directly to Acoustimass module RIGHT CENTER LEFT Audio Input Left Center Right Front Front Front Right Rear Audio Output Left Rear...
Owner's guide
Page 9
... the cube speaker. Connect the wire pair marked RIGHT REAR to secure the wires. 2. Release the tab to the right rear cube speaker (on the Acoustimass® module. Connect the wire pair marked LEFT REAR to secure the wires. 2. Insert the marked (+) wire into the red terminal and the plain (-) ...wire into the black terminal. See Figure 5. Setting Up 1. Plug the other end of the TV as you face it). 3. Be sure to the right of each cable into the Center Front, Right...
... the cube speaker. Connect the wire pair marked RIGHT REAR to secure the wires. 2. Release the tab to the right rear cube speaker (on the Acoustimass® module. Connect the wire pair marked LEFT REAR to secure the wires. 2. Insert the marked (+) wire into the red terminal and the plain (-) ...wire into the black terminal. See Figure 5. Setting Up 1. Plug the other end of the TV as you face it). 3. Be sure to the right of each cable into the Center Front, Right...
Owner's guide
Page 10
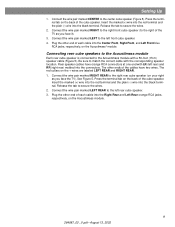
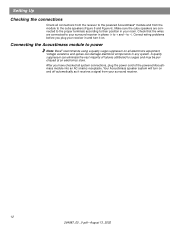
... jack. CAUTION: Before making any connections turn off your receiver. 10 264887_00 _V.pdf • August 13, 2002 terminal. If your TV unless the TV provides surround decoding circuitry and amplified outputs for connection to + and - Setting Up Connecting the Acoustimass® module to the receiver The 20-foot (6.1 m) system input...
... jack. CAUTION: Before making any connections turn off your receiver. 10 264887_00 _V.pdf • August 13, 2002 terminal. If your TV unless the TV provides surround decoding circuitry and amplified outputs for connection to + and - Setting Up Connecting the Acoustimass® module to the receiver The 20-foot (6.1 m) system input...
Owner's guide
Page 11
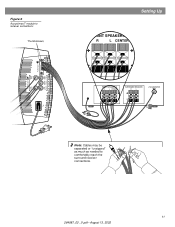
Figure 6 Acoustimass® module to receiver connections Thumbscrews Audio Output Left Rear Right Rear Audio Input Left Center Right Front Front Front Setting Up FRONT SPEAKERS A R L CENTER FRONT SPEAKERS A R L CENTER SURROUND SPEAKERS R L LFE/SUBWOOFER OUT Note: Cables may be separated or "unzipped" as much as needed to comfortably reach the surround receiver connections. 11 264887_00 _V.pdf • August 13, 2002
Figure 6 Acoustimass® module to receiver connections Thumbscrews Audio Output Left Rear Right Rear Audio Input Left Center Right Front Front Front Setting Up FRONT SPEAKERS A R L CENTER FRONT SPEAKERS A R L CENTER SURROUND SPEAKERS R L LFE/SUBWOOFER OUT Note: Cables may be separated or "unzipped" as much as needed to comfortably reach the surround receiver connections. 11 264887_00 _V.pdf • August 13, 2002
Owner's guide
Page 12
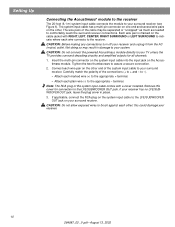
... at an electronics store. A quality suppressor can damage electronic components in phase (+ to + and - Connecting the Acoustimass module to power Note: Bose® recommends using a quality surge suppressor on and off automatically as it on. Voltage variations and spikes can eliminate... the vast majority of the powered Acoustimass module into an AC (mains) receptacle. After you plug your room. to your surround receiver in any system. Setting...
... at an electronics store. A quality suppressor can damage electronic components in phase (+ to + and - Connecting the Acoustimass module to power Note: Bose® recommends using a quality surge suppressor on and off automatically as it on. Voltage variations and spikes can eliminate... the vast majority of the powered Acoustimass module into an AC (mains) receptacle. After you plug your room. to your surround receiver in any system. Setting...
Owner's guide
Page 13
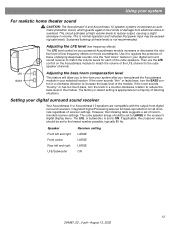
... home theater sound CAUTION: The Acoustimass® 6 and Acoustimass 10 speaker systems incorporate an automatic protection circuit, which guards against most kinds of receiver settings. Then use the LFE BASS control on movie soundtracks. The factory or detent setting is set to fine-tune your... system after you to LARGE in your digital surround sound receiver Your Acoustimass 6 or Acoustimass 10 speakers are compatible with the output from electrical stress or overload...
... home theater sound CAUTION: The Acoustimass® 6 and Acoustimass 10 speaker systems incorporate an automatic protection circuit, which guards against most kinds of receiver settings. Then use the LFE BASS control on movie soundtracks. The factory or detent setting is set to fine-tune your... system after you to LARGE in your digital surround sound receiver Your Acoustimass 6 or Acoustimass 10 speakers are compatible with the output from electrical stress or overload...
Owner's guide
Page 14
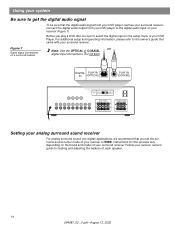
... IN (OPTICAL) PLAY IN (COAXIAL) DIGITAL PLAY IN IN (OPTICAL) PLAY IN (COAXIAL) FRONT SPEAKERS R L SURROUND SPEAKERS R REAR L CENTER Setting your analog surround sound receiver For analog surround sound (not digital) applications, we recommend that you play a DVD disc, be sure that came with your...7 Digital signal connections on a surround receiver Note: Use the OPTICAL or COAXIAL OR digital input connections, but not both. Before you set the surround-sound center mode of your receiver to the owner's guide that the digital audio signal from your DVD player reaches your surround ...
... IN (OPTICAL) PLAY IN (COAXIAL) DIGITAL PLAY IN IN (OPTICAL) PLAY IN (COAXIAL) FRONT SPEAKERS R L SURROUND SPEAKERS R REAR L CENTER Setting your analog surround sound receiver For analog surround sound (not digital) applications, we recommend that you play a DVD disc, be sure that came with your...7 Digital signal connections on a surround receiver Note: Use the OPTICAL or COAXIAL OR digital input connections, but not both. Before you set the surround-sound center mode of your receiver to the owner's guide that the digital audio signal from your DVD player reaches your surround ...
Owner's guide
Page 15
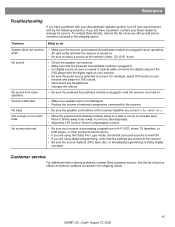
...check that surround-sound is correct. Customer service For additional help in the shipping carton. To contact Bose directly, refer to the list of service of the DVD player with your Acoustimass® speaker system, turn off your sound source and try the following solutions. No sound •... source selected is turned ON. • If you are using digital programming, verify that the settings are correct (+ to + and - No sound from cube speakers • Be sure the powered Acoustimass module is plugged in the shipping carton. 15 264887_00 _V.pdf • August 13, 2002 ...
...check that surround-sound is correct. Customer service For additional help in the shipping carton. To contact Bose directly, refer to the list of service of the DVD player with your Acoustimass® speaker system, turn off your sound source and try the following solutions. No sound •... source selected is turned ON. • If you are using digital programming, verify that the settings are correct (+ to + and - No sound from cube speakers • Be sure the powered Acoustimass module is plugged in the shipping carton. 15 264887_00 _V.pdf • August 13, 2002 ...


