Owner's guide
Page 3
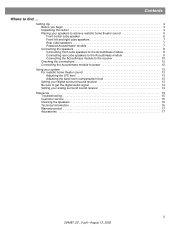
... left and right cube speakers 7 Rear cube speakers 7 Powered Acoustimass® module 7 Connecting the speakers 8 Connecting front cube speakers to the Acoustimass module 8 Connecting rear cube speakers to the Acoustimass module 9 Connecting the Acoustimass module to the receiver 10 Checking the connections 12 Connecting the Acoustimass module to power 12 Using your system 13 For realistic home theater...
... left and right cube speakers 7 Rear cube speakers 7 Powered Acoustimass® module 7 Connecting the speakers 8 Connecting front cube speakers to the Acoustimass module 8 Connecting rear cube speakers to the Acoustimass module 9 Connecting the Acoustimass module to the receiver 10 Checking the connections 12 Connecting the Acoustimass module to power 12 Using your system 13 For realistic home theater...
Owner's guide
Page 4
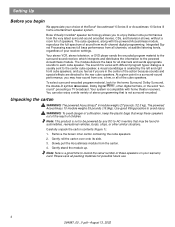
...carton WARNING: The powered Acoustimass® 6 module weighs 27 pounds (12.3 kg). The powered Acoustimass 10 module weighs 35 pounds (15.9kg). At a given point in a surround-sound performance, you begin We appreciate your choice of the Bose® Acoustimass® 6 Series III or Acoustimass 10 Series III home entertainment speaker system... is not surround-encoded. Setting Up Before you may be powered by the left and right front cube speakers, and you feel as if you to each cube speaker. Bose Virtually Invisible® speaker technology allows you are in automobiles,...
...carton WARNING: The powered Acoustimass® 6 module weighs 27 pounds (12.3 kg). The powered Acoustimass 10 module weighs 35 pounds (15.9kg). At a given point in a surround-sound performance, you begin We appreciate your choice of the Bose® Acoustimass® 6 Series III or Acoustimass 10 Series III home entertainment speaker system... is not surround-encoded. Setting Up Before you may be powered by the left and right front cube speakers, and you feel as if you to each cube speaker. Bose Virtually Invisible® speaker technology allows you are in automobiles,...
Owner's guide
Page 5
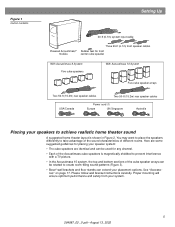
...8226; Bose® wall brackets and floor stands can be used for front center cube speaker With Acoustimass 6 System Five cube speakers With Acoustimass 10 System Five cube speaker arrays Two 50-ft (15.2m) rear speaker cables Two 50-ft (15.2m) rear speaker cables USA/Canada Power cord ...(1) Europe UK/Singapore Australia Placing your speakers to prevent interference with a TV picture. • In the Acoustimass 10 system, the top and bottom sections of different rooms. Here are identical and ...
...8226; Bose® wall brackets and floor stands can be used for front center cube speaker With Acoustimass 6 System Five cube speakers With Acoustimass 10 System Five cube speaker arrays Two 50-ft (15.2m) rear speaker cables Two 50-ft (15.2m) rear speaker cables USA/Canada Power cord ...(1) Europe UK/Singapore Australia Placing your speakers to prevent interference with a TV picture. • In the Acoustimass 10 system, the top and bottom sections of different rooms. Here are identical and ...
Owner's guide
Page 7
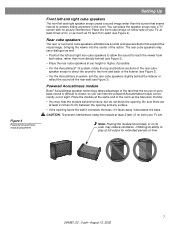
... a sound image wider than from directly behind the listener or reflect the sound off the rear wall (see Figure 3). Powered Acoustimass module Bose® Acoustimass speaker technology takes advantage of the fact that seems natural to viewers sitting anywhere in the room. Be sure there are at full ...To prevent interference, keep the module at least 2 feet (.6 m) from your TV, at ear height or higher, if possible. • For the Acoustimass® 10 system, rotate the top and bottom sections of the rear cube speaker arrays to direct the sound to the front and back of the action...
... a sound image wider than from directly behind the listener or reflect the sound off the rear wall (see Figure 3). Powered Acoustimass module Bose® Acoustimass speaker technology takes advantage of the fact that seems natural to viewers sitting anywhere in the room. Be sure there are at full ...To prevent interference, keep the module at least 2 feet (.6 m) from your TV, at ear height or higher, if possible. • For the Acoustimass® 10 system, rotate the top and bottom sections of the rear cube speaker arrays to direct the sound to the front and back of the action...
Owner's guide
Page 8
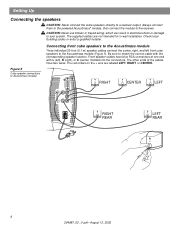
...connectors at one end with the corresponding speaker location. The supplied cables are labeled LEFT, RIGHT, or CENTER. Connecting front cube speakers to the Acoustimass module Three individual 20-foot (6.1 m) speaker cables connect the center, right, and left ), R (right), or C (center) molded into...Never use broken or frayed wiring, which can result in -wall installation. Be sure to a receiver output. Always connect them to the powered Acoustimass® module, then connect the module to your system. Check local building codes or enlist a qualified installer. Setting Up ...
...connectors at one end with the corresponding speaker location. The supplied cables are labeled LEFT, RIGHT, or CENTER. Connecting front cube speakers to the Acoustimass module Three individual 20-foot (6.1 m) speaker cables connect the center, right, and left ), R (right), or C (center) molded into...Never use broken or frayed wiring, which can result in -wall installation. Be sure to a receiver output. Always connect them to the powered Acoustimass® module, then connect the module to your system. Check local building codes or enlist a qualified installer. Setting Up ...
Owner's guide
Page 10
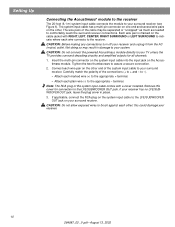
CAUTION: Do not connect the powered Acoustimass module directly to your receiver has no LFE/SUBWOOFER OUT jack, leave the plug cover in damage to your receiver. 10 264887_00 _V.pdf • August 13, 2002 to -). • Attach each marked wire (+) to the appropriate + terminal. &#...all channels. 1. Connect each other; Note: The RCA plug of the connections (+ to assure a secure connection. 2. Setting Up Connecting the Acoustimass® module to the receiver The 20-foot (6.1 m) system input cable connects the module to your surround receiver. CAUTION: Before making any ...
CAUTION: Do not connect the powered Acoustimass module directly to your receiver has no LFE/SUBWOOFER OUT jack, leave the plug cover in damage to your receiver. 10 264887_00 _V.pdf • August 13, 2002 to -). • Attach each marked wire (+) to the appropriate + terminal. &#...all channels. 1. Connect each other; Note: The RCA plug of the connections (+ to assure a secure connection. 2. Setting Up Connecting the Acoustimass® module to the receiver The 20-foot (6.1 m) system input cable connects the module to your surround receiver. CAUTION: Before making any ...
Owner's guide
Page 12
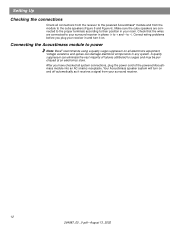
...Correct wiring problems before you have checked all system connections, plug the power cord of failures attributed to surges and may be purchased at an electronics store. Connecting the Acoustimass module to power Note: Bose® recommends using a quality surge suppressor on . Setting Up Checking... the connections Check all connections from the receiver to the powered Acoustimass® module and from your surround receiver. 12...
...Correct wiring problems before you have checked all system connections, plug the power cord of failures attributed to surges and may be purchased at an electronics store. Connecting the Acoustimass module to power Note: Bose® recommends using a quality surge suppressor on . Setting Up Checking... the connections Check all connections from the receiver to the powered Acoustimass® module and from your surround receiver. 12...
Owner's guide
Page 13
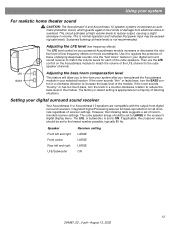
..., the crossover value should be exceeding safe levels. Using your system For realistic home theater sound CAUTION: The Acoustimass® 6 and Acoustimass 10 speaker systems incorporate an automatic protection circuit, which guards against most kinds of damage from digital surround receivers. Use...operation and indicates that power input may be set to LARGE in your digital surround LFE sound receiver to match the volume levels for a majority of listening situations. Setting your digital surround sound receiver Your Acoustimass 6 or Acoustimass 10 speakers are compatible ...
..., the crossover value should be exceeding safe levels. Using your system For realistic home theater sound CAUTION: The Acoustimass® 6 and Acoustimass 10 speaker systems incorporate an automatic protection circuit, which guards against most kinds of damage from digital surround receivers. Use...operation and indicates that power input may be set to LARGE in your digital surround LFE sound receiver to match the volume levels for a majority of listening situations. Setting your digital surround sound receiver Your Acoustimass 6 or Acoustimass 10 speakers are compatible ...
Owner's guide
Page 15
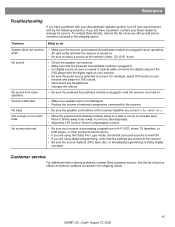
... AC wall outlet and that the receiver is turned ON. • If you are using digital programming, verify that the powered Acoustimass module is correct. Reference Troubleshooting If you have a problem, contact your Bose® dealer to arrange for DVD sound. • Disconnect any headphones. • Increase the volume. For example, select DVD...
... AC wall outlet and that the receiver is turned ON. • If you are using digital programming, verify that the powered Acoustimass module is correct. Reference Troubleshooting If you have a problem, contact your Bose® dealer to arrange for DVD sound. • Disconnect any headphones. • Increase the volume. For example, select DVD...
Owner's guide
Page 16
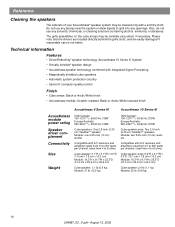
... protection circuitry • Syncom® computer quality control Finish • Cube arrays: Black or Arctic White finish • Acoustimass module: Scratch-resistant Black or Arctic White textured finish Acoustimass 6 Series III Acoustimass 10 Series III Acoustimass module power rating Speaker driver complement Connectivity Size Weight USA/Canada: 100-127V 50/60 Hz 135W Europe/Australia: 220-240V 50...
... protection circuitry • Syncom® computer quality control Finish • Cube arrays: Black or Arctic White finish • Acoustimass module: Scratch-resistant Black or Arctic White textured finish Acoustimass 6 Series III Acoustimass 10 Series III Acoustimass module power rating Speaker driver complement Connectivity Size Weight USA/Canada: 100-127V 50/60 Hz 135W Europe/Australia: 220-240V 50...
