
Owner's guide
Page 1
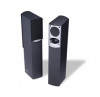
The Bose® 701® Direct/Reflecting® Series II Speakers Owner's Guide
The Bose® 701® Direct/Reflecting® Series II Speakers Owner's Guide
Owner's guide
Page 2
... located on the back panel of your 701® speakers: The lightning flash with this owner's guide. NO USER-SERVICABLE PARTS INSIDE. The exclamation point within the system enclosure that may be reproduced, modified, distributed, or otherwise used without prior written permission. It will help you set up and operate your owner's guide for use in this work may be placed on...
... located on the back panel of your 701® speakers: The lightning flash with this owner's guide. NO USER-SERVICABLE PARTS INSIDE. The exclamation point within the system enclosure that may be reproduced, modified, distributed, or otherwise used without prior written permission. It will help you set up and operate your owner's guide for use in this work may be placed on...
Owner's guide
Page 3
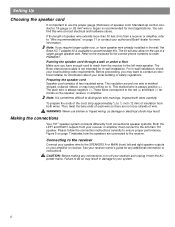
... with this owner's guide. 3 Details of each speaker. For your sales slip and warranty card together with your speakers. Serial numbers and Dealer name Dealer phone Purchase date We suggest you keep your records The serial number is located on the label on your digital receiver 9 Bass and LFE controls 9 Bass control 9 LFE level control 9 Reference Information 10 Troubleshooting 10 Technical Information 11 Customer service 11 Cleaning 11 Warranty Bose® 701® Direct/Refl...
... with this owner's guide. 3 Details of each speaker. For your sales slip and warranty card together with your speakers. Serial numbers and Dealer name Dealer phone Purchase date We suggest you keep your records The serial number is located on the label on your digital receiver 9 Bass and LFE controls 9 Bass control 9 LFE level control 9 Reference Information 10 Troubleshooting 10 Technical Information 11 Customer service 11 Cleaning 11 Warranty Bose® 701® Direct/Refl...
Owner's guide
Page 4
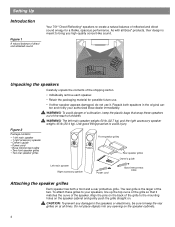
... front speaker grilles • Two rear speaker grilles Front speaker grilles Rear speaker grilles Owner's guide Left main speaker Right accessory speaker Power cord Bose interconnect cable Attaching the speaker grilles Each speaker has both speakers in the original carton and notify your speakers, line up the top curve of the grille to avoid injury. Your 701® Direct/Reflecting® speakers re-create a natural balance of reflected and direct sound energy for possible future use. •...
... front speaker grilles • Two rear speaker grilles Front speaker grilles Rear speaker grilles Owner's guide Left main speaker Right accessory speaker Power cord Bose interconnect cable Attaching the speaker grilles Each speaker has both speakers in the original carton and notify your speakers, line up the top curve of the grille to avoid injury. Your 701® Direct/Reflecting® speakers re-create a natural balance of reflected and direct sound energy for possible future use. •...

Owner's guide
Page 5
.... minimum .6 m 5 Note: Bose® 701® speakers are designed as you face the front of your room and place the right speaker on the right side of your TV screen. 2 ft. For best acoustic performance, place the left speaker on the left side as floor-standing speakers only. They are not intended to hang from walls, or to...
.... minimum .6 m 5 Note: Bose® 701® speakers are designed as you face the front of your room and place the right speaker on the right side of your TV screen. 2 ft. For best acoustic performance, place the left speaker on the left side as floor-standing speakers only. They are not intended to hang from walls, or to...
Owner's guide
Page 6
... outputs from the receiver to the red (+) and black (-) terminals on your receiver and unplug it ). Please follow the connection instructions carefully to order PN262061. You can find this . These wires correspond to the left main 701 speaker. Then, twist the bare ends of a larger gauge speaker wire. See your receiver owner's guide for any connections, turn off your amplifier or receiver. Preparing the speaker cord Speaker cord...
... outputs from the receiver to the red (+) and black (-) terminals on your receiver and unplug it ). Please follow the connection instructions carefully to order PN262061. You can find this . These wires correspond to the left main 701 speaker. Then, twist the bare ends of a larger gauge speaker wire. See your receiver owner's guide for any connections, turn off your amplifier or receiver. Preparing the speaker cord Speaker cord...
Owner's guide
Page 7
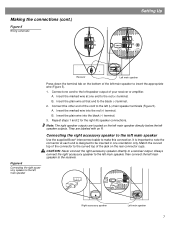
... speaker Use the supplied Bose® interconnect cable to the black (-) terminal. 2. Connect the other end of the cord to the receiver. Always connect the right accessory speaker to the left main speaker, then connect the left main speaker to the left (L) main speaker terminals (Figure 5). Making the connections (cont.) Figure 5 Wiring schematic Setting Up L L R R er Output Input LFE/ Subwoofer Figure 6 Connecting the right accessory speaker to the left main speaker L L R 125/115C 225W Power Output R Input LFE/ Subwoofer Receiver...
... speaker Use the supplied Bose® interconnect cable to the black (-) terminal. 2. Connect the other end of the cord to the receiver. Always connect the right accessory speaker to the left main speaker, then connect the left main speaker to the left (L) main speaker terminals (Figure 5). Making the connections (cont.) Figure 5 Wiring schematic Setting Up L L R R er Output Input LFE/ Subwoofer Figure 6 Connecting the right accessory speaker to the left main speaker L L R 125/115C 225W Power Output R Input LFE/ Subwoofer Receiver...
Owner's guide
Page 8
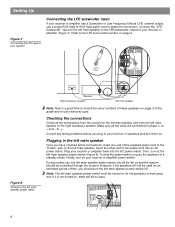
.... LFE/ Subwoofer Output L R put Input LFE/ Subwoofer Figure 8 Turning on the left main speaker to record the serial numbers of these speakers on page 3 of time, you should be no bass. Correct any wiring problems before you have checked all the connections from the receiver to the left main speaker and from the left main speaker power switch (Figure 8). However, if the speakers will be controlled through the receiver. Turning the power switch on...
.... LFE/ Subwoofer Output L R put Input LFE/ Subwoofer Figure 8 Turning on the left main speaker to record the serial numbers of these speakers on page 3 of time, you should be no bass. Correct any wiring problems before you have checked all the connections from the receiver to the left main speaker and from the left main speaker power switch (Figure 8). However, if the speakers will be controlled through the receiver. Turning the power switch on...
Owner's guide
Page 9
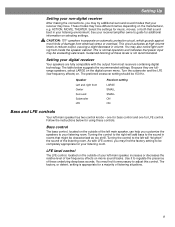
... volume. Bass control The bass control, located on movie sound tracks. As with the output from inside the speaker cabinet. LFE level control The LFE control, located on the outside of your left main speaker, increases or decreases the relative level of low frequency effects on the outside of the left main speaker has two control knobs - Setting Up Setting your non-digital receiver After making the connections, you may try additional surround sound modes...
... volume. Bass control The bass control, located on movie sound tracks. As with the output from inside the speaker cabinet. LFE level control The LFE control, located on the outside of your left main speaker, increases or decreases the relative level of low frequency effects on the outside of the left main speaker has two control knobs - Setting Up Setting your non-digital receiver After making the connections, you may try additional surround sound modes...

Owner's guide
Page 10
... to arrange for correct phone numbers. No bass Left main speaker is not plugged in or the power switch is probably defective. Use the chart below as troubleshooting guidelines. Problem Possible cause How to find out Solution One speaker doesn't play properly, call Bose or your left main speaker. especially AC power. Weak bass Subwoofer/LFE level or bass level set too low Check knob positions on . Adjust knob positions to...
... to arrange for correct phone numbers. No bass Left main speaker is not plugged in or the power switch is probably defective. Use the chart below as troubleshooting guidelines. Problem Possible cause How to find out Solution One speaker doesn't play properly, call Bose or your left main speaker. especially AC power. Weak bass Subwoofer/LFE level or bass level set too low Check knob positions on . Adjust knob positions to...

Owner's guide
Page 11
...) ferrofluid-cooled tweeter • One 3" (7.6 cm) tweeter per cabinet Compatibility Compatible with A/V receivers and amplifiers rated from 10 to 300 watts per channel, rated from 4 to drop into the speaker grilles. Do not use solvents or chemicals. Do not allow liquids to spill on maximum frequency response deviation of fices and phone numbers. See the enclosed list of Bose customer service of 0.5 dB Gauge...
...) ferrofluid-cooled tweeter • One 3" (7.6 cm) tweeter per cabinet Compatibility Compatible with A/V receivers and amplifiers rated from 10 to 300 watts per channel, rated from 4 to drop into the speaker grilles. Do not use solvents or chemicals. Do not allow liquids to spill on maximum frequency response deviation of fices and phone numbers. See the enclosed list of Bose customer service of 0.5 dB Gauge...

Owner's guide
Page 12
©2004 Bose Corporation The Mountain, Framingham, MA 01701-9168 USA 257816-ENGvo AM Rev.00
©2004 Bose Corporation The Mountain, Framingham, MA 01701-9168 USA 257816-ENGvo AM Rev.00


