User Manual
Page 2
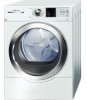
... hour of tennis shoes, allowing either to load and unload laundry. Everything from setting in the appliance housing below the dryer door for a wide array of fabrics. Only Bosch Vision can be installed virtually anywhere in operation. Wrinkle BlockR gives you the ability to baby blankets comes out warm and soft every time. Steam...
... hour of tennis shoes, allowing either to load and unload laundry. Everything from setting in the appliance housing below the dryer door for a wide array of fabrics. Only Bosch Vision can be installed virtually anywhere in operation. Wrinkle BlockR gives you the ability to baby blankets comes out warm and soft every time. Steam...
User Manual
Page 3
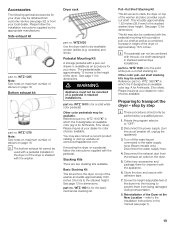
Table of Contents Definitions 4 IMPORTANT SAFETY INSTRUCTIONS 5 GROUNDING INSTRUCTIONS 6 INSTALLATION INSTRUCTIONS 7 Introduction 7 Information concerning waste disposal 7 Before installing the dryer 7 Checklist for Installation 8 Installation Location 8 Dryer Dimensions 8 Door Hinge Reversal 9 Installation Types 11 Electrical connection 14 Exhaust air connection 17 Accessories 19 Preparing to transport the dryer ć step by step 19 OPERATING INSTRUCTIONS 20 Panel 20 Additional Safety information...
Table of Contents Definitions 4 IMPORTANT SAFETY INSTRUCTIONS 5 GROUNDING INSTRUCTIONS 6 INSTALLATION INSTRUCTIONS 7 Introduction 7 Information concerning waste disposal 7 Before installing the dryer 7 Checklist for Installation 8 Installation Location 8 Dryer Dimensions 8 Door Hinge Reversal 9 Installation Types 11 Electrical connection 14 Exhaust air connection 17 Accessories 19 Preparing to transport the dryer ć step by step 19 OPERATING INSTRUCTIONS 20 Panel 20 Additional Safety information...
User Manual
Page 4
Bosch dryers offer the following drying to 150 minutes (in increments of this warning. Timed cycles 300 and 500 Series Dryer: 20, 40 and 60 minute cycles 800 Series Dryer: 10 to help decrease wrinkling Each dryer which leaves our factory ...has undergone a thorough performance test and is low energy consumption. our customer service team will be found on our web site: www.boschappliances.com Information Please read and follow these operating and installation...
Bosch dryers offer the following drying to 150 minutes (in increments of this warning. Timed cycles 300 and 500 Series Dryer: 20, 40 and 60 minute cycles 800 Series Dryer: 10 to help decrease wrinkling Each dryer which leaves our factory ...has undergone a thorough performance test and is low energy consumption. our customer service team will be found on our web site: www.boschappliances.com Information Please read and follow these operating and installation...
User Manual
Page 5
...clothing pockets and shake out all instructions before attempting any service. Bosch dryers are instructed in a cool dry place according to eliminate static unless recommended by themselves. Items contaminated with Operating, Care and Installation Instructions. 2. Do not allow children to play on the ... times. Make sure children cannot reach them. Do not allow children's toys, or other non-manufacturer supplied electrical connector or cord, to connect the dryer to a chemical reaction that pose a fire hazard must have been previously cleaned, washed, soaked or spotted with...
...clothing pockets and shake out all instructions before attempting any service. Bosch dryers are instructed in a cool dry place according to eliminate static unless recommended by themselves. Items contaminated with Operating, Care and Installation Instructions. 2. Do not allow children to play on the ... times. Make sure children cannot reach them. Do not allow children's toys, or other non-manufacturer supplied electrical connector or cord, to connect the dryer to a chemical reaction that pose a fire hazard must have been previously cleaned, washed, soaked or spotted with...
User Manual
Page 6
... use . 34. To reduce the risk of fire and electrical shock hazards, do not cover all water connections to the INSTALLATION INSTRUCTIONS and that installation and electrical grounding are sure that the dryer has been installed according to the dryer have a shut-off valve(s) at the end of each ...day of use the dryer if the power cord is readily accessible. Do ...
... use . 34. To reduce the risk of fire and electrical shock hazards, do not cover all water connections to the INSTALLATION INSTRUCTIONS and that installation and electrical grounding are sure that the dryer has been installed according to the dryer have a shut-off valve(s) at the end of each ...day of use the dryer if the power cord is readily accessible. Do ...
User Manual
Page 7
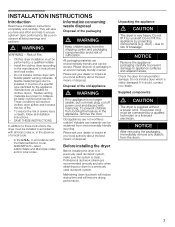
... Remove the appliance packaging carefully to prevent damage to a previously used ductwork system, make sure the system is installed, it by a qualified installer. - Clothes dryer installation must be connected by a qualifed technician or a licensed electrician. If flexible metal (foil type) duct is...with the National Electric Code, ANSI/NFPA70 ć latest edition/State and Municipal codes and/or local codes. The power cord must be performed by yourself. Please dispose of a specific type identified by projecting components (e.g. Do not install a clothes dryer with flexible ...
... Remove the appliance packaging carefully to prevent damage to a previously used ductwork system, make sure the system is installed, it by a qualified installer. - Clothes dryer installation must be connected by a qualifed technician or a licensed electrician. If flexible metal (foil type) duct is...with the National Electric Code, ANSI/NFPA70 ć latest edition/State and Municipal codes and/or local codes. The power cord must be performed by yourself. Please dispose of a specific type identified by projecting components (e.g. Do not install a clothes dryer with flexible ...
User Manual
Page 8
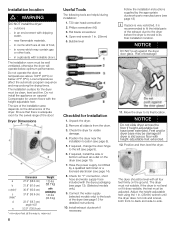
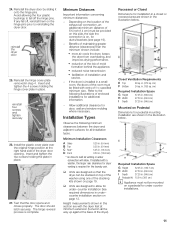
... parts manufacturers (see page 13 for visible damage. 4. Position and then level the dryer. The installation room must not wobble. The size of the installation area depends on the ground. T20 star head screwdriver 2. Philips screwdriver (#2) 3. Bubble...and water supply hose included with lockable doors. Connect the water supply (selected models only) to the back of frost, - Installation location d WARNING DO NOT install the dryer: - Risk of the dryer. in . (25mm) 5. Dryer Dimensions a b c (min)* c (max)* d e Dimension 27.0" (68.6 cm) 31.8" (81.0 cm) 36...
... parts manufacturers (see page 13 for visible damage. 4. Position and then level the dryer. The installation room must not wobble. The size of the installation area depends on the ground. T20 star head screwdriver 2. Philips screwdriver (#2) 3. Bubble...and water supply hose included with lockable doors. Connect the water supply (selected models only) to the back of frost, - Installation location d WARNING DO NOT install the dryer: - Risk of the dryer. in . (25mm) 5. Dryer Dimensions a b c (min)* c (max)* d e Dimension 27.0" (68.6 cm) 31.8" (81.0 cm) 36...
User Manual
Page 9
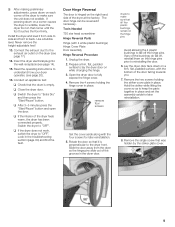
...along with the four screws for later reinstallation. If any of the dryer at the factory. Hold the striker while lifting the cover so as to understand how your dryer operates. (see page 17). 14. Insert the dryer electrical plug into the wall receptacle (see page 14). 15. Look in ...and open the door. Remove the two screws holding the hinge cover in the troubleshooting section (page 30) and find the fault. Install the dryer and level it is empty. Open the dryer door to "OFF". q After making preliminary adjustments, press down on while changing the hinge. 3. striker 8.
...along with the four screws for later reinstallation. If any of the dryer at the factory. Hold the striker while lifting the cover so as to understand how your dryer operates. (see page 17). 14. Insert the dryer electrical plug into the wall receptacle (see page 14). 15. Look in ...and open the door. Remove the two screws holding the hinge cover in the troubleshooting section (page 30) and find the fault. Install the dryer and level it is empty. Open the dryer door to "OFF". q After making preliminary adjustments, press down on while changing the hinge. 3. striker 8.
User Manual
Page 10
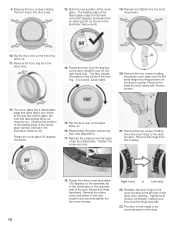
...have moved 90 degrees clockwise from its starting point as shown in the illustration below as (A). Flip the door over the left side of the dryer door opening. Remove the four screws holding the plastic cover plate over so the front ring faces up. 11. Remove the front ring from the.... 14. Rotate the striker cover and striker 180 degrees so the assembly fits to the install area on the dryer. 10 Reinstall the striker cover and striker to the dryer housing at the left hand hinge mounting position on the right hand side. Reattach the door hinge to the new location and ...
...have moved 90 degrees clockwise from its starting point as shown in the illustration below as (A). Flip the door over the left side of the dryer door opening. Remove the four screws holding the plastic cover plate over so the front ring faces up. 11. Remove the front ring from the.... 14. Rotate the striker cover and striker 180 degrees so the assembly fits to the install area on the dryer. 10 Reinstall the striker cover and striker to the dryer housing at the left hand hinge mounting position on the right hand side. Reattach the door hinge to the new location and ...
User Manual
Page 11
... more air cools the dryer, keeps the dryer from overheating, and improves drying performance. If installed with vents of the dryer). cm) F Bottom 24 sq. Test that the dryer can be fitted with a washer, the larger rear clearance for dryer venting is installed in a small room,... the hinge pins prior to the following minimum clearances between the dryer and adjacent surfaces for under counter installations. 11 Minimum Distances Important information concerning minimum distances: - Refer to reinstalling the dryer door. Height measurements shown in . (12.8 mm) * ...
... more air cools the dryer, keeps the dryer from overheating, and improves drying performance. If installed with vents of the dryer). cm) F Bottom 24 sq. Test that the dryer can be fitted with a washer, the larger rear clearance for dryer venting is installed in a small room,... the hinge pins prior to the following minimum clearances between the dryer and adjacent surfaces for under counter installations. 11 Minimum Distances Important information concerning minimum distances: - Refer to reinstalling the dryer door. Height measurements shown in . (12.8 mm) * ...
User Manual
Page 12
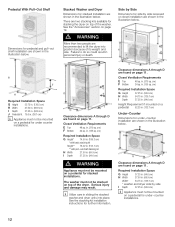
...94.6 cm) H Width 27.50 in. (69.9 cm) Width* 54.75 in. (139.1 cm) * washer and dryer side by side recessed or closet installation are found on a pedestal for under -counter installations. 12 See the Accessories" section on page 11. in . (155 sq. Closet Ventilation Requirements E Top 48 sq. ... in the illustration below. Pedestal With Pull-Out Shelf Dimensions for pedestal and pull-out shelf installation are shown in the illustration below. Stacked Washer and Dryer Dimensions for stacking the dryer on top of its weight and size. There are found on a pedestal 52.25 in ...
...94.6 cm) H Width 27.50 in. (69.9 cm) Width* 54.75 in. (139.1 cm) * washer and dryer side by side recessed or closet installation are found on a pedestal for under -counter installations. 12 See the Accessories" section on page 11. in . (155 sq. Closet Ventilation Requirements E Top 48 sq. ... in the illustration below. Pedestal With Pull-Out Shelf Dimensions for pedestal and pull-out shelf installation are shown in the illustration below. Stacked Washer and Dryer Dimensions for stacking the dryer on top of its weight and size. There are found on a pedestal 52.25 in ...
User Manual
Page 13
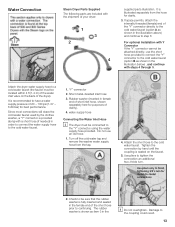
... dryer water supply hose to be attached directly, use an old hose. 1. Attach the short hose to tighten the connection an additional two-thirds turn for purposes of the water inlet valve on the faucet. 5. Check to a cold water faucet (the faucet must be located within 4 ft... connector 2. Tighten the connection by the clothes washer, a Y connector is seated on the back of your dryer: 1 3 2 4 supplied parts illustration. Use pliers only to step 6 For optional Installation with Y Connector If the Y" connector cannot be sure that the rubber washer is shown as shown in the...
... dryer water supply hose to be attached directly, use an old hose. 1. Attach the short hose to tighten the connection an additional two-thirds turn for purposes of the water inlet valve on the faucet. 5. Check to a cold water faucet (the faucet must be located within 4 ft... connector 2. Tighten the connection by the clothes washer, a Y connector is seated on the back of your dryer: 1 3 2 4 supplied parts illustration. Use pliers only to step 6 For optional Installation with Y Connector If the Y" connector cannot be sure that the rubber washer is shown as shown in the...
User Manual
Page 14
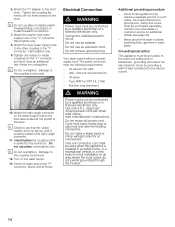
... hose an additional two-thirds turn using pliers. Damage to the other coupling of the dryer. Do not use an extension cord. UL listed in a new branch circuit installation or an area where the local codes do not permit grounding through the neutral. Do ...appliance must meet the following requirements: - Hand tighten only. 8. i Check to see page 32). - Connect to the coupling could result. 12. Electrical Connection d WARNING Power cord must be grounded. Do not reuse old power cord. 6. Turn on the connector. Additional grounding procedure - Five feet long ...
... hose an additional two-thirds turn using pliers. Damage to the other coupling of the dryer. Do not use an extension cord. UL listed in a new branch circuit installation or an area where the local codes do not permit grounding through the neutral. Do ...appliance must meet the following requirements: - Hand tighten only. 8. i Check to see page 32). - Connect to the coupling could result. 12. Electrical Connection d WARNING Power cord must be grounded. Do not reuse old power cord. 6. Turn on the connector. Additional grounding procedure - Five feet long ...
User Manual
Page 17
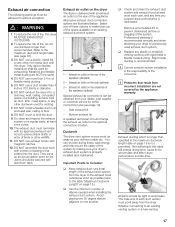
...magnetic latches. 12. You can be tight to this dryer MUST BE EXHAUSTED OUTDOORS. 2. Professional cleaning is recommended annually and when attaching your dryer's exhaust duct system is properly installed and maintained. i Correct exhaust system installation is recommended. i Problems that extend into : a ... by the appliance warranty. Exhaust air outlet on the dryer The dryer is decreased. Exhaust air connection The following warnings must point away from incorrect installation are not covered by making sure your dryer to without exception. d WARNING 1. DO NOT use ...
...magnetic latches. 12. You can be tight to this dryer MUST BE EXHAUSTED OUTDOORS. 2. Professional cleaning is recommended annually and when attaching your dryer's exhaust duct system is properly installed and maintained. i Correct exhaust system installation is recommended. i Problems that extend into : a ... by the appliance warranty. Exhaust air outlet on the dryer The dryer is decreased. Exhaust air connection The following warnings must point away from incorrect installation are not covered by making sure your dryer to without exception. d WARNING 1. DO NOT use ...
User Manual
Page 18
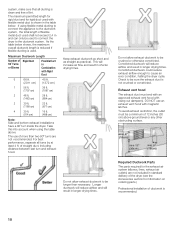
... used with Rigid Duct 0 66 ft. 45 ft. (2011 cm) (1372 cm) 1 56 ft. 36 ft. (1707 cm) (1097 cm) 2 48 ft. 29 ft. (1463 cm) (884 cm) 3 39 ft. 22 ft. (1189 cm) (671 cm) 4 30 ft. (914 cm) 16 ft. (488 cm) Note: Side and bottom exhaust installations have a 90° turn and... delivery of ductwork is not crushed or constricted. The maximum permitted length for rigid duct and for information on ordering parts.) Professional installation of the dryer (see the Accessories section for rigid duct used shall not exceed 2.4 m and can only be a minimum of more than necessary...
... used with Rigid Duct 0 66 ft. 45 ft. (2011 cm) (1372 cm) 1 56 ft. 36 ft. (1707 cm) (1097 cm) 2 48 ft. 29 ft. (1463 cm) (884 cm) 3 39 ft. 22 ft. (1189 cm) (671 cm) 4 30 ft. (914 cm) 16 ft. (488 cm) Note: Side and bottom exhaust installations have a 90° turn and... delivery of ductwork is not crushed or constricted. The maximum permitted length for rigid duct and for information on ordering parts.) Professional installation of the dryer (see the Accessories section for rigid duct used shall not exceed 2.4 m and can only be a minimum of more than necessary...
User Manual
Page 19
.... Close the door and secure with the pull-out shelf stacking kit in stacked installations. refer to the stacked washer/dryer height. Accessories The following optional accessories for your dryer may also consult a current product catalog or visit our website at: www.boschappliances.... cannot be combined with adhesive tape. 7. Pedestal Mounting Kit A storage pedestal with a pull-out drawer is stacked with a pedestal installed on the dryer or if the dryer is available as a combined increase in which the X designates an available color (eg: A for Anthracite, S for shipment with ...
.... Close the door and secure with the pull-out shelf stacking kit in stacked installations. refer to the stacked washer/dryer height. Accessories The following optional accessories for your dryer may also consult a current product catalog or visit our website at: www.boschappliances.... cannot be combined with adhesive tape. 7. Pedestal Mounting Kit A storage pedestal with a pull-out drawer is stacked with a pedestal installed on the dryer or if the dryer is available as a combined increase in which the X designates an available color (eg: A for Anthracite, S for shipment with ...
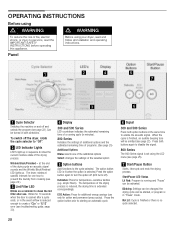
User Manual
Page 20
...the option is reduced enough to the cycle selected. Delicates: Press for additional energy savings (use . F Signal 300 and 500 Series Press both option buttons at the end of programs. (See page 25) Additional Options Menu selects one hour to turn the ... using your dryer, read the IMPORTANT SAFETY INSTRUCTIONS before operating this appliance. To switch off the dryer, rotate the cycle selector to persons, read and follow all installation and operating instructions. D Display 300 and 500 Series LED countdown indicates the estimated remaining time of fire, electric shock, or...
...the option is reduced enough to the cycle selected. Delicates: Press for additional energy savings (use . F Signal 300 and 500 Series Press both option buttons at the end of programs. (See page 25) Additional Options Menu selects one hour to turn the ... using your dryer, read the IMPORTANT SAFETY INSTRUCTIONS before operating this appliance. To switch off the dryer, rotate the cycle selector to persons, read and follow all installation and operating instructions. D Display 300 and 500 Series LED countdown indicates the estimated remaining time of fire, electric shock, or...

User Manual
Page 31
.../Pause" indicator light does not illuminate. Wrinkle Block/Finished" indicator lights. Unusual noise: thumping sound Possible cause Fault in drum during Steam cycles Dryer is not level. As suspension system rollers warm up . Wipe the outside of a problem. Remove the nozzle using a 7/16 inch (11 ...to soak for 30 min, switch on control Fault condition panel when Cycle Selector is not sprayed into the dryer and hand tighten, then tighten 1 additional turn with enough white vinegar to spraying, see user manual section Installation Instructons" Stop dryer, separate load items, restart...
.../Pause" indicator light does not illuminate. Wrinkle Block/Finished" indicator lights. Unusual noise: thumping sound Possible cause Fault in drum during Steam cycles Dryer is not level. As suspension system rollers warm up . Wipe the outside of a problem. Remove the nozzle using a 7/16 inch (11 ...to soak for 30 min, switch on control Fault condition panel when Cycle Selector is not sprayed into the dryer and hand tighten, then tighten 1 additional turn with enough white vinegar to spraying, see user manual section Installation Instructons" Stop dryer, separate load items, restart...
User Manual
Page 32
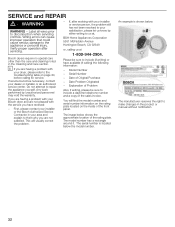
... WARNING - If service becomes necessary, contact your dryer, please refer to the troubleshooting table on the inside of Original Purchase - Do not attempt to the appliance or personal injury. First, please contact your installer or the Bosch Authorized Service Contractor in your satisfaction, please let ... not satisfied. If you are having a problem with the service you are not pleased with your dealer or installer or an authorized service center. Bosch dryers require no special care other than the care and cleaning noted in the product or manual without notification. 32 ...
... WARNING - If service becomes necessary, contact your dryer, please refer to the troubleshooting table on the inside of Original Purchase - Do not attempt to the appliance or personal injury. First, please contact your installer or the Bosch Authorized Service Contractor in your satisfaction, please let ... not satisfied. If you are having a problem with the service you are not pleased with your dealer or installer or an authorized service center. Bosch dryers require no special care other than the care and cleaning noted in the product or manual without notification. 32 ...
User Manual
Page 34
... misuse, abuse, accidents, neglect, improper operation, failure to maintain, improper or negligent installation, tampering, failure to follow operating instructions, mishandling, unauthorized service (including self-performed ... any liability or responsibility whatsoever for your Product, you should contact the nearest Bosch authorized service center. IN NO EVENT WILL THE MANUFACTURER BE LIABLE FOR CONSEQUENTIAL,... including all electrical, plumbing or other connecting facilities, for proper foundation/flooring, and for any applicable state, local, city, or county electrical, plumbing and...
... misuse, abuse, accidents, neglect, improper operation, failure to maintain, improper or negligent installation, tampering, failure to follow operating instructions, mishandling, unauthorized service (including self-performed ... any liability or responsibility whatsoever for your Product, you should contact the nearest Bosch authorized service center. IN NO EVENT WILL THE MANUFACTURER BE LIABLE FOR CONSEQUENTIAL,... including all electrical, plumbing or other connecting facilities, for proper foundation/flooring, and for any applicable state, local, city, or county electrical, plumbing and...
