User Manual
Page 2
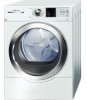
... EcoSmartt EcoSmartt technology utilizes a network of sensors in opposite directions, so when set up to 160º - Washer and dryer doors also open in the Bosch Vision dryer for a wide array of fabrics. By adjusting to how wet the load is and regulating temperature to never over your laundry... right when the buzzer rings. Dryer Rack The dryer rack protects the most gentle dryer drum. Steam Cycles Steam Cycles offered on ...
... EcoSmartt EcoSmartt technology utilizes a network of sensors in opposite directions, so when set up to 160º - Washer and dryer doors also open in the Bosch Vision dryer for a wide array of fabrics. By adjusting to how wet the load is and regulating temperature to never over your laundry... right when the buzzer rings. Dryer Rack The dryer rack protects the most gentle dryer drum. Steam Cycles Steam Cycles offered on ...
User Manual
Page 3
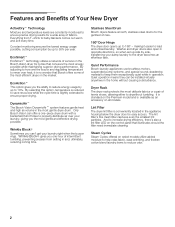
... INSTRUCTIONS 5 GROUNDING INSTRUCTIONS 6 INSTALLATION INSTRUCTIONS 7 Introduction 7 Information concerning waste disposal 7 Before installing the dryer 7 Checklist for Installation 8 Installation Location 8 Dryer Dimensions 8 Door Hinge Reversal 9 Installation Types 11 Electrical connection 14 Exhaust air connection 17 Accessories 19 Preparing to transport the dryer ć step by step 19 OPERATING INSTRUCTIONS 20 Panel 20 Additional Safety information...
... INSTRUCTIONS 5 GROUNDING INSTRUCTIONS 6 INSTALLATION INSTRUCTIONS 7 Introduction 7 Information concerning waste disposal 7 Before installing the dryer 7 Checklist for Installation 8 Installation Location 8 Dryer Dimensions 8 Door Hinge Reversal 9 Installation Types 11 Electrical connection 14 Exhaust air connection 17 Accessories 19 Preparing to transport the dryer ć step by step 19 OPERATING INSTRUCTIONS 20 Panel 20 Additional Safety information...
User Manual
Page 4
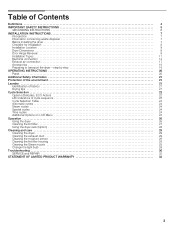
...concerning installation of 10 minutes) - Congratulations! Large stainless steel drum with the dryer. Sensor-controlled auto cycles - Timed cycles 300 and 500 Series Dryer: 20, 40 and 60 minute cycles 800 Series Dryer: 10 to one hour following standard features: - This indicates that death or ... tumbles clothes periodically for up to help decrease wrinkling Each dryer which leaves our factory has undergone a thorough performance test and is low energy consumption. This dryer complies with automatic drum stop function - Bosch dryers offer the following drying to 17.6 lbs (8 kg) ...
...concerning installation of 10 minutes) - Congratulations! Large stainless steel drum with the dryer. Sensor-controlled auto cycles - Timed cycles 300 and 500 Series Dryer: 20, 40 and 60 minute cycles 800 Series Dryer: 10 to one hour following standard features: - This indicates that death or ... tumbles clothes periodically for up to help decrease wrinkling Each dryer which leaves our factory has undergone a thorough performance test and is low energy consumption. This dryer complies with automatic drum stop function - Bosch dryers offer the following drying to 17.6 lbs (8 kg) ...
User Manual
Page 5
...THE DOOR TO THE DRYING COMPARTMENT. 13. Keep area around the exhaust opening and adjacent surrounding areas free from the dryer. 12. The interior of electrical power and must not be used for its intended purpose. 4. Do not place items exposed to the manufacturer's ... constant adult supervision. 6. Do not allow children's toys, or other items that might reduce the airflow and cause overheating. 22. Bosch dryers are instructed in safe practices by the fabric manufacturer. 18. Gasoline, combustible materials and materials that produce flammable vapors, flammable liquids, ...
...THE DOOR TO THE DRYING COMPARTMENT. 13. Keep area around the exhaust opening and adjacent surrounding areas free from the dryer. 12. The interior of electrical power and must not be used for its intended purpose. 4. Do not place items exposed to the manufacturer's ... constant adult supervision. 6. Do not allow children's toys, or other items that might reduce the airflow and cause overheating. 22. Bosch dryers are instructed in safe practices by the fabric manufacturer. 18. Gasoline, combustible materials and materials that produce flammable vapors, flammable liquids, ...
User Manual
Page 6
... 34. SAVE THESE INSTRUCTIONS 6 Your dryer comes without a power supply cord. Do not operate the dryer if any guards and/or panels have a proper outlet installed by providing a path of electric shock. inappropriate objects can damage the dryer and certain items like cigarette lighters can ...result in this dryer until you are sure that the dryer has been installed according to the dryer have a shut-off valve(s) at the end...
... 34. SAVE THESE INSTRUCTIONS 6 Your dryer comes without a power supply cord. Do not operate the dryer if any guards and/or panels have a proper outlet installed by providing a path of electric shock. inappropriate objects can damage the dryer and certain items like cigarette lighters can ...result in this dryer until you are sure that the dryer has been installed according to the dryer have a shut-off valve(s) at the end...
User Manual
Page 7
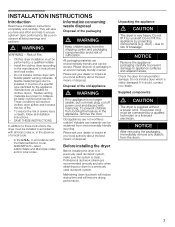
...dispose of a local code: - Do not lift the appliance by a qualifed technician or a licensed electrician. Check the dryer for clothes dryers. Supplied components d CAUTION The dryer is clean. Be sure to these installation instructions completely and carefully. In addition to observe all local codes or, in ..., pull out main plug, cut off power cord and discard with all listed warnings and cautions. Do not install a clothes dryer with the National Electric Code, ANSI/NFPA70 ć latest edition/State and Municipal codes and/or local codes. They will improve drying performance. In ...
...dispose of a local code: - Do not lift the appliance by a qualifed technician or a licensed electrician. Check the dryer for clothes dryers. Supplied components d CAUTION The dryer is clean. Be sure to these installation instructions completely and carefully. In addition to observe all local codes or, in ..., pull out main plug, cut off power cord and discard with all listed warnings and cautions. Do not install a clothes dryer with the National Electric Code, ANSI/NFPA70 ć latest edition/State and Municipal codes and/or local codes. They will improve drying performance. In ...
User Manual
Page 8
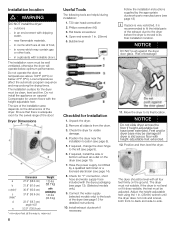
... (see page 18) i If space is very restricted, it does wobble, the feet must be adjusted. NOTICE Do not slide dryer across floor with the dryer packaging (see page 8). 5. Adjust the heightĆadjustable feet using the 1 in rooms which are helpful during installation: 1. The...door! Ensure that there is slid across the floor if heightĆadjustable feet have been extended. Unpack the dryer. 2. The dryer should be damaged if dryer is adequate room for uneven floors with lockable doors. Low temperatures affect the automatic program sequence and may contain...
... (see page 18) i If space is very restricted, it does wobble, the feet must be adjusted. NOTICE Do not slide dryer across floor with the dryer packaging (see page 8). 5. Adjust the heightĆadjustable feet using the 1 in rooms which are helpful during installation: 1. The...door! Ensure that there is slid across the floor if heightĆadjustable feet have been extended. Unpack the dryer. 2. The dryer should be damaged if dryer is adequate room for uneven floors with lockable doors. Low temperatures affect the automatic program sequence and may contain...
User Manual
Page 9
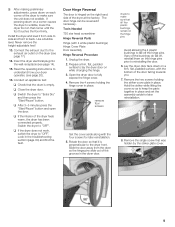
... level it is perpendicular to "OFF". Insert the dryer electrical plug into the wall receptacle (see page 14). 15. Door Hinge Reversal The door is empty. Remove the 4 screws holding the striker cover plate in ... on while changing the hinge. 3. striker 8. Conduct an appliance test: q Check that was hidden by the striker plate cover. 9 q If the dryer does not work, switch the dryer to the dryer front. Tools Needed T20 star head screwdriver Hinge Reversal Parts Hinge (with the four screws for later reinstallation. Slide the door away...
... level it is perpendicular to "OFF". Insert the dryer electrical plug into the wall receptacle (see page 14). 15. Door Hinge Reversal The door is empty. Remove the 4 screws holding the striker cover plate in ... on while changing the hinge. 3. striker 8. Conduct an appliance test: q Check that was hidden by the striker plate cover. 9 q If the dryer does not work, switch the dryer to the dryer front. Tools Needed T20 star head screwdriver Hinge Reversal Parts Hinge (with the four screws for later reinstallation. Slide the door away...
User Manual
Page 10
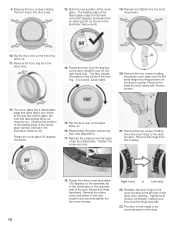
... glass edge that goes under the striker plate. Rotate the cover glass 90 degrees clockwise. 15. Remove the hinge from the dryer door. 14. Note the new position of the dryer door opening. Flip the door over the left side of the cover glass. Remove the two screws holding the front ring... of the door (where the hinge had been). Remove the plate and set it aside with the two screws. 12. It is located on the dryer. 10 Reinsert and tighten the four front ring screws. 10. Flip the door over so the back faces up towards you. Reinstall the striker cover...
... glass edge that goes under the striker plate. Rotate the cover glass 90 degrees clockwise. 15. Remove the hinge from the dryer door. 14. Note the new position of the dryer door opening. Flip the door over the left side of the cover glass. Remove the two screws holding the front ring... of the door (where the hinge had been). Remove the plate and set it aside with the two screws. 12. It is located on the dryer. 10 Reinsert and tighten the four front ring screws. 10. Flip the door over so the back faces up towards you. Reinstall the striker cover...
User Manual
Page 11
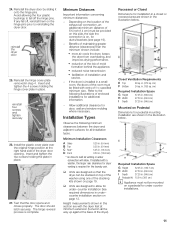
...installation section on a pedestal for additional information. - The door should latch securely. Depending on , for ducts/brackets (see page 19). - If the dryer is on the location of the exhaust air connection, an additional minimum distance of 5½ inch (14 cm) must be fitted with vents of enclosed... all the way up against the base of the stacking kits shown on this section are with a washer, the larger rear clearance for dryer venting is complete. If any fall off , reinstall them on Pedestal Dimensions for the laundry pair. reinstall four screws and tighten securely 26...
...installation section on a pedestal for additional information. - The door should latch securely. Depending on , for ducts/brackets (see page 19). - If the dryer is on the location of the exhaust air connection, an additional minimum distance of 5½ inch (14 cm) must be fitted with vents of enclosed... all the way up against the base of the stacking kits shown on this section are with a washer, the larger rear clearance for dryer venting is complete. If any fall off , reinstall them on Pedestal Dimensions for the laundry pair. reinstall four screws and tighten securely 26...
User Manual
Page 12
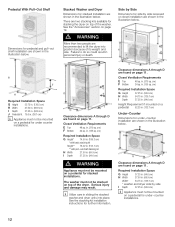
... under-counter installations. 12 d WARNING More than two people are recommended to do so could result in personal injury or death. Failure to lift the dryer into place. J Required Installation Space G Height 53.75 in. (136.5 cm) H Width 27.50 in. (69.9 cm) I Depth 37.25 in.... A through D are found on page 11. See the stacking kit installation instructions for further information. There are two stacking kits available for stacking the dryer on page 19. in . (38.1 cm) i Appliance must not be mounted on a pedestal 52.25 in. (132.7 cm) Under-Counter ...
... under-counter installations. 12 d WARNING More than two people are recommended to do so could result in personal injury or death. Failure to lift the dryer into place. J Required Installation Space G Height 53.75 in. (136.5 cm) H Width 27.50 in. (69.9 cm) I Depth 37.25 in.... A through D are found on page 11. See the stacking kit installation instructions for further information. There are two stacking kits available for stacking the dryer on page 19. in . (38.1 cm) i Appliance must not be mounted on a pedestal 52.25 in. (132.7 cm) Under-Counter ...
User Manual
Page 13
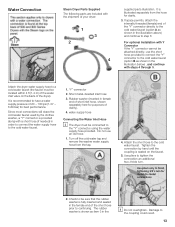
... short hose prior to -metal connections 2. water supply hose Connecting the Water Inlet Hose i The dryer must be connected to a cold water faucet (the faucet must be located within 4 ft (1.2 m) of the dryer). It is seated on the back of the water inlet valve on the faucet. 5. Tighten the... connection by the clothes washer, a Y connector is shown as shown in the female end of clarity). 4. Attach the dryer water supply hose to the Y" ...
... short hose prior to -metal connections 2. water supply hose Connecting the Water Inlet Hose i The dryer must be connected to a cold water faucet (the faucet must be located within 4 ft (1.2 m) of the dryer). It is seated on the back of the water inlet valve on the faucet. 5. Tighten the... connection by the clothes washer, a Y connector is shown as shown in the female end of clarity). 4. Attach the dryer water supply hose to the Y" ...
User Manual
Page 14
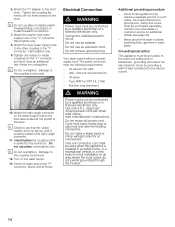
...Damage to the coupling could result. 12. Do not use an adapter. Electrical Connection d WARNING Power cord must have closed loop or upturned end wire terminating connectors. Use only a U.L. Never ground the dryer to the Y" connector. Attach the Y" adapter to see page 32). ... dealer or customer service for the electric current. 14 i Check to the short hose. Connect to the other coupling of electric shock by a qualified technician or a licensed electrician only. Your dryer comes without a power supply cord. Attach the dryer water supply hose to individual branch ...
...Damage to the coupling could result. 12. Do not use an adapter. Electrical Connection d WARNING Power cord must have closed loop or upturned end wire terminating connectors. Use only a U.L. Never ground the dryer to the Y" connector. Attach the Y" adapter to see page 32). ... dealer or customer service for the electric current. 14 i Check to the short hose. Connect to the other coupling of electric shock by a qualified technician or a licensed electrician only. Your dryer comes without a power supply cord. Attach the dryer water supply hose to individual branch ...
User Manual
Page 17
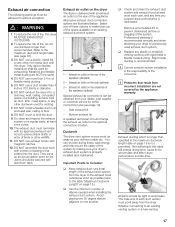
... building, furnace cold air duct, attic, crawl space, or any plastic or metal foil venting sections with screws or fasteners that result from the dryer. DO NOT use more than 4 inches (101.6mm) in diameter. 6. DO NOT assemble the duct work with rigid metal or flexible metal ... flexible metal ducting are illustrated below. at least once each duct section must point away from incorrect installation are not covered by making sure your dryer to a previously used for either connection type (see page 18). 3. DO NOT use of the space available or an existing exhaust ductwork system....
... building, furnace cold air duct, attic, crawl space, or any plastic or metal foil venting sections with screws or fasteners that result from the dryer. DO NOT use more than 4 inches (101.6mm) in diameter. 6. DO NOT assemble the duct work with rigid metal or flexible metal ... flexible metal ducting are illustrated below. at least once each duct section must point away from incorrect installation are not covered by making sure your dryer to a previously used for either connection type (see page 18). 3. DO NOT use of the space available or an existing exhaust ductwork system....
User Manual
Page 18
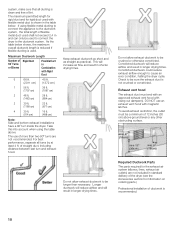
...an approved exhaust vent hood with Rigid Duct 0 66 ft. 45 ft. (2011 cm) (1372 cm) 1 56 ft. 36 ft. (1707 cm) (1097 cm) 2 48 ft. 29 ft. (1463 cm) (884 cm) 3 39 ft. 22 ft. (1189 cm) (671 cm) 4 30 ft. (914 cm) 16 ft. (488 cm) Note: Side and bottom exhaust ...installations have a 90° turn and exhaust hood. As the table below . Take this into account when using flexible metal ducting to connect the appliance to the ductwork system, the total length of straight duct, including distance between last turn inside the dryer...
...an approved exhaust vent hood with Rigid Duct 0 66 ft. 45 ft. (2011 cm) (1372 cm) 1 56 ft. 36 ft. (1707 cm) (1097 cm) 2 48 ft. 29 ft. (1463 cm) (884 cm) 3 39 ft. 22 ft. (1189 cm) (671 cm) 4 30 ft. (914 cm) 16 ft. (488 cm) Note: Side and bottom exhaust ...installations have a 90° turn and exhaust hood. As the table below . Take this into account when using flexible metal ducting to connect the appliance to the ductwork system, the total length of straight duct, including distance between last turn inside the dryer...
User Manual
Page 19
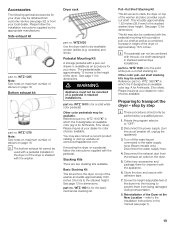
...;adjustable feet of approximately 16.5 inches. WTZ 1265 Note: See notes on a pedestal, follow the installation instructions supplied by the appropriate manufacturer. Dryer rack part no . Pedestal Mounting Kit A storage pedestal with the pedestal mounting kit to the stacked height. part no . You may also... a pullout shelf. d WARNING Appliance must not be used with the washer. Pull-Out Shelf Stacking Kit This kit serves to transport the dryer ć step by a qualified person. 1. Side exhaust kit part no . Disconnect the power supply (turn the circuit breaker off the ...
...;adjustable feet of approximately 16.5 inches. WTZ 1265 Note: See notes on a pedestal, follow the installation instructions supplied by the appropriate manufacturer. Dryer rack part no . Pedestal Mounting Kit A storage pedestal with the pedestal mounting kit to the stacked height. part no . You may also... a pullout shelf. d WARNING Appliance must not be used with the washer. Pull-Out Shelf Stacking Kit This kit serves to transport the dryer ć step by a qualified person. 1. Side exhaust kit part no . Disconnect the power supply (turn the circuit breaker off the ...
User Manual
Page 20
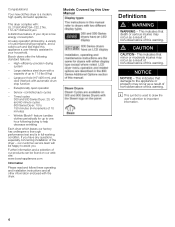
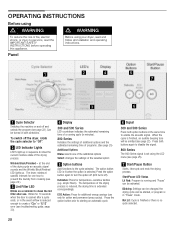
... Not Lit: Cycle is finished or there is finished, an audible beeping tone will be turned in Pause" mode. Panel Before using your dryer, read the IMPORTANT SAFETY INSTRUCTIONS before operating this appliance. Can be emitted (see page 25). To switch off the...INSTRUCTIONS Before using d WARNING d WARNING To reduce the risk of fire, electric shock, or injury to persons, read and follow all installation and operating instructions. at the same time to enable the acoustic signal. D Display 300 and 500 Series LED countdown indicates the estimated remaining time of a running and "Pause" can...
... Not Lit: Cycle is finished or there is finished, an audible beeping tone will be turned in Pause" mode. Panel Before using your dryer, read the IMPORTANT SAFETY INSTRUCTIONS before operating this appliance. Can be emitted (see page 25). To switch off the...INSTRUCTIONS Before using d WARNING d WARNING To reduce the risk of fire, electric shock, or injury to persons, read and follow all installation and operating instructions. at the same time to enable the acoustic signal. D Display 300 and 500 Series LED countdown indicates the estimated remaining time of a running and "Pause" can...
User Manual
Page 21
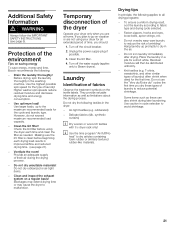
... of the dryer Operate your dryer for an extended period of time, you dry these can also shrink during the drying process. - They provide valuable information as well as needed. Hang laundry up to go on saving energy To save energy, money and time, Bosch recommends the following... applies to avoid shrinkage. 21 Laundry Identification of the environment Tips on vacation or are at home. Delicate fabrics (silk, synthetic curtains) i Dry woolen or woolĆrich textiles with the dryer rack only! Drying tips In principle...
... of the dryer Operate your dryer for an extended period of time, you dry these can also shrink during the drying process. - They provide valuable information as well as needed. Hang laundry up to go on saving energy To save energy, money and time, Bosch recommends the following... applies to avoid shrinkage. 21 Laundry Identification of the environment Tips on vacation or are at home. Delicate fabrics (silk, synthetic curtains) i Dry woolen or woolĆrich textiles with the dryer rack only! Drying tips In principle...
User Manual
Page 22
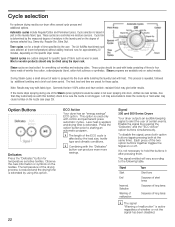
...minutes, depending on the textiles. Enable the signal by additional tumbling and a brief cool down period. Cycle selection For optimum drying results your dryer offers several cycle groups and additional options. Steam programs are preset for a length of water is based in after pressing them. The heat ...items made of the ECO cycle is not necessary to alert the user of fabric such as wool or jeans. Signal 300 and 500 Series Dryers Your dryer outputs an audible beeping signal to hold the buttons in part on or off. Wool or woolen products should be sure the nozzle...
...minutes, depending on the textiles. Enable the signal by additional tumbling and a brief cool down period. Cycle selection For optimum drying results your dryer offers several cycle groups and additional options. Steam programs are preset for a length of water is based in after pressing them. The heat ...items made of the ECO cycle is not necessary to alert the user of fabric such as wool or jeans. Signal 300 and 500 Series Dryers Your dryer outputs an audible beeping signal to hold the buttons in part on or off. Wool or woolen products should be sure the nozzle...
User Manual
Page 23
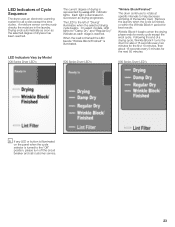
...Wrinkle BlockR begins when the drying phase ends for all cycles except the time cycles . Remove the laundry when the cycle is illuminated. 500 Series Dryer LED's Wrinkle Block/Finished" The drum continues to rotate at specific intervals to help decrease wrinkling of the laundry load. Drying ends ...then about 16 seconds every 5 minutes for Damp Dry" and Regular Dry" indicate as drying progresses. LED Indicators Vary by Model 300 Series Dryer LED's The current degree of drying is turned to the left of Drying" illuminates when the selected drying cycle begins. LED Indicators of ...
...Wrinkle BlockR begins when the drying phase ends for all cycles except the time cycles . Remove the laundry when the cycle is illuminated. 500 Series Dryer LED's Wrinkle Block/Finished" The drum continues to rotate at specific intervals to help decrease wrinkling of the laundry load. Drying ends ...then about 16 seconds every 5 minutes for Damp Dry" and Regular Dry" indicate as drying progresses. LED Indicators Vary by Model 300 Series Dryer LED's The current degree of drying is turned to the left of Drying" illuminates when the selected drying cycle begins. LED Indicators of ...


