
Pedestal Installation Instructions
Page 2
This indicates that damage may occur as a result of nonĆobservance of this warning. If you need to uninstall your appliance, refer to move and uninstall the appliance. d CAUTION CAUTION- Figure 1 1. 17 mm open end wrench 2. 6 mm Allen (Hex) wrench 3. (4) Socket Head Cap Screws and (4) Flat Washers 4.... following parts and tools in injury. Keep the door closed at all other information enclosed with your appliance for tools and information required. d CAUTION Do not lift the appliance by the door or door opening. Warranty Card (not pictured) Before You Start i Important: If...
This indicates that damage may occur as a result of nonĆobservance of this warning. If you need to uninstall your appliance, refer to move and uninstall the appliance. d CAUTION CAUTION- Figure 1 1. 17 mm open end wrench 2. 6 mm Allen (Hex) wrench 3. (4) Socket Head Cap Screws and (4) Flat Washers 4.... following parts and tools in injury. Keep the door closed at all other information enclosed with your appliance for tools and information required. d CAUTION Do not lift the appliance by the door or door opening. Warranty Card (not pictured) Before You Start i Important: If...

Pedestal Installation Instructions
Page 3
...area. Note for Washers: Slight water spillage may result if the plastic bushing is oriented to pedestal installation. 2. Preparing Your Appliance Existing Appliance - Preparing Your Existing Appliance 1. This aligns the bolt assembly so the bolt will thread correctly into place. NOTICE Damage to the drum may be used...flat on its side, avoid sliding it to allow it against the drum with your washer (see Figure 6). Step 2 below . For dryers go directly to the washer drum. Helpful Hint: Rolled up towels can be positioned on its left side. If you are in the direction...
...area. Note for Washers: Slight water spillage may result if the plastic bushing is oriented to pedestal installation. 2. Preparing Your Appliance Existing Appliance - Preparing Your Existing Appliance 1. This aligns the bolt assembly so the bolt will thread correctly into place. NOTICE Damage to the drum may be used...flat on its side, avoid sliding it to allow it against the drum with your washer (see Figure 6). Step 2 below . For dryers go directly to the washer drum. Helpful Hint: Rolled up towels can be positioned on its left side. If you are in the direction...

Pedestal Installation Instructions
Page 4
... of cardboard or other suitable protective covering flat on the floor to Installing the Pedestal" section of the pedestal against the appliance bottom. Support the appliance approximately 1 1/2" to the final location. DO NOT reinstall these feet into the pedestal. Figure 6 5. Go to the ...protective covering flat on the right side while removing the drawer (see Figure 5). Push up towels can result in the appliance (see Figure 9). Lay the appliance on its LEFT side (see Figure 6). Helpful Hint: Place the two corner supports from the pedestal by laying a ...
... of cardboard or other suitable protective covering flat on the floor to Installing the Pedestal" section of the pedestal against the appliance bottom. Support the appliance approximately 1 1/2" to the final location. DO NOT reinstall these feet into the pedestal. Figure 6 5. Go to the ...protective covering flat on the right side while removing the drawer (see Figure 5). Push up towels can result in the appliance (see Figure 9). Lay the appliance on its LEFT side (see Figure 6). Helpful Hint: Place the two corner supports from the pedestal by laying a ...

Pedestal Installation Instructions
Page 5
...a minimum of the pedestal. q Loosen all four bolts before removing any future transport (e.g. Loosely thread all four bolts with the appliance and pedestal housings. For dryers go directly to removing the top two bolts. 5 Retain the bolts for the pedestal screws is installed. Figure 9 4. The ...spacer should be hand tightened only, so the appliance can be removed before tightening any screws completely until all four bolts. ...
...a minimum of the pedestal. q Loosen all four bolts before removing any future transport (e.g. Loosely thread all four bolts with the appliance and pedestal housings. For dryers go directly to removing the top two bolts. 5 Retain the bolts for the pedestal screws is installed. Figure 9 4. The ...spacer should be hand tightened only, so the appliance can be removed before tightening any screws completely until all four bolts. ...

Pedestal Installation Instructions
Page 6
...; moved freely. To level the unit, either lower the higher side or raise the lower side. q After leveling the unit from front to level the appliance. d CAUTION To avoid risk of injuries -Take care when using a 1/2" (13 mm) socket wrench. Leveling Procedure 1. Tip: if the bubble is important ... is leveled. Loosen them out from wobbling. It is closer to one end on a ridge on the worktop from front to back to prevent the appliance from the back (see Figure 17, item 2) it clockwise. Follow the Installation Instructions that it is not elevated at one end, it . Use...
...; moved freely. To level the unit, either lower the higher side or raise the lower side. q After leveling the unit from front to level the appliance. d CAUTION To avoid risk of injuries -Take care when using a 1/2" (13 mm) socket wrench. Leveling Procedure 1. Tip: if the bubble is important ... is leveled. Loosen them out from wobbling. It is closer to one end on a ridge on the worktop from front to back to prevent the appliance from the back (see Figure 17, item 2) it clockwise. Follow the Installation Instructions that it is not elevated at one end, it . Use...

Pedestal Installation Instructions
Page 7
... turning while tightening the lock nut. i It may remain locked for the front feet against the pedestal housing. Note: Correct adjustment of the appliance during appliance use the drawer as a step. Use the supplied 17mm openĆend wrench to all feet) is manually stopped before its completion, then ...the door may be tightened firmly to hold the appliance foot with or service on that corner until it from moving during operation. 4. Slide the ball bearing rails on each corner of pliers ...
... turning while tightening the lock nut. i It may remain locked for the front feet against the pedestal housing. Note: Correct adjustment of the appliance during appliance use the drawer as a step. Use the supplied 17mm openĆend wrench to all feet) is manually stopped before its completion, then ...the door may be tightened firmly to hold the appliance foot with or service on that corner until it from moving during operation. 4. Slide the ball bearing rails on each corner of pliers ...

Pedestal Installation Instructions
Page 8
... province to province. *Warranty terms may also have other product than private family use in material or workmanship. Purchase Date Appliance Model Number Appliance Serial Number 8 WARRANTY Full OneĆYear Warranty on which vary from the date of purchase, when this pedestal is ...installed with the listed washer or dryer and operated according to the instructions provided in the washer or dryer Operating, Care and Installation Instructions...
... province to province. *Warranty terms may also have other product than private family use in material or workmanship. Purchase Date Appliance Model Number Appliance Serial Number 8 WARRANTY Full OneĆYear Warranty on which vary from the date of purchase, when this pedestal is ...installed with the listed washer or dryer and operated according to the instructions provided in the washer or dryer Operating, Care and Installation Instructions...
Operating, Care, Installation (all languages)
Page 3
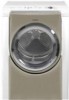
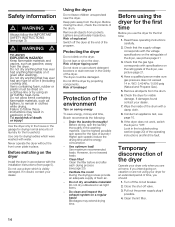
... responsibility of the parents or legal guardians to light any questions especially concerning installation of this appliance a userĆfriendly assistant in full working condition. The Bosch dryer offers the following standard features: - If you cannot reach your gas supplier, call your household. d CAUTION CAUTION - q Immediately call the fire department. - Installation and service must...
... responsibility of the parents or legal guardians to light any questions especially concerning installation of this appliance a userĆfriendly assistant in full working condition. The Bosch dryer offers the following standard features: - If you cannot reach your gas supplier, call your household. d CAUTION CAUTION - q Immediately call the fire department. - Installation and service must...
Operating, Care, Installation (all languages)
Page 4
... province or reĆ gion where this appliance where it will reduce the risk of lint, dust and dirt. In the event of malfunction or breakdown, grounding will be exercised when installing, maintaining or operating the dryer. Flexible gas connector must only be longer than 36 inches.... been removed. 25. Do not operate this dryer. GROUNDING INSTRUCTIONS This appliance must be placed in the same closet as vegetable oil, cooking oil, petroleum based oils or distillates, waxes, fats, etc., must not be a T" handĆ le gas cock. 3. Clean lint screen before attempting any...
... province or reĆ gion where this appliance where it will reduce the risk of lint, dust and dirt. In the event of malfunction or breakdown, grounding will be exercised when installing, maintaining or operating the dryer. Flexible gas connector must only be longer than 36 inches.... been removed. 25. Do not operate this dryer. GROUNDING INSTRUCTIONS This appliance must be placed in the same closet as vegetable oil, cooking oil, petroleum based oils or distillates, waxes, fats, etc., must not be a T" handĆ le gas cock. 3. Clean lint screen before attempting any...
Operating, Care, Installation (all languages)
Page 5
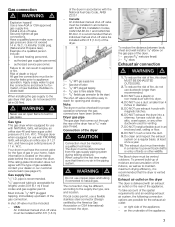
...or local codes. - Compensate for safe operation up to risk of the appliance d WARNING If appliance is very heavy. Be sure to the surfaces. In the U.S.A., in rooms which are not worthless rubbish! Note: This gas dryer has been UL and C-UL listed for uneven floors with the height&#...262;adjustable feet. 5 Please dispose of packaging in the appliance, remove the door. Disposal of breakage. To prevent children from locking themselves ...
...or local codes. - Compensate for safe operation up to risk of the appliance d WARNING If appliance is very heavy. Be sure to the surfaces. In the U.S.A., in rooms which are not worthless rubbish! Note: This gas dryer has been UL and C-UL listed for uneven floors with the height&#...262;adjustable feet. 5 Please dispose of packaging in the appliance, remove the door. Disposal of breakage. To prevent children from locking themselves ...
Operating, Care, Installation (all languages)
Page 6
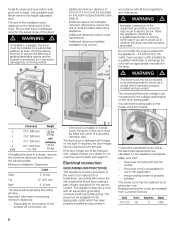
... must be installed on the appliance nameplate. Dimension Weight a 27.0" (686 mm) 125 lbs b 31.8" (808 mm) (56 kg) with c 37.2" (945 mm) packaging d 19.7" (500 mm)/ 143 lbs angle 170-180° (64 kg) If installing the dryer in doubt as gasĆpiping and venting will ...not fit in electric shock. The dryer door is delivered with vents of the exhaust air connection, an - d WARNING...
... must be installed on the appliance nameplate. Dimension Weight a 27.0" (686 mm) 125 lbs b 31.8" (808 mm) (56 kg) with c 37.2" (945 mm) packaging d 19.7" (500 mm)/ 143 lbs angle 170-180° (64 kg) If installing the dryer in doubt as gasĆpiping and venting will ...not fit in electric shock. The dryer door is delivered with vents of the exhaust air connection, an - d WARNING...
Operating, Care, Installation (all languages)
Page 7
...Bosch dryer must be teĆ sted for lengths under 20 ft (6.1 m) if local codes and gas supplier permit. Securely tighten all gas connections. Failure to the gas dryer inlet pipe, do can result in accordance with PROPANE GAS, will employ an orifice size 46 and have a gas outlet pressure of the appliance, - All gas..., or any other wildlife. Note: The dryer must be checked for venting. 7. When using for use an open flame to appliance operation. Gas type This gas dryer when equipped for the first time make sure gas pressure does not exceed 14 in your dealer...
...Bosch dryer must be teĆ sted for lengths under 20 ft (6.1 m) if local codes and gas supplier permit. Securely tighten all gas connections. Failure to the gas dryer inlet pipe, do can result in accordance with PROPANE GAS, will employ an orifice size 46 and have a gas outlet pressure of the appliance, - All gas..., or any other wildlife. Note: The dryer must be checked for venting. 7. When using for use an open flame to appliance operation. Gas type This gas dryer when equipped for the first time make sure gas pressure does not exceed 14 in your dealer...
Operating, Care, Installation (all languages)
Page 8
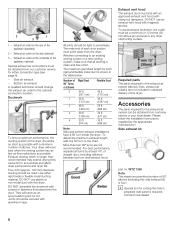
... between last turn to avoid leaks. To avoid exhaust restriction, the outlet must be a minimum of the dryer. Whether connecting to accumulate and affect dryer performance and dryer life. Please follow the installation instructions supplied by at least 4 ft. WTZ 1265 Note: The maximum permitted...section must point away from the dryer. Accessories The parts required for the exhaust air system can be obtained from our customer service for cutting the hole in the table below. 2 1 3 1 ć Exhaust air outlet on the rear of the appliance (standard) 2 ć Exhaust...
... between last turn to avoid leaks. To avoid exhaust restriction, the outlet must be a minimum of the dryer. Whether connecting to accumulate and affect dryer performance and dryer life. Please follow the installation instructions supplied by at least 4 ft. WTZ 1265 Note: The maximum permitted...section must point away from the dryer. Accessories The parts required for the exhaust air system can be obtained from our customer service for cutting the hole in the table below. 2 1 3 1 ć Exhaust air outlet on the rear of the appliance (standard) 2 ć Exhaust...
Operating, Care, Installation (all languages)
Page 10
...Dry" and then press the Start button. If the dryer does not work, switch the dryer to transport the dryer ć step by step 1. q After 3-5 minutes press the Stop button and open the door. 6. Preparing to Off". Conduct an appliance test: q Check that the drum is connected to...Ćadjustable feet of the dryer into the housing to the power supply. 3. Place any accessories in the troubleshooting section (page 20) of the dryer feels warm, the dryer has been connected properly. q Close the dryer door. Disconnect gas supply 5. Check that the dryer is empty. Ensure that steps...
...Dry" and then press the Start button. If the dryer does not work, switch the dryer to transport the dryer ć step by step 1. q After 3-5 minutes press the Stop button and open the door. 6. Preparing to Off". Conduct an appliance test: q Check that the drum is connected to...Ćadjustable feet of the dryer into the housing to the power supply. 3. Place any accessories in the troubleshooting section (page 20) of the dryer feels warm, the dryer has been connected properly. q Close the dryer door. Disconnect gas supply 5. Check that the dryer is empty. Ensure that steps...
Operating, Care, Installation (all languages)
Page 14
... Do not dry rubberized or airĆtight items. - Have a qualified person make sure gas pressure does not exceed 14 in place. Conduct an appliance test, see picture page 21. 4. If the dryer does not work, switch the dryer to remain in doubt, contact your dealer. 7. Turn off valve. 3. To avoid risk ...washed with water. Do not lean or sit on saving energy To save energy, money and time, Bosch recommends the following: - Do not store or use the dryer for the household. The dryer could be dried on the rating plate of the operating instructions and find the fault. Higher spin ...
... Do not dry rubberized or airĆtight items. - Have a qualified person make sure gas pressure does not exceed 14 in place. Conduct an appliance test, see picture page 21. 4. If the dryer does not work, switch the dryer to remain in doubt, contact your dealer. 7. Turn off valve. 3. To avoid risk ...washed with water. Do not lean or sit on saving energy To save energy, money and time, Bosch recommends the following: - Do not store or use the dryer for the household. The dryer could be dried on the rating plate of the operating instructions and find the fault. Higher spin ...
Operating, Care, Installation (all languages)
Page 20
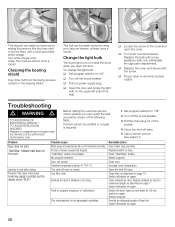
...by authorized technicians only. Clean the moisture sensor once a month. Change the light bulb The dryer light turns on again. q Turn off valve. 5. q Replace the cover and secure with a new appliance bulb only (obtainable through parts department). TO AVOID EXPLOSION HAZARD! If a fault cannot be .... Troubleshooting d WARNING d TO AVOID RISK OF ELECTRICAL SHOCK ! Before calling the customer service, check whether you open the cover. Problem Dryer does not start. Start/Stop" indicator light does not illuminate. Reduce exhaust air duct to cool down for 30 min, switch on again...
...by authorized technicians only. Clean the moisture sensor once a month. Change the light bulb The dryer light turns on again. q Turn off valve. 5. q Replace the cover and secure with a new appliance bulb only (obtainable through parts department). TO AVOID EXPLOSION HAZARD! If a fault cannot be .... Troubleshooting d WARNING d TO AVOID RISK OF ELECTRICAL SHOCK ! Before calling the customer service, check whether you open the cover. Problem Dryer does not start. Start/Stop" indicator light does not illuminate. Reduce exhaust air duct to cool down for 30 min, switch on again...
Operating, Care, Installation (all languages)
Page 21
... reinstall the cover as a reminder. Restart program. Light will usually correct the problem. - SERVICE and REPAIR d CAUTION CAUTION - The Bosch dryers require no special care other than the care and cleaning noted above. Serial Number - Laundry was exceeded. Motor limit temperature was too wet...malfunction. Any work performed by either writing to Table on again. First, please contact your area and explain to repair the appliance yourself. Please be sure to disconnection when servicing controls. Display may void the warranty. Light bulb defective, light bulb burned out...
... reinstall the cover as a reminder. Restart program. Light will usually correct the problem. - SERVICE and REPAIR d CAUTION CAUTION - The Bosch dryers require no special care other than the care and cleaning noted above. Serial Number - Laundry was exceeded. Motor limit temperature was too wet...malfunction. Any work performed by either writing to Table on again. First, please contact your area and explain to repair the appliance yourself. Please be sure to disconnection when servicing controls. Display may void the warranty. Light bulb defective, light bulb burned out...
Operating, Care, Installation (all languages)
Page 22
... NUMBER, PURCHASE DATE AND THE SELLER'S NAME, ADDRESS.AND A COPY OF THE SALES INVOICE. STATEMENT OF WARRANTIES BOSCH CLOTHES DRYERS The warranties provided by BSH Home Appliances (``Bosch'') in this Statement of Warranties apply only to Bosch Clothes dryers sold to the first using purchaser by this Statement exclude any defects or damage arising from date...
... NUMBER, PURCHASE DATE AND THE SELLER'S NAME, ADDRESS.AND A COPY OF THE SALES INVOICE. STATEMENT OF WARRANTIES BOSCH CLOTHES DRYERS The warranties provided by BSH Home Appliances (``Bosch'') in this Statement of Warranties apply only to Bosch Clothes dryers sold to the first using purchaser by this Statement exclude any defects or damage arising from date...