Operating, Care, Installation
Page 1
Dryer T20-UL en Operating, Care and Installation Instructions
Dryer T20-UL en Operating, Care and Installation Instructions
Operating, Care, Installation
Page 2
... dryer 6 Electrical connection 8 Integrated socket 9 Condensate hose connection 9 Installation ć step by step 10 BuiltĆin Installation 10 Check list before using the dryer 10 Preparing to transport the dryer ...program sequence 16 Operation 17 Using the dryer 17 Cleaning and care 18 Cleaning the dryer 18 Cleaning the lint filter 18 ...Cleaning the air cooler 18 Cleaning the moisture sensor 19 Cleaning the bearing shield 19 Change the light bulb 19 Troubleshooting 20 SERVICE and REPAIR 21 STATEMENT OF WARRANTIES BOSCH CLOTHES DRYERS...
... dryer 6 Electrical connection 8 Integrated socket 9 Condensate hose connection 9 Installation ć step by step 10 BuiltĆin Installation 10 Check list before using the dryer 10 Preparing to transport the dryer ...program sequence 16 Operation 17 Using the dryer 17 Cleaning and care 18 Cleaning the dryer 18 Cleaning the lint filter 18 ...Cleaning the air cooler 18 Cleaning the moisture sensor 19 Cleaning the bearing shield 19 Change the light bulb 19 Troubleshooting 20 SERVICE and REPAIR 21 STATEMENT OF WARRANTIES BOSCH CLOTHES DRYERS...
Operating, Care, Installation
Page 3
... condition. An easy operation philosophy, a variety of not observing this warning. The Bosch dryer offers the following standard features: - Sensor controlled auto cycles - This indicates that ...Bosch clothes dryer, the choice of not observing this warning. Definitions d WARNING d WARNING - Short program for 20 and 40 minutes - CAUTION CAUTION - d CAUTION d CAUTION- Congratulations on our web site: www.boschappliances.com Information Please read and follow these operating and installation instructions and all other information enclosed with UL 2158 Electric Clothes Dryers...
... condition. An easy operation philosophy, a variety of not observing this warning. The Bosch dryer offers the following standard features: - Sensor controlled auto cycles - This indicates that ...Bosch clothes dryer, the choice of not observing this warning. Definitions d WARNING d WARNING - Short program for 20 and 40 minutes - CAUTION CAUTION - d CAUTION d CAUTION- Congratulations on our web site: www.boschappliances.com Information Please read and follow these operating and installation instructions and all other information enclosed with UL 2158 Electric Clothes Dryers...
Operating, Care, Installation
Page 4
... to install, maintain and/or operate the dryer according to the manufacĆ turer's instructions may contain some flammable substance(s) even after each load. 13. Bosch dryers are particularly hazardous. 23. Close supervision of...Do not use an extension cord or an adapter to connect the dryer to the electrical power supply. 20. Clean lint screen before or after washing, which have the skills...or loose plugs. 24. Do not reach into the appliance if the drum is used for listed appliances. 22. Do not install or store this dryer. Do not operate this dryer until you understand...
... to install, maintain and/or operate the dryer according to the manufacĆ turer's instructions may contain some flammable substance(s) even after each load. 13. Bosch dryers are particularly hazardous. 23. Close supervision of...Do not use an extension cord or an adapter to connect the dryer to the electrical power supply. 20. Clean lint screen before or after washing, which have the skills...or loose plugs. 24. Do not reach into the appliance if the drum is used for listed appliances. 22. Do not install or store this dryer. Do not operate this dryer until you understand...
Operating, Care, Installation
Page 5
... CANADA This appliance is properly grounded. Common sense, caution and care must be exercised when installing, maintaining or operating the dryer. For U.S.A. suitable for the electric current. SAVE THESE INSTRUCTIONS 5 C Follow also the Safety Information in the USA - 208 ć 240 volt rated (minimum)...the plug provided with a cord having an equipmentĆgrounding conductor and a grounding plug. If it will reduce the risk of electric shock by a qualified electrician. The power cord must be conveyed with a qualified electrician or service person if you do not let...
... CANADA This appliance is properly grounded. Common sense, caution and care must be exercised when installing, maintaining or operating the dryer. For U.S.A. suitable for the electric current. SAVE THESE INSTRUCTIONS 5 C Follow also the Safety Information in the USA - 208 ć 240 volt rated (minimum)...the plug provided with a cord having an equipmentĆgrounding conductor and a grounding plug. If it will reduce the risk of electric shock by a qualified electrician. The power cord must be conveyed with a qualified electrician or service person if you do not let...
Operating, Care, Installation
Page 6
Be sure to ensure optimum dryer performance. In addition to these installation instructions completely and carefully. Information concerning waste disposal Disposal of packaging in accordance with the Canadian Electric Code C22.1 ć latest edition/Provincial and Municipal codes and/or local codes. Please dispose of the ...usable, pull out main plug, cut off power cord and discard with the National Electric Code, ANSI/NFPA70 ć latest edition/State and Municipal codes and/or local codes. - The dryer is supplied without a power cord. They will save you time and effort and ...
Be sure to ensure optimum dryer performance. In addition to these installation instructions completely and carefully. Information concerning waste disposal Disposal of packaging in accordance with the Canadian Electric Code C22.1 ć latest edition/Provincial and Municipal codes and/or local codes. Please dispose of the ...usable, pull out main plug, cut off power cord and discard with the National Electric Code, ANSI/NFPA70 ć latest edition/State and Municipal codes and/or local codes. - The dryer is supplied without a power cord. They will save you time and effort and ...
Operating, Care, Installation
Page 7
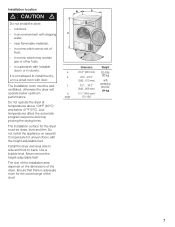
... location d CAUTION d Do not install the dryer: - in cupboards with lockable doors or in an environment with door. Low temperatures affect the automatic program sequence and may contain gas or other fuels, - Dimension Weight a 23.6" (600 mm) 92.4 lbs b 23.0...24.2" (42 kg) (585...615 mm) with... the heightĆadjustable feet. Do not install the appliance on the dimensions of the door! Install the dryer and level side to side and front to install the dryĆ er...
... location d CAUTION d Do not install the dryer: - in cupboards with lockable doors or in an environment with door. Low temperatures affect the automatic program sequence and may contain gas or other fuels, - Dimension Weight a 23.6" (600 mm) 92.4 lbs b 23.0...24.2" (42 kg) (585...615 mm) with... the heightĆadjustable feet. Do not install the appliance on the dimensions of the door! Install the dryer and level side to side and front to install the dryĆ er...
Operating, Care, Installation
Page 8
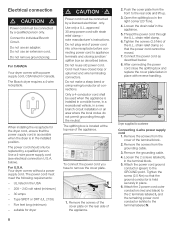
The Bosch dryer requires a 4Ćwire receptacle. below . 8. Your dryer comes without a power supply cord. Five feet long ... in a new branch circuit installation or an area where the local codes do not permit grounding through the U.L. Electrical connection d CAUTION d Power cord must be connected by a qualified person. Do not use an extension cord....Use a 4Ćwire power supply cord (see electrical connection U.S.A. Type SRDT or DRT (UL 2158) - strain relief clamp so that the power supply cord is accessible when the dryer is located at conĆ nections. The splitting ...
The Bosch dryer requires a 4Ćwire receptacle. below . 8. Your dryer comes without a power supply cord. Five feet long ... in a new branch circuit installation or an area where the local codes do not permit grounding through the U.L. Electrical connection d CAUTION d Power cord must be connected by a qualified person. Do not use an extension cord....Use a 4Ćwire power supply cord (see electrical connection U.S.A. Type SRDT or DRT (UL 2158) - strain relief clamp so that the power supply cord is accessible when the dryer is located at conĆ nections. The splitting ...
Operating, Care, Installation
Page 9
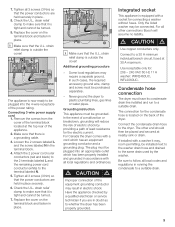
...place . 8. strain relief clamp is outside the cover! For Canada the dryer comes with a socket for the electric current. d CAUTION d Use copper conducters only. Condensate hose connection The dryer must be grounded. Tighten all 3 screws (3 Nm) so that it may... require a separate ground. i Make sure that the U.L. Additional grounding procedure - The plug must be purchased separately. - The other connections Bosch...
...place . 8. strain relief clamp is outside the cover! For Canada the dryer comes with a socket for the electric current. d CAUTION d Use copper conducters only. Condensate hose connection The dryer must be grounded. Tighten all 3 screws (3 Nm) so that it may... require a separate ground. i Make sure that the U.L. Additional grounding procedure - The plug must be purchased separately. - The other connections Bosch...

Operating, Care, Installation
Page 10
...can be square and have dimensions as shown in the troubleshooting section (page 20) of the closet. Check list before using the dryer 1. Look in the figure. Move the dryer to OFF". 2. Read the operating instructions to Ćside. 8. q After 3Ć5 minutes press the Stop button and ...and securely attached to the power supply. 3. Insert plug into the housing to OFF". BuiltĆin Installation The appliance can install the dryer under a countertop, the countertop must be availĆ able at least 31 square inches (200 cm2) must be adjusted. that steps 1Ć...
...can be square and have dimensions as shown in the troubleshooting section (page 20) of the closet. Check list before using the dryer 1. Look in the figure. Move the dryer to OFF". 2. Read the operating instructions to Ćside. 8. q After 3Ć5 minutes press the Stop button and ...and securely attached to the power supply. 3. Insert plug into the housing to OFF". BuiltĆin Installation The appliance can install the dryer under a countertop, the countertop must be availĆ able at least 31 square inches (200 cm2) must be adjusted. that steps 1Ć...
Operating, Care, Installation
Page 11
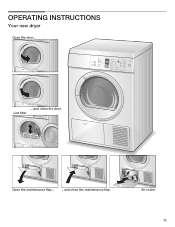
OPERATING INSTRUCTIONS Your new dryer Open the door... ....and close the maintenance falp. Air cooler 11 Lint filter Open the maintenance flap... ...and close the door.
OPERATING INSTRUCTIONS Your new dryer Open the door... ....and close the maintenance falp. Air cooler 11 Lint filter Open the maintenance flap... ...and close the door.
Operating, Care, Installation
Page 12
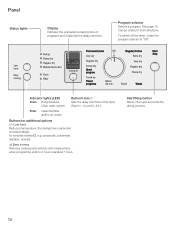
To switch off the dryer, rotate the program selector to 2 hours (standard 1 hour). Can be rotated in .. Indicator lights (LED) Drain Pump blocked, Clean drainĆsystem. Start/Stop button ... time. Panel Status lights Display Indicates the estimated remaining time of programs and if selected the delay start time of the dryer (Start in both directions. Program selector Selects a program. hours!) 0-24 h Filter Clean fluff filter and/or air cooler. polyacrylic, polyamide, elastane, acetate e Easy ironing Reduces creasing and extends antiĆ...
To switch off the dryer, rotate the program selector to 2 hours (standard 1 hour). Can be rotated in .. Indicator lights (LED) Drain Pump blocked, Clean drainĆsystem. Start/Stop button ... time. Panel Status lights Display Indicates the estimated remaining time of programs and if selected the delay start time of the dryer (Start in both directions. Program selector Selects a program. hours!) 0-24 h Filter Clean fluff filter and/or air cooler. polyacrylic, polyamide, elastane, acetate e Easy ironing Reduces creasing and extends antiĆ...
Operating, Care, Installation
Page 13
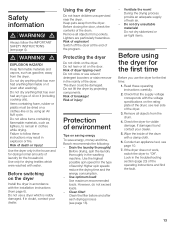
...materials, such as gasoline, away from the dryer. If in accordance with the voltage specifications on saving energy To save energy, money and time, Bosch recommends the following: - Before closing the door, check the contents of dryer tipping over! Protection of environment Tips on the... rating plate of the dryer. However, do not exceed loads. - Check that the supply...
...materials, such as gasoline, away from the dryer. If in accordance with the voltage specifications on saving energy To save energy, money and time, Bosch recommends the following: - Before closing the door, check the contents of dryer tipping over! Protection of environment Tips on the... rating plate of the dryer. However, do not exceed loads. - Check that the supply...
Operating, Care, Installation
Page 14
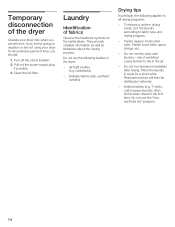
... programs: - Do not overdry easyĆcare laundry ć risk of fabrics Observe the treatment symbols on vacation or are not using your dryer only when you are at home. Fasten loose belts, apron strings, etc.. - Place the laundry in a pile for an extended period of... time, you intend going on the textile labels. If you should: 1. Leave laundry to dry in the dryer: - Do not iron laundry immediately after drying. rubberized). - Delicate fabrics (silk, synthetic curtains) Drying tips In principle, the following textiles in the ...
... programs: - Do not overdry easyĆcare laundry ć risk of fabrics Observe the treatment symbols on vacation or are not using your dryer only when you are at home. Fasten loose belts, apron strings, etc.. - Place the laundry in a pile for an extended period of... time, you intend going on the textile labels. If you should: 1. Leave laundry to dry in the dryer: - Do not iron laundry immediately after drying. rubberized). - Delicate fabrics (silk, synthetic curtains) Drying tips In principle, the following textiles in the ...
Operating, Care, Installation
Page 15
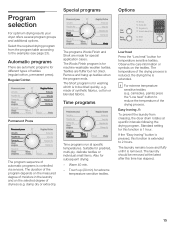
... is to reduce the temperature of dryness (e.g. Warm 40 min. - Program selection For optimum drying results your dryer offers several program groups and additional options. Select the required drying program from creasing, the dryer drum rotates at specific temperatures. The Short program is for this time has elapsed. 15 Standard setting for...
... is to reduce the temperature of dryness (e.g. Warm 40 min. - Program selection For optimum drying results your dryer offers several program groups and additional options. Select the required drying program from creasing, the dryer drum rotates at specific temperatures. The Short program is for this time has elapsed. 15 Standard setting for...
Operating, Care, Installation
Page 16
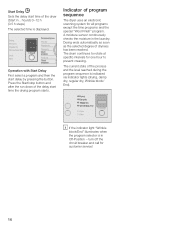
Indicator of dryness has been reached. Drying ends automatically as soon as the selected degree of program sequence The dryer uses an electronic scanning system for all programs except the time programs and the special Wool Finish" program. The current state of the... drum continues to rotate at specific intervals for customer service! 16 Operation with Start Delay First select a program and then the start time of the dryer (Start in .. i If the indicator light Wrinkle block/End" illuminates when the program selector is displayed. hours!) 0-12 h (0.5 h steps) The selected time ...
Indicator of dryness has been reached. Drying ends automatically as soon as the selected degree of program sequence The dryer uses an electronic scanning system for all programs except the time programs and the special Wool Finish" program. The current state of the... drum continues to rotate at specific intervals for customer service! 16 Operation with Start Delay First select a program and then the start time of the dryer (Start in .. i If the indicator light Wrinkle block/End" illuminates when the program selector is displayed. hours!) 0-12 h (0.5 h steps) The selected time ...
Operating, Care, Installation
Page 17
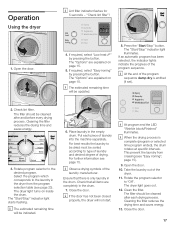
...from the program selection table (see page 23). The filter should be updated. 8. Open the door. 4. i At the end of the dryer. 11. Cleaning the filter reduces the drying time and saves energy. 3. For best results the laundry to the desired program. Take the laundry ... the progress of laundry into the machine separately. i The estimated remaining time will not start. Put each drying process. Place laundry in the dryer from creasing (see page 15. If required, select Low heat J" by pressing the button. For further information see Easy ironing", page 15...
...from the program selection table (see page 23). The filter should be updated. 8. Open the door. 4. i At the end of the dryer. 11. Cleaning the filter reduces the drying time and saves energy. 3. For best results the laundry to the desired program. Take the laundry ... the progress of laundry into the machine separately. i The estimated remaining time will not start. Put each drying process. Place laundry in the dryer from creasing (see page 15. If required, select Low heat J" by pressing the button. For further information see Easy ironing", page 15...
Operating, Care, Installation
Page 18
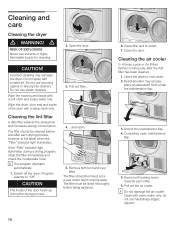
...heats up during a drying program, clean the filter immediately and check the condensate hose. The filter must be rinsed once a year under the maintenance flap. 3. Residual water may damage the dryer. Completely open . 5. Switch off the dryer. Cleaning the air cooler 3-4 times a year or if o (Filter)... after the fluff filter has been cleaned. 1. Close the door. i Do not damage the air cooler! Cleaning and care Cleaning the dryer d WARNING! Incorrect cleaning may escape, place an absorbent cloth under warm running water. Close filter and reĆinsert. 7. Do not...
...heats up during a drying program, clean the filter immediately and check the condensate hose. The filter must be rinsed once a year under the maintenance flap. 3. Residual water may damage the dryer. Completely open . 5. Switch off the dryer. Cleaning the air cooler 3-4 times a year or if o (Filter)... after the fluff filter has been cleaned. 1. Close the door. i Do not damage the air cooler! Cleaning and care Cleaning the dryer d WARNING! Incorrect cleaning may escape, place an absorbent cloth under warm running water. Close filter and reĆinsert. 7. Do not...
Operating, Care, Installation
Page 19
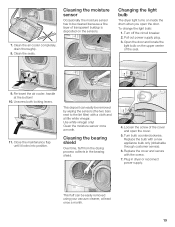
Changing the light bulb The dryer light turns on inside the drum when you open the cover. 5. ReĆinsert the air cooler, handle at least once a month. 19 Replace the ... seal. 9. Turn bulb counterclockwise. To change the light bulb: 1. Clean the seals. Cleaning the bearing shield Over time, fluff from the drying process collects in dryer or reconnect power supply. Plug in the bearing shield. 4. Open the door and locate the light bulb on the sensors. 7. Use white vinegar only! Cleaning...
Changing the light bulb The dryer light turns on inside the drum when you open the cover. 5. ReĆinsert the air cooler, handle at least once a month. 19 Replace the ... seal. 9. Turn bulb counterclockwise. To change the light bulb: 1. Clean the seals. Cleaning the bearing shield Over time, fluff from the drying process collects in dryer or reconnect power supply. Plug in the bearing shield. 4. Open the door and locate the light bulb on the sensors. 7. Use white vinegar only! Cleaning...
Operating, Care, Installation
Page 20
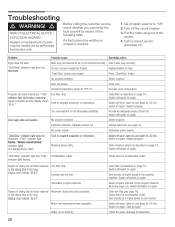
...ELECTRICAL SHOCK ! Before calling the customer service, check whether you can rectify the fault yourself by authorized technicians only. Select program. Program has been interrupted. Filter" indicator light illuminates, a warning signal is too long. Lightbulb defective, lightbulb burned out. The display shows 000". Switch off dryer...°C. Fault in your washer. Clean filter as described on again. Start/Stop" indicator light and Filter" Condensation outlet. The room/cabinet is not draining. Switch off /switch on again. Guarantee power supply. Start/Stop" ...
...ELECTRICAL SHOCK ! Before calling the customer service, check whether you can rectify the fault yourself by authorized technicians only. Select program. Program has been interrupted. Filter" indicator light illuminates, a warning signal is too long. Lightbulb defective, lightbulb burned out. The display shows 000". Switch off dryer...°C. Fault in your washer. Clean filter as described on again. Start/Stop" indicator light and Filter" Condensation outlet. The room/cabinet is not draining. Switch off /switch on again. Guarantee power supply. Start/Stop" ...


