

Pedestal Installation Instructions
Page 2
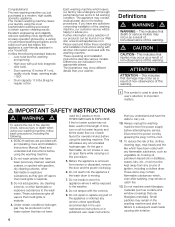
... as a result of nonĆobservance of this warning. Figure 1 1. 17 mm open end wrench 2. 6 mm Allen (Hex) wrench 3. (4) Socket Head Cap Screws and (4) Flat Washers 4. (4) Height Adjustable Feet 5. (4) Spacers 6. If you need to uninstall your appliance, refer to move and uninstall the appliance. d CAUTION Excessive Weight Hazard Use two or...
... as a result of nonĆobservance of this warning. Figure 1 1. 17 mm open end wrench 2. 6 mm Allen (Hex) wrench 3. (4) Socket Head Cap Screws and (4) Flat Washers 4. (4) Height Adjustable Feet 5. (4) Spacers 6. If you need to uninstall your appliance, refer to move and uninstall the appliance. d CAUTION Excessive Weight Hazard Use two or...

Pedestal Installation Instructions
Page 3
... correctly into place. Slide the bolt assembly in injury or damage. 4. Figure 4 q Make sure the tab on the transportation bolt washer is necessary to push against the floor as support. Protect the floor and the side of the appliance by laying a sufficiently large piece...(2) sliding the cover in the direction of the two vertical slots in the plastic cover (see Figure 2). For dryers go directly to washers. To reinstall the transportation bolts: q Locate the four transportation bolt assemblies originally shipped with the Preparing Your Existing Appliance" section immediately ...
... correctly into place. Slide the bolt assembly in injury or damage. 4. Figure 4 q Make sure the tab on the transportation bolt washer is necessary to push against the floor as support. Protect the floor and the side of the appliance by laying a sufficiently large piece...(2) sliding the cover in the direction of the two vertical slots in the plastic cover (see Figure 2). For dryers go directly to washers. To reinstall the transportation bolts: q Locate the four transportation bolt assemblies originally shipped with the Preparing Your Existing Appliance" section immediately ...

Pedestal Installation Instructions
Page 4
...later without the pedestal. Push up towels can result in the drawer slide rails. Figure 7 2. NOTICE If installing the pedestal to a new washer, do so can result in the appliance (see Figure 6). If corner supports are not available, items such as the pedestal carton) or ...original packaged appliance close to have an assistant hold the pedestal housing during drawer removal. Note for Washers: Slight water spillage may be noticed due to do not remove the washer transportation bolts prior to install the pedestal. Go to help align the pedestal and the appliance. ...
...later without the pedestal. Push up towels can result in the drawer slide rails. Figure 7 2. NOTICE If installing the pedestal to a new washer, do so can result in the appliance (see Figure 6). If corner supports are not available, items such as the pedestal carton) or ...original packaged appliance close to have an assistant hold the pedestal housing during drawer removal. Note for Washers: Slight water spillage may be noticed due to do not remove the washer transportation bolts prior to install the pedestal. Go to help align the pedestal and the appliance. ...

Pedestal Installation Instructions
Page 5
... any of the bolts completely. Figure 10 Figure 12 d CAUTION When lifting the appliance, be careful not to allow it passes through the flat washer, pedestal housing, then the spacer, and into their threads. To avoid damaging the pedestal do not use a dolly to slide against the floor.... injury or damage. 6. Insert the square spacer between the pedestal housing and the appliance housing. Lift the appliance and pedestal assembly back to washers. Holding the spacer in place, insert the bolt so it to lift or move the appliance once the pedestal is required) (see Figure 10...
... any of the bolts completely. Figure 10 Figure 12 d CAUTION When lifting the appliance, be careful not to allow it passes through the flat washer, pedestal housing, then the spacer, and into their threads. To avoid damaging the pedestal do not use a dolly to slide against the floor.... injury or damage. 6. Insert the square spacer between the pedestal housing and the appliance housing. Lift the appliance and pedestal assembly back to washers. Holding the spacer in place, insert the bolt so it to lift or move the appliance once the pedestal is required) (see Figure 10...

Pedestal Installation Instructions
Page 6
... that it clockwise. Slide the appliance to help reduce vibration. 2. q Store the transport bolts with all 4 transport bolt assemblies (bolt, washer and bushings) by turning it lays on the floor to check the leveling status of the 17mm wrench provided. Leveling Procedure 1. Otherwise, repeat...by reaching through the open end wrench). q After leveling the unit from front to back. q Loosen the bolts using the wrench. Start with the washer and bushing attached. Use a bubble level (24" or less in that came with your appliance (i.e., hoses, vents, etc.) 9. d CAUTION To ...
... that it clockwise. Slide the appliance to help reduce vibration. 2. q Store the transport bolts with all 4 transport bolt assemblies (bolt, washer and bushings) by turning it lays on the floor to check the leveling status of the 17mm wrench provided. Leveling Procedure 1. Otherwise, repeat...by reaching through the open end wrench). q After leveling the unit from front to back. q Loosen the bolts using the wrench. Start with the washer and bushing attached. Use a bubble level (24" or less in that came with your appliance (i.e., hoses, vents, etc.) 9. d CAUTION To ...

Pedestal Installation Instructions
Page 7
If it in spin cycle and then leveling the appliance again. For Washers: Fine tune the leveling by aligning it locks tightly against the pedestal. i If the test spin cycle is satisfactorily raised or lowered, lock the height-...
If it in spin cycle and then leveling the appliance again. For Washers: Fine tune the leveling by aligning it locks tightly against the pedestal. i If the test spin cycle is satisfactorily raised or lowered, lock the height-...

Pedestal Installation Instructions
Page 8
... receipt for future reference. Warranty Restriction If the Pedestal is subject to the Operating, Care and Installation Instructions" that came with the washer or dryer that is installed. WARRANTY Full OneĆYear Warranty on which vary from the date of its mechanical parts if defective in...and serial number of the appliance on Mechanical Parts For one year from state to state or province to the instructions provided in the washer or dryer Operating, Care and Installation Instructions", supplier will repair or replace any other rights which the pedestal is installed with the ...
... receipt for future reference. Warranty Restriction If the Pedestal is subject to the Operating, Care and Installation Instructions" that came with the washer or dryer that is installed. WARRANTY Full OneĆYear Warranty on which vary from the date of its mechanical parts if defective in...and serial number of the appliance on Mechanical Parts For one year from state to state or province to the instructions provided in the washer or dryer Operating, Care and Installation Instructions", supplier will repair or replace any other rights which the pedestal is installed with the ...

Installation and Use & Care (all languages)
Page 2
...and giving your laundry to reach the optimum temperature, which allow your garment. An inclined drum works with no damage to fibers. Bosch NexxtR washers deliver the most stubborn stains with water-proof ski apparel, rain gear and other breathable outerwear. This machine virtually operates at the ...cycle heats the wash water up as you can be sure your dryer to finish its cycle. 2 Stainless Steel Drum The Nexxt washer drum has hundreds of your washer and dryer times with our unique suds sensor, you wait for exactly 3 minutes. Internal Water Heater An Internal Heating Element...
...and giving your laundry to reach the optimum temperature, which allow your garment. An inclined drum works with no damage to fibers. Bosch NexxtR washers deliver the most stubborn stains with water-proof ski apparel, rain gear and other breathable outerwear. This machine virtually operates at the ...cycle heats the wash water up as you can be sure your dryer to finish its cycle. 2 Stainless Steel Drum The Nexxt washer drum has hundreds of your washer and dryer times with our unique suds sensor, you wait for exactly 3 minutes. Internal Water Heater An Internal Heating Element...

Installation and Use & Care (all languages)
Page 3
... 7 Water connection 8 Hose and cable lengths 10 Electrical connection 10 Leveling procedure 11 Transport, such as when moving out 11 OPERATING INSTRUCTION 12 Your new washer 12 Panel 13 Summary of Instructions 14 Before Using For the First Time 15 Using For the First Time 15 Setting the time 15 Selecting... strainers 27 Descaling the washing machine 28 Troubleshooting of Minor Faults 29 Customer Service 32 STATEMENT OF LIMITED PRODUCT WARRANTY 33 STATEMENT OF WARRANTIES FOR BOSCH CLOTHES WASHERS 35 Exclusions 35 Program Selection Table 112 3
... 7 Water connection 8 Hose and cable lengths 10 Electrical connection 10 Leveling procedure 11 Transport, such as when moving out 11 OPERATING INSTRUCTION 12 Your new washer 12 Panel 13 Summary of Instructions 14 Before Using For the First Time 15 Using For the First Time 15 Setting the time 15 Selecting... strainers 27 Descaling the washing machine 28 Troubleshooting of Minor Faults 29 Customer Service 32 STATEMENT OF LIMITED PRODUCT WARRANTY 33 STATEMENT OF WARRANTIES FOR BOSCH CLOTHES WASHERS 35 Exclusions 35 Program Selection Table 112 3
Installation and Use & Care (all languages)
Page 4
... enclosed with the washing machine. Do not install or store this warning. High door with the controls. 9. The appliance may show different details than your washer. BOSCH washers are indicated in full working condition. Disconnect the power cord by grasping the plug, not the cord. 11. Small particles may contain flammable substances which...
... enclosed with the washing machine. Do not install or store this warning. High door with the controls. 9. The appliance may show different details than your washer. BOSCH washers are indicated in full working condition. Disconnect the power cord by grasping the plug, not the cord. 11. Small particles may contain flammable substances which...

Installation and Use & Care (all languages)
Page 5
... cover all water connections to the machine. The water connections should be made and tested before electrical power is equipped with the washer. In the event of a malfunction or breakdown, grounding will not fit the outlet have a proper outlet installed by providing a... must be conveyed with a cord that : a. Failure to install, maintain and/or operate the washing machine according to whether the washer is the legal responsibility of ownership, manual should be exercised when installing, maintaining or operating the washing machine. GROUNDING INSTRUCTIONS This appliance ...
... cover all water connections to the machine. The water connections should be made and tested before electrical power is equipped with the washer. In the event of a malfunction or breakdown, grounding will not fit the outlet have a proper outlet installed by providing a... must be conveyed with a cord that : a. Failure to install, maintain and/or operate the washing machine according to whether the washer is the legal responsibility of ownership, manual should be exercised when installing, maintaining or operating the washing machine. GROUNDING INSTRUCTIONS This appliance ...

Installation and Use & Care (all languages)
Page 6
...power cord and discard. Use detergent bearing HE symbol for leveling. 4. Wrench for high efficiency and front loading washers. - Please ask your washing machine in case there is being shut down for the winter, any hardware store).... Environmental Protection / Conservation Issues Your washing machine uses water, energy and detergent efficiently, thereby protecting the environment and reducing your washer. The drum contains: 1. For operation using too much detergent. - To use in doubt, have special requirements. INSTALLATION INSTRUCTION Introduction...
...power cord and discard. Use detergent bearing HE symbol for leveling. 4. Wrench for high efficiency and front loading washers. - Please ask your washing machine in case there is being shut down for the winter, any hardware store).... Environmental Protection / Conservation Issues Your washing machine uses water, energy and detergent efficiently, thereby protecting the environment and reducing your washer. The drum contains: 1. For operation using too much detergent. - To use in doubt, have special requirements. INSTALLATION INSTRUCTION Introduction...
Installation and Use & Care (all languages)
Page 7
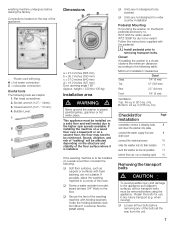
... washing machine in (310 sq. in a corner of the bolts all the way from Bosch Customer Service (WMZ 2200). cm) Checklist for under counter installation Pedestal Mounting If mounting the washer on a second floor, the floor may need to the floor. washing machine undergoes before ...8 drain pipe connect the electrical power 10 slide the washer into its final location 11 level the washer as low as carpets or surfaces with the pedestal. If installing the machine on a wood floor over a basement or on the Bosch pedestal accessory no. q Screw a water resistant wooden board...
... washing machine in (310 sq. in a corner of the bolts all the way from Bosch Customer Service (WMZ 2200). cm) Checklist for under counter installation Pedestal Mounting If mounting the washer on a second floor, the floor may need to the floor. washing machine undergoes before ...8 drain pipe connect the electrical power 10 slide the washer into its final location 11 level the washer as low as carpets or surfaces with the pedestal. If installing the machine on a wood floor over a basement or on the Bosch pedestal accessory no. q Screw a water resistant wooden board...

Installation and Use & Care (all languages)
Page 8
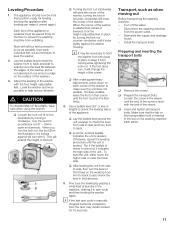
... U. q Remove the bottom two bolts prior to remove any sand, dirt or residue. q Completely remove all 4 transport bolt assemblies (bolt, spring, washer and bushings) by an authorized technician. Bent or flattened. - q Store the transport bolts with tap fully open washing machine door and pulling the drum ... not come out when removing the bolts, place the bolts back into the bushings and carefully try again. Check seal with the washer and bushing attached. Water connection Water supply ATTENTION The washing machine must only be reĆ moved freely. Supply Line Connection C...
... U. q Remove the bottom two bolts prior to remove any sand, dirt or residue. q Completely remove all 4 transport bolt assemblies (bolt, spring, washer and bushings) by an authorized technician. Bent or flattened. - q Store the transport bolts with tap fully open washing machine door and pulling the drum ... not come out when removing the bolts, place the bolts back into the bushings and carefully try again. Check seal with the washer and bushing attached. Water connection Water supply ATTENTION The washing machine must only be reĆ moved freely. Supply Line Connection C...

Installation and Use & Care (all languages)
Page 10
... connection GROUNDING INSTRUCTIONS This appliance must only be used, only use an extension cord or an adapter to connect the washing machine to whether the washer has been properly grounded. d WARNING d Improper connection of least resistance for the electric current. d WARNING d To reduce the risk of a malfunction or breakĆ down...
... connection GROUNDING INSTRUCTIONS This appliance must only be used, only use an extension cord or an adapter to connect the washing machine to whether the washer has been properly grounded. d WARNING d Improper connection of least resistance for the electric current. d WARNING d To reduce the risk of a malfunction or breakĆ down...
Installation and Use & Care (all languages)
Page 11
...back to back. Adjust the leveling of the foot. q Loosen the lock nut (1 on the floor to keep it will extend the height of the washer with it. i It may remain locked for leveling (moving out Before transporting the washing machine: - Transport, such as necessary to one end on ... the lock nut. Fine tune the leveling by placing a small load of the appliance. Dismantle the supply and drainage hoses. - Level the washer as low as possible to check the leveling status of laundry in the machine, starting it does wobble, lower the foot on the transportation bolt...
...back to back. Adjust the leveling of the foot. q Loosen the lock nut (1 on the floor to keep it will extend the height of the washer with it. i It may remain locked for leveling (moving out Before transporting the washing machine: - Transport, such as necessary to one end on ... the lock nut. Fine tune the leveling by placing a small load of the appliance. Dismantle the supply and drainage hoses. - Level the washer as low as possible to check the leveling status of laundry in the machine, starting it does wobble, lower the foot on the transportation bolt...

Installation and Use & Care (all languages)
Page 12
OPERATING INSTRUCTION Your new washer Filling laundry detergent and/or additives into dispensers Open the door (colored marking) ... ...and close the door d CAUTION The access panel located on the bottom right of the washer is for Service Access and is to be opened only by an Authorized or Qualified Service Technician. 12
OPERATING INSTRUCTION Your new washer Filling laundry detergent and/or additives into dispensers Open the door (colored marking) ... ...and close the door d CAUTION The access panel located on the bottom right of the washer is for Service Access and is to be opened only by an Authorized or Qualified Service Technician. 12

Installation and Use & Care (all languages)
Page 15
... laundry) Your appliance was tested before leaving the factory. q Pour 1-2 Tbsp. The settings are indicated in advance. q Pour approx. 1 quart (1 liter) of clothes, run the washer a complete cycle, without clothes, in the display field. The Start/Pause indicator light flashes (red). q Close the flap of the detergent dispenser. q Check that the...
... laundry) Your appliance was tested before leaving the factory. q Pour 1-2 Tbsp. The settings are indicated in advance. q Pour approx. 1 quart (1 liter) of clothes, run the washer a complete cycle, without clothes, in the display field. The Start/Pause indicator light flashes (red). q Close the flap of the detergent dispenser. q Check that the...

Installation and Use & Care (all languages)
Page 16
...tie them up duvets and hooks. To prevent loss or damage to laundry and the machine, the following items should be required in the washer, the wire may come loose during wasing and cause damage) Sorting the laundry According to one week. - Never wash new multiĆ...; is on stains. q Remove pins, buttons, buckles and other hard objects to avoid pilling. q Turn synthetic knitwear insideĆout to avoid scratching the washer interior. Tćshirts, shirts and blouses that have been used for one day. - Bibs. - Working clothes such as parts of the washing machine (e.g. ...
...tie them up duvets and hooks. To prevent loss or damage to laundry and the machine, the following items should be required in the washer, the wire may come loose during wasing and cause damage) Sorting the laundry According to one week. - Never wash new multiĆ...; is on stains. q Remove pins, buttons, buckles and other hard objects to avoid pilling. q Turn synthetic knitwear insideĆout to avoid scratching the washer interior. Tćshirts, shirts and blouses that have been used for one day. - Bibs. - Working clothes such as parts of the washing machine (e.g. ...

Installation and Use & Care (all languages)
Page 17
...and will eventually become gray and stiff. Measure out the detergent (powder or liquid) according to deliver optimum performance from your washer. Filling laundry detergent and/or additives q Open the flap of varying size will increase wrinkling. Dispenser I: Dispenser for liquid bleach... (chlorine bleach, color safe bleach). For best results it immediately. Laundry Detergents and Additives Dispensing the correct amount of the washer's colored surface. Soft water requires less detergent. - i Bleach may prevent proper spinning. Do not dye items of clothing and place...
...and will eventually become gray and stiff. Measure out the detergent (powder or liquid) according to deliver optimum performance from your washer. Filling laundry detergent and/or additives q Open the flap of varying size will increase wrinkling. Dispenser I: Dispenser for liquid bleach... (chlorine bleach, color safe bleach). For best results it immediately. Laundry Detergents and Additives Dispensing the correct amount of the washer's colored surface. Soft water requires less detergent. - i Bleach may prevent proper spinning. Do not dye items of clothing and place...


