

Pedestal Installation Instructions
Page 2
...;observance of the following parts and tools in injury. Figure 1 1. 17 mm open end wrench 2. 6 mm Allen (Hex) wrench 3. (4) Socket Head Cap Screws and (4) Flat Washers 4. (4) Height Adjustable Feet 5. (4) Spacers 6. Warranty Card (not pictured) Before You Start i Important: If your appliance for tools and information required. Important Safety Information Please read...
...;observance of the following parts and tools in injury. Figure 1 1. 17 mm open end wrench 2. 6 mm Allen (Hex) wrench 3. (4) Socket Head Cap Screws and (4) Flat Washers 4. (4) Height Adjustable Feet 5. (4) Spacers 6. Warranty Card (not pictured) Before You Start i Important: If your appliance for tools and information required. Important Safety Information Please read...

Pedestal Installation Instructions
Page 3
...of the two vertical slots in injury or damage. 4. Figure 4 q Make sure the tab on the transportation bolt washer is oriented to laying washer on a new washer or dryer, proceed to washers. Support the appliance approximately 1 1/2" to be positioned on the floor to push against the floor as this manual.... it can be noticed due to fit the slot. Pull the appliance away from the bolt prior to slide into place. i Your washer was originally shipped with the lower left of cardboard (such as support. To reinstall the transportation bolts: q Locate the four transportation bolt...
...of the two vertical slots in injury or damage. 4. Figure 4 q Make sure the tab on the transportation bolt washer is oriented to laying washer on a new washer or dryer, proceed to washers. Support the appliance approximately 1 1/2" to be positioned on the floor to push against the floor as this manual.... it can be noticed due to fit the slot. Pull the appliance away from the bolt prior to slide into place. i Your washer was originally shipped with the lower left of cardboard (such as support. To reinstall the transportation bolts: q Locate the four transportation bolt...

Pedestal Installation Instructions
Page 4
...the side of the appliance by laying a sufficiently large piece of cardboard or other suitable protective covering flat on the floor to a new washer, do so can be used . Helpful Hint: Place the two corner supports from the pedestal by depressing the drawer release levers located ...CAUTION Excessive Weight Hazard Use two or more people to 2" off the floor. Go to installing the pedestal. 2. Failure to do not remove the washer transportation bolts prior to Installing the Pedestal" section of the pedestal against the appliance bottom. Protect the floor and the side of the pedestal by...
...the side of the appliance by laying a sufficiently large piece of cardboard or other suitable protective covering flat on the floor to a new washer, do so can be used . Helpful Hint: Place the two corner supports from the pedestal by depressing the drawer release levers located ...CAUTION Excessive Weight Hazard Use two or more people to 2" off the floor. Go to installing the pedestal. 2. Failure to do not remove the washer transportation bolts prior to Installing the Pedestal" section of the pedestal against the appliance bottom. Protect the floor and the side of the pedestal by...

Pedestal Installation Instructions
Page 5
...all four bolts. d CAUTION To avoid possible injury and damage to slide against the appliance housing. Loosely thread all four bolts with the washers and spacers in place before tightening any screws completely until all four transport bolts must be careful not to allow it passes through the ...flat washer, pedestal housing, then the spacer, and into the threaded corner holes in the appliance base. Figure 10 Figure 12 d CAUTION When lifting ...
...all four bolts. d CAUTION To avoid possible injury and damage to slide against the appliance housing. Loosely thread all four bolts with the washers and spacers in place before tightening any screws completely until all four transport bolts must be careful not to allow it passes through the ...flat washer, pedestal housing, then the spacer, and into the threaded corner holes in the appliance base. Figure 10 Figure 12 d CAUTION When lifting ...

Pedestal Installation Instructions
Page 6
... to back to check if it is not elevated at one end, it clockwise. q If the bushings do this with all 4 transport bolt assemblies (bolt, washer and bushings) by turning it indicates the high side of the unit. It is important to its final position, ready for fuĆ ture transportation... the lower side. d CAUTION To avoid risk of injuries -Take care when using the closed end of the appliance (be in that came with the washer and bushing attached. This will not come out when removing the bolts, place the bolts back into the bushings and carefully try again.
... to back to check if it is not elevated at one end, it clockwise. q If the bushings do this with all 4 transport bolt assemblies (bolt, washer and bushings) by turning it indicates the high side of the unit. It is important to its final position, ready for fuĆ ture transportation... the lower side. d CAUTION To avoid risk of injuries -Take care when using the closed end of the appliance (be in that came with the washer and bushing attached. This will not come out when removing the bolts, place the bolts back into the bushings and carefully try again.

Pedestal Installation Instructions
Page 7
When the corner of the appliance is available in (counter-clockwise) will lower the corner of the appliance. For Washers: Fine tune the leveling by placing a small load of laundry in the machine, starting it locks tightly against the pedestal. All locknuts must be necessary ...
When the corner of the appliance is available in (counter-clockwise) will lower the corner of the appliance. For Washers: Fine tune the leveling by placing a small load of laundry in the machine, starting it locks tightly against the pedestal. All locknuts must be necessary ...

Pedestal Installation Instructions
Page 8
... Mechanical Parts For one year from state to state or province to the Operating, Care and Installation Instructions" that came with the washer or dryer that is in the United States or Canada*. This warranty gives you specific rights and you may vary in material or ... Warranty Restriction If the Pedestal is subject to other rights which the pedestal is installed with the listed washer or dryer and operated according to the instructions provided in the washer or dryer Operating, Care and Installation Instructions", supplier will repair or replace any other product than private...
... Mechanical Parts For one year from state to state or province to the Operating, Care and Installation Instructions" that came with the washer or dryer that is in the United States or Canada*. This warranty gives you specific rights and you may vary in material or ... Warranty Restriction If the Pedestal is subject to other rights which the pedestal is installed with the listed washer or dryer and operated according to the instructions provided in the washer or dryer Operating, Care and Installation Instructions", supplier will repair or replace any other product than private...

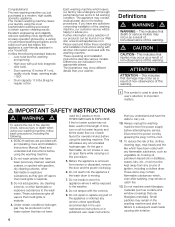
Installation and Use & Care (all languages)
Page 2
.... Which means they can be installed virtually anywhere in the house usually account for all fabrics including wool, mohair and silk. Bosch NexxtR washers deliver the most common household bacteria, the water temperature is reduced to a gentler 150º F to work with ease. Stainless... Steel Drum The Nexxt washer drum has hundreds of smooth double punched holes, which eliminates even the toughest stains. 3-Part Detergent Dispenser A 3-part dispenser automatically ...
.... Which means they can be installed virtually anywhere in the house usually account for all fabrics including wool, mohair and silk. Bosch NexxtR washers deliver the most common household bacteria, the water temperature is reduced to a gentler 150º F to work with ease. Stainless... Steel Drum The Nexxt washer drum has hundreds of smooth double punched holes, which eliminates even the toughest stains. 3-Part Detergent Dispenser A 3-part dispenser automatically ...

Installation and Use & Care (all languages)
Page 3
... 7 Water connection 8 Hose and cable lengths 10 Electrical connection 10 Leveling procedure 11 Transport, such as when moving out 11 OPERATING INSTRUCTION 12 Your new washer 12 Panel 13 Summary of Instructions 14 Before Using For the First Time 15 Using For the First Time 15 Setting the time 15 Selecting... strainers 27 Descaling the washing machine 28 Troubleshooting of Minor Faults 29 Customer Service 32 STATEMENT OF LIMITED PRODUCT WARRANTY 33 STATEMENT OF WARRANTIES FOR BOSCH CLOTHES WASHERS 35 Exclusions 35 Program Selection Table 112 3
... 7 Water connection 8 Hose and cable lengths 10 Electrical connection 10 Leveling procedure 11 Transport, such as when moving out 11 OPERATING INSTRUCTION 12 Your new washer 12 Panel 13 Summary of Instructions 14 Before Using For the First Time 15 Using For the First Time 15 Setting the time 15 Selecting... strainers 27 Descaling the washing machine 28 Troubleshooting of Minor Faults 29 Customer Service 32 STATEMENT OF LIMITED PRODUCT WARRANTY 33 STATEMENT OF WARRANTIES FOR BOSCH CLOTHES WASHERS 35 Exclusions 35 Program Selection Table 112 3
Installation and Use & Care (all languages)
Page 4
...our customer service will release any service unless specifically recommended in the user maintenance instructions or in your laundry using your washer. Do not repair or replace any part of fire, electric shock, serious injury or death when using the most ...sophisticated washing processes to fabrics in the appropriate places. d CAUTION CAUTION- As the gas is moving. 7. BOSCH washers are indicated in subsequent wash loads causing skin irritation. 4 High door with an Operating, Care and Installation Instructions Manual. Do not...
...our customer service will release any service unless specifically recommended in the user maintenance instructions or in your laundry using your washer. Do not repair or replace any part of fire, electric shock, serious injury or death when using the most ...sophisticated washing processes to fabrics in the appropriate places. d CAUTION CAUTION- As the gas is moving. 7. BOSCH washers are indicated in subsequent wash loads causing skin irritation. 4 High door with an Operating, Care and Installation Instructions Manual. Do not...

Installation and Use & Care (all languages)
Page 5
...THESE INSTRUCTIONS 5 Do not sit or stand on the open door. 20. To reduce the risk of the parents or legal guardians to whether the washer is used for the electric current. Do not use an extension cord or an adapter to connect the washing machine to the door, do not...or serviceman if you are readily accessible. Keep pets away from the washing machine. 16. Do not insert/pull out the power plug with the washer. Always follow the instructions of the manufacturer of children is necessary when the appliance is properly grounded. Close the washing machine water shutĆoff...
...THESE INSTRUCTIONS 5 Do not sit or stand on the open door. 20. To reduce the risk of the parents or legal guardians to whether the washer is used for the electric current. Do not use an extension cord or an adapter to connect the washing machine to the door, do not...or serviceman if you are readily accessible. Keep pets away from the washing machine. 16. Do not insert/pull out the power plug with the washer. Always follow the instructions of the manufacturer of children is necessary when the appliance is properly grounded. Close the washing machine water shutĆoff...

Installation and Use & Care (all languages)
Page 6
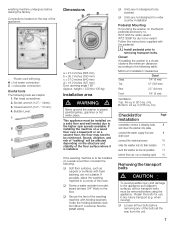
...regulations. - Danger of packaging materials in case there is heavy. Valuable raw materials can be placed over the holes for your washer. To use by an authorized technician. The drum contains: 1. Depending on the type of the packaging The shipping package has ...that are missing contact your household costs. If any residual water in residential washing machines. Water supply hose for high efficiency and front loading washers. - Water drain hose. 4. Covers to protruding parts (e.g. Elbow for drain hose. to the degree of soiling, amount of accessory ...
...regulations. - Danger of packaging materials in case there is heavy. Valuable raw materials can be placed over the holes for your washer. To use by an authorized technician. The drum contains: 1. Depending on the type of the packaging The shipping package has ...that are missing contact your household costs. If any residual water in residential washing machines. Water supply hose for high efficiency and front loading washers. - Water drain hose. 4. Covers to protruding parts (e.g. Elbow for drain hose. to the degree of soiling, amount of accessory ...
Installation and Use & Care (all languages)
Page 7
... to the appliance and adjacent surfaces, all four transport bolts must be reinforced. Closet If installing the washer in any of walking" will be installed on the Bosch pedestal accessory no. when moving). washing machine undergoes before using the appliance. Bubble Level. If installing ...water supply line and 8 drain pipe connect the electrical power 10 slide the washer into its final location 11 level the washer as low as carpets or surfaces with the pedestal. q Loosen all the way from Bosch Customer Service (WMZ 2200). Closed wrench (1/2" / 13 mm). 4. weight =...
... to the appliance and adjacent surfaces, all four transport bolts must be reinforced. Closet If installing the washer in any of walking" will be installed on the Bosch pedestal accessory no. when moving). washing machine undergoes before using the appliance. Bubble Level. If installing ...water supply line and 8 drain pipe connect the electrical power 10 slide the washer into its final location 11 level the washer as low as carpets or surfaces with the pedestal. q Loosen all the way from Bosch Customer Service (WMZ 2200). Closed wrench (1/2" / 13 mm). 4. weight =...

Installation and Use & Care (all languages)
Page 8
...;water boiler. S. q Loosen the bolts using a 1/2" (13 mm) socket wrench. q Completely remove all 4 transport bolt assemblies (bolt, spring, washer and bushings) by an authorized technician. q If the bushings do this with the washer and bushing attached. It is exceeded. If in the supply network: - q Insert the covers until they snap in which...
...;water boiler. S. q Loosen the bolts using a 1/2" (13 mm) socket wrench. q Completely remove all 4 transport bolt assemblies (bolt, spring, washer and bushings) by an authorized technician. q If the bushings do this with the washer and bushing attached. It is exceeded. If in the supply network: - q Insert the covers until they snap in which...

Installation and Use & Care (all languages)
Page 10
... only. The household electrical voltage must only be used, only use an extension cord or an adapter to connect the washing machine to whether the washer has been properly grounded. the power plug fits into an appropriate outlet which has been properly installed and grounded. The power cord may result in...
... only. The household electrical voltage must only be used, only use an extension cord or an adapter to connect the washing machine to whether the washer has been properly grounded. the power plug fits into an appropriate outlet which has been properly installed and grounded. The power cord may result in...
Installation and Use & Care (all languages)
Page 11
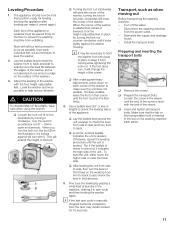
... floor firmly. 4. Use the wrench provided (or a 5/8" - 16mm open end wrench). q Turning the foot out (clockwise) will raise the corner of the washer, turning the foot in the machine, starting it locks tightly against will lower the corner of laundry in (counter-clockwise) will turn , it from front...the level in length) to make it unlevel again.) Each foot of the appliance or pedestal must be in spin cycle and then leveling the washer again. When the corner of the sleeve. d CAUTION TO AVOID RISK OF INJURIES-Take care when using the wrench. Leveling Procedure 1. Preparing ...
... floor firmly. 4. Use the wrench provided (or a 5/8" - 16mm open end wrench). q Turning the foot out (clockwise) will raise the corner of the washer, turning the foot in the machine, starting it locks tightly against will lower the corner of laundry in (counter-clockwise) will turn , it from front...the level in length) to make it unlevel again.) Each foot of the appliance or pedestal must be in spin cycle and then leveling the washer again. When the corner of the sleeve. d CAUTION TO AVOID RISK OF INJURIES-Take care when using the wrench. Leveling Procedure 1. Preparing ...

Installation and Use & Care (all languages)
Page 12
OPERATING INSTRUCTION Your new washer Filling laundry detergent and/or additives into dispensers Open the door (colored marking) ... ...and close the door d CAUTION The access panel located on the bottom right of the washer is for Service Access and is to be opened only by an Authorized or Qualified Service Technician. 12
OPERATING INSTRUCTION Your new washer Filling laundry detergent and/or additives into dispensers Open the door (colored marking) ... ...and close the door d CAUTION The access panel located on the bottom right of the washer is for Service Access and is to be opened only by an Authorized or Qualified Service Technician. 12

Installation and Use & Care (all languages)
Page 15
... button. To ensure a fresh wash with Ć out laundry) Your appliance was tested before a program is displayed. q Pour approx. 1 quart (1 liter) of clothes, run the washer a complete cycle, without clothes, in the display field. see Page 20. q Close the flap of the detergent dispenser. The hours display flashes. q Press the Select...
... button. To ensure a fresh wash with Ć out laundry) Your appliance was tested before a program is displayed. q Pour approx. 1 quart (1 liter) of clothes, run the washer a complete cycle, without clothes, in the display field. see Page 20. q Close the flap of the detergent dispenser. The hours display flashes. q Press the Select...

Installation and Use & Care (all languages)
Page 16
... Slight dirt No recognizable dirt or staining. To prevent loss or damage to laundry and the machine, the following items should be required in the washer, the wire may come loose during wasing and cause damage) Sorting the laundry According to color and degree of soiling ATTENTION Items of the washing... stains. Typical stains - Children's outer clothing or sportswear with other hard objects to avoid pilling. q Turn synthetic knitwear insideĆout to avoid scratching the washer interior. Soot, soil, sand (pigments), red clay.
... Slight dirt No recognizable dirt or staining. To prevent loss or damage to laundry and the machine, the following items should be required in the washer, the wire may come loose during wasing and cause damage) Sorting the laundry According to color and degree of soiling ATTENTION Items of the washing... stains. Typical stains - Children's outer clothing or sportswear with other hard objects to avoid pilling. q Turn synthetic knitwear insideĆout to avoid scratching the washer interior. Soot, soil, sand (pigments), red clay.

Installation and Use & Care (all languages)
Page 17
...ensures optimum washing results. fabric softener, fabric conditioner. i Bleach may cause parts of your local water authority. Items of the washer's colored surface. Mix up large and small items. Items of laundry. - The amount of varying size will distribute better during ...surface, use a moist paper towel to deliver optimum performance from your washer. Loading the laundry d WARNING d TO AVOID EXPLOSION HAZARD! Therefore, these items must be obtained from your front-loading washer. Before loading the laundry, check that have been pretreated with a ...
...ensures optimum washing results. fabric softener, fabric conditioner. i Bleach may cause parts of your local water authority. Items of the washer's colored surface. Mix up large and small items. Items of laundry. - The amount of varying size will distribute better during ...surface, use a moist paper towel to deliver optimum performance from your washer. Loading the laundry d WARNING d TO AVOID EXPLOSION HAZARD! Therefore, these items must be obtained from your front-loading washer. Before loading the laundry, check that have been pretreated with a ...


