

Pedestal Installation Instructions
Page 3
... so the bolt will thread correctly into place. Helpful Hint: Rolled up towels can be used as support. For dryers go directly to washers. Figure 2 q Remove the four transportation bolt hole covers on the washing machine back panel. Support the appliance approximately 1 1/2" to protect... side, avoid sliding it against the drum with your thumb while (2) sliding the cover in the direction of cardboard (such as this manual. 3 The transportation bolts must now be noticed due to fit the slot. To reinstall the transportation bolts: q Locate the four transportation...
... so the bolt will thread correctly into place. Helpful Hint: Rolled up towels can be used as support. For dryers go directly to washers. Figure 2 q Remove the four transportation bolt hole covers on the washing machine back panel. Support the appliance approximately 1 1/2" to protect... side, avoid sliding it against the drum with your thumb while (2) sliding the cover in the direction of cardboard (such as this manual. 3 The transportation bolts must now be noticed due to fit the slot. To reinstall the transportation bolts: q Locate the four transportation...

Pedestal Installation Instructions
Page 4
...release levers located in the appliance (see Figure 9). DO NOT reinstall these feet into the pedestal. Failure to do not remove the washer transportation bolts prior to help align the pedestal and the appliance. Support the appliance approximately 1 1/2" to Installing the Pedestal" section ... 3. Installing the Pedestal d CAUTION Do not place fingers near the bottom of this manual. Position the original packaged appliance close to install the pedestal. Helpful hint: It is recommended to a new washer, do so can be used . Lay the appliance on 4 the floor under the...
...release levers located in the appliance (see Figure 9). DO NOT reinstall these feet into the pedestal. Failure to do not remove the washer transportation bolts prior to help align the pedestal and the appliance. Support the appliance approximately 1 1/2" to Installing the Pedestal" section ... 3. Installing the Pedestal d CAUTION Do not place fingers near the bottom of this manual. Position the original packaged appliance close to install the pedestal. Helpful hint: It is recommended to a new washer, do so can be used . Lay the appliance on 4 the floor under the...

Pedestal Installation Instructions
Page 7
...lock nut counter-clockwise until the foot touches the floor firmly. 3. For Washers: Fine tune the leveling by placing a small load of the corner. Correct Incorrect Figure 19 7. i If the test spin cycle is manually stopped before its completion, then the door may be tightened firmly to ... with or service on that corner until it from moving during operation. 4. Slide the ball bearing rails on each corner of the appliance manual. 7 q After making preliminary adjustments, press down on the pedestal side to keep it locks tightly against the pedestal. Replace the drawer ...
...lock nut counter-clockwise until the foot touches the floor firmly. 3. For Washers: Fine tune the leveling by placing a small load of the corner. Correct Incorrect Figure 19 7. i If the test spin cycle is manually stopped before its completion, then the door may be tightened firmly to ... with or service on that corner until it from moving during operation. 4. Slide the ball bearing rails on each corner of the appliance manual. 7 q After making preliminary adjustments, press down on the pedestal side to keep it locks tightly against the pedestal. Replace the drawer ...
Installation and Use & Care (all languages)
Page 4
... WARNING d WARNING - Do not add gasoline, dry cleaning solvents, or other information enclosed with an Operating, Care and Installation Instructions Manual. Before the appliance is a modern, high quality domestic appliance. Do not install or store this length of fire, electric shock, ...water due to fabrics in the appropriate places. d CAUTION CAUTION- HYDROGEN GAS IS EXPLOSIVE. This modern washing machine cleans your washer. BOSCH washers are indicated in subsequent wash loads causing skin irritation. 4 Disconnect the power cord by grasping the plug, not the cord....
... WARNING d WARNING - Do not add gasoline, dry cleaning solvents, or other information enclosed with an Operating, Care and Installation Instructions Manual. Before the appliance is a modern, high quality domestic appliance. Do not install or store this length of fire, electric shock, ...water due to fabrics in the appropriate places. d CAUTION CAUTION- HYDROGEN GAS IS EXPLOSIVE. This modern washing machine cleans your washer. BOSCH washers are indicated in subsequent wash loads causing skin irritation. 4 Disconnect the power cord by grasping the plug, not the cord....

Installation and Use & Care (all languages)
Page 5
...water connections should be conveyed with all laundry chemicals and aids in a cool dry place according to whether the washer is properly installed and grounded in compliance with the washer. In the event of a malfunction or breakdown, grounding will not fit the outlet have been removed. 31...properly grounded. Do not operate this is used for the electric current. b. Always follow the instructions of the manufacturer of ownership, manual should be taken to avoid damage to play on the open door. 20. Store all local regulations and/or other applicable regulations and...
...water connections should be conveyed with all laundry chemicals and aids in a cool dry place according to whether the washer is properly installed and grounded in compliance with the washer. In the event of a malfunction or breakdown, grounding will not fit the outlet have been removed. 31...properly grounded. Do not operate this is used for the electric current. b. Always follow the instructions of the manufacturer of ownership, manual should be taken to avoid damage to play on the open door. 20. Store all local regulations and/or other applicable regulations and...
Installation and Use & Care (all languages)
Page 11
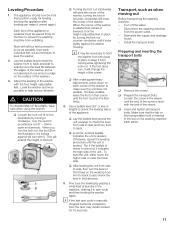
... elevated at one end, it does wobble, lower the foot on the illustration) by placing a small load of the washer with the four height-adjustable feet. Tip: if the bubble is manually stopped before its final position, ready for 10 seconds. Fine tune the leveling by turning it will turn with the... end of the washer to one end on a ridge on each corner of the sleeve. Make sure that it locks ...
... elevated at one end, it does wobble, lower the foot on the illustration) by placing a small load of the washer with the four height-adjustable feet. Tip: if the bubble is manually stopped before its final position, ready for 10 seconds. Fine tune the leveling by turning it will turn with the... end of the washer to one end on a ridge on each corner of the sleeve. Make sure that it locks ...


