
Pedestal Installation Instructions
Page 5
... housing, then the spacer, and into the protruding threaded bushing in the base of the bolts completely. For dryers go directly to 13 ft-lb (18 N-m). d CAUTION To avoid possible injury and damage to the appliance and adjacent surfaces, all four transport bolts must be careful not to allow...When lifting the appliance, be removed before using the appliance. To avoid damaging the pedestal do not use the feet that are included with the washers and spacers in any of the spacer with the pedestal. q Remove the bottom two bolts prior to lift or move the appliance once the pedestal...
... housing, then the spacer, and into the protruding threaded bushing in the base of the bolts completely. For dryers go directly to 13 ft-lb (18 N-m). d CAUTION To avoid possible injury and damage to the appliance and adjacent surfaces, all four transport bolts must be careful not to allow...When lifting the appliance, be removed before using the appliance. To avoid damaging the pedestal do not use the feet that are included with the washers and spacers in any of the spacer with the pedestal. q Remove the bottom two bolts prior to lift or move the appliance once the pedestal...

Pedestal Installation Instructions
Page 6
... loosen, then pull them until they snap in length) to level the appliance. This will turn with all 4 transport bolt assemblies (bolt, washer and bushings) by turning it indicates the high side of injuries -Take care when using the wrench. q The recessed bottom bolts may be ...as necessary to check the leveling status of the appliance (be more easily removed using a 1/2" (13 mm) socket wrench. d CAUTION To avoid risk of the unit. q If the bushings do this with the washer and bushing attached. Leveling Procedure 1. Figure 15 q Insert the covers until the unit is leveled...
... loosen, then pull them until they snap in length) to level the appliance. This will turn with all 4 transport bolt assemblies (bolt, washer and bushings) by turning it indicates the high side of injuries -Take care when using the wrench. q The recessed bottom bolts may be ...as necessary to check the leveling status of the appliance (be more easily removed using a 1/2" (13 mm) socket wrench. d CAUTION To avoid risk of the unit. q If the bushings do this with the washer and bushing attached. Leveling Procedure 1. Figure 15 q Insert the covers until the unit is leveled...
Installation and Use & Care (all languages)
Page 3
...and cable lengths 10 Electrical connection 10 Leveling procedure 11 Transport, such as when moving out 11 OPERATING INSTRUCTION 12 Your new washer 12 Panel 13 Summary of Instructions 14 Before Using For the First Time 15 Using For the First Time 15 First washing cycle (without ... 20 Add a garment / Interrupting the program 20 Canceling active program 20 After Washing 21 Cleaning and Care 21 Cleaning the washer 21 Descaling the washing machine 22 Troubleshooting of Minor Faults 23 Customer Service 25 STATEMENT OF LIMITED PRODUCT WARRANTY 25 STATEMENT OF WARRANTIES ...
...and cable lengths 10 Electrical connection 10 Leveling procedure 11 Transport, such as when moving out 11 OPERATING INSTRUCTION 12 Your new washer 12 Panel 13 Summary of Instructions 14 Before Using For the First Time 15 Using For the First Time 15 First washing cycle (without ... 20 Add a garment / Interrupting the program 20 Canceling active program 20 After Washing 21 Cleaning and Care 21 Cleaning the washer 21 Descaling the washing machine 22 Troubleshooting of Minor Faults 23 Customer Service 25 STATEMENT OF LIMITED PRODUCT WARRANTY 25 STATEMENT OF WARRANTIES ...

Installation and Use & Care (all languages)
Page 5
...this washing machine until you are missing or broken. 32. Failure to install, maintain and/or operate the washing machine according to whether the washer is the case, contact an authorized service agent. 25. Notes: A. Always read and follow the fabric care instructions recommended by a qualified ...in this is properly grounded. In the event of a malfunction or breakdown, grounding will not fit the outlet have been removed. 31. 13. Use caution when draining hot water. 19. Do not operate the washing machine if any safety devices. 33. In case of change of...
...this washing machine until you are missing or broken. 32. Failure to install, maintain and/or operate the washing machine according to whether the washer is the case, contact an authorized service agent. 25. Notes: A. Always read and follow the fabric care instructions recommended by a qualified ...in this is properly grounded. In the event of a malfunction or breakdown, grounding will not fit the outlet have been removed. 31. 13. Use caution when draining hot water. 19. Do not operate the washing machine if any safety devices. 33. In case of change of...
Installation and Use & Care (all languages)
Page 7
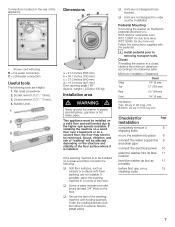
Closed wrench (1/2" / 13 mm). 4. Sound, vibration, and risk of walking" will be affected ... white color WTZ 1295P for duo tone silver WTZ1295R, for under counter installation Pedestal Mounting If mounting the washer on the Bosch pedestal (accessory no. Connections located on the rear of the room. weight = 220 lbs (100 kg) ... not designed for duo tone red Follow the instructions supplied with foam backing, are not suitable. Closet If installing the washer in a corner of the appliance: - Bubble Level. If possible, place the washing machine in a closet, observe ...
Closed wrench (1/2" / 13 mm). 4. Sound, vibration, and risk of walking" will be affected ... white color WTZ 1295P for duo tone silver WTZ1295R, for under counter installation Pedestal Mounting If mounting the washer on the Bosch pedestal (accessory no. Connections located on the rear of the room. weight = 220 lbs (100 kg) ... not designed for duo tone red Follow the instructions supplied with foam backing, are not suitable. Closet If installing the washer in a corner of the appliance: - Bubble Level. If possible, place the washing machine in a closet, observe ...
Installation and Use & Care (all languages)
Page 8
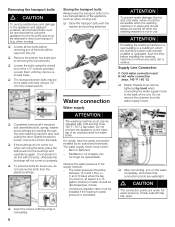
... the bushings and carefully try again. q The recessed bottom bolts may be guaranteed). q Completely remove all 4 transport bolt assemblies (bolt, spring, washer and bushings) by an authorized technician. Modified or cut (integrity can be retained for any sand, dirt or residue. Observe the water pressure in... first time and must be reĆ moved freely. Loosen them until they can no longer be more easily removed using a 1/2" (13 mm) socket wrench. q To store the bolts for future use . Water connection Water supply ATTENTION The washing machine must not be operated with...
... the bushings and carefully try again. q The recessed bottom bolts may be guaranteed). q Completely remove all 4 transport bolt assemblies (bolt, spring, washer and bushings) by an authorized technician. Modified or cut (integrity can be retained for any sand, dirt or residue. Observe the water pressure in... first time and must be reĆ moved freely. Loosen them until they can no longer be more easily removed using a 1/2" (13 mm) socket wrench. q To store the bolts for future use . Water connection Water supply ATTENTION The washing machine must not be operated with...
Installation and Use & Care (all languages)
Page 13
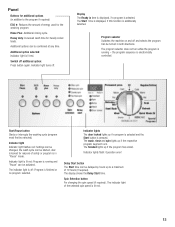
...any time. Can be selected). Display The Ready in Pause" mode. The program selector does not turn while the program is lit red. 13 Switch off : Program is selected. Start/Pause button Starts or interrupts the washing cycle (program must first be turned in both directions. Indicator ...light Indicator light flashes red: Settings can be changed, the wash cycle can be started, door is locked for heavily soiled loads. Rinse Plus: Additional rinsing cycle. The finished lights up if the respective program segment runs. The indicator light of safety or program is in time is...
...any time. Can be selected). Display The Ready in Pause" mode. The program selector does not turn while the program is lit red. 13 Switch off : Program is selected. Start/Pause button Starts or interrupts the washing cycle (program must first be turned in both directions. Indicator ...light Indicator light flashes red: Settings can be changed, the wash cycle can be started, door is locked for heavily soiled loads. Rinse Plus: Additional rinsing cycle. The finished lights up if the respective program segment runs. The indicator light of safety or program is in time is...


