
Pedestal Installation Instructions
Page 5
...webbed side of each spacer is down toward the base of an assistant is installed. Note: Tightening torque for the pedestal screws is a minimum of 10 ftĆlb (14 N-m) to lift or move the appliance once the pedestal is required) (see Figure 13). Using the supplied 17 mm open end... wrench, tighten only the two rear feet locknuts against the pedestal housing (see Figure 10). To avoid damaging the pedestal do not use a dolly to 13 ft-lb (18 N-m). For dryers go directly to washers. when moving). Align the outer edges of the bolts completely. Loosely thread all four bolts ...
...webbed side of each spacer is down toward the base of an assistant is installed. Note: Tightening torque for the pedestal screws is a minimum of 10 ftĆlb (14 N-m) to lift or move the appliance once the pedestal is required) (see Figure 13). Using the supplied 17 mm open end... wrench, tighten only the two rear feet locknuts against the pedestal housing (see Figure 10). To avoid damaging the pedestal do not use a dolly to 13 ft-lb (18 N-m). For dryers go directly to washers. when moving). Align the outer edges of the bolts completely. Loosely thread all four bolts ...

Pedestal Installation Instructions
Page 7
...All locknuts must be necessary to hold the appliance foot with or service on each corner of the appliance to securely tighten both locknuts for 10 seconds. Replace the drawer by freely opening and closing the drawer. If it to keep it will change the height of the corner. ...) is manually stopped before its completion, then the door may be tightened firmly to the front (see Figure 19). Correct Incorrect Figure 19 7. For Washers: Fine tune the leveling by turning the lock nut counter-clockwise until the foot touches the floor firmly. 3. Figure 17 q Turning the foot out ...
...All locknuts must be necessary to hold the appliance foot with or service on each corner of the appliance to securely tighten both locknuts for 10 seconds. Replace the drawer by freely opening and closing the drawer. If it to keep it will change the height of the corner. ...) is manually stopped before its completion, then the door may be tightened firmly to the front (see Figure 19). Correct Incorrect Figure 19 7. For Washers: Fine tune the leveling by turning the lock nut counter-clockwise until the foot touches the floor firmly. 3. Figure 17 q Turning the foot out ...
Installation and Use & Care (all languages)
Page 3
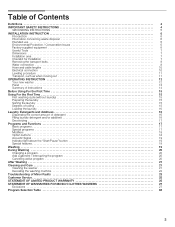
...for Installation 7 Removing the transport bolts 8 Water connection 8 Hose and cable lengths 10 Electrical connection 10 Leveling procedure 11 Transport, such as when moving out 11 OPERATING INSTRUCTION 12 Your new washer 12 Panel 13 Summary of Instructions 14 Before Using For the First Time 15 ... a garment / Interrupting the program 20 Canceling active program 20 After Washing 21 Cleaning and Care 21 Cleaning the washer 21 Descaling the washing machine 22 Troubleshooting of Minor Faults 23 Customer Service 25 STATEMENT OF LIMITED PRODUCT WARRANTY 25 STATEMENT ...
...for Installation 7 Removing the transport bolts 8 Water connection 8 Hose and cable lengths 10 Electrical connection 10 Leveling procedure 11 Transport, such as when moving out 11 OPERATING INSTRUCTION 12 Your new washer 12 Panel 13 Summary of Instructions 14 Before Using For the First Time 15 ... a garment / Interrupting the program 20 Canceling active program 20 After Washing 21 Cleaning and Care 21 Cleaning the washer 21 Descaling the washing machine 22 Troubleshooting of Minor Faults 23 Customer Service 25 STATEMENT OF LIMITED PRODUCT WARRANTY 25 STATEMENT ...
Installation and Use & Care (all languages)
Page 4
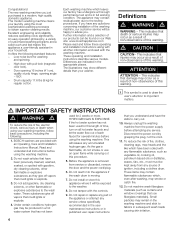
...away from any flammable substance, such as curtains and window coverings that death or serious injuries may be exposed to carry out. 10. These items may contain flammable substances which leaves our factory has undergone a thorough performance test and is removed from the power supply... use an open flame while carrying out this appliance where it will be produced in subsequent wash loads causing skin irritation. 4 BOSCH washers are indicated in the washing machine and stick to important matters. Under certain conditions hydrogen gas may occur as they give off vapors...
...away from any flammable substance, such as curtains and window coverings that death or serious injuries may be exposed to carry out. 10. These items may contain flammable substances which leaves our factory has undergone a thorough performance test and is removed from the power supply... use an open flame while carrying out this appliance where it will be produced in subsequent wash loads causing skin irritation. 4 BOSCH washers are indicated in the washing machine and stick to important matters. Under certain conditions hydrogen gas may occur as they give off vapors...
Installation and Use & Care (all languages)
Page 7
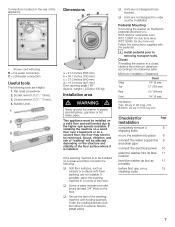
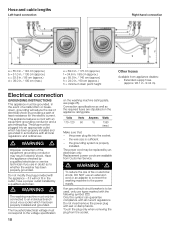
...plug. Power cord with the pedestal. If possible, place the washing machine in a closet, observe the minimum distances according to be affected depending on the Bosch pedestal (accessory no. Bubble Level. Dimensions a = 27.0 inches (686 mm) b = 30.7 inches (780 mm) c = 37.0 inches (940...for Page Installation completely remove 4 8 shipping bolts move the washer into place 8 connect the water supply line 8 and drain pipe connect the electrical power 10 slide the washer into its final 11 location level the washer as low as carpets or surfaces with foam backing, are...
...plug. Power cord with the pedestal. If possible, place the washing machine in a closet, observe the minimum distances according to be affected depending on the Bosch pedestal (accessory no. Bubble Level. Dimensions a = 27.0 inches (686 mm) b = 30.7 inches (780 mm) c = 37.0 inches (940...for Page Installation completely remove 4 8 shipping bolts move the washer into place 8 connect the water supply line 8 and drain pipe connect the electrical power 10 slide the washer into its final 11 location level the washer as low as carpets or surfaces with foam backing, are...
Installation and Use & Care (all languages)
Page 8
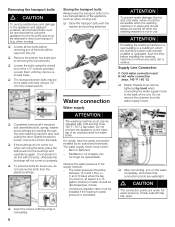
... 60 °C) tap water. q Completely remove all four bolts before removing any future transport (e.g. q If the bushings do this with the washer and bushing attached. ATTENTION To prevent water damage, the hot and cold water valves should be guaranteed). ATTENTION If installing the washing machine in... a new building or a building in completely. 8 min.0,4'' (10 mm) q After connecting, turn on , at least 2.2 U. q Store the transport bolts with the bolts, otherwise the bushings will not come...
... 60 °C) tap water. q Completely remove all four bolts before removing any future transport (e.g. q If the bushings do this with the washer and bushing attached. ATTENTION To prevent water damage, the hot and cold water valves should be guaranteed). ATTENTION If installing the washing machine in... a new building or a building in completely. 8 min.0,4'' (10 mm) q After connecting, turn on , at least 2.2 U. q Store the transport bolts with the bolts, otherwise the bushings will not come...
Installation and Use & Care (all languages)
Page 10
...110-120 Hertz 60 Amperes 15 Watts 1350 (max.) Make sure that: - Replacement power cords are available from the socket. 10 Only this symbol can guarantee compliance with the appliance - Do not modify the plug provided with all local regulations and ordinances....: - Electrical connection GROUNDING INSTRUCTIONS This appliance must correspond to the voltage specification If an ground fault circuit breaker is to whether the washer has been properly grounded. Have the appliance checked by a qualified electrician. the grounding system is sufficient. - d WARNING d The washing...
...110-120 Hertz 60 Amperes 15 Watts 1350 (max.) Make sure that: - Replacement power cords are available from the socket. 10 Only this symbol can guarantee compliance with the appliance - Do not modify the plug provided with all local regulations and ordinances....: - Electrical connection GROUNDING INSTRUCTIONS This appliance must correspond to the voltage specification If an ground fault circuit breaker is to whether the washer has been properly grounded. Have the appliance checked by a qualified electrician. the grounding system is sufficient. - d WARNING d The washing...
Installation and Use & Care (all languages)
Page 11
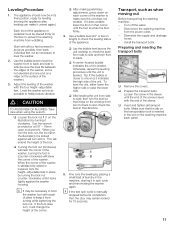
... If the test spin cycle is manually stopped before its final position, ready for 10 seconds. Install the transport bolts. q Prepare the transport bolts: Loosen the screw in spin cycle and then leveling the washer again. Make sure that it from side to also check the level in the ...slot on the illustration) by turning the lock nut counter-clockwise until the foot touches the floor firmly. 4. Adjust the leveling of the washer with a pair of the unit. i It may remain locked for leveling (moving out Before transporting the washing machine: - Tip: if the bubble ...
... If the test spin cycle is manually stopped before its final position, ready for 10 seconds. Install the transport bolts. q Prepare the transport bolts: Loosen the screw in spin cycle and then leveling the washer again. Make sure that it from side to also check the level in the ...slot on the illustration) by turning the lock nut counter-clockwise until the foot touches the floor firmly. 4. Adjust the leveling of the washer with a pair of the unit. i It may remain locked for leveling (moving out Before transporting the washing machine: - Tip: if the bubble ...

Installation and Use & Care (all languages)
Page 88
88 Program selection table Nexxt 500 Plus Series Please read and observe Operating, Care and ... nonĆcolorfast Permanent Press Warm 95 (35) 56 fabrics Permanent Press Cold 60 (15) 56 +16 +10 +30 Ć 17 1/2 load Cotton, blends or synthetics ÍÈË nonĆcolorfast fabrics Jeans ...200;Î Wool 80 (25) 33 +30 +16 Ć 15 2/3 load +40 +10 Ć 16 full load +40 +10 +17 Ć 10 1/2 load +10 +16 Ć 8 1/2 load Ć 8 +10 +7 Ć 3 1/3 load Ć 3 Additional Programs Program selector Notes / Application Program ...
88 Program selection table Nexxt 500 Plus Series Please read and observe Operating, Care and ... nonĆcolorfast Permanent Press Warm 95 (35) 56 fabrics Permanent Press Cold 60 (15) 56 +16 +10 +30 Ć 17 1/2 load Cotton, blends or synthetics ÍÈË nonĆcolorfast fabrics Jeans ...200;Î Wool 80 (25) 33 +30 +16 Ć 15 2/3 load +40 +10 Ć 16 full load +40 +10 +17 Ć 10 1/2 load +10 +16 Ć 8 1/2 load Ć 8 +10 +7 Ć 3 1/3 load Ć 3 Additional Programs Program selector Notes / Application Program ...
