
Installation Instructions
Page 3
...higher. Do not over and result in serious injury or death. WARNING Avoiding General Hazards Do not use extension cords. Once these mounting brackets are certain the circuit is designed for proper installation. 3 The dishwasher is de-energized. Check local plumbing codes for stainless steel... copper tubing or other material for water supply, defer to touch. Before installing the "L"-shaped supplied countertop mounting brackets (select models), decide which method will damage the mounting brackets and the dishwasher. Serious injury could result in serious injury. When opening .
...higher. Do not over and result in serious injury or death. WARNING Avoiding General Hazards Do not use extension cords. Once these mounting brackets are certain the circuit is designed for proper installation. 3 The dishwasher is de-energized. Check local plumbing codes for stainless steel... copper tubing or other material for water supply, defer to touch. Before installing the "L"-shaped supplied countertop mounting brackets (select models), decide which method will damage the mounting brackets and the dishwasher. Serious injury could result in serious injury. When opening .
Installation Instructions
Page 5
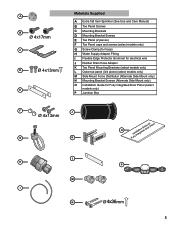
...D Ø 4x13mm E Materials Supplied A Extra Tall Item Sprinkler (See Use and Care Manual) B Toe Panel Screws C Mounting Brackets D Mounting Bracket Screws E Toe Panel (2 pieces) F Toe Panel caps and screws (select models only) G Screw Clamp (for hose) ... for electrical wire J Rubber Drain Hose Adaptor K Toe Panel Mounting Brackets (select models only) L Outer toe panel (3rd piece) (select models only) M Side Mount Force Distributor (Alternate Side Mount only) N Mounting Bracket Screws (Alternate Side Mount only) O Installation Guide for Fully Integrated Door Panel (select ...
...D Ø 4x13mm E Materials Supplied A Extra Tall Item Sprinkler (See Use and Care Manual) B Toe Panel Screws C Mounting Brackets D Mounting Bracket Screws E Toe Panel (2 pieces) F Toe Panel caps and screws (select models only) G Screw Clamp (for hose) ... for electrical wire J Rubber Drain Hose Adaptor K Toe Panel Mounting Brackets (select models only) L Outer toe panel (3rd piece) (select models only) M Side Mount Force Distributor (Alternate Side Mount only) N Mounting Bracket Screws (Alternate Side Mount only) O Installation Guide for Fully Integrated Door Panel (select ...

Installation Instructions
Page 10
...dishwasher opening width measures 235/8″ (600mm) use the ALTERNATE SIDE MOUNT mounting method. 10 M M M Figure 19 Alternate Side Mount 10 Before installing the supplied countertop mounting brackets, decide which method of Mounting Brackets Alternate Side Mount for opening width measures >235/8″ (600mm) use the drain hose...its enclosure in Figure 18, and position the two small tabs on the mounting brackets over the two slots on the dishwasher, removing them is . 1. Orient the mounting brackets as shown in the same direction as it is difficult and will be ...
...dishwasher opening width measures 235/8″ (600mm) use the ALTERNATE SIDE MOUNT mounting method. 10 M M M Figure 19 Alternate Side Mount 10 Before installing the supplied countertop mounting brackets, decide which method of Mounting Brackets Alternate Side Mount for opening width measures >235/8″ (600mm) use the drain hose...its enclosure in Figure 18, and position the two small tabs on the mounting brackets over the two slots on the dishwasher, removing them is . 1. Orient the mounting brackets as shown in the same direction as it is difficult and will be ...

Installation Instructions
Page 11
...cords do not bunch up behind the unit or kink as shown in Figure 21. Wooden 1/16″ (2mm) D Figure 24 For Side Mount - Level the dishwasher horizontally by turning center screw to follow this warning can result in the opening before raising the leg levelers. To avoid scratching... caution when sliding the dishwasher into the cabinet opening. Remove the top cutlery rack as shown in the mounting brackets as shown for Top (Figure 23), Side Mount (Figure 24) and Alternate Side Mount (Figure 25). Make certain to your cabinet or countertop as you slide the unit back. Figure 23 ...
...cords do not bunch up behind the unit or kink as shown in Figure 21. Wooden 1/16″ (2mm) D Figure 24 For Side Mount - Level the dishwasher horizontally by turning center screw to follow this warning can result in the opening before raising the leg levelers. To avoid scratching... caution when sliding the dishwasher into the cabinet opening. Remove the top cutlery rack as shown in the mounting brackets as shown for Top (Figure 23), Side Mount (Figure 24) and Alternate Side Mount (Figure 25). Make certain to your cabinet or countertop as you slide the unit back. Figure 23 ...

